


Installing the SAN Integrated Switch
2–5
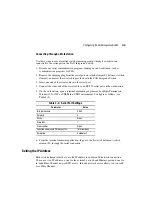
Items Required for Installation
The following items are required to install the SAN Integrated Switch:
■
Lift device (recommended)
■
SAN Integrated Switch (IS/32 or IS/64)
■
Mounting brackets and hardware
■
Number 2 Phillips screwdriver
■
Minimum 30-inch deep rack space, 14 rack units (RU) high and 19 inches wide
■
Six power outlets, one for each switch element (preferably distributed across two
power sources)
Unpacking the SAN Integrated Switch
The SAN Integrated Switch arrives in a wooden crate. Use these steps to unpack the
switch.
WARNING:
The SAN Integrated Switch weighs approximately 200 pounds. The use of
a lift device is recommended to install safely the SAN Integrated Switch, and to reduce
the possibility of injury or product damage. This procedure documents the use of a lift
device.
1. To release each of the six latches at the front of the crate and the two latches at the rear
of the crate:
WARNING:
Brace the front panel of the crate before releasing the final latch,
otherwise the panel may fall away and could cause personal injury.
a. Lift each key and turn it counterclockwise.
b. Remove the front panel of the crate and put aside.
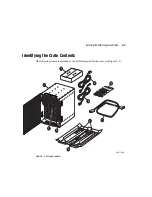
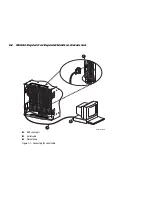
2. Lift the crate cover away from the base to expose the SAN Integrated Switch and two
boxes containing mounting hardware, cables, and a documentation kit. See Figure 2–2.
3. Set aside the two boxes.
4. Remove the packing material around and on top of the SAN Integrated Switch.