
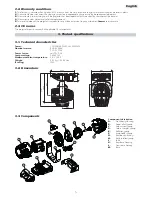
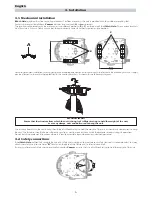


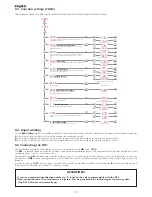
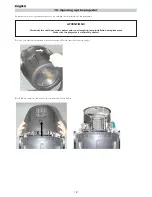


4.1. Mechanical installation
iWash Halo
may be either floor or ceiling mounted. For floor mounting, the unit is provided with four rubber mounting feet.
For ceiling mounted installations,
Coemar
includes two cam-lock (
A
) support brackets.
The two cam-lock brackets may be mounted in two different positions (
B
&
C
) on the base of the
iWash Halo.
The cam-lock brackets
are affixed via a 1/4 nut. Please ensure that they are correctly seated and firmly tightened into position.
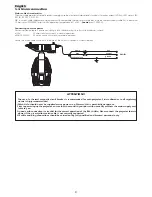
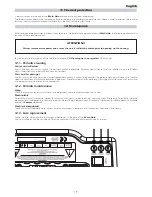
For ceiling mounted installations we suggest the use of appropriate clamps or fixings to attach the fixture to the mounting surface. Clamps
may be attached to the central hole provided in the cam-lock brackets, as shown in the following diagram.
The structure from which the unit is hung should be of sufficient rating to hold the weight of the unit, as should any clamps used to hang
the unit. The structure should also be sufficiently rigid so as not to move or shake whilst the projector moves during its operation.
Do not install the projector in locations where it is readily accessible by aunthorised or untrained personnel.
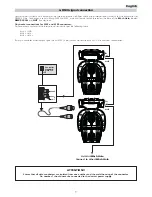
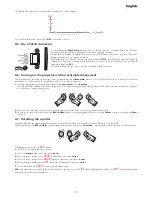
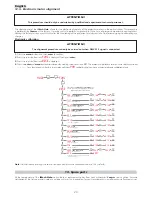
4.2. Safety connections
If the
iWash Halo
is affixed to a structure the use of a safety chain designed to meet relevant safety standards is recommended. You may
attach the safety chain to the holes
“D”
located on the base of the fixture and to the structure itself.
If using an after-market safety chain not manufactured by
Coemar
, ensure that it is of sufficient rating to hold the weight of the unit.
D
ATTENTION!!
Ensure that the structure from which the unit is hung is of sufficient rating to hold the weight of the unit,
as are any clamps, nuts and bolts used to hang the unit.
B
C
345mm
13,58”
A
293mm
11,54”
4. Installation
6
English


