Coemar iWASH Halo Instruction Manual Download Page 4

Congratulations on having purchased a 

Coemar

product. You have assured yourself of a fixture of the highest quality, both in compo-

nentry and in the technology used. We renew our invitation to you to complete the service information on the previous page, to expe-
dite any request for service information or spares (in case of problems encountered either during, or subsequent to, installation). This
information will assist in providing prompt and accurate advice from your 

Coemar

service centre.

Following the instructions and procedures outlined in this manual will ensure the maximum efficiency of this product for years to come.

1.1. Packaging

Open the packaging and ensure that no part of the equipment has suffered damage in transit. In case of damage to the equipment,
contact your carrier immediately by telephone or fax, following this with formal notification in writing.

Packing list

Ensure the packaging contains:

1 iWash Halo
1 instruction manual
2 cam-lock support brackets
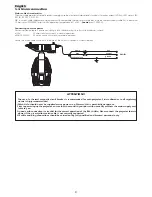
1.2. Transportation

The 

iWash Halo

should be transported in its original packaging or in an appropriate flight case.

2.1. Important safety information

Fire prevention:

1.

iWash Halo

utilises a 

Philips TXO 750W 100V

; the use of any alternative lamp is not recommended and will null and void the fix-

ture’s warranty.

2.

Never locate the fixture on any flammable surface.

3.

Minimum distance from flammable materials: 0,5 m.

4.

Minimum distance from the closest illuminable surface: 2 m.

5.

Replace any blown or damaged fuses only with those of identical values. Refer to the schematic diagram if there is any doubt.

6.

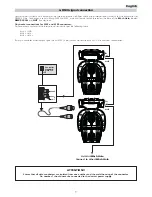
Connect the projector to mains power via a thermal magnetic circuit breaker.

Preventing electric shock:

1.

High voltage is present in the internals of the unit. Isolate the projector from mains supply prior to performing any function which
involves touching the internals of the unit, including lamp replacement.

2.

For mains connection, adhere strictly to the guidelines outlined in this manual.

3.

The level of technology inherent in the 

iWash Halo 

requires the use of specialised personnel for all service applications; refer all work

to your authorised 

Coemar

service centre.

4.

A good earth connection is essential for proper functioning of the projector.

5.

Mains cables should not come into contact with other cables. Never operate the unit without proper earth connection.

6.

Do not operate the projector with wet hands or in an area where water present.

7.

The fixture should never be located in an exposed position, or in areas of extreme humidity. A steady supply of circulating air is essen-
tial.

Safety:

1.

The projector should always be installed with bolts, clamps, and other fixings which are suitably rated to support the weight of the
unit.

2.

Always use a secondary safety chain of a suitable rating to sustain the weight of the unit in case of the failure of the primary fixing
point.

3.

The external surface of the unit, at various points, may exceed 150°C. Never handle the unit until at least 10 minutes have elapsed
since the lamp was turned off.

4.

Always replace the lamp if any physical damage is evident.

5.

Never install the fixture in an enclosed area lacking sufficient air flow; the ambient temperature should not exceed 35°C.

6.

Wait at least 10 minutes after the unit has been turned off prior to attempting to replace the lamp.

7.

The proejctor contains electronic and electrical components which should under no circumstances be exposed to contact with water,
oil or any other liquid. Failure to do so will compromise the proper functioning of the projector.

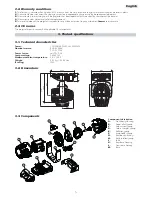
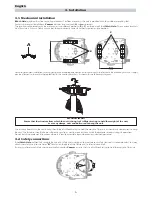
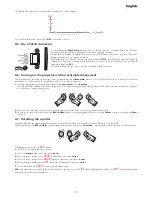
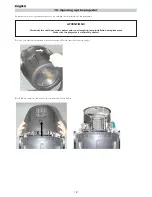
Articulated movement

The projector has a pan range of 540° in its base and a tilt range 252° in its yoke; do not obstruct the projector whilst it is undertaking
articulated movement.

Forced ventilation

You will note several air vents on the body of the projector. To avoid any problems associated with overheating, never obstruct any of
these vents as this may seriously compromise the proper operation of the unit.

Protection rating against penetration by external agents:

1.

The fixture is classified ordinary apparatus ; its protection grade against penetration by external agents,solid or liquid, is IP 20

2. General information

1. Packaging and transportation

English

4

Summary of Contents for iWASH Halo

Page 1: ...manuale di istruzioni instructions manual Version 1 0 ...

Page 2: ...pace provided above the relative service information of the model and the retailer from whom you purchased your iWash Halo This information will assist us in answering any technical enquiries with the utmost speed and accuracy ATTENZIONE la sicurezza dell apparecchio è garantita solo con l uso appropriato delle presenti istruzioni per tanto è necessario conservarle WARNING the security of the fixt...

Page 3: ...tor Pag 10 7 1 DMX addressing 10 7 2 DMX functions 11 8 Display panel functions Pag 12 8 1 Quick guide to menu navigation 12 8 2 Measure and test MEAS 13 8 3 Function settings FUNC 14 8 4 Rapid scrolling 14 8 5 Connecting the DR1 14 8 6 Use of RJ45 connector 15 8 7 Turning on the projector with no articulated movement 15 8 8 Resetting counters 15 9 Lamp installation and alignment Pag 16 9 1 Lamp i...

Page 4: ...ent in the iWash Halo requires the use of specialised personnel for all service applications refer all work to your authorised Coemar service centre 4 A good earth connection is essential for proper functioning of the projector 5 Mains cables should not come into contact with other cables Never operate the unit without proper earth connection 6 Do not operate the projector with wet hands or in an ...

Page 5: ...centre 2 3 CE norms The projector meets or exceeds all applicable CE requirements 3 1 Technical characteristics Power 115 208 230 240 Vac 50 60Hz Nominal current 3 9A 230V 7 1A 115V Power factor cos ϕ 0 98 Lamp wattage 750W TH Maximum ambient temperature 35 C 95 F Weight 25 1 Kg 55 33 Lbs IP rating IP20 3 2 Dimensions 3 3 Components Component description A Front body housing B Zoom effect group C ...

Page 6: ... of sufficient rating to hold the weight of the unit as should any clamps used to hang the unit The structure should also be sufficiently rigid so as not to move or shake whilst the projector moves during its operation Do not install the projector in locations where it is readily accessible by aunthorised or untrained personnel 4 2 Safety connections If the iWash Halo is affixed to a structure the...

Page 7: ... in the base of the unit 3 Select a voltage from amongst 115 208 230 or 240V by disconnecting cable n 5 and moving it to the correct voltage Refer to the sticker locat ed on the transformer to ensure the proper terminal is selected for your requriements Cable number 10 must not have its position altered under any cir cumstances 4 If the voltage setting is 115V replace the fuses located on the rear...

Page 8: ...constant current in normal operation Locate the mains cable which exits the base of the unit and connect as shown below ATTENTION The use of a thermal magnetic circuit breaker is recommended for each projector Strict adherance to all regulatory norms is higly recommended iWash Halo should never be supplied mains power via a Dimmer this is potentially dangerous Prior to powering up the projector en...

Page 9: ...ors Pin connections conform to the international standard as per the following table pin 1 GND pin 2 data pin 3 data If using a controller which output signal via an XLR 5 5 pin socket do not use pins 4 and 5 leave them unconnected ATTENTION Ensure that all data conductors are isolated from one another and the metal housing of the connector Pin number 1 should never be connected to the device s po...

Page 10: ...xture Any number between 1 and 497 can be generated via the multifunction panel of the unit This procedure must be carried out on every projector being used When powered up initially each projector will show A001 which indicates DMX address 001 a projector thus addressed will respond to com mands on channel 1 to 16 from your DMX controller A second unit should be addresses as A017 a third as A033 ...

Page 11: ...5 91 100 step no colour white beam 0 7 0 3 colour 1 8 27 3 11 colour 2 28 47 11 18 colour 3 48 67 19 26 colour 4 68 87 27 34 colour 5 88 107 35 42 colour 6 108 127 42 50 proportional rainbow effect in a counterclockwise direction from fast to slow 128 190 50 75 step norotation 191 192 75 75 proportional rainbow effect in a clockwise direction from slow to fast 193 255 76 100 step white no colour 0...

Page 12: ...s or selections NOTE the symbol shows which key has to be pushed to obtain the desired function 8 1 Quick guide to menu navigation For your convenience the following is a guide to navigating the menu system of the projector F U NC enter MEAS enter PDIR o TDIR o OPTO o FANS o DISP o LED o RESE o OFSE o DEMO o X Y o PAN o ID o TEMP o VOLT o DMIN o RATE o ALRM o HOUR o AOO1 menu TEST o Press together...

Page 13: ...nter o o o o o o TEST test function test o 1 0 value reading o enter enter enter o HOUR working time working time in hours 5 8 9 value reading 1 2 3 0 value reading L I F E lamp life after last reset L I F S life of all lamps used on the unit U N I T projector life enter N B reset the LIFE value when changing the lamp o 0128 o 0050 o 0010 o 0020 enter o 0000 o enter 0128 enter 0128 enter enter ent...

Page 14: ...tem The DR1 will show an error message PD IR pan movement inversion To reverse horizontal movement direction of the beam on DMX level variation TDIR tilt an movement inversion To reverse vertical movement direction of the beam on DMX level variation OPTO optic sensor de activation To deactivate the optic sensor function with return in position of the unit if accidentally knocked out of the place F...

Page 15: ...ose which control articulated movement the pan and tilt motors which remain static 2 You may alter the DMX address or any other parameter without any articulated movement occuring 3 To return to normal functioning of the iWash Halo simply turn the projector off and on via the Power switch or activate the Reset function 8 7 Resetting the counter The lamp life counter needs to be reset to zero at ev...

Page 16: ... stand and cool for 10 minutes prior to its removal Lamps must be handled with great care 9 1 Lamp installation 1 Use a suitable tool to loosen the two screws A which affix the lampholder assembly at the rear of the projector 2 Remove the lampholder assembly B 3 Identify the lampholder C ATTENTION Disconnet the unit from mains power prior to attempting lamp installation or replacement Make sure th...

Page 17: ...be on black out fully open and no colours selected If the lamp is not correctly aligned a hot spot will be readily noticeable Using the 3 adjusters in unison you will need to bring the hot spot to the centre of the beam adjusters B and C and then flatten the beam to maximum uniformity adju ster A Vertical adjustment Adjuster C acts on a lever and spring assembly to position the lamp via a vertical...

Page 18: ... remove the screws which affix the front and rear housings 2 Lift the housing to gain access to the internals of the fixture ATTENTION Disconnet the unit from mains power prior to attempting lamp installation or replacement Make sure the projector is sufficiently cooled 10 Opening up the projector 18 English ...

Page 19: ... depend of course upon the conditions in which the projector is operating Suitable instruments for performing this type of maintenance are a brush and a common vacuum cleaner or an air compressor 12 2 Periodic maintenance Lamp Check the lamp and replacing it if there is any observable damage or deformation due to heat Mechanicals Periodically check all mechanical devices for wear and tear gears gu...

Page 20: ... will assist us in providing for your requirements in an efficient and effective manner 13 Spare parts RESE AOO1 o FUNC o menu PAN pan alignment Pan movement alignment TILT tilt alignment Tilt movement alignment SHUT shutter alignment Shutter movement alignment DIMM dimmer alignment Dimmer level alignment EFF effect wheel alignment Effect alignment COLR colour wheel alignment colour wheel alignmen...

Page 21: ...ress indicated on the display and the channel numbers being outputted from the controller Note that not all controllers will output all 512 channels S1ER Control circuit error relating to position sensors for 4 motors located in the yoke at left when viewed from the rear of the unit Check for the presence of power to the PCB and the condition of the connectors and cabling between the PCB and the s...

Page 22: ... connection Incorrect DMX addressing The wiring of the cannon plug may be incorrect Inspect the signal cable rectify any incorrect wiring repari or replace any damaged cables or connectors Check the DMX address Repair or replace the signal cable The lamp turns off intermittently The projector is too hot Let the fixture cool down Check that the air vents above the cooling fans are not obstrucdted a...

Page 23: ...2 A 46042 Castel Goffredo Mantova Italy ph 39 0376 77521 fax 39 0376 780657 info coemar com Coemar si riserva il diritto di apportare modifiche senza preavviso Coemar reserves the right to effect modifications without notification ...

Reviews: