background image

Page 2 of 4

Installation & Mounting:

Before installation, examine the LED heads for transit damage. Do not use damaged or broken parts.

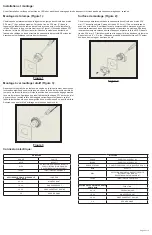
Lamp Mounting (Figure 1):

Pick a location in the vehicle lamp housing that is at least 1” away from any 

existing bulbs. Drill 1” hole in vehicle lamp reflector housing with hole saw. Install 

the LED head into the hole as shown in Figure 1.  Use silicone RTV around the 

LED head to seal.  Strap the driver module to a nearby wire harness or body 

structure.  Make electrical connections as described below.

Surface Mounting (Figure 2):

Pick a location in the vehicle body that is at least 1” away from other objects.  Drill 

a 1” hole in the body with a hole saw.  Using the bezel as a template, mark and 

drill the mounting hole locations in the mounting surface.  Make the electrical 

connections described below and place the LED head in the 1” hole.  Install the 

bezel and bracket using the two screws provided.  Torque screws to 8 +/- 2 in-lbs.

Silicone RTV sealant should be used around the mounting and screw holes.

Figure 1

Twist-lock Mounting (Figure 3):

Locate and removed the OEM light bulb plug by rotating it counter clockwise until 

the bulb plug stops in its rotation, pull out of the socket. Take note of the positions 

of the retention cam clearance notches.  Apply silicone RTV sealant around the 

rubber gasket. Insert the twist-lock lighthead through the socket and rotate it 

clockwise until it stops. Make sure lighthead is tightly secured in the socket.

Figure 2

Figure 3

Single Color Flash Pattern Chart

Tabla de patrones de parpadeo de color único 

Tableau des modes de clignotements unicolores 

Einfarbige Leuchtmustertabelle

SAE J595

WHITE

1

Single Flash 75FPM sim. Phase1

yes 

Class 3

2

Single Flash 75FPM sim. Phase2

yes 

Class 3

3

Single Flash 75FPM Alt.

yes 

N/C

4

Single Flash 120FPM sim. Phase1

yes 

Class 3

5

Single Flash 120FPM sim. phase2

yes 

Class 3

6

Single Flash 120FPM Alt.

yes 

N/C

7

Double Flash 75FPM sim. Phase1

yes 

Class 3

8

Double Flash 75FPM sim. phase2

yes 

Class 3

9

Double Flash 75FPM Alt.

yes 

N/C

10

Double Flash 120FPM sim. Phase1

yes 

Class 3

11

Double Flash 120FPM sim. phase2

yes 

Class 3

12

Double Flash 120FPM  Alt.

yes 

N/C

13-Default Quad Flash 75FPM sim. Phase1

yes 

Class 3

14

Quad Flash 75FPM sim. Phase2

yes 

Class 3

15

Quad Flash 75FPM Alt.

yes 

N/C

16

Quad Flash 150FPM sim. Phase1

yes 

Class 3

17

Quad Flash 150FPM sim. Phase2

yes 

Class 3

18

Quad Flash 150FPM Alt

yes 

N/C

19

Triple 75FPM sim. Phase1

yes 

Class 3

20

Triple 75FPM sim. Phase2

yes 

Class 3

21

Triple 75FPM Alt.

yes 

N/C

22

Quint Flash 150FPM sim. Phase1

yes 

Class 3

23

Quint Flash 150FPM sim. Phase2

yes 

Class 3

24

Quint Flash 150FPM Alt.

yes 

N/C

9

25

Steady - Single

NO

N/C

10

26

Steady Burn

NO

N/C

11

27

Modulation

NO

N/C

12

28

2 Double Flash,2 Triple Alt.

NO

N/C

13

29

4 Single Flash ,2 Quad Flash Alt.

NO

N/C

7

8

1

2

3

4

5

6

Pattern

MODE

PATTERNS 

SYNC.

Summary of Contents for CD9012 Series

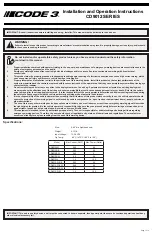
Page 1: ...bag deployment area It is the responsibility of the user operator to determine a suitable mounting location ensuring the safety of all passengers inside the vehicle particularly avoiding areas of pote...

Page 2: ...t Insert the twist lock lighthead through the socket and rotate it clockwise until it stops Make sure lighthead is tightly secured in the socket Figure 2 Figure 3 Single Color Flash Pattern Chart Tabl...

Page 3: ...Color 4 yes N C 16 28 Double 120FPM Ph1 Color 1 Synchronous Color 3 yes Class 3 17 29 Double 120FPM Ph2 Color 1 Synchronous Color 3 yes Class 3 30 Double 120FPM Ph1 Color 1 Alternately Color 4 yes N C...

Page 4: ...tal or consequential damages 920 0884 00 Rev A After installing the system it is best to do a POWER UP RESET the frst time to ensure that all heads are in sync Touch BLUE wire to ground while applying...

Page 5: ...aje adecuada que garantice la seguridad de todos los ocupantes del veh culo y deben evitar zonas que puedan provocar golpes en la cabeza 6 Es responsabilidad del operador del veh culo asegurarse de qu...

Page 6: ...ara sellarlo Fije el m dulo del controlador a un mazo de cables o una estructura de la carrocer a cercanos Realice las conexiones el ctricas como se describe a continuaci n Montaje en superficie Figur...

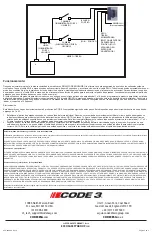
Page 7: ...0884 00 Rev A ROJO POSITIVO CAMBIAR SUMINISTRADO POR EL USUARIO FUSIBLE EN L NEA SUMINISTRADO POR EL USUARIO BLANCA POSITIVO AMARILLO Sincronizaci n AZUL TIERRA MOMENT NEA SELECCIONE PATR N DE PARPAD...

Page 8: ...n vitant en particulier les zones d impact potentiel de la t te 6 Il incombe l op rateur du v hicule de s assurer que toutes les fonctionnalit s de ce produit fonctionnent correctement au cours de l u...

Page 9: ...la sceller Attachez le module conducteur un faisceau de c blage ou une structure de carrosserie proximit Effectuez les branchements lectriques comme d crit ci dessous Surface de montage Figure 2 Choi...

Page 10: ...EUR BLANC POSITIF JAUNE Fonction de synchronisation BLEU MOMENTAN LA MASSE S LECTION DU MODE DE CLIGNOTEMENT POSITIF ATT NUATION EN MODE D AVERTISSEMENT UNIQUEMENT NOIR N GATIF COMMUTATEUR FOURNI PAR...

Page 11: ...Es liegt in der Verantwortung des Benutzers Bedieners einen geeigneten Montageort festzulegen um die Sicherheit aller Fahrzeuginsassen zu gew hrleisten und insbesondere Bereiche zu vermeiden in denen...

Page 12: ...Treibermodul in unmittelbarer N he eines Kabelbaums oder der Karosseriestruktur Stellen Sie elektrische Verbindungen her wie unten beschrieben Oberfl chenmontage Abbildung 2 W hlen Sie eine Stelle in...

Page 13: ...M LIEFERUMFANG ENTHALTEN WEI POSITIV GELB Synchronisiert BLAU KURZZEITIG GEGEN MASSE LEUCHTMUSTERAU SWAHL POSITIV NUR DIMMEN DES WARNMUSTERS SCHWARZ MASSE SCHALTER NICHT IM LIEFERUMFANG ENTHALTEN SCHA...

Reviews: