background image

17

.

AFTER SALES SUPPORT

 1300 663 907 


 [email protected] 


MODEL: HE161192

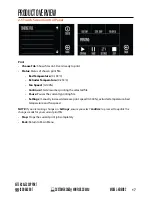
2.5 Touch Screen Control Panel

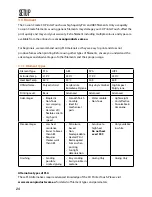
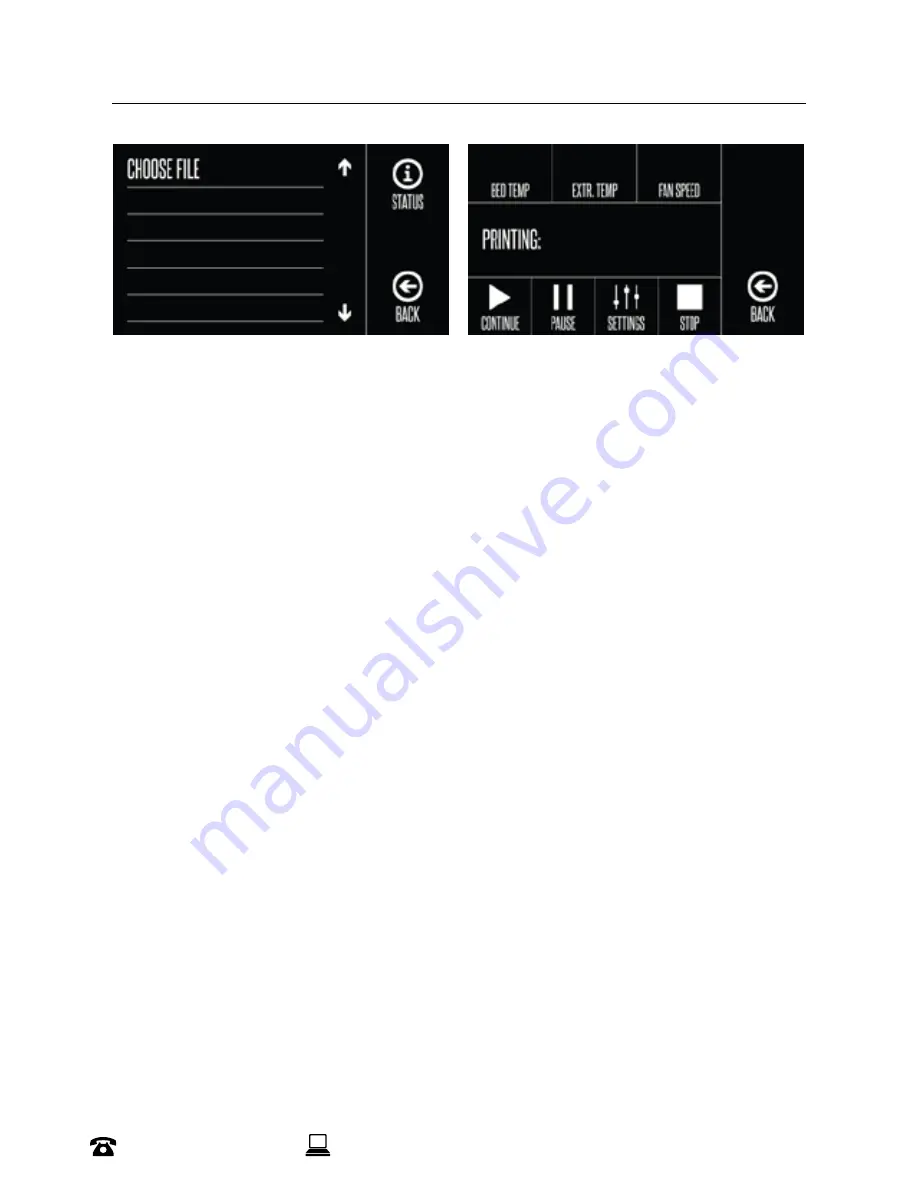
Print
•  Choose File: Shows files on SD card ready to print
•  Status: Status of chosen print file 

•  Bed Temperature: (0-109ºC)
•  Extruder Temperature: (0-255ºC)
•  Fan Speed: (0-100%)
•  Continue: Starts/resumes printing the selected file
•  Pause: Pauses the currently printing file
•  Settings: manually increase/decrease print speed (0-300%), extruder temperature, bed 

temperature and fan speed

NOTE:

 If you are making changes in ‘

Settings

’, ensure you select ‘

Confirm

’ to proceed to update the 

changes made for your current print file

•  Stop: Stops the current print job completely
•  Back: Return to Main Menu

PRODUCT OVERVIEW

.

Summary of Contents for HE161192

Page 1: ... MODELNUMBER HE161192 INSTRUCTIONMANUAL VERSION 1 ISSUED 23 11 17 ...

Page 2: ... ...

Page 3: ...can be reached on Phone 1300 663 907 Mon Fri 8 30am 6 00pm AEST Email customercare winplus com au Web www winplus com au IMPORTANT Getting the most out of your 3D Printer Touch Read the manual carefully It will help you set up with ease Visit www cocoonproducts com au We have additional support videos and guides Call After Sales Support 1300 663 907 Available Monday Friday 8 30am 6 00pm AEST Email...

Page 4: ...lar state and territory laws Our goods come with guarantees that cannot be excluded under the Australian Consumer Law You are entitled to a replacement or refund for a major failure and for compensation for any other reasonably foreseeable loss or damage You are also entitled to have the goods repaired or replaced if the goods fail to be of acceptable quality and the failure does not amount to a m...

Page 5: ...at you use eye protection when cleaning sanding printed models to avoid small particles contacting eyes Please read and understand the contents of this installation and user manual carefully Failure to read the manual may lead to personal injury inferior results or damage to the 3D Printer Touch Always make sure that anyone who uses the 3D printer knows and understand the contents of the manual an...

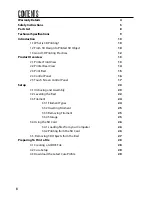
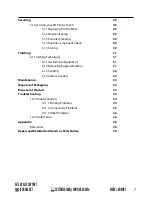
Page 6: ...Bed 15 2 4 Control Panel 16 2 5 Touch Screen Control Panel 17 Setup 20 3 1 Unboxing and Assembly 20 3 2 Levelling the Bed 22 3 3 Filament 24 3 3 1 Filament Types 24 3 3 2 Inserting Filament 25 3 3 3 Removing Filament 25 3 3 4 Storage 25 3 4 Using the SD Card 26 3 4 1 Loading files from your Computer 26 3 4 2 Printing from the SD Card 26 3 5 Removing 3D Objects from the Bed 27 Preparing To Print a ...

Page 7: ... 5 Storing 30 Finishing 31 6 1 Finishing Techniques 31 6 1 1 Useful Tools Equipment 31 6 1 2 Removing Support Material 31 6 1 3 Sanding 32 6 1 4 Surface Coating 32 Maintenance 33 Disposal of Packaging 33 Disposal of Product 33 Troubleshooting 34 10 1 Troubleshooting 34 10 1 1 Printing Problems 34 10 1 2 Connectivity Problems 35 10 1 3 Other Problems 36 10 2 Useful Terms 36 Appendix 38 References 3...

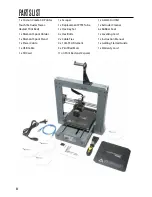
Page 8: ... x Power Cable 1 x USB Cable 1 x SD Card 1 x Scraper 1 x Replacement PTFE Tube 1 x Hex Key Set 6 x Hex Bolts 2 x Cable Ties 4 x 10m PLA Filament 3 x Print Bed Mats 1 on Print Bed and 2 spare 1 x 0 4mm Drill Bit 1 x Extruder Cleaner 6 x Rubber Feet 1 x Levelling Card 1 x Instruction Manual 1 x Getting Started Guide 1 x Warranty Card ...

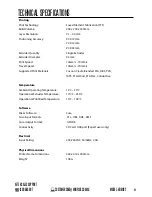
Page 9: ...0mm s 70mm s Travel Speed 10mm s 70mm s Supported Print Materials Cocoon Create Branded PLA ABS PVA HIPS PLA Wood PLA Flex Conductive Temperature Ambient Operating Temperature 15 C 30 C Operational Extruder Temperature 170ºC 255ºC Operational Print Bed Temperature 15ºC 109ºC Software Slicer Software Cura Cura Input Formats STL OBJ DAE AMF Cura Output Format GCODE Connectivity SD Card USB port Expe...

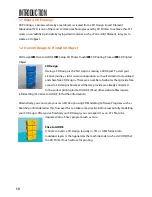
Page 10: ...oad and share free 3D Designs There are a number of websites that provide free access to 3D designs however all that we provide are already converted to the correct printing format GCODE Most other website files require reformatting See Slice to GCODE for further information Alternatively you can create your own 3D Design using 3D Modelling Software Programs such as SketchUp or Blender allow this ...

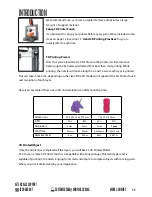
Page 11: ...e X and Y axis as each layer is printed This can take some time depending on the size of the 3D model print speed of the 3D Printer Touch and resolution of each layer Here is an example of how size infill and resolution can affect printing time Dimensions 62 5 x 25 75 x 67 75mm 70 x 70 x 140mm Infill 20 0 20 20 Resolution 2mm 2mm 2mm 1mm Print Time 53min 39min 6hr 40min 13hr 12min Filament Used 4m...

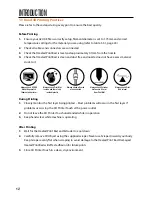
Page 12: ...r in the first layer If problems occur stop the 3D Printer Touch at the power outlet 2 Do not leave the 3D Printer Touch unattended while in operation 3 Keep hands clear while machine is operating After Printing 1 Wait for the Heated Print Bed and Extruder to cool down 2 Carefully remove 3D Object using the supplied scraper Never use Scraper towards your body Keep Scraper evenly flat when scraping...

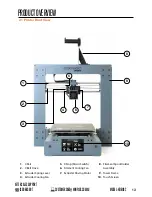
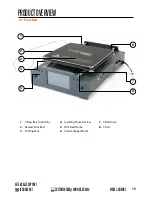
Page 13: ...161192 PRODUCTOVERVIEW 2 1 Printer Front View 1 X Rail 2 X Belt Drive 3 Extruder Spring Lever 4 Extruder Cooling Fan 5 X Stop Micro Switch 6 Filament Cooling Fan 7 Extruder Driving Motor 8 Filament Spool Holder Assembly 9 Tower Frame 10 Touch Screen 6 2 9 10 8 1 4 7 3 5 ...

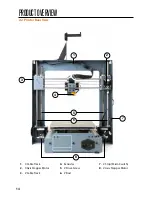
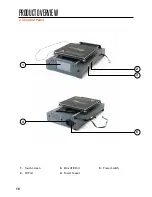
Page 14: ...14 PRODUCTOVERVIEW 2 2 Printer Rear View 1 X Cable Track 2 X Axis Stepper Motor 3 Z Cable Track 4 Extruder 5 Z Drive Screw 6 Z Rod 7 Z Stop Micro Switch 8 Z Axis Stepper Motor 3 4 8 5 6 1 2 7 ...

Page 15: ...CUSTOMERCARE WINPLUS COM AU MODEL HE161192 PRODUCTOVERVIEW 2 3 Print Bed 1 Y Stop Micro Switch 2 Heated Print Bed 3 Printing Mat 4 Levelling Thumb Screw 5 Print Bed Frame 6 Y Axis Stepper Motor 7 Y Belt Drive 8 Y Rail 2 1 3 4 5 8 7 6 ...

Page 16: ...16 PRODUCTOVERVIEW 2 4 Control Panel 1 Touch Screen 2 SD Port 3 Mini USB Port 4 Power Socket 5 Power Switch 1 2 3 4 5 ...

Page 17: ...e 0 255ºC Fan Speed 0 100 Continue Starts resumes printing the selected file Pause Pauses the currently printing file Settings manually increase decrease print speed 0 300 extruder temperature bed temperature and fan speed NOTE If you are making changes in Settings ensure you select Confirm to proceed to update the changes made for your current print file Stop Stops the current print job completel...

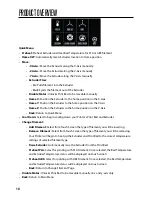
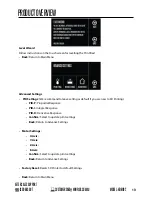
Page 18: ... Menu Cool Down Select to begin cooling down your Printer s Print Bed and Extruder Change Filament Add Filament Select from Touch Screen the type of filament you will be inserting Remove Filament Select from Touch Screen the type of filament you will be removing Your Printer will begin to heat up the Extruder and Print Bed to the correct temperature settings of selected filament type Raise Extrude...

Page 19: ... Settings We recommend to leave setting as default if you are new to 3D Printing PID P Proportial Response PID I Integral Response PID D Derivative Response Confirm Select to update print settings Back Return to Advance Settings Motor Settings X Axis Y Axis Z Axis E Axis Confirm Select to update print settings Back Return to Advance Settings Factory Reset Resets 3D Printer to default Settings Back...

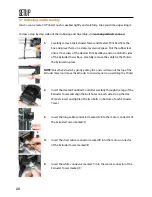
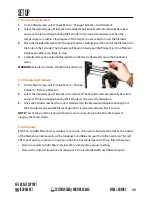
Page 20: ...Extruder in place NOTE Raise the Extruder by gently pulling the z axis rod towards the top of the Extruder Tower and move the Extruder to one side prior to assembling the Printer 2 Insert the Heated Print Bed Controller carefully through the legs of the Extruder Tower and align the bolt holes on each side Using the Hex Wrench insert and tighten the two bolts on bottom of each Extruder Tower 3 Inse...

Page 21: ...upper arm of the filament spool holder by unscrewing the end cap then reattaching Position the Filament Spool Holder Stand on top of the Extruder Tower then insert the bolts and tighten with the Hex Wrench 9 Ensure the power switch is in the OFF position then insert the Power Supply Cable into the back of the 3D Printer Base Insert the other end into a nearby mains power outlet Turn on the power o...

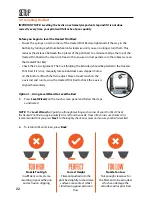
Page 22: ... axis stepper motors on the bottom of both shafts to adjust Place a Hex Wrench on the z axis rod and run it across the Heated Print Bed to check the z axis is aligned horizontally Option 1 Using Level Wizard to Level the Bed 1 Press Level Wizard on the touch screen panel and follow the steps as indicated NOTE The Level Wizard will guild you through levelling each corner of your Print Bed Check the...

Page 23: ...e Bed 3 Manually move the Bed so the Nozzle Head is at a corner of the Bed 4 Adjust the thumbwheels on the bottom of the Heated Print Bed so the distance between the Bed and the Nozzle head is approximately 0 1mm apart 5 Fine tune the gap distance by sliding the levelling card or using an A4 piece of paper You should be able to feel a slight friction when sliding the paper between the Bed and the ...

Page 24: ...Official Name Polyactic Acid Acrylonitrile Butadiene Styrene Polyvinylv Alcohol High Impact Polystyrene Printing Level Basic Advanced Advanced Advanced Advantages Bioplastic Non Toxic Less warping issues Hard or soft flexible variants High print speed Smooth finish Durable Ideal for mechanical parts Water soluble Non Toxic Lightweight Cost effective Dissolvable in Limonene Disadvantages Low heat r...

Page 25: ...Removing Filament 1 On the Main Screen select Quick Menu Change Filament Remove Filament 2 Select the desired type of Filament to be removed The Extruder will automatically be raised and your Printer will begin heating the Extruder to the correct temperature 3 Once the Extruder reaches the correct temperature the filament will begin retracting from the Extruder Gently pull the filament up until it...

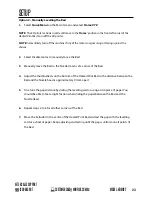
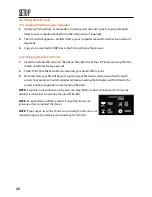
Page 26: ...etal contacts are facing upwards 2 Select Print from the Main Menu and select your desired file to print 3 Once selected your file will begin to load and your file status can be viewed on the touch screen Your printer will automatically commence heating the Extruder and Print Bed to the correct printing range before commencing the print NOTE If your file is not printing correctly press the Stop Bu...

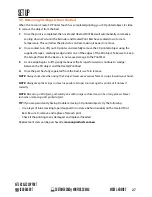
Page 27: ...t cause damage to the Print Mat 3 As one edge begins to lift gently maneuver the Scraper forward to continue to wedge between the 3D object and the Heated Print Bed 4 Once the part has fully separated from the bed it is safe to remove NOTE Always take care when using the Scraper Never use excessive force or scrape towards your hand NOTE Always keep the Scraper as level as possible Scraper can dama...

Page 28: ...ware list You can learn how to install and use Cura from below link https ultimaker com en resources 16579 installation After installing Cura please add your Cocoon Create 3D Printer Touch to Cura 1 On first launch Cura will ask you to add a 3D Printer Touch Alternatively you can add a 3D Printer Touch by selecting Machine Machine Settings Add New Machine 2 Select Other 3 Select Custom 4 Enter Mac...

Page 29: ...ded to start at a corner to ensure no bubbles become present 5 Use the Scraper to apply pressure on the new Print Mat ensuring strong adhesion Keep the Scraper level as it can damage the Print Mat TIP Warming the bed slightly may make removal easier You can also use masking tape in lieu of a Print Mat Blue painters tape is recommended 5 1 2 Nozzle Cleaning If your Extruder nozzle becomes blocked f...

Page 30: ...the nozzle 5 1 4 Routine Component Check Motor Connectors Loose motor connections could cause a 3D print to fail It s a good habit to routinely check for any damage to the connectors or the black cables Axis Lubrication Regular lubrication of the X and Y Axis rods is important for the longevity and smooth running of your printer The rods can be lubricated with machine oil or synthetic grease We re...

Page 31: ...rent paint types are also compatible with PLA and ABS Consult your local paint supplier for the best compatibility for your intended purpose 6 1 2 Removing Support Material Even after support material is removed by hand residual material will remain 1 Ensure that safety goggles and a mask are worn for protection 2 Remove most of the support material by hand taking care not to damage the 3D object ...

Page 32: ...is can then be sanded away and repeated until the desired smoothness is achieved 6 1 4 Surface Coating Finally to make your models more presentable follow these steps 1 Ensure that safety goggles and a mask are worn for protection 2 Ensure that your 3D object is clean and free from dust 3 Spray your model using an acrylic based primer following the directions of your primer 4 Allow appropriate tim...

Page 33: ... prevent any damage if the product needs to be transported in the future and you can use it to store the appliance when it is not in use In the event it is to be disposed of please recycle all packaging material where possible Wrapping can be a suffocation hazard for babies and young children so ensure all packaging materials are out of their reach and disposed of safely Observe any local regulati...

Page 34: ... has been corrupted Try reformatting your SD Card and reloading the GCODE file NOTE Reformatting will delete all files on your SD card Not extruding when starting to print Ensure that the nozzle temperature has been set to match your material Not sticking to the bed Ensure that the bed is clean and free from dust Check that the bed is level and set to a distance of approximately 0 1mm If there are...

Page 35: ... stop micro switches are aligned with the motor mount and registering The print head bed does not move Check the part can be moved by hand when stepper motor is disabled Clear anything that is blocking the path Check that the motor is turning using position menu If motor turns but belt does not you will need to tighten the gear motor gear nut Please visit cocoonproducts com au for further support ...

Page 36: ...types of filament can my 3D Printer Touch Print The Cocoon Create 3D Printer Touch accepts various types of filaments including PLA ABS PVA HIPS and specialty filaments such as wood flexible luminous and conductive For our full range of filaments visit cocoonproducts com au 10 2 Useful Terms ABS Filament Commonly used plastic filament with good strength and industrial properties Brim Raft Types of...

Page 37: ... memory card This is where your GCODE files can be stored and accessed by the 3D Printer Touch Slicing Process that turns a 3D Design into a code that can be used by 3D Printer Touch Spool Filaments of PLA and ABS are wrapped creating a spool Stepper Motor DC motors that move in discrete steps This allows for precise positioning and or speed control stl A common file format for 3D Designs Models U...

Page 38: ...38 APPENDIX References Some of the 3D Models used in this manual and other included materials were sourced from the below ...

Page 39: ...nding the product for repair You should also be aware that rather than repairing goods we may replace them with refurbished goods of the same type or use refurbished parts in the repair process Please be assured though refurbished parts or replacements are only used where they meet ALDI s stringent quality specifications If at any time you feel your repair is being handled unsatisfactorily you may...

Page 40: ... ...

Reviews: