9
CLEARSPAN
™
STORAGE MASTER
Revision date: 03.22.19 PB02580R6N1D
RAFTER ASSEMBLY (CONTINUED)
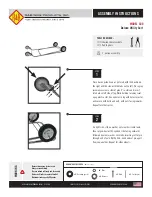
4. With the main rafter pipes seated at each joint and the
rafter positioned on a flat surface, secure each joint
with a single self-tapping Tek screw. Position Tek screw
approximately 2" from pipe joint.
2˝
Tek screw
5. After assembling the rafter, securing the joints, and
setting the band clamps in position, cut a length of
rope (or cable) that is the width of the shelter plus and
additional 12 inches.
6. After the rope (or cable) is cut, insert approximately 6"
through the rafter foot mounting holes at the bottom
of the rafter leg and clamp the cable in place using a
clamp on the outside as shown below.
7. Insert the remaining end of the cable through the other
rafter bolt holes, measure the 20' on-center width
dimension, and clamp the legs in place to prevent the
rafter from spreading when the chord and struts are
attached.
8. Position two (2) sections of the 166S099 pipe (99"
each) and one (1) 166P040 pipe (40") on the ground
between the rafter legs, slide two (2) of the smaller
band clamps (QH1402) onto one of the center pipe
sections, and assemble the chord.
9. Secure each pipe joint of the chord with one FA4482
Tek screw. Standing on the chord assembly helps to
keep the pipes from turning as the screws are installed.
Be certain each joint is properly seated before installing
the screw.
10. Position the assembled chord between the rafter legs
and connect the chord to the rafter as shown below.
Chord
Band Clamps
Chord
Square to
Round Bracket
NOTE:
For best results, attach a 104074 bracket to one
end of the chord and then attach the chord to the rafter.
Repeat the steps at the remaining end of the chord.
See the diagrams on the following page.