background image

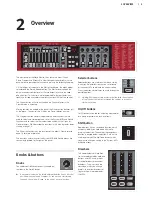
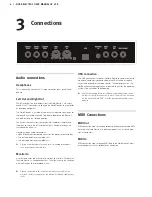
The front panel of the Nord Electro 3 has four main areas, Organ, 
Piano, Program and Effects. We’ll familiarize ourselves briefly with the 
panel here and describe the functions in detail in the following chapters.

On the left part of the panel is the Master Level knob, the organ model 
selector and the Rotary Speed section. The Master level controls the 
entire instruments output level at the two output jacks and the head-
phone output. This control is not programmable, that particular func-
tionality is instead available in the effects section with the Gain control. 

The Organ section is lit and active when the Organ selector in the 
Program area is activated. 

Moving towards the middle of the panel, the Piano section behaves just 
as the organ. The controls are lit when the Piano selector is active.

The Program section contain the parameters and functions that are 
used to select and store programs, to set the System, MIDI and Sound 
functions and to select the instrument to be used with the Organ or 
Piano selectors. We’ll describe the functions in this area in greater detail 
starting at page 15.

The Effect section contains the functions of the effects. Please refer to 
page 16 for more information.

The functions and settings of the System, MIDI and Sound menus are 
conveniently printed to the right on the panel. 

Knobs & buttons

Knobs

The knobs control the continuously variable pa-
rameters in the Nord Electro 3.


!

A parameter value can be totally different from the knob’s physical 
position when you load a Program. As soon as you start turning 
the knob, the value will ‘snap’ to the knob’s physical position.

Selector buttons

Selector buttons are used to activate one setting 
in an array. Selector buttons have a set of round 
or triangular LEDs to indicate the current setting. 
Press the button several times to cycle through the 
possible options. 


!

Holding Shift and pressing a selector button (with the exception 
of the Type button) will cycle through the settings in a counter 
clockwise fashion.

On/Off buttons

On/Off buttons are used for activating a parameter 
or a group of parameters such as effects.

Shift button

Some buttons have a secondary function, which 
will be available if you hold down Shift while 
pressing the button. The name of the secondary 
function is printed below the button. Shift is also 
used together with the Up/Down buttons when 
you want to change a setting in the System, MIDI 
or Sound menus. 

Drawbars

The nine drawbars of Nord Elec-
tro 3 are represented by up/down 
buttons and LED chain graphs 
instead of ordinary mechanical 
drawbars. This gives you a big 
advantage; when you change 
presets, the correct drawbar set-
tings are shown immediately by 
the LEDs.

Overview 


2 OVERVIEW  

|  5

Summary of Contents for Nord Electro 3

Page 1: ...User Manual Nord Electro 3 OS Version 3 x Part No 50316 Copyright Clavia DMI AB 2011 Print Edition 3 1...

Page 2: ...L B53D2 C85689 562 4 57 29V B 7 2 5635 M3H J2 N 7 NS 8295 M3D985 42 5 97585 52 3 87K N 2B2 5 8 76 K 5 2 7 97 012345 67589 8 7 5 49 A7B C 5D9 6 9 E DE 98 F5 6GE958 6 85 0 E 95906 4E 85 5DE 95908 E 58...

Page 3: ...6 Speaker Comp 16 Reverb 16 Delay Reverb Electro 3 HP 17 Feedback 17 Ping Pong 17 Tempo Tap 17 Gain 17 6 The Menus System Menu 18 Memory Protect On Off 18 Output Routing 18 Transpose 18 Fine Tune 18 S...

Page 4: ...erence section where all the functions are explained in detail The Electro 3 HP the Electro 61 and the Electro 73 versions share most of the features The sections in this manual that explains the addi...

Page 5: ...nd Sound menus are conveniently printed to the right on the panel Knobs buttons Knobs The knobs control the continuously variable pa rameters in the Nord Electro 3 A parameter value can be totally dif...

Page 6: ...tor a signal from an mp3 or a CD player at the Nord Electro 3 s headphone output This allows you to e g rehearse with the Electro 3 to pre recorded music Signals connected to this input will not be pr...

Page 7: ...ds and rotary speed selection for organ sounds see Sustain Pedal Configuration on page 18 for details on how to configure this Control Pedal stereo connector for a pedal of the potentiometer type also...

Page 8: ...ograms within each bank Edit a program Editing a program is just as easy as grabbing a knob and change a set ting or press a button to select a different setting The knob s physical position isn t alw...

Page 9: ...ethods see above You can also store programs into the Live memory location in which case the program settings will replace the current Live memory settings Octave Shift Press either of the Octave Shif...

Page 10: ...lf will use the Preset 2 Up setting If you press and hold both the Shift and the Preset Split buttons for a couple of seconds the Split LED will begin to flash and you can press a key on the keyboard...

Page 11: ...hange the sound of the B3 model from squeaky clean to a battered old work horse The VX model The original instrument is probably the most famous of all the tran sistor based combo organs that emerged...

Page 12: ...ound when you press the key s The percussion will only affect the upper manual if the Split function is active The Percussion is a single triggered non legato effect It is only present when you hit th...

Page 13: ...Organ Preset buttons The display will show the selected preset number 4 Confirm your intentions by pressing Store once more This procedure may be aborted by pressing any button except Store or one of...

Page 14: ...Piano2 Wurlitzer reed based electric pianos Clav Hps Clavinets and Harpsichords Samp Lib Samples Mono If you press Shift Mono when a stereo instrument is selected the stereo samples will be played bac...

Page 15: ...ft button In order to be able to store settings the Memory Protection must be turned off Read more about this on Memory Protect On Off on page 18 Prog A Prog B After you have selected a program number...

Page 16: ...lowpass filter sweep across the frequency range If a control pedal is connected this sweep is instead controlled by the pedal action and the Rate knob will then have no effect Ring Modulation RM is a...

Page 17: ...e delay repeats alternate between the left and right channels If short delay times are used these repeats will be asymmetrical and produce delays that are more like early reflections in reverb units T...

Page 18: ...his allows you to change the polarity of a sustain type pedal con nected to control Rotor Speed in case the functionality of your pedal is reversed i e when the pedal is up Rotor Speed is fast and vic...

Page 19: ...e Range 1 16 OF off default 2 Local Control This allows you to set if the Nord Electro 3 keyboard and front panel controls should control internal Programs or only send note and con troller messages v...

Page 20: ...percussion effect Range L Long n Normal default S Short Perc Slow Decay Sets the slow mode decay time of the Tonewheel percussion effect Range L Long n Normal default S Short Perc Norm Level Sets the...

Page 21: ...o as sounds in this manual and in the application itself Press Ctrl Tab on the computer keyboard to cycle between the tabs The lists can be ordered according to location name size version and date in...

Page 22: ...the computer hard drive where the new sound is located 2 Make sure that the Sound Manager window and the folder are visible on the screen 3 Drag the new sound to the white area in the Sound Manager sa...

Page 23: ...tent of the Program partition with its 128 programs 1 Make sure that Organize is activated in the View menu 2 Select and drag a program from the destination location to the desired location If you dro...

Page 24: ...rams or all Programs can be transmitted and received as a System Exclusive dump Nord Electro 3 with a sequencer Connections 1 Connect the MIDI Out on the Nord Electro 3 to the MIDI In on your sequence...

Page 25: ...all Programs All it will replace all programs currently stored in the Nord Electro 3 If the dump contained only a single program it will be temporarily placed in the currently selected program memory...

Page 26: ...s Touch Channel X X X X Pitch Bender X X Control Change O O Program Change True O 0 127 O 0 127 System Exclusive O O System Song Pos Common Song Sel Tune X X X X X X System Clock Realtime Commands X...

Page 27: ...5 Organ Model 11 Organ Presets 13 Organ section 11 Organ Trig 18 Output Routing 17 P Perc Drawbar 9 Cancel 19 Perc Norm Level 19 Perc Slow Decay 19 Perc Soft Level 19 Percussion 12 Phaser 16 Piano 13...

Page 28: ......

Reviews: