background image

English

English

Owner’s Manual

VX401E/VZ401E

39

You can customize the various settings of this 
unit from the Settings screen. 
Touch 

[Settings] 

key on the Main Menu screen.

The Setting menu screen will be displayed.
Touch the 

[Main]

 key to return to the Main 

screen.

General Settings 

1. Touch the 

[General]

 key. The general setting 

screen appears. The screen includes:

  Clock, Clock Mode, Radio, and Version.
2. Touch the desired tab key and perform the 

basic adjustments.

• Setting the Clock


Touch this tab to set the time. 

  The keypad will appear for adjustment.
  Touch the 

[OK]

 key to save.

• Setting the Clock Mode


Touch this tab to change to 12Hr or 24Hr 
mode.

• Version

  This tab displays the software version of 

your unit. 

Audio Settings

1. Touch the 

[Audio]

 key to set: Bass Freq, 

Treble Freq, and Bass Q-Factor.

2. Touch the desired tab key to make the 

desired audio adjustments.

• Bass Freq 

  Select the desired bass center adjustment 

frequency: 60Hz, 80Hz, 100Hz, 200Hz

• Treble Freq

  Select the desired treble center adjustment 

frequency: 10KHz, 12.5KHz, 15KHz, 
17.5KHz

• Bass Q-Factor 

  Select the desired bass Q-Factor:
  1.0, 1.25, 1.5, 2.0.

Regional Settings

1. Touch the 

[Regional]

 key to set the default 

subtitle and audio language preferences.

2. Touch the desired tab key and perform the 

adjustments. 
• Select the desired audio/subtitle language: 

English, German, French, Italian, 

Spanish, Swedish, Dutch, Polish, 

Greek or Russian.


• Select 

Auto 

to automatically set the 

language. Select 

Off 

to turn the desired 

function off.

Monitor Adjust Settings

1. Touch the 

[Monitor Adjust]

 key to set: Touch 

Screen Calibration, Brightness, TFT Angle 
and TFT Auto Open.

2. Touch the desired tab key and perform the 

necessary adjustments.

• Touch Screen Calibration

  This key is to activate the touch screen 

activation mode, please consult technical 
support before attempting this process.

• Brightness 

  Set screen brightness value from 0 to 20.

• TFT Angle (VZ401E)

  Adjust the TFT angle from 0 to 5.

• TFT Auto Open (VZ401E)

  When it is On and the ACC power on, the 

TFT opens automatically. 

Video Settings

1. Touch the 

[Video]

 key to set: Aux In 

Sensitivity, Aux In Format, and Aspect Ratio.

2. Touch the desired tab key and perform the 

adjustments.

• Aux In Input SW 

  Select the 

Low

Mid

 or 

High

 for the Aux In 

input sensitivity level.

• Aux In


Select the video format for Aux In signal.


Select from

 Auto

PAL

 or 

NTSC

.

• Aspect Ratio


Select the screen area shape: 

4:3

 or 

16:9

.

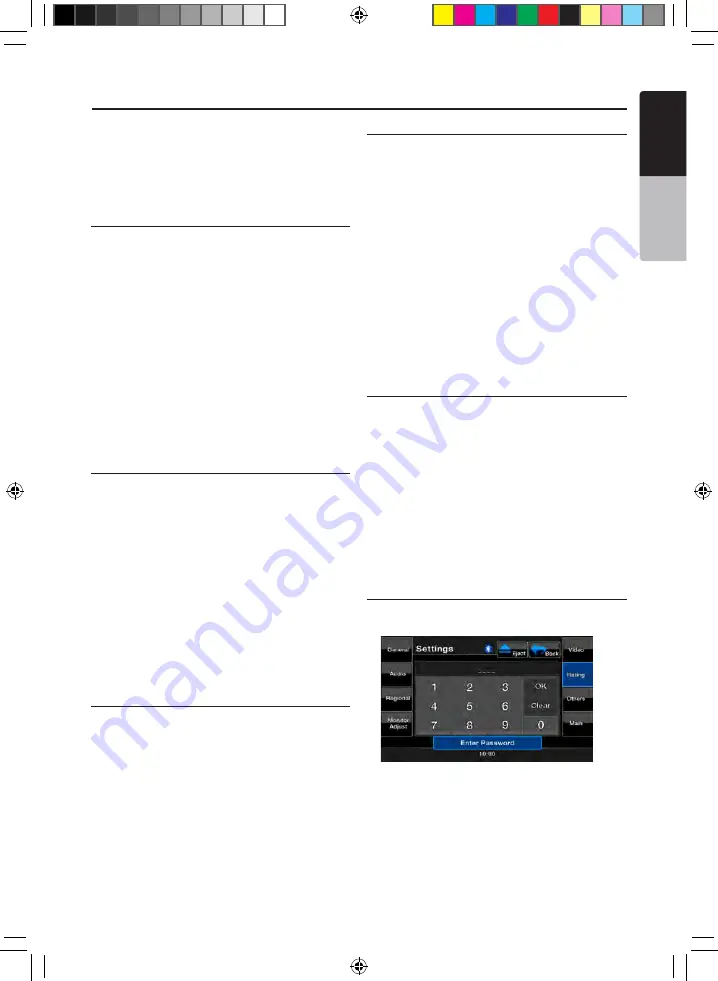
Rating Settings

1. Touch the 

[Rating]

 key to set: Password, 

DVD Parental control rating.

2. Touch the desired tab key and perform the 

adjustments.

• Password

  Refer to Setting up the password for 

parental level control in page 24. 

Setup Operations

VX_VZ401E_EN_GE_FR_IT_ES_multibook.indb   39

4.8.2010   22:03:14

Summary of Contents for VX401E

Page 1: ...STATION WITH 7 inch TOUCH PANEL CONTROL DVD MULTIMEDIA STATION MIT 7 TOUCHPANEL STEUERUNG STATION MULTIMÉDIA DVD AVEC COMMANDE ÉCRAN TACTILE DE 7 pouces STAZIONE MULTIMEDIALE DVD CON PANNELLO DI CONTROLLO A SFIORAMENTO DA 7 pollici ESTACIÓN DVD MULTIMEDIA CON PANEL DE CONTROL TÁCTIL DE 7 pulgadas VX401E VZ401E Owner s manual Installation manual Benutzerhandbuch und Installationshandbuch Mode d emp...

Page 2: ...English Owner s Manual 2 VX401E VZ401E VX_VZ401E_EN_GE_FR_IT_ES_multibook indb 2 4 8 2010 22 02 14 ...

Page 3: ...TEM 14 DVD Video Features 14 Discs 15 About the registered marks etc 16 6 OPERATIONS 17 Basic Operations 17 Radio Operations 20 DVD Video Player Operations 23 7 ACCESSORIES 31 iPod iPhone Operations 31 USB Operations 33 Bluetooth Audio Player Operations 34 Bluetooth Telephone Operations 36 AUX In AV In Operations 38 Camera In Operations 38 Setup Operations 39 8 TROUBLESHOOTING 41 9 ERROR DISPLAY 4...

Page 4: ... 7 Touch Panel Control VZ401E OEM Steering Wheel Remote Ready DVD Video CD DA MP3 WMA Playback Capability Built In Bluetooth Compatible with iPod iPhone via USB DivX Certified to play DivX video Expanding visual features Rear monitor iPod Rear Vision Camera Expanding audio features External Power Amplifier iPhone USB Memory Bluetooth Telephone VX_VZ401E_EN_GE_FR_IT_ES_multibook indb 4 4 8 2010 22 ...

Page 5: ...k For that case consult your authorized dealer or a nearest Clarion service center In case of a problem such as any material has been entered in the unit the unit gets wet or smoke or strange smells come out of the unit etc stop using this unit immediately and consult your authorized dealer or a nearest Clarion service center Using it in that condition may cause an accident fire or electric shock ...

Page 6: ...iving on extremely bumpy roads which cause severe vibration may cause the sound to skip 3 This unit uses a precision mechanism Even in the event that trouble arises never open the case disassemble the unit or lubricate the rotating parts CAUTIONS This appliance contains a laser system and is classified as a CLASS 1 LASER PRODUCT To use this model properly read this owner s Manual carefully and kee...

Page 7: ... Owner s Manual VX401E VZ401E 7 3 CONTROLS Operational Panel VOL SOURCE PWR AUX IN SENSOR RESET CLOSE MIC VOL VOL SOURCE PWR SENSOR RESET MIC VOL OPEN AUX IN VX_VZ401E_EN_GE_FR_IT_ES_multibook indb 7 4 8 2010 22 02 17 ...

Page 8: ...for more than 2 seconds to turn the power off VOL VOL Buttons Use these buttons to increase decrease the volume OPEN CLOSE Button VZ401E Use this button to open close operation panel RESET Button Press this button to reset the unit SENSOR Receiver for the remote control unit operating range 30 degree in all directions MIC Internal microphone for use during Bluetooth phone calls Sensitivity can be ...

Page 9: ...ake note of the following points Do not short circuit disassemble or heat battery Do not dispose of battery into fire or flames Dispose of discharged battery properly WARNING Alkaline CR button battery contain Perchlorate Dispose of discharged battery properly Only when capable iPod iPhone is connected ANGLE AUDIO iPod MODE SUB TITLE VIDEO iPod MODE ROOT REPEAT ENTER TA PIC MENU SET BAND AUDIO ZOO...

Page 10: ...ation up or down in the TUNER Radio mode Buttons Press to manually select the next station up or down in the TUNER Radio mode Buttons Press to scroll through the saved presets list in the TUNER Radio mode Press to scroll through the page screens in the TUNER Radio mode TA Button Press to set TA standby mode on or off DVD PLAYER mode Button Short press to play or pause the video or audio media Long...

Page 11: ...m title repeat in DVD video mode or folder repeat in MP3 WMA mode In CD mode this will activate the repeat all mode Press again to perform all repeat in MP3 WMA playback mode ZOOM Button Press to turn on and zoom in while in DVD Video mode You can zoom in up to 3x AUDIO Button Press to switch the AUDIO function in the DVD video mode SUB T Button Press to display subtitles in the DVD video mode ANG...

Page 12: ...tc as these substances may damage the cabinet or cause the paint to peel Also leaving rubber or plastic products in contact with the cabinet for long periods of time may cause stains Cleaning the liquid crystal panel The liquid crystal panel tends to collect dust so wipe it off occasionally with a soft cloth The surface is easily scratched so do not rub it with hard objects USB Port The USB memory...

Page 13: ...mercially available disc protection sheets or discs equipped with stabilizers etc These may damage the disc or cause breakdown of the internal mechanism Storage Do not expose discs to direct sunlight or any heat source Do not expose discs to excess humidity or dust Do not expose discs to direct heat from heaters Cleaning To remove fingermarks and dust use a soft cloth and wipe in a straight line f...

Page 14: ...select the angle of choice The number of recorded angles are indicated by the icon shown below Subpicture subtitles function A DVD video can record subtitles for up to 32 languages and you can select the language of the subtitles you wish to see The number of recorded subtitle languages are indicated by the icon shown below Multi story function When a DVD video contains more than one story for a f...

Page 15: ...This DVD video player cannot play back DVD Audio DVD RAM Photo CDs etc Note It may also not be possible to play back CDs recorded on a CD R unit and CD RW unit Cause disc characteristics cracks dust dirt dust dirt on player s lens etc If a CD R or CD RW disc that has not been finalized is played it will take a long time to start playing Also it may not be possible to play depending on its recordin...

Page 16: ...tively and has been certified by the developer to meet Apple performance standards Apple is not responsible for the operation of this device or its compliance with safety and regulatory standards iPhone and iPod are trademarks of Apple Inc registered in the U S and other countries iTunes is a trademark of Apple Inc The Bluetooth word mark and logos are owned by the Bluetooth SIG Inc And any use of...

Page 17: ...or more than 2 seconds Or press the SRC POWER button on the remote control to turn OFF the power for more than 1 seconds Engine ON position Opening and Closing Operational Panel Press OPEN button on the unit VZ401E The operational panel will be open Press the same button again to close the panel CAUTION Do not move the operation panel forcibly or apply strong force to the operation panel When the ...

Page 18: ...UTE button on the remote control to turn mute On and Off Adjusting the Settings 1 Press Settings to enter the setting menu mode 2 Press the desired mode key Modes come in the following order General Audio Regional Monitor Adjust Video Rating Others 3 Perform the adjustment for the desired item See the following sections for details Adjusting the Audio Settings 1 Touch the Audio Settings key on the...

Page 19: ...e balance level The factory default setting is 0 Adjustment range left 9 to right 9 Adjusting the Subwoofer The Subwoofer can be adjusted as follows 1 Touch the or key to adjust to the subwoofer level The factory default setting is 0 Adjustment range left 9 to right 9 Adjusting the Loudness The Loudness can be adjusted as follows 1 Touch the or key to turn loudness On or Off Adjusting the clock 1 ...

Page 20: ...uching the M Seek key the station is tuned in the direction of higher frequencies When touching the M Seek key the station is tuned in the direction of lower frequencies Recalling a preset station There are 2 ways to recall the preset station Using the tuner unit 1 Touch the BAND key to select the desire band FM or AM on the tuner 2 Touch the List key to display the Preset List screen 3 Touch or t...

Page 21: ...F button to set AF ON AF button will be lighted and AF will be displayed at the top of the screen 3 Touch AF button again to set AF OFF REG Regional Program function When the REG function is ON the optimum regional station can be received When this function is OFF if the regional station area is switched as you drive a regional station for that region is received Note This function is disabled whe...

Page 22: ... be lighted and PTY will be displayed at the top of the screen Touch the button again to set PTY standby mode OFF 3 Touch PTY Select button to display the PTY Select screen 4 Touch your desired PTY preset key to select the program type 5 Touch PTY Select button to return to the previous screen Changing the PTY language 1 Touch the List key 2 Touch the PTY Select key 3 Touch the PTY Lang key to dis...

Page 23: ...ar view monitor 4 3 the leftmost and rightmost areas of the screen are cut off This function allows displaying the important part of image fully on the screen In some cases image is displayed while being panned scrolled When watching a wide type through a wide type of the rear view monitor 16 9 the leftmost and rightmost areas of the screen are not cut off Setting up the Video System Format 1 Touc...

Page 24: ...TRICTED R RESTRICTED NC 17 NO ONE 17 AND UNDER ADMITTED Adult ONLY ADULT ADMITTED The contents that the parental level restricts vary with the country code Note The rating can be selected only under the password unlocked status and the limits can be set only under the password locked status Watching Listening to a disc Note Refer to the diagram in CONTROLS chapter To load a disc 1 Press the OPEN C...

Page 25: ...ouch the or key to start your fast backward or fast forward during playback The playback speed starts at 2x then will increase to 4x 8x and 16x with each additional press No audio is reproduced during fast forward and fast backward operation The fast forward and fast backward speed may differ depending on the disc Direct Search Options You can locate the beginning of a scene using the time chapter...

Page 26: ...ages It may take time to switch among audios Depending on the disc up to 8 audios may be recorded For details see the mark of the disc 8 Indicates that 8 audios have been recorded When the power is turned on and when the disc is changed to a new one the language set as the factory default is selected If that language has not been recorded the language is specified on the disc Depending on the disc...

Page 27: ...layback starts from the beginning of the previous track Fast Forward and Fast Backward 1 Touch the or key during playback The media will advance at 2x speed 2 Touch again to advance to higher speed reversing or forwarding such as 4x 8x and 16x Touch once more to resume normal speed playback Scanning the Tracks 1 Touch the List key to display the Disc List screen 2 Touch the Scan key to begin previ...

Page 28: ... can be displayed for MP3 WMA file containing Tag information Precautions when creating MP3 disc File extensions 1 Always add a file extension MP3 or mp3 to an MP3 file and WMA or wma to a WMA file by using single byte letters If you add a file extension other than specified or forget to add these file extension the file cannot be played In addition if you use upper case and lower case letters cap...

Page 29: ... maximum number of tracks that can be played back 2 Tracks are played in the order that they were recorded onto a disc Tracks might not always be played in the order displayed on the PC Some noise may occur depending on the type of encoder software used while recording In case of a track recorded at VBR variable bit rate the display for the play time of the track may be slightly different from the...

Page 30: ...The player will only recognize three folder levels and does not display folders containing other folders In the example above the unit will display folders 2 3 5 and 7 but not 1 and 6 since they do not contain others Playing DivX file This system can playback DivX movie files recorded on a disc Official DivX Certified product Plays all versions of DivX video including DivX 6 with standard playback...

Page 31: ...iPod iPhone s language setting to English before connecting your iPod iPhone Some characters of the other languages may not be displayed correctly in this system Precautions on battery consumption If the iPod iPhone is connected to this unit when the iPod iPhone s internal battery has run down this function may not operate correctly You must connect the iPod iPhone after charging the battery if it...

Page 32: ...oy the video data and slide show data stored in the iPod iPhone showing them on the display of this unit and the rear monitor if connected Note Do not connect the iPod iPhone to this unit when a Video Playlists item is selected on the iPod iPhone 1 Touch the Video key on the iPod audio mode menu screen The iPod play video screen is displayed 2 Select the type of video you would like to play by tou...

Page 33: ... kbps Add the following file extension using single byte characters For MP3 files MP3 or mp3 For WMA files WMA or wma Notes on the folder structure The folder hierarchy must be within 8 hierarchical levels Otherwise playback will be impossible The maximum allowable number of folders is 200 including root directory and folders with no MP3 WMA file The maximum allowable number of files in a folder i...

Page 34: ...equired password to pair the phone to the unit is 1234 1 Touch the Settings key on the screen 2 Touch the Pair mode key on the Settings screen 3 Touch the Pairing key to begin the pairing process 4 The cellular phone may prompt to acknowledge the Bluetooth connection and to enter the Pass Key code of this unit Perform these operations according to the message displayed 5 When the pairing operation...

Page 35: ...back 1 Touch the key during playback Playback pauses 2 To resume playback touch the key Playback resumes Skipping a Track Searching 1 Touch the or key during playback Tracks are skipped as many as the times the key is touched and playback starts Note Control functions such as play pause and track skipping are not available on all devices Fast Forward and Fast Backward 1 Touch and hold the or key d...

Page 36: ...is 3 Note The input level of the microphone can be affected by its surroundings Adjust the level when the person on the other end of the telephone has a reception problem 2 Touch the level indicator of the MIC Gain key to adjust the input level Note You can talk with other party by using the internal microphone When it is hard to hear for the other party in accordance with the communication condit...

Page 37: ...ion the Phone Book data must be sent from the cellular phone Only the Phone Book items with at least one telephone number registered in the captured Phone Book data are displayed on the Phone Book screen 1 Touch the Phone Function key to display the Phone Log screen 2 Select My Phonebook or SIM Phonebook to select your desired phonebook to view 3 Touch the desired Name key you wish to dial Touch t...

Page 38: ... audio can be heard The picture can be only watched when the car is stopped and parking brake is applied Switching to AUX IN AV IN mode Touch AUX IN or AV IN key on Main Menu to select desired mode when unit is reading The LCD will display the external video The screen will display No Video menu if there is no video signal You cannot directly control external devices connected to the AUX IN or AV ...

Page 39: ... perform the adjustments Select the desired audio subtitle language English German French Italian Spanish Swedish Dutch Polish Greek or Russian Select Auto to automatically set the language Select Off to turn the desired function off Monitor Adjust Settings 1 Touch the Monitor Adjust key to set Touch Screen Calibration Brightness TFT Angle and TFT Auto Open 2 Touch the desired tab key and perform ...

Page 40: ...ey to save it Anti theft Touch this tab to turn On or Off the anti theft lock function Turn on the Back up when the Anti theft is On you need enter the right Anti theft code to turn on the unit normally If you enter the wrong code for four times the unit will be locked and must be unlocked by the professionals Bluetooth Touch this tab to turn On or Off the Bluetooth Tel SP Touch this tab to set th...

Page 41: ... not work The battery of the remote control unit is dead or there is no battery in the remote control unit Check the battery of the remote control unit Problem Cause Measure Disc cannot be loaded A disc is already loaded Eject the disc before loading the new one There is foreign matter already in the disc slot Remove the foreign matter or consult a service station Sound skips or is noisy Disc is d...

Page 42: ...A files encoded properly The iPod iPhone s video image is disturbed The TV Signal setting of the iPod iPhone is not set correctly Set the TV Signal setting NTSC PAL of the iPod iPhone correctly Bluetooth Problem Cause Measure Cannot pair the Bluetooth enable device with the car audio system The device does not support the profiles required for the system Use another device to connect The Bluetooth...

Page 43: ...ight of the vehicle is lit The display is made dark at night to prevent the glare When the headlight of the vehicle is lit in the daytime the display gets dark When the VTR is connected the image is disturbed Improper NTSC PAL setting Set the AUTO PAL NTSC properly according to the VTR There are red green and blue points in display This is not a failure but a phenomenon peculiar to a liquid crysta...

Page 44: ...pears press the Reset button If the problem persists turn off the power and consult your store of purchase When the Reset button is pressed frequencies of radio stations titles etc stored in memory are cleared 10 SPECIFICATIONS FM Tuner Frequency Range 87 5 MHz to 108 MHz Usable Sensitivity 8 dBµV 50dB Quieting Sensitivity 14 dBµV Alternate Channel Selectivity 70 dB Stereo Separation 25 dB 1 kHz F...

Page 45: ...ification USB 1 1 2 0 FS Playable audio format MP3 mp3 MPEG 2 Audio Layer 3 WMA wma Ver 7 8 9 1 9 2 Audio amplifier Maximum power output 160W 40W x 4 Speaker impedance 4 4 to 8 allowable General Power source voltage 14 4 V DC 10 8 to 15 6 V allowable Ground Negative Current consumption 4 0 A 1 W Auto Antenna Rated Current 500 mA less VX401E dimensions 178 mm 163 mm 145 mm 100 mm VX401E weight 2 4 ...

Page 46: ...clean the case Never use a rough cloth thinner benzine or alcohol etc For tough dirt apply a little cold or warm water to a soft cloth and wipe off the dirt gently Main unit 1 Wiring harness 1 AV cable 1 Remote control unit 1 Battery CR2025 1 Installed in remote control Trim ring 1 Cleaning cloth 1 Warranty Card 1 Owner s manual 1 Electro tap 1 2DIN trim ring 200mm wide VX401E only 1 Mounting Brac...

Page 47: ... not hamper operation of the gearshift lever or obstruct your view before selecting the installation location Figure 2 Figure 2 VZ401E Gearshift lever Check that it does not touch the LCD Dashboard Gearshift lever 3 Install the unit within 30 of the horizontal plane Figure 3 VX401E VZ401E Figure 3 4 If you have to do any work on the car body such as drilling holes consult your car dealer beforehan...

Page 48: ...7 2 Wire as shown in Section 7 3 Reassemble and secure the unit in the dashboard and set the face panel and center panel Installing the Main Unit in NISSAN Vehicle Note 1 Position the face panel with its wide edge at the bottom Fit the edge into the groove of the main unit Figure 5 For NISSAN vehicle Mounting Screw Holes Side View of the Main Unit For TOYOTA vehicle Figure 6 6 Spacer thickness 1mm...

Page 49: ...ok on the installation bracket interferes with the unit bend and flatten it with a nipper or similar tool Vehicles other than NISSAN and TOYOTA In some cases the center panel may require modification Trimming filing etc Removing the Main Unit When the main unit is to be removed disassemble it in the reverse of the order in INSTALLING THE MAIN UNIT 8 Hexagonal screws M5x8 Mounting bracket 1 pair fo...

Page 50: ... wiring is correct If a fuse is blown replace it with a new one of the same amperage rating as the original 15A FUSE 4 To replace the fuse remove the old fuse on the back of the unit and insert the new one Figure 8 NOTE There are various types of fuse holder Do not let the battery side touch other metal parts Figure 8 Fuse 15A FUSE After the connection fix the cord by a clamp or insulation tape fo...

Page 51: ... R CCA 748 sold separately 4 Channel Amplifier Subwoofer 1 Subwoofer 2 Line Out Rear R Line Out Rear L Line Out Front R Line Out Front L Red Steering Wheel Remote Control Terminal External Microphone Connection Monitor Gray Black Black Video Out Rear Vision Camera Radio Antenna Jack Purple Gray Black Yellow Red White Red White Red White Yellow Yellow White Red SWI CAMERA VIDEO OUT VISUAL IN MIC Ca...

Page 52: ...Front L Video in Audio R Audio L Camera Yellow White White Red Red Red White Yellow Purple Gray Gray Red Black Black Black Steering Wheel Remote Control Terminal Yellow Monitor iPod iPhone CCA 748 sold separately Yellow White Red Red White External Microphone Connection MIC SWI Black CAMERA VISUAL OUT VISUAL IN VZ401E Refer to page 53 VX_VZ401E_EN_GE_FR_IT_ES_multibook indb 52 4 8 2010 22 03 20 ...

Page 53: ...4 A 5 A 6 A 7 A 8 B 1 B 2 B 3 B 4 B 5 B 6 B 7 B 8 Rear right Rear right Rear left Rear left Front left Front left Front right Front right GND Illumination Auto antenna ACC BACK UP BACK UP Yellow Auto antenna Blue Phone interrupt Brown Parking Grass green Remote Blue White Reverse Purple White ACC Red No Description 3 4 5 6 7 2 1 3 4 5 6 7 2 1 Warning Parking brake safety device must be connected f...

Page 54: ...ice The iPod iPhone device can be connected to dedicated iPod iPhone connection on the main unit For detailed information refer to the instruction sheet or manual for the iPod iPhone cable Note This unit may not support all functions of all iPod iPhone devices The iPod iPhone connection will charge your iPod iPhone unless the iPod iPhone battery is completely depleted If the specified cord of the ...

Page 55: ...ons pertinentes de la directive 1999 5 CE Italiano Dichiarazione di conformità Clarion dichiara che il presente modello VX401E VZ401E è conforme ai requisiti essenziali e alle altre disposizioni pertinenti stabiliti dalla direttiva 1999 5 CE Español Declaración de conformidad Clarion declara que este modelo VX401E VZ401E cumple con los requisitos esenciales y otras disposiciones aplicables descrit...

Reviews: