background image

Chapter3

Advanced Configuration

4

Wreless-G Broadband Router wth SpeedBooster

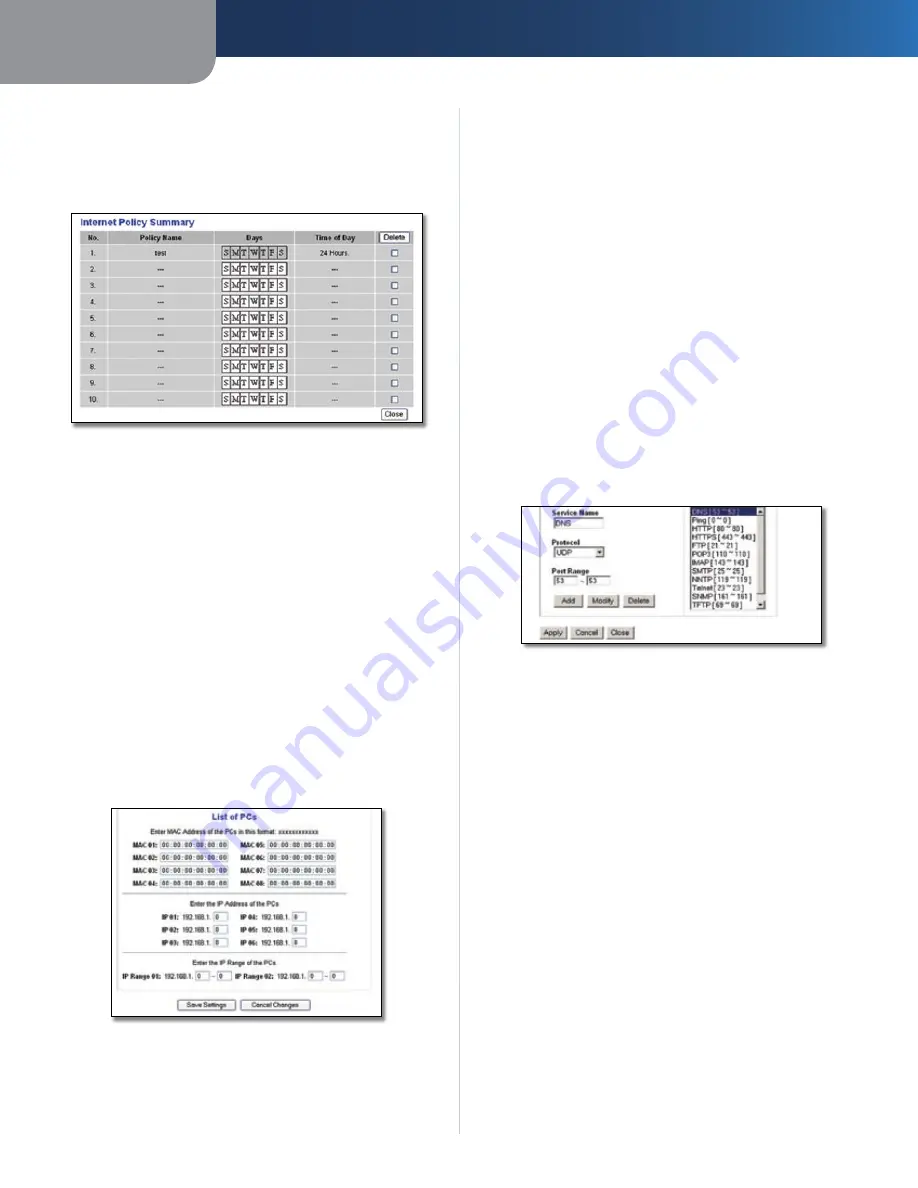
policy’s number and click the 

Delete

 button. To view all 

the policies, click the 

Summary

 button. (Policies can be 

deleted from the 

Summary

 screen by selecting the policy 

or policies and clicking the 

Delete

 button. To return to the 

Internet Access tab, click the 

Close

 button.)

Internet Policy Summary

Status 

Policies are disabled by default. To enable a policy, 

select the policy number from the drop-down menu, and 

select 

Enable

.

To create an Internet Access policy:

Select a number from the 

Internet Access Policy

 drop-

down menu.
To enable this policy, select 

Enable

.

Enter a Policy Name in the field provided. 
Click the 

Edt Lst of PCs

 button to select which PCs 

will  be  affected  by  the  policy. The 

List  of  PCs

  screen 

appears.  You  can  select  a  PC  by  MAC  Address  or  IP 

Address. You  can  also  enter  a  range  of  IP  Addresses 

if you want this policy to affect a group of PCs. After 

making your changes, click the 

Save Settngs

 button 

to apply your changes or 

Cancel Changes

 to cancel 

your changes. Then click the 

Close

 button. 

List of PCs

Select  the  appropriate  option, 

Deny

  or 

Allow

depending  on  whether  you  want  to  block  or  allow 

Internet access for the PCs you listed on the 

List of PCs


screen.

1.

2.
3.
4.

5.

Decide which days and what times you want this policy 

to be enforced. Select the individual days during which 

the policy will be in effect, or select 

Everyday

. Then 

enter a range of hours and minutes during which the 

policy will be in effect, or select 

24 Hours

.

Select any Blocked Services or Website Blocking you 

wish to use.
Click  the 

Save  Settngs

  button  to  save  the  policy’s 

settings, or click the 

Cancel Changes

 button to cancel 

the policy’s settings.

Blocked Services

You can filter access to various services accessed over the 

Internet, such as FTP or telnet, by selecting services from 

the drop-down menus next to 

Blocked Services

. (You can 

block up to 20 services.) Then enter the range of ports you 

want to filter.
If the service you want to block is not listed or you want to 

edit a service’s settings, then click the 

Add/Edt Servce 

button. Then the 

Port Services

 screen will appear.

Port Services

To add a service, enter the service’s name in the 

Service 

Name

  field.  Select  its  protocol  from  the 

Protocol

  drop-

down menu, and enter its range in the 

Port Range

 fields. 

Then click the 

Add

 button.

To  modify  a  service,  select  it  from  the  list  on  the  right. 

Change  its  name,  protocol  setting,  or  port  range.  Then 

click the 

Modfy

 button.

To delete a service, select it from the list on the right. Then 

click the 

Delete

 button.

When you are finished making changes on the 

Port Services


screen, click the 

Apply

 button to save the changes. If you 

want  to  cancel  your  changes,  click  the 

Cancel

  button. 

To close the 

Port Services

 screen and return to the 

Access 

Restrictions

 screen, click the 

Close

 button.

Website Blocking by URL Address

If you want to block websites with specific URL addresses, 

enter each URL in a separate field next to 

Website Blocking 

by URL Address

.

6.

7.

8.

Summary of Contents for Linksys WRT54GS

Page 1: ...USER GUIDE Wireless G Broadband Router with SpeedBooster Model No WRT54GS ...

Page 2: ...s Online Resources Most web browsers allow you to enter the web address without adding the http in front of the address This User Guide will refer to websites without including http in front of the address Some older web browsers may require you to add it Resource Website Linksys www linksys com Linksys International www linksys com international Glossary www linksys com glossary Network Security ...

Page 3: ... Wireless MAC Filter 11 Wireless Advanced Wireless Settings 11 Security Firewall 12 Security VPN Passthrough 13 Access Restrictions Internet Access 13 Applications and Gaming Port Range Forward 15 Applications Gaming Port Triggering 15 Applications and Gaming DMZ 16 Applications and Gaming QoS 16 Administration Management 17 Administration Log 17 Administration Diagnostics 18 Administration Factor...

Page 4: ...nformation 23 Limited Warranty 23 Wireless Disclaimer 24 FCC Statement 24 Safety Notices 24 Industry Canada Canada 24 IC Statement 24 Règlement d Industry Canada 24 User Information for Consumer Products Covered by EU Directive 2002 96 EC on Waste Electric and Electronic Equipment WEEE 25 ...

Page 5: ... SecureEasySetupisafeaturethatmakes it easy to set up your wireless network If you haveSecureEasySetupdevices runtheRouter s Setup Wizard CD ROM and follow the on screen instructions to use SecureEasySetup Power Green The Power LED lights up and will stay on while the Router is powered on When the Router goes through its self diagnostic mode during every boot up this LED will flash When the diagno...

Page 6: ...e you the ability to enable Media Access Control MAC address filtering The MAC address is a unique series of numbers and letters assigned to every networking device With MAC address filtering enabled wireless network access is provided solely for wireless devices with specific MAC addresses For example you can specify the MAC address of each computer in your home so that only those computers can a...

Page 7: ...ault IP address 192 168 1 1 in the Address field Then press Enter A password request screen will appear Non Windows XP users will see a similar screen Leave the User name field blank The first time you open the Web based utility use the default password admin You can set a new password from the Administration tab s Management screen Click the OK button to continue Password Screen Setup Basic Setup...

Page 8: ...select this option the Router will periodically check your Internet connection If you are disconnected then the Router will automatically re establish your connection To use this option select Keep Alive In the Redial Period field you specify how often you want the Router to check the Internet connection The default Redial Period is 30 seconds PPTP Point to Point Tunneling Protocol PPTP is a servi...

Page 9: ...ion after it has been inactive for a specified period of time Max Idle Time If your Internet connection has been terminated due to inactivity Connect on Demand enables the Router to automatically re establish your connection as soon as you attempt to access the Internet again To use this option select Connect on Demand In the Max Idle Time field enter the number of minutes you want to have elapsed...

Page 10: ...nter the amount of time in minutes that the user will be leased this dynamic IP address After the time is up the user will be automatically assigned a new dynamic IP address The default is 0 minutes which means one day Static DNS 1 3 The Domain Name System DNS is how the Internet translates domain or website names into Internet addresses or URLs Your ISP will provide you with at least one DNS Serv...

Page 11: ... to cancel your changes Setup MAC Address Clone A MAC address is a 12 digit code assigned to a unique piece of hardware for identification Some ISPs will require you to register a MAC address in order to access the Internet If you do not wish to re register the MAC address with your ISP you may assign the MAC address you have currently registered with your ISP to the Router with the MAC Address Cl...

Page 12: ...te network or host to which you want to assign a static route Subnet Mask The Subnet Mask determines which portion of a Destination LAN IP address is the network portion and which portion is the host portion DefaultGateway This is the IP address of the gateway device that allows for contact between the Router and the remote network or host Interface This interface tells you whether the Destination...

Page 13: ...ands for Wired Equivalent Privacy while RADIUS stands for Remote Authentication Dial In User Service These six are briefly discussed here For detailed instructions on configuring wireless security for the Router refer to Chapter 2 Wireless Security Wireless Security Security Mode Select the security method for your wireless network If you do not want to use wireless security keep the default Disab...

Page 14: ...S Port Enter the port number of the RADIUS server Shared Key Enter the key shared between the Router and the server Key Renewal Timeout Enter a Key Renewal Timeout period which instructs the Router how often it should change the encryption keys The default Key Renewal Timeout period is 3600 seconds RADIUS This option features WEP used in coordination with a RADIUS server This should only be used w...

Page 15: ...s MAC Filter WirelessMACFilter TofilterwirelessusersbyMACAddress either permitting or blocking access click Enable If you do not wish to filter users by MAC Address keep the default setting Disable Prevent Clicking this button will block wireless access by MAC Address This button is selected by default Permit Only Clicking this button will allow wireless access by MAC Address Edit MAC Address Filt...

Page 16: ...The default value is 100 Enter a value between 1 and 65 535 milliseconds The Beacon Interval value indicates the frequency interval of the beacon A beacon is a packet broadcast by the Router to synchronize the wireless network DTIM Interval This value between 1 and 255 indicates the interval of the Delivery Traffic Indication Message DTIM A DTIM field is a countdown field informing clients of the ...

Page 17: ... Security VPN Passthrough screen allows you to enable VPN tunnels using IPSec PPTP or L2TP protocols to pass through the Router s firewall VPN Passthrough IPSec Passthrough Internet Protocol Security IPSec is a suite of protocols used to implement secure exchange of packets at the IP layer To allow IPSec tunnels to pass through the Router keep the default Enable PPTP Passthrough Point to Point Tun...

Page 18: ...t or select Everyday Then enter a range of hours and minutes during which the policy will be in effect or select 24 Hours Select any Blocked Services or Website Blocking you wish to use Click the Save Settings button to save the policy s settings or click the Cancel Changes button to cancel the policy s settings Blocked Services You can filter access to various services accessed over the Internet ...

Page 19: ...pplication enter the IP Address of the PC running the specific application Enable Select Enable to enable port forwarding for the relevant application Click the Save Settings button to apply your changes or click Cancel Changes to cancel your changes Applications Gaming PortTriggering The Applications Gaming Port Triggering screen allows the Router to watch outgoing data for specific port numbers ...

Page 20: ...encing There are three types of QoS available Device Priority Ethernet Port Priority and Application Priority QoS Enable Disable ToenableQoS selectEnable Otherwise select Disable Upstream Bandwidth Select Auto or Manual from the drop down menu Manual allows you to specify the maximum outgoing bandwidth that applications can utilize Applications and Gaming QoS Device Priority Enter the name of your...

Page 21: ...nt screen allows the network s administrator to manage specific Router functions for access and security Administration Management Router Password Local Router Access Router Password Enter a new Password for the Router Re enter to confirm Enter the Password again to confirm Web Access Access Server HTTP HyperText Transport Protocol is the communications protocol used to connect to servers on the W...

Page 22: ...ing Test screen will show if the test was successful To stop the test click the Stop button Click the Clear Log button to clear the screen Click the Close button to return to the Diagnostics screen The Ping Test TracerouteTest Traceroute To test the performance of a connection click the Traceroute button Enter the address of the PC whose connection you wish to test and click the Traceroute button ...

Page 23: ...up the Router s configuration file click the Backup button Then follow the on screen instructions Restore Configuration Please select a file to restore Click the Browse button and select the configuration file Then click the Restore button Status Router The Status Router screen displays the Router s current status Administration Factory Defaults Router Information Firmware Version This is the Rout...

Page 24: ...PCs are utilizing the Router as a DHCP server You can delete PCs from that list and sever their connections by checking a Delete box and clicking the Delete button DHCP Clients Table Click the Refresh button to update the on screen information Status Wireless The Status Wireless screen displays the status of your wireless network Status Wireless Wireless MAC Address This is the Router s MAC Addres...

Page 25: ...em insert the setup CD into your computer and then follow the on screen instructions 1 2 3 When you double click the web browser you are prompted for a username and password If you want to get rid of the prompt follow these instructions Launch the web browser and perform the following steps these steps are specific to Internet Explorer but are similar for other browsers Select Tools Internet Optio...

Page 26: ...g Type CAT5 LEDs Power DMZ WLAN LAN 1 4 Internet SecureEasySetup RF Power Output 18 dBm UPnP able cert Able Security features Stateful Packet Inspection SPI Firewall Internet Policy Wireless Security Wi Fi Protected Access 2 WPA2 WEP Wireless MAC Filtering Environmental Dimensions 7 32 x 1 89 x 6 06 186 x 48 x 154 mm Weight 13 6 oz 385 g Power External 12V DC 0 5A Certifications FCC IC 03 CE Wi Fi...

Page 27: ...IED CONDITIONS REPRESENTATIONS AND WARRANTIES INCLUDING ANY IMPLIED WARRANTY OF NON INFRINGEMENT AREDISCLAIMED Somejurisdictions do not allow limitations on how long an implied warranty lasts so the above limitation may not apply to You This warranty gives You specific legal rights and You may also have other rights which vary by jurisdiction This warranty does not apply if the Product a has been ...

Page 28: ...er is encouraged to try to correct the interference by one or more of the following measures Reorient or relocate the receiving antenna Increase the separation between the equipment or devices Connect the equipment to an outlet other than the receiver s Consultadealeroranexperiencedradio TVtechnician for assistance Safety Notices Caution To reduce the risk of fire use only No 26 AWG or larger tele...

Page 29: ...nie Evropská směrnice 2002 96 ES zakazuje aby zařízení označené tímto symbolem na produktu anebo na obalu bylo likvidováno s netříděným komunálním odpadem Tento symbol udává že daný produkt musí být likvidován odděleně od běžného komunálního odpadu Odpovídáte za likvidaci tohoto produktu a dalších elektrických a elektronických zařízení prostřednictvím určených sběrných míst stanovených vládou nebo...

Page 30: ...στημα από το οποίο αγοράσατε το προϊόν Français French Informations environnementales pour les clients de l Union européenne La directive européenne 2002 96 CE exige que l équipement sur lequel est apposé ce symbole sur le produit et ou son emballage ne soit pas jeté avec les autres ordures ménagères Ce symbole indique que le produit doit être éliminé dans un circuit distinct de celui pour les déc...

Page 31: ...n Ha elavult berendezéseinek felszámolásához további részletes információra van szüksége kérjük lépjen kapcsolatba a helyi hatóságokkal a hulladékfeldolgozási szolgálattal vagy azzal üzlettel ahol a terméket vásárolta Nederlands Dutch Milieu informatie voor klanten in de Europese Unie DeEuropeseRichtlijn2002 96 ECschrijftvoordatapparatuurdie is voorzien van dit symbool op het product of de verpakk...

Page 32: ...ácia pomôže zabrániť prípadným negatívnym dopadom na životné prostredie a zdravie ľudí Ak máte záujem o podrobnejšie informácie o likvidácii starého zariadenia obráťte sa prosím na miestne orgány organizácie zaoberajúce sa likvidáciou odpadov alebo obchod v ktorom ste si produkt zakúpili Slovenčina Slovene Okoljske informacije za stranke v Evropski uniji Evropska direktiva 2002 96 EC prepoveduje o...

Reviews: