background image

Verification 


10-9 

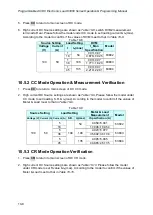
Table 10-10 

Source Setting 

Load Setting 

Meter & Load 

Measurement 

Model 

Voltage 

(V) 

Current 

(A) 

R (Ω) 

I

p

(max) 

R Specification 

(Ω) 

100 

18 

100 

54 

81.286~129.908 

63802 

50 

2.965~3.036 

100 

36 

100 

108 

71.174~168.067 

63803 

50 

1.5 

1.484~1.517 

100 

50 

100 

135 

66.445~202.020 

63804 

50 

1.2 

1.187~1.213 


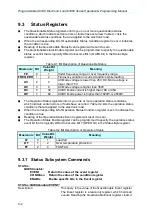
10.5.4  CP Mode Operation Verification


1.  Press 

CP

 to return to main screen of DC CP mode. 

 
2.  High current DC Source settings are shown as 

Table 10-11

. Please follow the model 

under CP mode to set the loading watt & I

p

(max). According to the model to confirm if the 

values of Meter & Load meet to that i

Table 10-11

. 


Source Setting 

Load Setting 

Meter & Load 

Measurement 

Model   

Voltage 

(V) 

Current 

(A) 

I

p

(max) 

P Specification 

(W) 

100 

50 

50 

54 

44.5~55.5 

63802 

1800 

1791~1809 

50 

108 

39.1~60.9 

63803 

3600 

3582~3618 

50 

135 

36.4~63.3 

63804 

4500 

4477.5~4522.5 

Table 10-11 


10.5.5  CV Mode Operation Verification


1.  Press 

CV

 to return to main screen of DC CV mode. 

 
2.  High current DC Source settings are shown as 

Table 10-12

. Set loading voltage & I

max


under CV mode and confirm if the values of Meter & Load meet to that in 

Table 10-12

. 


Table 10-12 

Source Setting 

Load Setting 

Meter & Load 

Measurement 

Voltage 

(V) 

Current (A) 

I

max


V Specification 

10 

7.5 

7.09~7.41 

80 

14 

70 

15 

69.54~70.46 


Summary of Contents for 63800 Series

Page 1: ......

Page 2: ......

Page 3: ...Programmable AC DC Electronic Load 63800 Series Operation Programming Manual Version 2 0 July 2017 ...

Page 4: ...ATE INC shall not be held liable for errors contained herein or direct indirect special incidental or consequential damages in connection with the furnishing performance or use of this material CHROMA ATE INC 66 Huaya 1st Road Guishan Taoyuan 33383 Taiwan Copyright Notices Copyright 2009 2017 Chroma ATE INC all rights reserved Reproduction adaptation or translation of this document without prior w...

Page 5: ...ions or operations repairs will be billed at cost Chroma assumes no responsibility for its product being used in a hazardous or dangerous manner either alone or in conjunction with other equipment High voltage used in some instruments may be dangerous if misused Special disclaimers apply to these instruments Chroma assumes no liability for secondary charges or consequential damages and in any even...

Page 6: ...rective 2011 65 EU indicates that the level of the specified chemical substance exceeds the threshold level specified in the standards of SJ T 11363 2006 and EU Directive 2011 65 EU Remarks The CE marking on product is a declaration of product compliance with EU Directive 2011 65 EU Disposal Do not dispose of electrical appliances as unsorted municipal waste use separate collection facilities Cont...

Page 7: ...U 1 Chroma is not fully transitioned to lead free solder assembly at this moment however most of the components used are RoHS compliant 2 The environment friendly usage period of the product is assumed under the operating environment specified in each product s specification Disposal Do not dispose of electrical appliances as unsorted municipal waste use separate collection facilities Contact your...

Page 8: ...vi ...

Page 9: ...hock before turning on the power NECESSITY OF PROTECTIVE GROUNDING Never cut off the internal or external protective grounding wire or disconnect the wiring of protective grounding terminal Doing so will cause a potential shock hazard that may bring injury to a person FUSES Only fuses with the required rated current voltage and specified type normal blow time delay etc should be used Do not use re...

Page 10: ...ound is not explicitly stated This symbol indicates the power connector does not provide grounding Frame or chassis To identify a frame or chassis terminal Alternating Current AC Direct Current DC Alternating Current AC Direct Current DC Push on Push off power switch The WARNING sign highlights an essential operating or maintenance procedure practice condition statement etc which if not strictly o...

Page 11: ...he section of Current Subsystem the descriptions in the section of Power Subsystem the descriptions in the section of Resistance Subsystem Mar 2011 1 3 Add the chapter of Verification Dec 2011 1 4 Add the description in the following sections Note in the section of The Front Panel Notices in the sections of AC Load Simulation DC Load Simulation and DC Load Simulation Constant Voltage Mode Using li...

Page 12: ...ement Verification Mar 2013 1 7 Modify the fuse specification to 3A 250V in the section of Specifications Oct 2016 1 8 Modify Declaration of Conformity Mar 2017 1 9 Modify the following Material Contents Declaration CE Declaration of Conformity Add User Manual Customer Feedback Jul 2017 2 0 Delete the power cable of standard accessory table in the section of Inspection ...

Page 13: ...nfiguration 3 3 3 4 2 External ON OFF 3 6 3 4 3 Going To Local 3 7 3 4 4 Online Change Loading 3 7 3 4 5 Load ON OFF 3 7 3 4 6 The Relationship of Crest Factor and Power Factor 3 8 3 4 7 Ip max Setting and Automatic Bandwidth Adjustment ABA Mode 3 10 3 4 8 Lock Mode 3 11 3 5 AC Load Simulation 3 13 3 6 AC Load Simulation Constant Current Mode 3 15 3 6 1 BOTH 3 16 3 6 2 CF Only 3 18 3 6 3 PF Only 3...

Page 14: ...mulation 4 2 4 1 1 Constant Current Mode 4 3 4 1 2 Constant Resistance Mode 4 4 4 1 3 Constant Power Mode 4 5 4 1 4 Rectified Load Mode 4 6 4 1 4 1 RLC Mode 4 6 4 1 4 2 CP Mode 4 7 4 1 4 3 Inrush Current Mode 4 8 4 2 DC Load Simulation 4 8 4 2 1 Constant Current Mode 4 9 4 2 2 Constant Resistance Mode 4 9 4 2 3 Constant Voltage Mode 4 10 4 2 4 Constant Power Mode 4 11 4 2 5 Rectified Load Mode 4 1...

Page 15: ...em 8 14 8 6 3 2 Power Subsystem 8 16 8 6 3 3 Resistance Subsystem 8 17 8 6 3 4 Voltage Subsystem 8 18 8 6 3 5 Crest Factor Subsystem 8 18 8 6 3 6 Power Factor Subsystem 8 19 8 6 3 7 RLC Subsystem 8 19 8 6 3 8 Inrush Current Subsystem 8 20 8 6 3 9 DC Rectified Subsystem 8 21 8 6 3 10 Time Subsystem 8 22 8 6 4 System Subsystem 8 23 8 6 4 1 Recall Default Subsystem 8 23 8 6 4 2 Remote Subsystem 8 23 ...

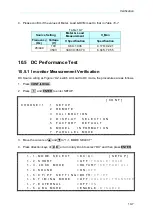
Page 16: ...0 5 DC Performance Test 10 7 10 5 1 I monitor Measurement Verification 10 7 10 5 2 CC Mode Operation Measurement Verification 10 8 10 5 3 CR Mode Operation Verification 10 8 10 5 4 CP Mode Operation Verification 10 9 10 5 5 CV Mode Operation Verification 10 9 10 5 6 V_Monitor Voltage Measurement Verification 10 10 Appendix A RS 232C Connection A 1 Appendix B Pin Assignment of TTL I O Signals B 1 A...

Page 17: ...ied DC load simulation Programmable load value power factor PF and crest factor CF Minimum input resistance allows load to sink high current even with low input voltage 10 sets of memories to save recall user definable setups 16 bit A D converter with precision measurement Short circuit simulation Isolated voltage and current monitoring waveforms output 1 3 Description The functions of the 63800 s...

Page 18: ...meters is allowed to use the equipment 3 All specifications are tested under 20 C 30 C except otherwise stated 4 The range for operation temperature is 0 C 40 C 5 The relative humidity is from 10 to 90 6 The specifications of current accuracy are tested after the input is applied for 30 seconds 7 The typical temperature coefficient is 100ppm This equipment is not intended for performing measuremen...

Page 19: ... CC CP modes Range 2 1 414 5 0 Programmable 1 414 5 0 Programmable 1 414 5 0 Programmable Accuracy 0 5 Irms 1 F S 0 5 Irms 1 F S 0 5 Irms 1 F S Resolution 0 005 0 005 0 005 Power Factor Range 0 1 lead or lag Programmable 0 1 lead or lag Programmable 0 1 lead or lag Programmable Accuracy 1 F S 1 F S 1 F S Resolution 0 001 0 001 0 001 Rectified Load Mode Operating Frequency 45Hz 70Hz RLC mode Parame...

Page 20: ...grammable Accuracy 0 3 0 3 F S 0 3 0 3 F S 0 3 0 3 F S Resolution 0 01V 0 01V 0 01V Measurement Section DVM Range 350Vrms 500 Vpeak 350Vrms 500 Vpeak 350Vrms 500 Vpeak DVM Accuracy 0 1 0 1 F S 0 1 0 1 F S 0 1 0 1 F S DVM Resolution 10 mV 10 mV 10 mV DAM Range 18Arms 80 Apeak 36Arms 160 00 Apeak 36Arms 200 00 Apeak DAM Accuracy 70Hz 0 1 0 2 F S 0 1 0 2 F S 0 1 0 2 F S DAM Accuracy 70Hz 1 0 1 1 CF2 ...

Page 21: ...out notice Note 1 Additional Spec 0 1 CF2 kHz 2 The load value of CF is related to characteristic frequency and output impedance of UUT When frequency is 440Hz the load value of CF and the accuracy of the measurement value above 4 3 will over the specification 3 CF 0 5 Irms 1 F S 4 S Siemens indicates conductance that is the inverse of resistance 1 5 Names of Parts 1 5 1 The Front Panel The front ...

Page 22: ...key to recall the saved setting from EEPROM that default of CC CR CV CP and PROG files 1 to 10 4 Pressing the SAVE key to save all of the present mode settings in the specified files The save program is from 1 to 10 Saving DEFAULT is to save the status for the next time the Electronic Load is turned on All saved settings are stored in EEPROM and will not be lost when ac power is cycled 5 The CONF ...

Page 23: ...pically the power factor setting 3 It enables the lock function of rotary or keypad by pressing the LOCK key 4 To clear the digits entered from keypad This CLEAR key lets you correct wrong digits before they are entered 5 It executes the entered value or the parameter for the command accessed presently The parameters you have entered with other keys are displayed but not entered into the Load unti...

Page 24: ...IB bus is connected to the AC load through this connector for remote operation 10 RS 232C connector The 9 pin D type female connector transfers control commands to and from the remote PC for remote operation 11 Voltage monitor output Analog output proportional to voltage waveform 12 Current monitor output Analog output proportional to current waveform 13 Load terminal Voltage sense terminal Load t...

Page 25: ...hin the temperature range from 0 to 40ºC However you must install the Electric Load in an area that has enough space around the unit for adequate air flowing through and escaping from the back 2 3 1 Preparation for Use In the beginning the instrument must be connected with an appropriate AC line input Then since fans intelligently cool it it must be installed in sufficient space for circulation of...

Page 26: ...rd is connected to the AC input socket The power supplies a chassis ground through a third connector Be sure that your outlet is of three conductor type with the correct pin connected to ground Turn on the Load by the power switch on the front panel and observe the display Immediately after turning on the Electronic Load executes a self test and checks the GPIB interface board and identify the inf...

Page 27: ...nnected to the Electronic Load Because the input source is rectified with the single phase diode bridge circuit the load terminals do not have to be identified the input polar direction The major considerations in making input connections are the current wire size length and the voltage sense cables The minimum current wire size required to avoid overheating may not be enough to maintain good regu...

Page 28: ......

Page 29: ...d modes and Rectified load modes If the application requires a greater power or current capacity than one load can provide you need to connect the loads in parallel The AC load can be configured to operate in local or remote mode The operation in remote mode through a remote GPIB controller or RS 232C will be described in Chapter 5 In this section the operation in local mode through the keypad on ...

Page 30: ...CTION keypad In DC load simulation you can select the mode by pressing CC CR CP CV or RLC DC RECT keys under the FUNCTION keypad The parameters in current resistance power or rectified load mode can be programmed easily when the mode is selected All data set in any mode will be rescaled to fit the resolution of current voltage levels power value crest factor CF or power factor PF In local mode any...

Page 31: ...en setting the load level the resolution of current voltage power resistance and slew rate will be different from the entered values The displayed value will remain as the one entered But the output will be the actual value D A programmed in the load These parameters except resistance will be degraded to low values when entered CC CR CP CV CURSOR EDIT RECALL SAVE CONF LOCAL RLC DC RECT PROG SHORT ...

Page 32: ...ate in AC mode as well as DC mode In item 2 if the hold is chosen short function will stop when the user releases the SHORT key In item 3 if the keypad is chosen the keypad will be locked when the user presses the LOCK key The keypad will recover when the LOCK key is pressed again So do the other two choices In item 4 if the user chooses the OFF the buzzer will become invalid In item 5 the user ca...

Page 33: ...e who wants to enter into the calibration has to input the password for protecting the calibrated values are changed arbitrarily The unit had been calibrated before exiting factory so that users do not need to calibrate during operation Calibration function is only for Chroma s calibration department users do not process it P A S S W O R D _ _ _ _ _ 4 DISPLAY SELECTION In this display selection th...

Page 34: ...ault settings for all parameters F A C T O R Y D E F A U L T R E C A L L D E F A U L T N O 6 MODEL INFORMATION In this item the user can view some information of F W version S N model and specification M O D E L I N F O R M A T I O N H O S T F W 1 4 1 D S P F W 1 4 1 M O D E L 6 3 8 0 4 3 4 2 External ON OFF 63800 can control Load ON OFF status through TTL signal LOAD ON OFF key is invalid when Ex...

Page 35: ...ance value CP mode lower the power value By CURSOR EDIT In LOAD ON press the mode key CC CR or CP to make the display show numeric values for the setting Press CURSOR EDIT to see the cursor blinking on the display Press keys to move the cursor to the digit you want to edit Change the value by rotary knob Press the CURSOR EDIT key again to disable the cursor 3 4 5 Load ON OFF Load ON After setting ...

Page 36: ...because the estimated algorithm is established on that the input voltage waveform and the sunk current waveform are sinusoidal or modified sinusoidal waveforms The maximum power factor of a determinate crest factor occurs at the maximum overlap of input voltage waveform and sunk current waveform That is the peaks value of the voltage and current are at the same time The minimum power factor occurs...

Page 37: ...e outside of the range as in Figure 3 6 and Table 3 1 63800 Electronic Load will modify users settings to a reasonable range automatically Example 1 when the priority is CF and the output voltage of UUT is 200Vrms a If users set CF 1 5 and PF 1 however the allowable PF value with CF 1 5 is from 0 977 to 0 993 The system will use a loading with a PF value close to the allowable PF value in this cas...

Page 38: ... and CF 1 5 however the allowable CF value reasonable range under PF 0 5 is from 2 157 to 3 552 The system will use a loading with a CF value close to the allowable CF value in this case a CF value of 2 157 will be used 3 4 7 Ip max Setting and Automatic Bandwidth Adjustment ABA Mode Ip max has to be set for all modes and it has two functions the 63800 Electronic Load uses the value Ip max set as ...

Page 39: ...refore it is recommended to set Ip max value according to the maximum load current of the UUT When the ABA Mode is Disable the Ip max only need to be set once It is very dangerous for beginner to use this mode The ABA Disable Mode is an advanced mode for users that are familiar with the Chroma AC Load If ABA is set to Disable 63800 series may be damaged in the application While operating the ABA s...

Page 40: ...R T O F F T O G G L E H O L D 1 3 L O C K M O D E R O T A R Y K E Y P A D A L L 1 4 S O U N D O N O F F 1 5 C F P F S E T T I N G B O T H C F P F 1 6 T I M I N G M O D E O F F H O L D U P T R A N S F E R 1 7 E X T E R N A L O F F O N 1 8 A B A M O D E E N A B L E D I S A B L E 5 Press CC CR CP or RLC DC RECT to back to the mode that user want to use 6 Press LOCK to lock the item you select in step...

Page 41: ...ocal control AC mode and DC mode can be chosen in the 63800 series Press CONF LOCAL and select the first item SETUP to choose one In AC mode the load values PF and CF are common to CC and CP modes CR and RLC mode only set determinate values It is necessary to set UUT s output maximum current value Ip max in all modes The value Ip max is for 63800 to test UUT s output impedance for getting system o...

Page 42: ...D 1 3 L O C K M O D E R O T A R Y K E Y P A D A L L 1 4 S O U N D O N O F F 1 5 C F P F S E T T I N G B O T H C F P F 1 6 T I M I N G M O D E O F F H O L D U P T R A N S F E R 1 7 E X T E R N A L O F F O N 1 8 A B A M O D E E N A B L E D I S A B L E 5 Then press CC CR CP or RLC DC RECT to enter the CC CR CP or Rectified mode There are two kinds of AC mode Constant Load modes and Rectified Load Mod...

Page 43: ... waveform of the input voltage is a square wave a special setting is prepared in RLC DC RECT See Section 3 9 CF PF parameters have CF ONLY PF ONLY and BOTH these three types in CC mode If CF only is set the PF should remain at the CF maximum and cannot be changed If PF only is set the CF should remain at the PF minimum and cannot be changed If BOTH is set it is necessary to set priority When CF is...

Page 44: ...4 Press the direction key or rotate the rotary knob to choose BOTH then press ENTER 1 1 M O D E S E L E C T A C D C S E T U P 1 2 S H O R T O F F T O G G L E H O L D 1 3 L O C K M O D E R O T A R Y K E Y P A D A L L 1 4 S O U N D O N O F F 1 5 C F P F S E T T I N G B O T H C F P F 1 6 T I M I N G M O D E O F F H O L D U P T R A N S F E R 1 7 E X T E R N A L O F F O N 1 8 A B A M O D E E N A B L E ...

Page 45: ...ion of maximum and minimum Contrarily when PRIORITY PF CF also has the limitation of maximum and minimum More detailed information please refers section 3 4 6 I s e t 0 5 0 0 C F 1 4 1 4 P F 1 0 0 0 I p m a x 1 0 0 U N I T A V 0 0 0 P 0 0 0 I 0 0 0 S 0 0 0 A C P R I O R I T Y C F The procedures of setting Iset 5 000 CF 1 5 PF 0 800 and Ip max 20 0 are described as below 1 Move the cursor by pressi...

Page 46: ...0 8 0 0 I p m a x 1 0 0 U N I T A 7 Move the cursor by pressing to the command line of Ip max I s e t 5 0 0 0 C F 1 5 0 0 P F 0 8 0 0 I p m a x 1 0 0 U N I T A 8 Press 2 0 then press ENTER to change the value to 20 0 I s e t 5 0 0 0 C F 1 5 0 0 P F 0 8 0 0 I p m a x 2 0 0 U N I T A 9 After setting the parameter of the load the LOAD ON OFF key should be pressed to turn on the load so that the load ...

Page 47: ... F 1 4 1 4 I p m a x 1 0 0 U N I T A V 0 0 0 P 0 0 0 I 0 0 0 S 0 0 0 A C C F O N L Y The procedures of setting Iset 5 100 CF 1 51 and Ip max 20 2 are described as below 1 Move the cursor to the command line of Iset I s e t 0 5 0 0 C F 1 4 1 4 I p m a x 1 0 0 I p m a x 1 0 0 U N I T A 2 Press 5 1 then press ENTER to change the value to 5 100 I s e t 5 1 0 0 C F 1 4 1 4 I p m a x 1 0 0 I p m a x 1 0...

Page 48: ...re of inputting value press CLEAR to clear at any time and then input again 3 6 3 PF Only For switching PF only mode the procedures are as below 1 Press CONF LOCAL key 2 Press 1 then press ENTER to enter SETUP The display please refer 3 6 1 BOTH mode 3 Move the direction key to 1 5 CF PF SETTING 4 Press the direction key or rotate the rotary knob to choose PF The display please refers 3 6 1 BOTH m...

Page 49: ...0 0 U N I T A 4 Press 0 8 8 then press ENTER to change the value to 0 880 I s e t 5 2 0 0 P F 0 8 8 0 I p m a x 1 0 0 U N I T A 5 Move the cursor by pressing to the command line of Ip max I s e t 5 2 0 0 P F 0 8 8 0 I p m a x 1 0 0 U N I T A 6 Press 2 0 3 then press ENTER to change the value to 20 3 I s e t 5 2 0 0 P F 0 8 8 0 I p m a x 2 0 3 U N I T A 7 After setting the parameter of the load the...

Page 50: ...ffect on the programmed resistance value is not linear over the resistance range because resistance is the reciprocal of conductance The electronic load is designed for high current applications of CR mode Therefore when large resistance is required accuracy can be improved by reading the voltage and current from the load calculating the actual resistance and adjusting the set value To calculate t...

Page 51: ...t R s e t 5 0 0 I r m s m a x 5 0 0 U N I T Ω A 2 Press 1 0 5 then press ENTER to change the value to 10 50 R s e t 1 0 5 0 I r m s m a x 5 0 0 U N I T Ω A 3 Move the cursor by pressing to the command line of Irms max R s e t 1 0 5 0 I r m s m a x 5 0 0 U N I T Ω A 4 Press 2 0 then press ENTER to change the value to 20 0 R s e t 1 0 5 0 I r m s m a x 2 0 0 U N I T Ω A 5 After setting the parameter...

Page 52: ...refers section 3 6 2 and 3 6 3 CP mode can be set by pressing CP key Users can press the arrow key to select the setting parameters on the LCD display including current Power value CF PF and Ip max If the voltage is drawn to 0V under CP mode it will trigger the warning of Load Fail LDF Meanwhile the loading for the load will be stopped When LDF warning is triggered then press power switch to resta...

Page 53: ... I N G M O D E O F F H O L D U P T R A N S F E R 1 7 E X T E R N A L O F F O N 1 8 A B A M O D E E N A B L E D I S A B L E 5 After pressing ENTER meanwhile a window will be popped up to request users to key in the priorities of CF and PF 6 Press the direction key or rotate the rotary knob to choose the priority you want then press ENTER If ENTER is not pressed a window will not be popped up thus t...

Page 54: ...edures of setting Pset 2200 0 CF 2 000 PF 0 780 and Ip max 25 0 are described as below 1 Move the cursor to the command line of Pset P s e t 4 5 0 0 0 C F 1 4 1 4 P F 1 0 0 0 I p m a x 3 0 0 U N I T W A 2 Press 2 2 0 0 then press ENTER to change the value to 2200 0 P s e t 2 2 0 0 0 C F 1 4 1 4 P F 1 0 0 0 I p m a x 3 0 0 U N I T W A 3 Move the cursor by pressing to the command line of CF P s e t ...

Page 55: ...hat the load can sink the current For the detailed information please refer section 3 4 5 If there is error during the procedure of inputting value press CLEAR to clear the value at any time and then input again 3 8 2 CF Only For switching to CF only mode the procedures are as below 1 Press CONF LOCAL key 2 Press 1 then press ENTER to enter SETUP The display please refer 3 8 1 BOTH mode 3 Move the...

Page 56: ...splay please refer 3 8 1 BOTH mode 3 Move the direction key to 1 5 CF PF SETTING 4 Press the direction key or rotate the rotary knob to choose PF The display please refer 3 8 1 BOTH mode 5 Then press CP to enter the PF only mode Users can press the arrow key to select the setting parameters on the LCD display including current RMS value PF and Ip max Users can type the values of current PF and Ip ...

Page 57: ...d load 3 9 1 RLC Mode For switching RLC mode the procedures are as below 1 Press RLC DC RECT key to go into the Rectified Load Mode 2 Press 1 then press ENTER to enter RLC mode R E C T I F I E D L O A D Rs Ls RL C C H O O S E 1 1 R L C M O D E 2 C P M O D E 3 I N R U S H C U R R E N T Users are able to set the equivalent series resistance Rs equivalent series inductance Ls equivalent parallel load...

Page 58: ...F A 2 Press 0 2 then press ENTER to change the value to 0 20 R s 0 2 0 L s 2 0 0 C 2 0 0 0 R L 5 0 0 0 0 0 I p m a x 1 0 0 U N I T Ω u H u F A 3 Move the cursor by pressing to the command line of Ls R s 0 2 0 L s 2 0 0 C 2 0 0 0 R L 5 0 0 0 0 0 I p m a x 1 0 0 U N I T Ω u H u F A 4 Press 1 0 0 then press ENTER to change the value to 100 R s 0 2 0 L s 1 0 0 C 2 0 0 0 R L 5 0 0 0 0 0 I p m a x 1 0 0...

Page 59: ... L 4 5 0 0 0 0 I p m a x 3 0 0 U N I T Ω u H u F A 11 After setting the parameter of the load the LOAD ON OFF key should be pressed to turn on the load so that the load can sink the current For more detailed information please refer section 3 4 5 If there is error during the procedure of inputting value press CLEAR to clear the value at any time and then input again 3 9 2 CP Mode The appropriate p...

Page 60: ...N I T W A V 0 0 0 P 0 0 0 I 0 0 0 S 0 0 0 A C C P The input ranges of Pset and PF are 200W to 3375W and 0 4 to 0 75 in CP mode 63800 calculates a group of Rs Ls C and RL for loading by Pset PF values and UUT s impedance which set by users Users can press and to view the values of Rs Ls C and RL as below P s e t 1 0 0 0 0 P F 0 6 0 0 I p m a x 2 0 0 U N I T W A I p 0 0 0 T H D 0 0 0 I p 0 0 0 R s 0...

Page 61: ... Press 3 0 then press ENTER to change the value to 30 0 P s e t 5 0 0 0 P F 0 7 0 0 I p m a x 3 0 0 U N I T W A 7 After setting the parameter of the load the LOAD ON OFF key should be pressed to turn on the load so that the load can sink the current For the detailed information please refer section 3 4 5 If there is error during the procedure of inputting value press CLEAR to clear the value at an...

Page 62: ...oad network parameter Rs Ls C RL and use DSP to control the initial loading position It can simulate the input angle during maximum inrush current output Ip max is the parameter needed to be set as well for the subsequent loading For the detailed information please refer section 3 4 7 For switching to Inrush Current mode the procedures are as below 1 Press RLC DC RECT key to go into the Rectified ...

Page 63: ...ER to change the value to 0 02 R s 0 0 2 L s 2 0 0 C 2 0 0 0 R L 5 0 0 0 0 0 P H A S E 9 0 I p m a x 1 0 U N I T Ω u H u F A 3 Move the cursor by pressing to the command line of Ls R s 0 0 2 L s 2 0 0 C 2 0 0 0 R L 5 0 0 0 0 0 P H A S E 9 0 I p m a x 1 0 U N I T Ω u H u F A 4 Press 1 1 0 then press ENTER to change the value to 110 R s 0 0 2 L s 1 1 0 C 2 0 0 0 R L 5 0 0 0 0 0 P H A S E 9 0 I p m a...

Page 64: ... x 1 0 U N I T Ω u H u F A 10 Press 1 8 0 then press ENTER to change the value to 180 R s 0 0 2 L s 1 1 0 C 2 3 0 0 R L 3 6 0 0 0 0 P H A S E 1 8 0 I p m a x 1 0 U N I T Ω u H u F A 11 Move the cursor by pressing to the command line of Ip max R s 0 0 2 L s 1 1 0 C 2 3 0 0 R L 3 6 0 0 0 0 P H A S E 1 8 0 I p m a x 1 0 U N I T Ω u H u F A 12 Press 3 0 then press ENTER to change the value to 30 0 R s...

Page 65: ...measuring transfer time This function is mainly to measure the UPS s transfer time from Main power to Battery mode However the transfer time can only be used in CR mode under AC mode For switching to Timing mode its setting methods are as follows 1 Press CONF LOCAL key 2 Press 1 then press ENTER to enter SETUP C O N F C H O O S E 1 1 S E T U P 2 R E M O T E 3 C A L I B R A T I O N 4 D I S P L A Y ...

Page 66: ...M O D E E N A B L E D I S A B L E 5 Press CC CR or CP key to back to main page of timing mode Example CR mode under Timing mode R s e t 2 5 0 0 0 I r m s m a x 5 0 0 T I M E O U T 0 0 0 1 0 0 C U T O F F V 5 0 0 0 0 V 0 0 0 T 0 0 0 0 0 0 0 0 0 m s H O L D U P A C 3 10 1 CC Mode Once under timing mode if users want to switch to CC mode of timing mode press CC key then to enter There are three sub m...

Page 67: ... D E H O L D U P T R A N S F E R O F F 1 7 E X T E R N A L O F F O N 1 8 A B A M O D E E N A B L E D I S A B L E 5 After pressing ENTER meanwhile a window will be popped up to request users to key in CF and PF priorities 6 Press the direction key or rotate the rotary knob to choose the priority you want then press ENTER If ENTER is not pressed a window will not be popped up thus the priority is th...

Page 68: ...00 20 00 and CUTOFF V 110 are described as below 1 Move the cursor to the command line of Iset I s e t 2 5 0 0 0 C F 1 4 1 4 P F 1 0 0 0 I p m a x 5 0 0 T I M E O U T 0 0 0 1 0 0 C U T O F F V 5 0 0 0 0 2 Press 1 8 then press ENTER to change the value to 18 000 I s e t 1 8 0 0 0 C F 1 4 1 4 P F 1 0 0 0 I p m a x 5 0 0 T I M E O U T 0 0 0 1 0 0 C U T O F F V 5 0 0 0 0 3 Move the direction by pressi...

Page 69: ...0 then press ENTER to change the value to 20 0 I s e t 1 8 0 0 0 C F 1 5 0 0 P F 0 8 0 0 I p m a x 2 0 0 T I M E O U T 0 0 0 1 0 0 C U T O F F V 5 0 0 0 0 9 Move the cursor by pressing to the command line of TIME OUT I s e t 1 8 0 0 0 C F 1 5 0 0 P F 0 8 0 0 I p m a x 2 0 0 T I M E O U T 0 0 0 1 0 0 C U T O F F V 5 0 0 0 0 10 Move the cursor by pressing to the command line of TIME OUT 00 01 00 I s...

Page 70: ... 0 0 15 After setting the parameter of the load the LOAD ON OFF key should be pressed to turn on the load so that the load can sink the current For detailed information please refer section 3 4 5 If there is error during the procedure of inputting value press CLEAR to clear the value at any time and then input again For switching to CF only mode the procedures are as follows 1 Press CONF LOCAL key...

Page 71: ... setting parameters on the LCD display including current RMS value PF Ip max Timeout and Cutoff voltage Users can type the values with the Entry keys I s e t 2 5 0 0 0 P F 1 0 0 0 I p m a x 5 0 0 T I M E O U T 0 0 0 1 0 0 V 0 0 0 C U T O F F V 5 0 0 0 0 T 0 0 0 0 0 0 0 0 0 m s H O L D U P A C P F O N L Y 3 10 2 CR Mode Once under timing mode if users want to switch to CR mode of timing mode press ...

Page 72: ...0 0 0 2 Press 1 5 then press ENTER to change the value to 15 000 R s e t 1 5 0 0 0 I r m s m a x 5 0 0 T I M E O U T 0 0 0 0 0 0 C U T O F F V 5 0 0 0 0 3 Move the cursor by pressing to the command line of Irms max R s e t 1 5 0 0 0 I r m s m a x 5 0 0 T I M E O U T 0 0 0 0 0 0 C U T O F F V 5 0 0 0 0 4 Press 2 5 then press ENTER to change the value to 25 0 R s e t 1 5 0 0 0 I r m s m a x 2 5 0 T ...

Page 73: ...ion 3 4 5 If there is error during the procedures of inputting value press CLEAR to clear the value at any time and then input again 3 10 3 CP Mode Once under timing mode if users want to switch to CP mode of timing mode press CP key then to enter There are also have CF ONLY PF ONLY and BOTH under CP mode for selection Its operation methods are the same as CC mode about the setting method please r...

Page 74: ...seen is shown as below Users can press the arrow key to select the setting parameters on the LCD display including equivalent series resistance Rs equivalent series inductance Ls equivalent parallel load capacitance C equivalent parallel load resistance RL Ip max Time out and Cut off voltage Users can type the values with the Entry keys R s 1 1 0 0 L s 2 0 0 C 2 0 0 0 R L 5 0 0 0 I p m a x 5 0 0 T...

Page 75: ...w 1 Move the cursor to the command line of Pset P s e t 1 0 0 0 0 P F 1 0 0 0 I p m a x 5 0 0 T I M E O U T 0 0 0 0 0 0 C U T O F F V 5 0 0 0 0 2 Press 3 5 0 then press ENTER to change the value to 350 00 P s e t 3 5 0 0 0 P F 1 0 0 0 I p m a x 5 0 0 T I M E O U T 0 0 0 0 0 0 C U T O F F V 5 0 0 0 0 3 Move the cursor by pressing to the command line of PF P s e t 3 5 0 0 0 P F 1 0 0 0 I p m a x 5 0...

Page 76: ...V 5 0 0 0 0 10 Press 2 1 then press ENTER to change the value to 21 000 P s e t 3 5 0 0 0 P F 0 8 0 0 I p m a x 3 5 0 T I M E O U T 0 0 0 0 2 0 C U T O F F V 2 1 0 0 0 11 After setting the parameter of the load the LOAD ON OFF key should be pressed to turn on the load so that the load can sink the current The detailed information please refer section 3 4 5 If there is error during the procedures o...

Page 77: ... N F O R M A T I O N 7 P A R A L L E L M O D E 3 Move the cursor to 1 6 TIMING MODE 4 Press the direction key or rotate the rotary knob to choose TRANSFER then press ENTER 1 1 M O D E S E L E C T A C D C S E T U P 1 2 S H O R T O F F T O G G L E H O L D 1 3 L O C K M O D E R O T A R Y K E Y P A D A L L 1 4 S O U N D O N O F F 1 5 C F P F S E T T I N G B O T H C F P F 1 6 T I M I N G M O D E T R A ...

Page 78: ... 0 0 I r m s m a x 5 0 0 U N I T Ω A 2 Press 3 3 then press ENTER to change the value to 33 00 R s e t 3 3 0 0 I r m s m a x 5 0 0 U N I T Ω A 3 Move the cursor by pressing to the command line of Irms max R s e t 3 3 0 0 I r m s m a x 5 0 0 U N I T Ω A 4 Press 2 2 then press ENTER to change the value to 22 0 R s e t 3 3 0 0 I r m s m a x 2 2 0 U N I T Ω A 5 After setting the parameter of the load ...

Page 79: ...ON keypad The parameters in current resistance voltage power or rectified mode can be programmed easily when the mode is selected All data set in CC CR CP CV Rectified mode will be rescaled to fit the resolution of current voltage levels or slew rate In local mode any value can be set to the Load from the keypad There are no upper and lower limits that would cause an error The Load automatically s...

Page 80: ...ress ENTER 1 1 M O D E S E L E C T D C A C S E T U P 1 2 S H O R T O F F T O G G L E H O L D 1 3 L O C K M O D E R O T A R Y K E Y P A D A L L 1 4 S O U N D O N O F F 1 5 C F P F S E T T I N G B O T H C F P F 1 6 T I M I N G M O D E O F F H O L D U P T R A N S F E R 1 7 E X T E R N A L O F F O N 1 8 A B A M O D E E N A B L E D I S A B L E 5 Then press CC CR CP CV or RLC DC RECT to back to main pag...

Page 81: ...h are rise rate and fall rate The CC mode can be set by CC key in the front panel users can press the arrow key to select the setting parameters on the LCD display including current RMS value slew rate rise fall A ms and Ip max Users can type the values with the Entry keys I s e t 1 0 0 A 1 0 0 A m s 1 0 0 A m s I p m a x 1 0 0 0 A V 0 0 0 P 0 0 0 I 0 0 0 D C The procedures of setting Iset 18 0 Ri...

Page 82: ... 1 0 0 0 A 6 Press 1 1 5 then press ENTER to change the value to 115 I s e t 1 8 0 A 1 1 5 A m s 1 1 5 A m s I p m a x 1 0 0 0 A 7 Move the cursor by pressing to the command line of Ip max I s e t 1 8 0 A 1 1 5 A m s 1 1 5 A m s I p m a x 1 0 0 0 A 8 Press 2 0 then press ENTER to change the value to 20 0 I s e t 1 8 0 A 1 1 5 A m s 1 1 5 A m s I p m a x 2 0 0 A 9 After setting the parameter of the...

Page 83: ...ermines the rate at which the current input of changes to a newly programmed value There are two slew rate values which are rise rate and fall rate The CR mode can be set by CR key in the front panel users can press the arrow key to select the setting parameters on the LCD display including resistor value slew rate rise fall A ms and Ip max Users can type the values with the Entry keys R s e t 4 0...

Page 84: ... p m a x 1 0 0 0 A 5 Move the cursor by pressing to the command line of R s e t 3 0 0 A 1 0 5 A m s 1 0 0 A m s I p m a x 1 0 0 0 A 6 Press 1 0 5 then press ENTER to change the value to 105 R s e t 3 0 0 A 1 0 5 A m s 1 0 5 A m s I p m a x 1 0 0 0 A 7 Move the cursor by pressing to the command line of Ip max R s e t 3 0 0 A 1 0 5 A m s 1 0 5 A m s I p m a x 1 0 0 0 8 Press 2 5 then press ENTER to ...

Page 85: ...ng to programmed value User can set the Vset and Imax value in this mode CV mode can be entered by pressing the CV key Enter the voltage and current values with the keypad V s e t 1 0 0 0 0 V I m a x 4 5 0 0 A V 0 0 0 P 0 0 0 I 0 0 0 D C The procedures of setting Vset 50 00 and Imax 21 00 are described as below 1 Move the cursor to the command line of Vset V s e t 1 0 0 0 0 V I m a x 4 5 0 0 A 2 P...

Page 86: ... 5 1 If there is error during the procedures of inputting value press CLEAR to clear the value at any time and then input again 2 DC_CV mode limits are used in UUTs with current source output form The limits are listed as the following i Instrument F W version 1 53Beta included above is need ii DC mode ABA is set to ENABLE iii The operating minimum load current needs to be larger 2A iv The UUT s o...

Page 87: ...maximum power on the panel the warning of loading power can not be higher The CR mode can be set by CP key in the front panel users can press the arrow key to select the setting parameters on the LCD display including power and Ip max Users can type the values with the Entry keys P s e t 2 5 0 0 0 0 W I p m a x 1 0 0 0 0 A V 0 0 0 P 0 0 0 I 0 0 0 D C The procedures of setting Pset 1550 00 and Ip m...

Page 88: ...tified Load Mode The general DC input AC output products such as DC to AC inverter its input current is not always DC However the load current is often similar to the current loaded by rectified load thus this mode is designed to simulate a period of load current under CC mode Press RLC DC RECT key to go into the DC Rectified mode users can set the Iset CF and select the LINE SYNC to be the refere...

Page 89: ... of the power line is loading Vsource UUT This load frequency is two times of power line frequency please refer Figure 3 15 For example power line frequency is 60Hz thus the load frequency of the current is 120Hz Positive Using the power line frequency as the reference frequency for the load current for the Positive setting the positive half period of the power line is loading Vsource UUT This loa...

Page 90: ... D 3 16 1 Crest Factor in Rectified Mode Explanation The load current in rectified mode are shown in Figure 3 15 Figure 3 16 and Figure 3 17 it s a rectified sine wave therefore the CF value needs to be set 3 17 DC Load Simulation Timing Mode Timing Mode can be executed CC CR CP CV and Rectified mode under the DC mode The timer starts after Load ON There are three different conditions for the time...

Page 91: ... S E T U P 1 2 S H O R T O F F T O G G L E H O L D 1 3 L O C K M O D E R O T A R Y K E Y P A D A L L 1 4 S O U N D O N O F F 1 5 C F P F S E T T I N G B O T H C F P F 1 6 T I M I N G M O D E H O L D U P O F F T R A N S F E R 1 7 E X T E R N A L O F F O N 1 8 A B A M O D E E N A B L E D I S A B L E 5 Press CC CR CV CP or RLC DC RECT key to return to the main page of timing mode Example CC mode unde...

Page 92: ... 0 Timeout 24 00 00 and Cutoff V 30 are described as below 1 Move the cursor to the command line of Iset I s e t 1 0 0 A 1 0 0 A m s 1 0 0 A m s I p m a x 1 0 0 0 A T I M E O U T 0 0 0 0 0 0 C U T O F F V 5 0 0 0 0 2 Press 1 8 then press ENTER to change the value to 18 0 I s e t 1 8 0 A 1 0 0 A m s 1 0 0 A m s I p m a x 1 0 0 0 A T I M E O U T 0 0 0 0 0 0 C U T O F F V 5 0 0 0 0 3 Move the cursor ...

Page 93: ... value to 20 0 I s e t 1 8 0 A 1 1 5 A m s 1 1 5 A m s I p m a x 2 0 0 A T I M E O U T 0 0 0 0 0 0 C U T O F F V 5 0 0 0 0 9 Move the cursor by pressing to the command line of TIMEOUT 00 00 00 I s e t 1 8 0 A 1 1 5 A m s 1 0 0 A m s I p m a x 2 0 0 A T I M E O U T 0 0 0 0 0 0 C U T O F F V 5 0 0 0 0 10 Move the cursor by pressing to the command line of TIMEOUT 00 00 00 I s e t 1 8 0 A 1 1 5 A m s ...

Page 94: ...res of inputting value press CLEAR to clear the value at any time and then input again 3 17 2 CR Mode Under timing mode to enter CR timing mode press the CR key In this mode the loading resistance Rset rise and fall slew rate maximum current value Ip max as well as the timeout time and cutoff voltage of the UUT can be set R s e t 1 0 0 0 0 Ω 1 0 0 A m s 1 0 0 A m s I p m a x 5 0 0 A T I M E O U T ...

Page 95: ... s 1 0 0 A m s I p m a x 5 0 0 A T I M E O U T 0 0 0 0 0 0 C U T O F F V 5 0 0 0 0 5 Move the cursor by pressing to the command line of R s e t 2 7 5 Ω 1 6 0 A m s 1 0 0 A m s I p m a x 5 0 0 A T I M E O U T 0 0 0 0 0 0 C U T O F F V 5 0 0 0 0 6 Press 1 6 0 then press ENTER to change the value to 160 R s e t 2 7 5 Ω 1 6 0 A m s 1 6 0 A m s I p m a x 5 0 0 A T I M E O U T 0 0 0 0 0 0 C U T O F F V ...

Page 96: ...e the value to 00 15 00 R s e t 2 7 5 Ω 1 6 0 A m s 1 6 0 A m s I p m a x 2 5 0 A T I M E O U T 0 0 1 5 0 0 C U T O F F V 5 0 0 0 0 12 Move the cursor by pressing to the command line of CUTOFF V R s e t 2 7 5 Ω 1 6 0 A m s 1 6 0 A m s I p m a x 2 5 0 A T I M E O U T 0 0 1 5 0 0 C U T O F F V 5 0 0 0 0 13 Press 1 0 5 then press ENTER to change the value to 10 500 R s e t 2 7 5 Ω 1 6 0 A m s 1 6 0 A...

Page 97: ...ibed as below 1 Move the cursor to the command line of Pset P s e t 1 0 0 0 0 W I p m a x 5 0 0 A T I M E O U T 0 0 0 0 0 0 C U T O F F V 5 0 0 0 0 2 Press 3 0 0 then press ENTER to change the value to 300 00 P s e t 3 0 0 0 0 W I p m a x 5 0 0 A T I M E O U T 0 0 0 0 0 0 C U T O F F V 5 0 0 0 0 3 Move the cursor by pressing to the command line of Ip max P s e t 3 0 0 0 0 W I p m a x 5 0 0 A T I M...

Page 98: ... T 0 0 1 0 0 0 C U T O F F V 5 0 0 0 0 9 Press 1 5 then press ENTER to change the value to 00 10 15 P s e t 3 0 0 0 0 W I p m a x 1 6 0 A T I M E O U T 0 0 1 0 1 5 C U T O F F V 5 0 0 0 0 10 Move the cursor by pressing to the command line of CUTOFF V P s e t 3 0 0 0 0 W I p m a x 1 6 0 A T I M E O U T 0 0 1 0 1 5 C U T O F F V 5 0 0 0 0 11 Press 9 5 then press ENTER to change the value to 9 500 P ...

Page 99: ...ibed as below 1 Move the cursor to the command line of Vset V s e t 2 0 0 0 0 V I p m a x 5 0 0 A T I M E O U T 0 0 0 0 0 0 C U T O F F V 5 0 0 0 0 2 Press 2 0 0 then press ENTER to change the value to 200 00 V s e t 2 0 0 0 0 V I p m a x 5 0 0 A T I M E O U T 0 0 0 0 0 0 C U T O F F V 5 0 0 0 0 3 Move the cursor by pressing to the command line of Ip max V s e t 2 0 0 0 0 V I p m a x 5 0 0 A T I M...

Page 100: ... OFF key should be pressed to turn on the load so that the load can sink the current The detailed information please refer section 3 4 5 If there is error during the procedures of inputting value press CLEAR to clear the value at any time and then input again 3 17 5 Rectified Mode Under timing mode to enter DC rectified timing mode press the RLC DC RECT key In this mode the loading power Iset the ...

Page 101: ...mand line of CF I s e t 1 5 0 0 C F 1 4 1 4 L I N E S Y N C N O F 1 2 0 I p m a x 5 0 0 T I M E O U T 0 0 0 0 0 0 C U T O F F V 5 0 0 0 0 4 Press 2 then press ENTER to change the value to 2 000 I s e t 1 5 0 0 C F 2 0 0 0 L I N E S Y N C N O F 1 2 0 I p m a x 5 0 0 T I M E O U T 0 0 0 0 0 0 C U T O F F V 5 0 0 0 0 5 Move the cursor by pressing to the command line of LINE SYNC I s e t 1 5 0 0 C F 2...

Page 102: ...F F V 5 0 0 0 0 10 Press 3 9 then press ENTER to change the value to 39 0 I s e t 1 5 0 0 C F 2 0 0 0 L I N E S Y N C N O F 5 0 I p m a x 3 9 0 T I M E O U T 0 0 0 0 0 0 C U T O F F V 5 0 0 0 0 11 Move the cursor by pressing to the command line of TIMEOUT 00 00 00 I s e t 1 5 0 0 C F 2 0 0 0 L I N E S Y N C N O F 5 0 I p m a x 3 9 0 T I M E O U T 0 0 0 0 0 0 C U T O F F V 5 0 0 0 0 12 Press 5 then...

Page 103: ... the output voltage of UUT via oscilloscope with BNC connectors These are useful tools when user wants to monitor the voltage and current waveform via scope Both of the monitoring signals are isolated from the hazardous voltage The corresponding relation between voltage and current on the oscilloscope is as below Voltage 500V 10V for 63802 63803 and 63804 Current 80A 10V for 63802 200A 10V for 638...

Page 104: ...lease and the input is shorted The LED beside this key will be activated Press the SHORT key again and the function will be terminated Then the load will be under last situation before pressing SHORT key Under HOLD mode press SHORT key and the input is shorted The LED beside this key will be activated After release the SHORT keypad and the function will be terminated Then the load will be under la...

Page 105: ...g factory defaults file 0 will return to the default settings Example 1 SAVE Under CC mode 1 Press SAVE key then pop up a window 2 Press 0 then press ENTER to save the values in file 0 S A V E F I L E O F C C M O D E F I L E 0 S A V E F I L E N O 3 Move the cursor by pressing to the command line of SAVE FILE S A V E F I L E O F C C M O D E F I L E 0 S A V E F I L E N O 4 Press the direction key or...

Page 106: ... A L L F I L E N O 4 Press the direction key or rotate the rotary knob to choose YES then press ENTER to recall file R E C A L L F I L E O F C C M O D E F I L E 0 R E C A L L F I L E Y E S 3 21 Parallel Setting The AC Load is capable of connecting up to five units in parallel with CC CR CP RLC RLC CP modes available supporting AC operation only The DC load in 63800 series only provides simple sing...

Page 107: ...e unit The TOTAL UNIT setting on the master unit is required to be set to ensure the load rating of the paralleled AC Loads When setting the AC Load for parallel operation the slave units need to be set up firstly before the master unit is set to ensure the correct TOTAL UNIT setting on the master unit Below is an example of setting up three AC Load units in parallel Select an AC Load and set it a...

Page 108: ...y knob to choose PARALLEL then press ENTER P A R A L L E L O P E R A T I N G M O D E P A R A L L E L S I N G L E P H A S E A P O S I T I O N 1 T O T A L U N I T 1 4 Move the cursor to POSITION 5 Press 2 then press ENTER It sets the first slave POSITION to 2 and its A2 setting is completed P A R A L L E L O P E R A T I N G M O D E P A R A L L E L S I N G L E P H A S E A P O S I T I O N 2 Select the...

Page 109: ...ss ENTER P A R A L L E L O P E R A T I N G M O D E P A R A L L E L S I N G L E P H A S E A P O S I T I O N 1 T O T A L U N I T 1 4 Move the direction by pressing to POSITION 5 Press 3 then press ENTER It sets the second slave POSITION to 3 and its A3 setting is completed P A R A L L E L O P E R A T I N G M O D E P A R A L L E L S I N G L E P H A S E A P O S I T I O N 3 Select the next AC Load and ...

Page 110: ...L L E L M O D E 3 Press the direction key or rotate the rotary knob to choose PARALLEL then press ENTER P A R A L L E L O P E R A T I N G M O D E P A R A L L E L S I N G L E P H A S E A P O S I T I O N 1 T O T A L U N I T 1 4 Rotate the rotary knob to choose A then press ENTER P A R A L L E L O P E R A T I N G M O D E P A R A L L E L P H A S E A P O S I T I O N 1 T O T A L U N I T 1 5 Press 1 then...

Page 111: ... P E R A T I N G M O D E P A R A L L E L S I N G L E P H A S E A P O S I T I O N 1 T O T A L U N I T 3 7 The master A1 setting is completed Press CC CR CP or RLC DC RECT to return to the mode that the users want to use Under CC mode the Master and Slave unit displays are as shown below Master unit display I s e t 9 0 0 C F 1 4 1 4 P F 1 0 0 0 I p m a X 1 3 5 0 U N I T A V 1 0 0 0 0 P 9 0 0 0 0 I 9...

Page 112: ...C Load the following display will be shown At the same time the AC Load loading will be turned off I N C O R R E C T D E V I C E N U M B E R P L E A S E C H E C K I T A G A I N P R E S S E N T E R T O E X I T After the AC Load has been set up in parallel mode it will be saved in the memory ROM The AC Load will then start up in parallel mode on subsequent power on Upon power on the Master unit will...

Page 113: ...error message will be displayed C O M M U N I C A T I O N E R R O R P R E S S E N T E R T O C H E C K P A R A L L E L N E T WO R K To exit parallel mode press the CONF LOCAL key Example if the AC Load has been set as the slave unit as shown below S L A V E A 2 To change the slave unit from parallel mode back to single unit control the steps are as follows 1 Press CONF LOCAL key 2 Press 7 then pres...

Page 114: ...b to choose SINGLE then press ENTER P A R A L L E L O P E R A T I N G M O D E S I N G L E P A R A L L E L P H A S E A P O S I T I O N 2 4 Press CC CR CP or RLC DC RECT to return to the mode that the users want to use For all AC Loads set to parallel mode regardless of whether it is a Master or Slave unit to operate as a single unit the operation mode must be set as single mode and remove parallel ...

Page 115: ...e parallel mode can connect 5 sets in parallel and it only can be operated in CC CR CP RLC RLC CP modes under AC load The connection methods of parallel power include Y and Delta connection which are given as Figure 3 19 and Figure 3 20 Figure 3 19 Parallel 3 Phase Y connection ...

Page 116: ... 1 it means the AC load will be set as master If POSITION 2 5 it means AC load will be set as slave In addition master needs to set TOTAL UNIT quantity to ensure loading power It is needed to start setting from slave of A phase and master slave of B C phase as setting 3 phase parallel mode That is to say users need to set AC load to slave and Master of B C phase setting is completed set master of ...

Page 117: ...lustrates 6 sets of AC load 3 phase parallel setting methods of each phase with 2 sets of AC load Phase A Select an AC Load and set it as the slave unit A2 1 Press CONF LOCAL key 2 Press 7 then press ENTER to enter PARALLEL MODE C O N F C H O O S E 1 1 S E T U P 2 R E M O T E 3 C A L I B R A T I O N 4 D I S P L A Y S E L E C T I O N 5 F A C T O R Y D E F A U L T 6 M O D E L I N F O R M A T I O N 7...

Page 118: ...L E L O P E R A T I N G M O D E P A R A L L E L P H A S E A P O S I T I O N 2 Phase B Select the next AC Load and set it as the B phase Master B1 1 Press CONF LOCAL key 2 Press 7 then press ENTER to enter PARALLEL MODE 3 Press the direction key or rotate the rotary knob to choose PARALLEL then press ENTER C O N F C H O O S E 1 1 S E T U P 2 R E M O T E 3 C A L I B R A T I O N 4 D I S P L A Y S E L...

Page 119: ...ss 1 then press ENTER Set POSITION of B phase master as 1 master B1 setting is completed P A R A L L E L O P E R A T I N G M O D E P A R A L L E L P H A S E B P O S I T I O N 1 Select the next AC Load and set it as the B phase slave unit B2 1 Press CONF LOCAL key 2 Press 7 then press ENTER to enter PARALLEL MODE P A R A L L E L O P E R A T I N G M O D E P A R A L L E L P H A S E B P O S I T I O N ...

Page 120: ... L E L M O D E 3 Press the direction key or rotate the rotary knob to choose PARALLEL then press ENTER P A R A L L E L O P E R A T I N G M O D E P A R A L L E L S I N G L E P H A S E A P O S I T I O N 1 T O T A L U N I T 1 4 Rotate the rotary knob to choose B then press ENTER P A R A L L E L O P E R A T I N G M O D E P A R A L L E L P H A S E B P O S I T I O N 1 5 Press 2 then press ENTER Set POSI...

Page 121: ...ress the direction key or rotate the rotary knob to choose PARALLEL then press ENTER P A R A L L E L O P E R A T I N G M O D E P A R A L L E L S I N G L E P H A S E A P O S I T I O N 1 T O T A L U N I T 1 4 Rotate the rotary knob to choose C then press ENTER C O N F C H O O S E 1 1 S E T U P 2 R E M O T E 3 C A L I B R A T I O N 4 D I S P L A Y S E L E C T I O N 5 F A C T O R Y D E F A U L T 6 M O...

Page 122: ...ad and set it as the C phase slave unit C2 1 Press CONF LOCAL key 2 Press 7 then press ENTER to enter PARALLEL MODE C O N F C H O O S E 1 1 S E T U P 2 R E M O T E 3 C A L I B R A T I O N 4 D I S P L A Y S E L E C T I O N 5 F A C T O R Y D E F A U L T 6 M O D E L I N F O R M A T I O N 7 P A R A L L E L M O D E 3 Press the direction key or rotate the rotary knob to choose PARALLEL then press ENTER ...

Page 123: ...L L E L O P E R A T I N G M O D E P A R A L L E L P H A S E C P O S I T I O N 1 5 Press 2 then press ENTER Set POSITION of C phase slave as 2 C phase slave C2 setting is completed P A R A L L E L O P E R A T I N G M O D E P A R A L L E L P H A S E C P O S I T I O N 2 Select the next AC Load and set it as the A phase master A1 unit 1 Press CONF LOCAL key 2 Press 7 then press ENTER to enter PARALLEL...

Page 124: ...P A R A L L E L M O D E 3 Press the direction key or rotate the rotary knob to choose PARALLEL then press ENTER P A R A L L E L O P E R A T I N G M O D E P A R A L L E L S I N G L E P H A S E A P O S I T I O N 1 T O T A L U N I T 1 4 Rotate the rotary knob to choose A then press ENTER P A R A L L E L O P E R A T I N G M O D E P A R A L L E L P H A S E A P O S I T I O N 1 T O T A L U N I T 1 5 Pres...

Page 125: ... L E P H A S E A P O S I T I O N 1 T O T A L U N I T 6 7 The master A1 setting is completed Press CC CR CP or RLC DC RECT to return to the mode that the users want to use Under CC mode the Master and Slave unit displays are as shown below PHASE A A phase Master A1 unit display I s e t 9 0 0 C F 1 4 1 4 P F 1 0 0 0 I p m a X 1 3 5 0 P H A S E S E L E C T A B C V 1 0 0 0 0 P 9 0 0 0 0 I 9 0 0 0 S 9 ...

Page 126: ...nual 3 98 A phase SLAVE A2 unit display S L A V E A 2 PHASE B B phase Master B1 unit display I s e t 9 0 0 C F 1 4 1 4 P F 1 0 0 0 I p m a X 1 3 5 0 V 1 0 0 0 0 P 9 0 0 0 0 I 9 0 0 0 S 9 0 0 0 0 P R I O R I T Y C F M A S T E R B 1 B phase SLAVE B2 unit display S L A V E B 2 ...

Page 127: ...onsistent with what is detected by the AC Load the following display will be shown At the same time the AC Load loading will be turned off I N C O R R E C T D E V I C E N U M B E R P L E A S E C H E C K I T A G A I N P R E S S E N T E R T O E X I T After the AC Load has been set up in parallel mode it will be saved in the memory ROM The AC Load will then start up in parallel mode on subsequent pow...

Page 128: ...top loading and the following error message will be displayed C O M M U N I C A T I O N E R R O R P R E S S E N T E R T O C H E C K P A R A L L E L N E T W O R K To exit parallel mode press the CONF LOCAL key Example if the AC Load has been set as the slave unit as shown below S L A V E A 2 To change the slave unit from parallel mode back to single unit control the steps are as follows 1 Press CON...

Page 129: ...s of whether it is a Master or Slave unit to operate as a single unit the operation mode must be set as single mode To return the Master unit to single mode the steps are the same as described above for the Slave unit PHASE SELECT only be displayed in A1 PHASE SELECT can set to A B C A B C this item is for changing setting value of each phase When A B C is selected if Iset CF PF Ip max changed thu...

Page 130: ...tronic Load 63800 Series Operation Programming Manual 3 102 I s e t 9 0 0 C F 1 4 1 4 P F 1 0 0 0 I p m a X 1 3 5 0 P H A S E S E L E C T A B C V 1 0 0 0 0 P 9 0 0 0 0 I 9 0 0 0 S 9 0 0 0 0 P R I O R I T Y C F M A S T E R A 1 ...

Page 131: ... definitions of the measuring values are given below True Power P Displays the true power consumed by the load and computed as T idt v T W 0 1 where T represents the period of voltage v and i represent instantaneous voltage and instantaneous current separately Apparent Power S Displays the apparent power consumed by the load and computed as rms rms I V S where rms V and rms I represent the root me...

Page 132: ...Displays the total harmonic distortions of the UUT input voltage and computed as 1 2 1 2 h h rms V V V THD where 1 h V represents the fundamental component of voltage If the frequency is out of the specification the measurement will not be in the normal status 4 1 AC Load Simulation There are two kinds of AC mode Constant Load modes and Rectified Load Modes are shown as Figure 3 1 The detail of Co...

Page 133: ...0 0 A C P R I O R I T Y C F Second page I s e t 0 5 0 0 C F 1 4 1 4 P F 1 0 0 0 I p m a x 1 0 0 U N I T A Q 0 0 0 C F 0 0 0 0 P F 0 0 0 0 F 0 0 0 A C P R I O R I T Y C F Third page I s e t 0 5 0 0 C F 1 4 1 4 P F 1 0 0 0 I p m a x 1 0 0 U N I T A I P 0 0 0 T H D 0 0 0 I P 0 0 0 A C P R I O R I T Y C F Users can change the orders of the measurement parameters arbitrarily under CONF LOCAL 4 DISPLAY ...

Page 134: ... e t 5 0 0 I r m s m a x 5 0 0 U N I T Ω A V 0 0 0 P 0 0 0 I 0 0 0 S 0 0 0 A C Second page R s e t 5 0 0 I r m s m a x 5 0 0 U N I T Ω A Q 0 0 0 C F 0 0 0 0 P F 0 0 0 0 F 0 0 0 A C Third page R s e t 5 0 0 I r m s m a x 5 0 0 U N I T Ω A I P 0 0 0 T H D 0 0 0 I P 0 0 0 R 0 0 0 A C Users can change the orders of the measurement parameters arbitrarily under CONF LOCAL 4 DISPLAY SELECTION please refe...

Page 135: ... A C P R I O R I T Y C F Second page P s e t 4 5 0 0 0 C F 1 4 1 4 P F 1 0 0 0 I p m a x 1 0 0 U N I T W A Q 0 0 0 C F 0 0 0 0 P F 0 0 0 0 F 0 0 0 A C P R I O R I T Y C F Third page P s e t 4 5 0 0 0 C F 1 4 1 4 P F 1 0 0 0 I p m a x 1 0 0 U N I T W A I P 0 0 0 T H D 0 0 0 I P 0 0 0 A C P R I O R I T Y C F Users can change the orders of the measurement parameters arbitrarily under CONF LOCAL 4 DIS...

Page 136: ...es under RLC mode V I P S Q PF CF F Ip Ip and THD They are shown as pages below Main page R s 0 1 1 L s 2 0 0 C 2 0 0 0 R L 5 0 0 0 0 0 I p m a x 1 0 0 U N I T Ω u H u F A V 0 0 0 P 0 0 0 I 0 0 0 S 0 0 0 A C Second page R s 0 1 1 L s 2 0 0 C 2 0 0 0 R L 5 0 0 0 0 0 I p m a x 1 0 0 U N I T Ω u H u F A Q 0 0 0 C F 0 0 0 0 P F 0 0 0 0 F 0 0 0 A C Third page R s 0 1 1 L s 2 0 0 C 2 0 0 0 R L 5 0 0 0 0...

Page 137: ...F CF F Ip Ip and THD They are shown as pages below Main page P s e t 1 0 0 0 0 P F 1 0 0 0 I p m a x 1 0 0 U N I T W A V 0 0 0 P 0 0 0 I 0 0 0 S 0 0 0 A C C P Second page P s e t 1 0 0 0 0 P F 1 0 0 0 I p m a x 1 0 0 U N I T W A Q 0 0 0 C F 0 0 0 0 P F 0 0 0 0 F 0 0 0 A C C P Third page P s e t 1 0 0 0 0 P F 1 0 0 0 I p m a x 1 0 0 U N I T W A I P 0 0 0 T H D 0 0 0 I P 0 0 0 A C C P Users can chan...

Page 138: ... 0 0 0 A C I N R U S H Second page R s 0 1 1 L s 2 0 0 C 2 0 0 0 R L 5 0 0 0 0 0 P H A S E 9 0 I p m a x 1 0 U N I T Ω u H u F A I P 0 0 0 T H D 0 0 0 I P 0 0 0 A C I N R U S H Users can change the orders of the measurement parameters arbitrarily under CONF LOCAL 4 DISPLAY SELECTION please refers section 3 4 1 Setting the Configuration 4 2 DC Load Simulation There are five modes of operation Const...

Page 139: ...I 0 0 0 D C Second page I s e t 4 0 0 A 1 0 0 A m s 1 0 0 A m s I p m a x 1 0 0 0 A V o v e r s h o o t 0 0 0 V u n d e r s h o o t 0 0 0 D C Users can change the orders of the measurement parameters arbitrarily under CONF LOCAL 4 DISPLAY SELECTION please refers section 3 4 1 Setting the Configuration 4 2 2 Constant Resistance Mode There are five measurement values under CR mode V I P Vovershoot a...

Page 140: ...s I p m a x 1 0 0 0 A V o v e r s h o o t 0 0 0 V u n d e r s h o o t 0 0 0 D C Users can change the orders of the measurement parameters arbitrarily under CONF LOCAL 4 DISPLAY SELECTION please refer section 3 4 1 Setting the Configuration 4 2 3 Constant Voltage Mode There are three measurement values under CV mode V I and P They are shown as pages below Main page V s e t 1 0 0 0 0 V I m a x 4 5 0...

Page 141: ...own as pages below Main page P s e t 2 5 0 0 0 0 W I p m a x 1 0 0 0 0 A V 0 0 0 P 0 0 0 I 0 0 0 D C Second page P s e t 2 5 0 0 0 0 W I p m a x 1 0 0 0 0 A V o v e r s h o o t 0 0 0 V u n d e r s h o o t 0 0 0 D C Users can change the orders of the measurement parameters arbitrarily under CONF LOCAL 4 DISPLAY SELECTION please refer section 3 4 1 Setting the Configuration 4 2 5 Rectified Load Mode...

Page 142: ... e t 1 0 0 0 A C F 1 4 1 4 L I N E S Y N C N O F 1 2 0 0 H z I p m a x 1 0 0 0 A V 0 0 0 P 0 0 0 I 0 0 0 I p 0 0 0 D C R E C T I F I E D Users can change the orders of the measurement parameters arbitrarily under CONF LOCAL 4 DISPLAY SELECTION please refer section 3 4 1 Setting the Configuration ...

Page 143: ...of power devices of the load 5 2 Over Current Protection OCP The protection method is set the protected current at 3 Arms 3 ADC over the full scale current The value is specified in the Load specification 5 3 Over Power Protection OPP The over power protection is caused by the unconditional driving of the load Protection level is set at a level above 4600W AC 4600W DC of the indicated power The ov...

Page 144: ...NTER When LDF occurs users need to press the power switch to restart the AC load If AC load can not function normally after restarting please contact Chroma sales or service office To protect the Electronic Load from possible damage the input voltage must not exceed the maximum input voltage rating specification 5 9 Transient Over Pressure Protection OVPP If there is transient surge pressure occur...

Page 145: ...Operation 6 1 6 Theory of Operation 6 1 General The AC load consists of 10 printed circuit boards and other components Each of the PCB has its specific function that will be described in the following subsection ...

Page 146: ...T D A Voltage Measurement Current Measurement SYNC DSP GNDC1 Vs OTP LDF Load module 1 2 4 3 1 2 4 3 1 2 4 3 1 2 4 3 1 2 4 3 R Rs Voltage A D Current A D GNDC2 GNDC4 GNDD Fan fail Ctrl GNDD LDF SPS system power 15VC1 15VC1 5VC1 GNDC1 15VC2 15VC2 GNDC2 GNDD 8VC5 GNDC5 15VD 5VD 15VD SPS system power 7 5VC4 7 5VC4 15VC6 GNDC6 ...

Page 147: ...age of UUT lower than specification or not OVER CURRENT protection OCP The sink current is over specification or I LIMIT Reduce the current OVER POWER protection OPP The input power is over specification Reduce the over power or lower down input voltage current OVER TEMPERAURE protection OTP 1 Ambient temperature is too high 2 Airway is obstructed 1 Operate the unit 0 40 C 2 Unblock the airway Fan...

Page 148: ......

Page 149: ...e address can be only changed from the CONF functional list menu please refer to 3 4 1 This menu is also used to select the RS 232C interface and specify the parameters of RS 232C such as baud rate and parity 8 1 2 Wire Connection of RS 232C The AC Load is shipped with the baud rate set at 57600 and with parity set as None For RS 232C interface only the signals of TxD and RxD are used for its tran...

Page 150: ...tered once or more times 8 3 2 Numerical Data Formats All data programmed to or returned from the AC Load are ASCII The data can be numerical or character string Numerical Data Formats Symbol Description Example NR1 It is a digit with no decimal point The decimal is assumed to be at the right of the least significant digit 123 0123 NR2 It is a digit with a decimal point 12 3 123 8 3 3 Boolean Data...

Page 151: ...mon command and query headers is described in IEEE 488 2 It is used together with the IEEE 488 2 defined common commands and queries The commands with a leading are common commands Instrument Controlled Headers Instrument controlled headers are used for all other instrument commands Each of them has a long form and a short form The AC Load only accepts the exact short and long forms A special nota...

Page 152: ...and Tree Multiple program message unit elements can be sent in a program message The first command is always referred to the root node Subsequent commands are referred to the same tree level as the previous command in a program message A colon preceding a program message unit changes the header path to the root level Example LOAD CURR 10 All colons are header separators LOAD CURR 10 Only the first...

Page 153: ...d Event Status is set the ESB of Status Byte Register is set too Bit Configuration of Standard Event Status Enabled Register Bit Position 7 6 5 4 3 2 1 0 Bit Name CME EXE DDE QYE OPC CME Command error enable DDE Device dependent error EXE Execution error enable OPC Operation complete enable QYE Query error enable Setting Syntax ESE Setting Parameter NR1 0 255 Query Syntax ESE Response Parameter NR...

Page 154: ...ter NR1 RST Reset command Description This command performs device initial setting Setting Syntax RST Setting Parameter none Query Syntax none Response Parameter none SRE n Service request enabled register Description This command sets the Service Request Enabled Register Setting Syntax SRE Setting Parameter NR1 0 255 Query Syntax SRE Response Parameter NR1 0 255 STB This query returns the Status ...

Page 155: ...urrent measurement is updated only when the value measured exceed the last measured value If the hold command is set to OFF the peak current measurement is updated each cycle AC mode only Setting Syntax MEASure SCALar CURRent AMPLitude HOLD FETCh SCALar CURRent AMPLitude HOLD Setting Parameter 0 OFF 1 ON Query Syntax MEASure SCALar CURRent AMPLitude HOLD FETCh SCALar CURRent AMPLitude HOLD Respons...

Page 156: ...re SCALar CURRent PEAK POSitive FETCh SCALar CURRent PEAK POSitive Response Parameter NR2 Example MEAS CURR PEAK POS 8 6 2 2 Frequency Measurement MEASure FETCh SCALar FREQuency Return the output frequency MEASure SCALar FREQuency FETCh SCALar FREQuency Description Return the output frequency in Hertz Query Syntax MEASure SCALar FREQuency FETCh SCALar FREQuency Response Parameter NR2 Example MEAS ...

Page 157: ...ACtor Description Return the load power factor The power factor is computed as power factor real power apparent power Query Syntax MEASure SCALar POWer PFACtor FETCh SCALar POWer PFACtor Response Parameter NR2 Example MEAS POW PFAC MEASure SCALar POWer REACtive FETCh SCALar POWer REACtive Description These queries return the reactive component of the power being dissipated by the load at the input...

Page 158: ...turn the peak voltage measured at the input of electronic load Query Syntax MEASure SCALar VOLTage AMPLitude MAX FETCh SCALar VOLTage AMPLitude MAX Response Parameter NR2 Example MEAS POW AMPL MAX MEASure SCALar VOLTage DC FETCh SCALar VOLTage DC Description Return the Vdc of alternating current Query Syntax MEASure SCALar VOLTage DC FETCh SCALar VOLTage DC Response Parameter NR2 Example MEAS VOLT...

Page 159: ...ME HOLD Response Parameter NR2 Example MEAS TIME HOLD MEASure SCALar TIME TRAN FETCh SCALar TIME TRAN Description Return the measurement value of transfer time sec Query Syntax MEASure SCALar TIME TRAN FETCh SCALar TIME TRAN Response Parameter NR2 Example MEAS TIME TRAN 8 6 2 7 RLC Measurement MEASure FETCh SCALar RLC SET CAP Return the C measurement value of RLC CP mode LS Return the Ls measureme...

Page 160: ...RLC SET RS Response Parameter NR2 Example MEASure SCALar RLC SET RS 8 6 3 LOAD Subsystem LOAD STATus Set load ON OFF LOAD ABA Set ABA mode MODE Set CC CP CV CR mode SCIRcuit Set short ON OFF PROTect Queue protection status CLEar Reset protection status LOAD STATus Description The LOAD command makes the electronic load active on or inactive off Setting Syntax LOAD STATus Setting Parameter 0 OFF 1 O...

Page 161: ... CR Mode Setting Syntax LOAD SCIRcuit Setting Parameter 0 OFF 1 ON Query Syntax LOAD SCIRcuit Response Parameter 0 1 Example SCIR ON LOAD PROTect Description This command returns the status of electronic load Query Syntax LOAD PROTect Response Parameter NR1 Example PROT Mnemonic Bit Value Bit Weight Meaning FE 0 1 Under frequency range or over frequency range UV 1 2 AC Mode voltage is lower than 4...

Page 162: ...t the load current stays constant at the set value Setting Syntax LOAD CURRent LEV AMPL AC Setting Parameter NR2 63804 Range 0 45 63803 Range 0 36 63802 Range 0 18 Unit A Query Syntax LOAD CURRent LEV AMPL AC Response Parameter NR2 Example CURR 45 LOAD CURR LEV AMPL DC Description This command sets the DC current of the electronic load The electronic load insures that the load current stays consta...

Page 163: ...C Setting Parameter NR2 63804 Range 0 45 63803 Range 0 36 63802 Range 0 18 Unit A AC CR Mode Query Syntax LOAD CURR MAX LEV AMPL AC Response Parameter NR2 Example CURR MAX 45 LOAD CURR MAX LEV AMPL DC Description Ip max setting this command is only operating in DC Mode Setting Syntax LOAD CURR MAX LEV AMPL DC Setting Parameter NR2 63804 Range 0 135 63803 Range 0 108 63802 Range 0 54 Unit A Query S...

Page 164: ... POW LEV AMPL AC Response Parameter NR2 Example POW 4500 LOAD POW LEV AMPL DC Description This command sets the DC power of the electronic load in Watts The electronic load insures that the load power stays constant at the set value Setting Syntax LOAD POW LEV AMPL DC Setting Parameter NR2 63804 Range 0 4500 63803 Range 0 3600 63802 Range 0 1800 Unit W Query Syntax LOAD POW LEV AMPL DC Response Pa...

Page 165: ...ce LEVel AMPLitude DC Setting Parameter NR2 63804 Range 1 2500 63803 Range 1 25 2500 63802 Range 2 22 2500 Unit Ohm Query Syntax LOAD RESistance LEVel AMPLitude DC Response Parameter NR2 Example RES DC 10 LOAD RESistance LEVel AMPLitude DC RISE Description This command sets current rise slew rate of constant resistance mode Setting Syntax LOAD RESistance LEVel AMPLitude DC RISE Setting Parameter N...

Page 166: ... LEVel AMPLitude AC Set the Crest Factor AC CC CP Mode DC Set the Crest Factor DC Rectified Mode LIMit Return the setting range of CF LOAD CFAC LEV AMPL AC Description This command sets the crest factor of the electronic load The electronic load will attempt to program the crest factor to a value as close as possible to the set value The ability to do so will be affected by the mode and the power ...

Page 167: ... only valid value Setting Syntax LOAD PFACtor LEVel AMPLitude AC Setting Parameter NR2 Range 1 000 1 000 AC Mode Query Syntax LOAD PFACtor LEVel AMPLitude AC Response Parameter NR2 Example PFAC 0 7 LOAD PFAC LIMit Description This command queries the setting range of PF Query Syntax LOAD PFAC LIMit Response Parameter 1 000 1 000 Example PFAC LIM 8 6 3 7 RLC Subsystem LOAD RLC CAP Set the C AC RLC ...

Page 168: ...ng Syntax LOAD RLC RS Setting Parameter NR2 Range 0 9 999 Unit Ohm Query Syntax LOAD RLC RS Response Parameter NR2 Example RLC RS 0 1 LOAD RLC POW Description It sets the value C this command is only operating in AC RLC CP Mode Setting Syntax LOAD RLC POW Setting Parameter NR2 Range 100 4500 Unit W Query Syntax LOAD RLC POW Response Parameter NR2 Example RLC POW 1000 LOAD RLC PFAC Description It s...

Page 169: ...g Parameter NR2 63804 Range 1 11 9999 99 63803 Range 1 39 9999 99 63802 Range 2 77 9999 99 Unit Ohm Query Syntax LOAD INRush RL Response Parameter NR2 Example INR RL 50 LOAD INRush RS Description It sets the value RS this command is only operating in AC Inrush Current Mode Setting Syntax LOAD INRush RS Setting Parameter NR2 Range 0 9 999 Unit Ohm Query Syntax LOAD INRush RS Response Parameter NR2 ...

Page 170: ...PLitude DC Response Parameter NR2 Example FREQ DC 100 8 6 3 10 Time Subsystem LOAD TIME MODE Select line frequency or set frequency TOUT VCUT LOAD TIME MODE Description It sets TIMING mode When the timing mode is set user can choose HOLD or TRANSFER mode Setting Syntax LOAD TIME MODE Setting Parameter 0 OFF 1 HOLD 2 TRAN Query Syntax LOAD TIME MODE Response Parameter OFF HOLD TRAN Example TIME MOD...

Page 171: ...tronic load Setting Syntax SYSTem COMMunicate GPIB ADDRess Setting Parameter NR1 Range 1 30 Query Syntax SYSTem COMMunicate SERial BAUD Response Parameter NR1 Example SYST COMM GPIB ADDR 8 SYSTem COMMunicate SERial BAUD Description This command sets the RS 232 baud rate of the electronic load Setting Syntax SYSTem COMMunicate SERial BAUD Setting Parameter 9600 19200 38400 57600 Query Syntax SYSTem...

Page 172: ...d as AC load mode or DC load mode Setting Syntax SYSTem SETup MODE Setting Parameter NR1 0 AC 1 DC Query Syntax SYSTem SETup MODE Response Parameter AC DC SYSTem SETup CFPF MODE Description It sets the modes of CF PF ALL This command is only operating in AC CC CP modes When this command sets as 0 it indicates the system enter to CF only mode When this command sets as 1 it indicates the system ente...

Page 173: ...parameter is 2 it indicates three phases parallel Query Syntax PAR STAT Response Parameter NR1 0 1 2 Example PAR STAT 8 6 6 PHASE Subsystem PHASe SEL PHASe SEL Description It decides LOAD MEAS and FETC subsystem commands are belong to three phases balance ALL or three phases unbalance phase A B C setting This command is only for three phases parallel used Setting Syntax PHASe SEL Setting Parameter...

Page 174: ......

Page 175: ...ing the condition register does not change the state of its bits Only changes in electronic load conditions affect the contents of this register Enable register The Enable register can be programmed to enable which bit in the corresponding Event register is logically ORed into the Channel Summary bit QUESTIONABLE STATUS CONDITION EVENT ENABLE LOGICAL OR 1 2 4 8 16 1 2 4 8 16 N U N U N U MAV OPER E...

Page 176: ...DC Mode current is higher than 18A or 45A OP 7 64 AC DC Mode power is higher than 1800W or 4500W The Operation Status registers inform you one or more operation status conditions which indicate certain errors or faults have occurred Table 9 2 lists the operation status conditions that are applied to the electronic load When the corresponding bit of Operation Status Condition register is set it ind...

Page 177: ... the event register CONDition Returns the value of the condition register ENABle Enable specific bits in the Event register STATus OPERation EVENt Description This query is the value of the Operation Event register The Event register is a read only register which holds all events Reading the Operation Event register and clears it Query Syntax STATus Operation EVENt Return Parameters NR1 STATus OPE...

Page 178: ... that the device has completed all selected pending operations QYE 2 4 Query Error The output queue was read when no data were present or the data in the queue were lost DDE 3 8 Device Dependent Error Memory was lost or self test failed EXE 4 16 Execution Error A command parameter was outside the legal range or inconsistent with the electronic load s operation or the command could not be executed ...

Page 179: ... questionable event has occurred MAV 4 16 Message Available It indicates if the Output Queue contains data ESB 5 32 Event Status Bit It indicates if an enabled standard event has occurred RQS MSS 6 64 Request Service Master Summary Status During a serial pull RQS is returned and cleared For an STB query MSS is returned without being cleared 9 7 Service Request Enable Register The Service Request E...

Page 180: ......

Page 181: ...0 1 Equipment Feature Model Recommended Voltage meter 5 1 2 digit or higher HP34401A HP3458A Current shunt 0 05 accuracy Prodigit 7550 10 ohms 20mA VALHALLA 2572A 0 1 ohms 2A 0 01 ohms 20A 0 001 ohms 250A 100A 0 05m ohms 1000A High voltage DC power 500V 9A HP6035 HP6032 High current DC power 40V 50A Chroma 62050 100 100 AC power 0 380V 5kW above Chroma 6560 POWER ANALYZER PM3000A Wire BNC to allig...

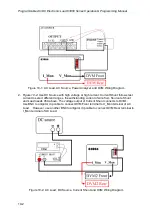
Page 182: ...test current to select different ranges the withstanding current of wire from Source to Shunt and Load needs 45A above The voltage output of Current Shunt connects to DVM1 Use BNC to alligator clip cable to connect DVM Front terminal to V_Mon terminal of AC Load However use another BNC to alligator clip cable to connect DVM Rear terminal to I_Mon terminal of AC Load Figure 10 2 AC Load DC Source C...

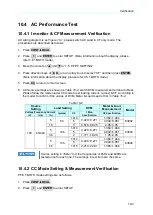
Page 183: ...low the model under CC mode to set loading current Ip max CF According to the model to confirm if the values of DVM Meter Load meet to that in Table 10 2 Table 10 2 Source Setting Load Setting DVM Meter Load Measurement Model Voltage V Frequency Hz Current A Ip max CF I_Mon Specification CF Specification 100 45 440 5 54 1 414 0 229 0 271 1 364 1 464 63802 5 4 949 5 051 18 3 0 876 0 925 2 95 3 05 5...

Page 184: ... 4 S O U N D O N O F F 1 5 C F P F S E T T I N G B O T H C F P F 1 6 T I M I N G M O D E O F F H O L D U P T R A N S F E R 1 7 E X T E R N A L O F F O N 1 8 A B A M O D E E N A B L E D I S A B L E 5 After pressing ENTER a window will be popped up to request users to key in CF and PF sequence 6 Press direction keys of or turn rotary knob to select CF and then press ENTER If ENTER doesn t be pressed...

Page 185: ... 135 1 188 1 213 63804 350 100 68 707 183 638 10 4 4 CP Mode Setting Verification Switch it to PF only mode the procedures are as follows 1 Press CONF LOCAL 2 Press 1 and ENTER to enter SETUP More information about the display please refer 3 6 1 BOTH mode 3 Move the cursors of and to 1 5 CF PF SETTING 4 Press direction keys of or turn rotary knob to select PF More information about the display ple...

Page 186: ...I P 0 0 0 T H D 0 0 0 I P 0 0 0 A C P R I O R I T Y C F Table 10 6 Source Setting Meter Load Measurement Model Voltage V Frequency Hz THD THD Specification 150 45 10 9 9 10 1 AC Load 440 40 39 6 40 4 10 4 6 V monitor Voltage Measurement Verification 1 Press CC to enter CC mode 2 Set AC SOURCE to series file to output current limit 1A other settings are as Table 10 7 3 Switch DVM measurement termin...

Page 187: ...o enter SETUP C O N F C H O O S E 1 1 S E T U P 2 R E M O T E 3 C A L I B R A T I O N 4 D I S P L A Y S E L E C T I O N 5 F A C T O R Y D E F A U L T 6 M O D E L I N F O R M A T I O N 7 P A R A L L E L M O D E 3 Move the cursors of and to 1 1 MODE SELECT 4 Press direction keys of or turn rotary knob to select DC and then press ENTER 1 1 M O D E S E L E C T D C A C S E T U P 1 2 S H O R T O F F T O...

Page 188: ... Verification 1 Press CC to return to main screen of DC CC mode 2 High current DC Source settings are shown as Table 10 9 Please follow the model under CC mode to set loading S R Ip max According to the model to confirm if the values of Meter Load meet to that in Table 10 9 Table 10 9 Source Setting Load Setting Meter Load Measurement Model Voltage V Current A Current A S R Ip max I Specification ...

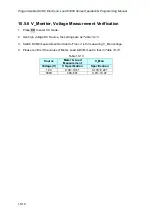
Page 189: ... to the model to confirm if the values of Meter Load meet to that in Table 10 11 Source Setting Load Setting Meter Load Measurement Model Voltage V Current A W Ip max P Specification W 100 50 50 54 44 5 55 5 63802 1800 1791 1809 50 108 39 1 60 9 63803 3600 3582 3618 50 135 36 4 63 3 63804 4500 4477 5 4522 5 Table 10 11 10 5 5 CV Mode Operation Verification 1 Press CV to return to main screen of DC...

Page 190: ...ode 2 Use high voltage DC Source the settings are as Table 10 13 3 Switch DVM2 measurement terminal to Front it is for measuring V_Mon voltage 4 Please confirm if the values of Meter Load DVM meet to that in Table 10 13 Table 10 13 Source Meter Load Measurement V_Mon Voltage V V Specification Specification 10V 9 49 10 51 0 179 0 221 500V 499 501 9 93 10 07 ...

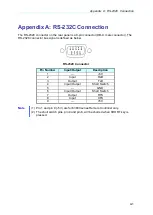
Page 191: ...ctor bus signal is defined as below RS 232C Connector Pin Number Input Output Description 1 5V 2 Input RxD 3 Output TxD 4 Input Output Short Switch 5 GND 6 Input Output Short Switch 7 Output RTS 8 Input CTS 9 5V Note 1 Pin 1 and pin 9 5V are for 63800 series Remote Controller only 2 The short switch pins pin 4 and pin 6 will be shorted when SHORT key is pressed ...

Page 192: ......

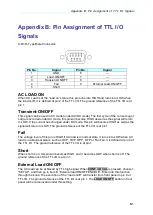
Page 193: ... become HIGH as well as the signal will return to LOW The ground reference of the TTL I O is at pin 1 Fail The voltage level of this pin is HIGH if AC load is in normal state It turns into LOW when AC load is in abnormal status such as OCP OVP OPP OTP or Fan Fail It is defined at pin 4 of the TTL I O The ground reference of the TTL I O is at pin 1 Short When short is on this pin will becomes HIGH ...

Page 194: ......

Page 195: ...n setting Irms 45A and CF 4 the actual loading may not reach the setting values When there is an inductor in series with the AC load under high frequency high current and high CF OVPP over shooting will be occurred OVPP will be occurred when the Vpeak is over 600V 2 RLC mode When changing the PF value under Load ON due to the AC Load algorithm the response time of changing the PF value may be slow...

Page 196: ......

Page 197: ...k Chroma welcomes all comments and recommendations to improve this publication in the future editions Please scan the QR code below or click the URL http www chromaate com survey n 793ce6db 17ef 4cd3 b0de 8bbd09aa38e0 to fill in the customer feedback form Thank you ...

Page 198: ...oyuan 33383 Taiwan 台灣桃園市 33383 龜山區 華亞一路 66 號 T 886 3 327 9999 F 886 3 327 8898 Mail info chromaate com http www chromaate com Copyright by CHROMA ATE INC All Rights Reserved All other trade names referenced are the properties of their respective companies ...

Reviews: