8.0 Maintenance Guide
51
8. Recheck the clamp height in case tightening the linkage moved it out of adjustment. If the
clamp has moved out of adjustment, repeat steps 3 through 7 as necessary.
9. Once a satisfactory setting has been obtained, replace all covers and unlock the power
source.
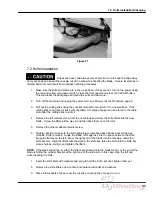
Figure 31
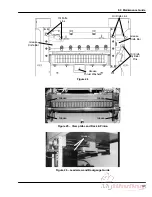
Clamp Leveling Procedure:
Remove the knife, false clamp plate and the cut stick. Place a 2” wide strip of paper under the left and
right hand side of the clamp. Access the Knife Adjust menu in the “Maintenance Section” and cycle
the clamp and knife to the down position. Pull on the paper strips; if one pulls out, that side will have
to be adjusted. NOTE: Keep the adjustments small so the clamp will remain at 4”
1. Turn the machine off and lock out the power. (See page 6)
2. Remove the bottom front cover and the top rear cover.
3. Loosen one end of the rack and pinion shaft coupling (pg. 50, fig. 30)
4. Loosen the clamp rod bottom nut on the side of the clamp that doesn’t hold paper.
5. Adjust the top clamp rod nut until the paper is held tight.
6. Tighten the bottom nut, then recheck the paper. Readjust if necessary.
7. Tighten the rack and pinion shaft coupling.
8.7.4 Proximity Switches
Proximity switches are used to inform the computer of the up and down positions of the knife and
clamp. They do not determine the stopping positions of the knife and clamp, and therefore rarely
need to be adjusted. However, if a proximity switch is not sensing the knife or clamp position
correctly, it may need adjustment.
To check if the four proximity switches are sensing correctly, go to Maintenance Mode (page 26) and
select Diagnostic. Then select Sensor Data, and a list of abbreviations for several inputs and outputs
Summary of Contents for Titan 265
Page 60: ...9 0 Parts List Sequence of Operations 59 9 2 Main Assembly Side View 44000 Sht 2 Rev J...
Page 61: ...9 0 Parts List Sequence of Operations 60 9 3 Main Assembly Rear View 44000 Sht 3 Rev E...
Page 62: ...9 0 Parts List Sequence of Operations 61 9 4 Main Assembly Table View 44000 Sht 4 Rev E...
Page 63: ...9 0 Parts List Sequence of Operations 62 9 5 Main Assembly Parts List 44000 Sht 5 Rev S...
Page 64: ...9 0 Parts List Sequence of Operations 63 Main Assembly Parts List continued 44000 Sht 6 Rev N...
Page 65: ...9 0 Parts List Sequence of Operations 64 9 6 Main Assembly Cut Buttons 44000 Sht 7 Rev H...
Page 66: ...9 0 Parts List Sequence of Operations 65 9 7 Main Assembly Front Shield 44000 Sht 7 Rev H...
Page 67: ...9 0 Parts List Sequence of Operations 66 9 8 Electrical Panel Assembly EE 2879 Rev H...
Page 68: ...9 0 Parts List Sequence of Operations 67 Electrical Panel Assembly continued EE 2879 Rev H...
Page 69: ...9 0 Parts List Sequence of Operations 68 Electrical Panel Assembly continued EE 2879 Rev H...
Page 71: ...9 0 Parts List Sequence of Operations 70 9 10 Hydraulic Power Unit Assembly H 507 Rev E...
Page 72: ...9 0 Parts List Sequence of Operations 71 Hydraulic Power Unit Assembly continued H 507 Rev E...
Page 73: ...9 0 Parts List Sequence of Operations 72 9 11 Manifold Assembly H 516 Sheet 1 Rev C...
Page 74: ...9 0 Parts List Sequence of Operations 73 9 12 Hydraulic Schematic H 516 Sheet 2 Rev B...
Page 75: ...9 0 Parts List Sequence of Operations 74 9 13 Manifold Sub Plate Assembly H 517...
Page 76: ...9 0 Parts List Sequence of Operations 75 9 14 Sequence Check Valve Assembly H 551 Rev A...
Page 77: ...9 0 Parts List Sequence of Operations 76 9 15 Basic Machine Schematic E 2853 Rev C...
Page 78: ...9 0 Parts List Sequence of Operations 77 Basic Machine Schematic continued E 2853 Rev C...
Page 80: ...9 0 Parts List Sequence of Operations 79 9 17 Cut Button Assembly EE 2851 1...
Page 81: ...9 0 Parts List Sequence of Operations 80 9 18 Control Console Assembly EE 2773 1 Rev C...
Page 82: ...9 0 Parts List Sequence of Operations 81 9 19 Control P C Assembly EE 2807 1...
Page 83: ...9 0 Parts List Sequence of Operations 82 9 20 Power Panel Label S 1781 54 Rev C...
Page 85: ...9 0 Parts List Sequence of Operations 84 9 22 Knife Latch Assembly 47568 Rev C...
Page 86: ...9 0 Parts List Sequence of Operations 85 9 23 Line Light Assembly EE 2779 Rev B...


