background image

GB  

//  10

Pay attention to the charge level indication on your transmitter.

•  With power packs or batteries that are half discharged, you can lose control of the model.
•  In the transmitter, never mix fully charged batteries, rechargeable or not, with half 

discharged batteries or rechargeable batteries of different capacity.

•  Never try to charge non-rechargeable batteries (dry cells), only batteries specified as 

rechargeable can be charged.

SAFETY PRECAUTIONS

Safety Instructions and Intended Use

This product is designed exclusively for hobby use and may only be used on tracks and areas 

intended for this purpose. No persons or animals may be transported with this model. To avoid 

operator errors, it is mandatory that the user manual is read before use! These models may 

only be used with bodywork that is correctly fitted. When removing the bodywork, please note 

that, during operation, certain parts can become very hot. Please note that various models 

can generate very high noise levels and should, therefore, not be operated in your immediate 

proximity. Please make sure, before every driving session, that the tank is correctly closed or 

the power pack is correctly inserted. To avoid faulty operation of the control system causing the 

model to run out of control, it must be checked that the transmitter and model batteries are in 

good condition. It is essential to check that the model is correctly assembled both before and 

after use; if need be, tighten nuts and bolts.

This model is not a toy!

•  This product is not a toy, its operation must be learned step by step.
•  Children under 14 years of age should operate the model only if supervised by an adult.
Operating RC models is a fascinating hobby that, however, must only be exercised with proper 

precautions and care. Since the weight of this model is considerable and it can reach a very high 

speed it can, if it runs out of control, cause significant damage and injury for which you, as the 

operator, are liable. 
Only a correctly assembled model will work and react as expected.
Never improvise with unsuitable materials but, when the need arises, use only original spare 

parts. Even if the model is pre-assembled, all joints and fastenings should be checked for correct 

seating and tightness.

Before use, you must make sure of the following points:

•  All rechargeable batteries must be fully charged.
•  Before starting, check the radio range.
•  Check that the model reacts correctly to the control signals.
•  All functional parts of the product are in a faultless condition and have been checked.
•  All screw fastenings are firmly seated.
•  Do not drive under high-voltage power lines or radio masts or with nearby thunderstorms!
•  Atmospheric interference can influence the operation of your model.
•  The electrical parts of the model are not water-tight. Do not, therefore, drive it in rain or 

snow or through puddles or wet grass.

•  The remote controlled model may be driven only on suitable areas and must not be used on 

the public highway.

•  Do not use near people or animals!
•  Do not use it when tired or if your reactions are otherwise impaired.
•  Always maintain direct visual contact with your model.
•  Regular maintenance and care are required for firt class driving performance.
•  The model has parts that become hot in operation, e.g. the top of the motor, the metal 

gearbox, amongst many others. Touching these parts during operation can cause injury.

1. General:

 Lithium batteries (accumulators) are energy storage devices with a high energy 

density and can present risks. For this reason, particular care is needed when charging, 

discharging, storing and handling. Read these instructions very carefully before first using the 

battery. Do not fail to take note of the warning notices and instructions for use. Misuse can lead 

to risks such as explosion, overheating or fire. Failure to observe the instructions for use leads to 

early failure and other defects. The instructions should therefore be kept in a safe place and it is 

essential that they are handed over to the second user if the batteries are passed on.

2. Warning notices:

•  Avoid short-circuits. A short-circuit may well destroy the product. Cables and connections 

must be well insulated.

•  It is essential when connecting the battery to ensure that the polarity is correct. 

•  Original plug connectors and cables may not be cut off or changed - if need be, use an 

adapter cable.

•  Do not expose the battery to excessive heat or cold or to direct sunlight. Do not throw in the 

fire. Do not place the battery in contact with water or other liquids.

•  Charge the battery only with charging units intended for the purpose and always use the 

balancer connection. It is only by using the balancer connection that optimum charging can 

be ensured. If this connection is not used, charging is subject to the risks mentioned above. 

Before charging, always first allow the battery to cool to ambient temperature. Never charge 

while hot.

•  When charging, place the battery on a non-flammable, heat-resistant support. There should 

be no flammable or readily ignited objects in the vicinity of the battery.

•  During charging or operation, never leave the battery unsupervised.

•  Do not fail to keep to the recommended charge/discharge current. 

•  The battery casing must not be damaged. It is essential to avoid damage by sharp objects 

such as knives or the like, from dropping, impact, bending etc. Damaged batteries may no 

longer be used.

•  Batteries are not toys. They should be kept away from children.

3. Charging instructions: 

Lithium batteries are charged according to the CC-CV procedure. 

CC stands for “constant current“, which is applied during the first phase of charging. Once the 

battery reaches the maximum voltage configured in the charger, it switches to CV (constant 

voltage) for the second phase of charging. The battery voltage no longer increases. The charging 

current now falls continuously until the battery is fully charged. The maximum charging current 

for the battery is 1C (C=nominal capacity of the battery, e.g. for a battery with a nominal 

capacity of 2700 mA, the maximum charging current for the battery is 2700 mA (2.7 A)). Never 

charge several batteries together from a single charger. Differing states of charge and capacities 

can lead to overcharging and destruction.

4. Storage instructions: 

Lithium batteries should be stored charged to 20-50 % of their 

capacity and at a temperature of 15-18 °C. If the cell voltage falls below 3 V, they should be 

recharged. Deep discharge and storage when discharged (call voltage <3 V) will render the 

battery unusable.

5. General terms of guarantee: 

There is a legal guarantee for production and material faults 

as applicable at the time of dispatch. No liability is accepted for normal wear and tear. This 

guarantee does not apply for defects attributable to improper use, inadequate maintenance, 

third-party interference or mechanical damage. This applies, in particular, to used batteries 

and batteries clearly showing signs of use. Damage and loss of performance due to improper 

handling and/or overload are not product faults. Batteries are consumables and subject to a 

certain ageing. This is influenced by factors such as the charge/discharge currents, the charging 

procedure, the operating and storage temperatures and the state of charge during storage. 

The ageing shows itself in, among other things, an irreversible loss of capacity. In the model 

field, where batteries are frequently used to supply motors, very high currents can flow from 

time to time.

6. Exclusion of liability: 

Since we are unable to have any control over charge/discharge, handling, 

compliance with assembly and operating instructions, battery replacement and its care and 

maintenance, Tamiya / Carson can accept no liability for loss, damage or costs incurred. Any claim 

for damages that may result from operation, failure or faulty operation or that is in any way related 

thereto will therefore be refused. We accept no liability for personal injury or material damage and 

their consequences that arise from our delivery. 

7. Disposal instructions: 

Batteries are hazardous waste. Damaged or unusable cells must be 

disposed of in the correct manner.

No liability for printing errors, we reserve the right to make changes!

SAFETY PRECAUTIONS LITHIUM BATTERIES

Summary of Contents for Climb Warrior 3.0

Page 1: ...anleitung 03 08 GB Instruction Manual 09 14 FR Avertissement de sécurité 15 16 IT Avvertenze di sicurezza 17 18 ES Indicaciones de seguridad 19 20 NL Veiligheidsinstructies 21 22 Montageanleitung Instructions 23 Ersatzteile Spare Parts 41 ASSEMBLED 100 READY TO RUN MODEL Climb Warrior 3 0 2 4 GHz ...

Page 2: ...n Lecontenudumanuelet lescaractéristiquestechniquesduproduitpeuventêtremodifiéessansannoncepréalable Voustrouverezlaversionactuelledumanuelàl adressesuivante www carson modelsport com Primadellaprimamessainfunzionedelprodottooprimadiogniordinazionediricambiverificareseilmanualeadisposizionecorrispondeallaversionepiùrecente Ilpresentemanualecontienegli allegatitecnici leistruzioniimportantiperlacor...

Page 3: ...durch Nichtbeachten der Sicherheitsanweisungen oder der Bedienungsanleitung höhere Gewalt Unfall fehlerhafte oder außergewöhnliche Beanspruchung fehlerhafte Handhabung eigenmächtige Veränderungen Blitzschlag oder anderer Einfluss von Hochspannung oder Strom Schäden die durch den Verlust der Kontrolle über Ihr Produkt entstehen Reparaturen die nicht durch einen autorisierten CARSON Service durchgef...

Page 4: ...ungenoderFeuerführen NichtbeachtungderVerwendungshinweiseführt zuvorzeitigemVerschleißodersonstigenDefekten DieseAnleitungistsicheraufzubewahrenund imFalleeinerWeitergabedesAkkusdemnachfolgendenBenutzerunbedingtmitzugeben 2 Warnhinweise VermeidenSieKurzschlüsse EinKurzschlusskannunterUmständendasProduktzerstören KabelundVerbindungenmüssengutisoliertsein AchtenSieunbedingtaufrichtigePolung beimAnsc...

Page 5: ...m eine 100 ige Funktion des Fahrreglers zu gewährleisten ist es unbedingt notwendig den TH TYPE Gas Verteilung auf den Wert 50 50 einzustellen Schalten Sie den Fahrregler aus und den Sender ein Stellen Sie alle Werte ihres Sendersauf 100 Wir empfehlen dringend die Failsave Funktion zu aktivieren Auswahl Ton Akkutyp 1x kurz beep NiMh Akku 2xkurz beep 2sLiPo 3xkurz beep 3sLiPo Longonebeep Normaloper...

Page 6: ...S Fahrmodus und Akku Mode werden über einen Jumper eingestellt Jumper Einstellungen Modellauswahl F B R Vorwärts Bremse Rückwärts Boot Vorwärts Rückwärts ohne Bremse Crawler Modus Vorwärts Rückwärts Handbremse Werkseinstellung Akku LiPo Fahrmodus F B R vorwärts bremsen rückwärts SCHUTZFUNKTIONEN 1 Batterieschutz Regler erkennt Unterspannung der Batterie Stufe 1 Regler begrenzt die Leistung Stufe 2...

Page 7: ...t hängen Drehen Sie das Steuerrad bis zum Anschlag nach rechts und links Die Räder sollen dem Lenkausschlag folgen Zum Regeln der Fahrgeschwindigkeit betätigen Sie den Gas Bremshebel nach hinten Vorwärtsfahrt Gas geben bzw nach vorne Bremsen Rückwärtsfahrt Neutral Links Rechts Vorwärtsfahrt Gasgeben Bremsen Rückwärtsfahrt 1 Schließen Sie den Fahrakku an 2 Karosserie aufklappen und einschalten 3 1 ...

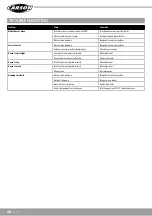
Page 8: ...ie Empfängerantenne Modell fährt nicht geradeaus Lenkungstrim ist nicht korrekt eingestellt Justieren Sie die Trimmung am Drehknopf Radmuttern sind lose Ziehen Sie die Radmuttern fest an Modell bleibt nicht stehen Trimmung für den Gas Bremshebel ist nicht korrekt eingestellt Justieren Sie die Trimmung Modell fährt nicht rückwärts Trimmung für den Gas Bremshebel ist nicht korrekt eingestellt Justie...

Page 9: ...roducts may be used in the performance of warranty services Repaired or replaced parts and products are warranted for the remainder of the original warranty period You will be charged for repair or replacement of the product made after the expiration of the warranty period TheWarrantydoesnotcover Damage or failure caused by or attributable to acts of God abuse accident misuse improper or abnormal ...

Page 10: ...tial that they are handed over to the second user if the batteries are passed on 2 Warning notices Avoid short circuits A short circuit may well destroy the product Cables and connections must be well insulated It is essential when connecting the battery to ensure that the polarity is correct Original plug connectors and cables may not be cut off or changed if need be use an adapter cable Do not e...

Page 11: ...y necessary to set the TH TYPE gas distribution to the value 50 50 Switch off the speed controller and switch on the transmitter Set all values of your transmitter to 100 We strongly recommend activating the failsave function Battery type selection sound with Beep Short one beep Nimh battery short two beep 2s Lipo short three beep 3s Lipo Long one beep Normal operation LED indication when operatio...

Page 12: ...ving mode and battery mode are set via a jumper Jumper settings Model selection F B R forward brake backward Boat forwards backwards without brake Crawler mode forward backward handbrake Factory setting Battery LiPo Driving mode F B R forwards braking backwards Protective functions 1 Battery protection controller detects undervoltage in the battery Level 1 Controller limits the power Stage 2 contr...

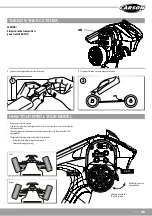
Page 13: ... to follow the steering direction If the wheels operate in the opposite direction operate the servo Reverse switch ST in position REV To regulate the driving speed actuate the throttle brake backwards forward driving accelerating or forwards braking reversing Neutral Left Right driving forward to give speed braking reverse movement 3 1 1 Connect the rechargeable battery for the driving 2 To remove...

Page 14: ...perly Attach receiver antenna Doesn t run straight Steering trim is not adjusted correctly Make adjustment Front and rear wheel nuts are too lose Tighten wheel nuts Doesn t stop Throttle trim is not adjusted correctly Make adjustment Doesn t reverse Throttle trim is not adjusted correctly Make adjustment Wrong action Control properly Running too slowly Batteries have run down Change batteries or c...

Page 15: ...emplacées ne sont sous garantie que pour la durée restante de la période de garantie initiale Après expiration de la période de garantie les réparations effectuées ou les pièces détachées fournies sont facturées Lagarantienecouvrepas Tout dommage ou défaillance causé par force majeure abus accident utilisation abusive erronée ou anormale non respect des instructions mauvaise mise en route ou maint...

Page 16: ...sexplosions desproblèmesdesurchauffeoudesincendies Lenon respectdesconsignes d utilisationpeutentraîneruneusureprématuréedel accuetd autresdéfauts Cesinstructions doiventêtreconservéesdansunendroitsûretremisesimpérativementavecl accuauxpersonnes amenéesàmanipulerl appareil 2 Misesengarde Évitezlescourts circuits carcelapeutdétruirel appareil Lescâblesetlesconnexionsdoiventêtre bienisolés Faitesbie...

Page 17: ...rodotto originale Dopo la scadenza del periodo di garanzia sarà addebitato il costo di eventuali riparazioni o sostituzioni Dallagaranziasonoesclusi Danni o cadute derivanti dalla mancata osservanza delle istruzioni d uso e di sicurezza da cause di forza maggiore incidenti utilizzo scorretto o improprio maneggiamento erroneo modifiche arbitrarie fulmini o altri incidenti causati da eccesso di volt...

Page 18: ...taosservanzadellepresentiistruzioniperl usodeterminal usuraprecoceo persinodifettidellabatteriastessa Taliistruzionidevonoessereconservateinunluogosicuroe in casodicessionedellabatteria consegnatesenzaeccezioniall utentesuccessivo 2 Avvertenze Evitarecortocircuiti Indeterminatecircostanzeuncortocircuitopuòdistruggereilprodotto I cavieicollegamentidevonoesserebenisolati Assicurarsidicollegarelabatt...

Page 19: ...iginal Las reparaciones realizadas o las piezas de recambio entregadas una vez finalizado el periodo de garantía serán facturadas Estánexcluidosdelagarantía Daños o averías derivados de la falta de observancia de las indicaciones de seguridad o el manual de instrucciones fuerza mayor accidente uso erróneo o fuera de lo corriente manejo erróneo modificaciones por cuenta propia rayo o cualquier otro...

Page 20: ...asinstruccionesdebenguardarseenunlugarseguroy deberánentregarsesinfaltacuandosedélabateríaalsiguienteusuario 2 Advertencias Eviteloscortocircuitos Uncircuitopodríadañarelproductobajodeterminadascircunstancias Loscablesylasconexionesdebenestarbienaislados Tengasiemprecuidadoderespetarlapolaridadcorrectaalconectarlabatería Losenchufesoriginalesyloscablesnodebenacortarsenimodificarse emplearcables ad...

Page 21: ...tijd van de oorspronkelijke garantietermijn Na afloop van de garantietermijn uitgevoerde reparaties of geleverde reserveonderdelen worden in rekening gebracht Uitgeslotenvandegarantiezijn Beschadiging of uitval door niet naleving van de veiligheidsinstructies of de bedieningshandleiding overmacht ongeval foutief of uitzonderlijk gebruik foutieve hantering eigenhandige modificaties blikseminslag of...

Page 22: ... Waarschuwingen Vermijd kortsluiting Kortsluiting kan het product onder bepaalde omstandigheden vernielen Kabels en aansluitingen moeten goed geïsoleerd zijn Let beslist op de juiste polariteit bij het aansluiten van de accu Originele stekkers en kabels mogen niet worden afgesneden of aangepast eventueel adapterkabel gebruiken De accu mag niet worden blootgesteld aan extreme hitte koude of directe...

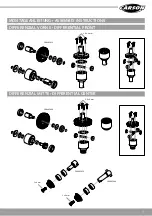
Page 23: ...23 MONTAGEANLEITUNG ASSEMBLY INSTRUCTIONS DIFFERENZIAL VORNE DIFFERENTIAL FRONT DIFFERENZIAL MITTE DIFFERENTIAL CENTER 500405652 2 0 x 8 mm 500405652 3 x 8 mm 3 x 8 mm 500405664 500405664 2 0 x 8 mm ...

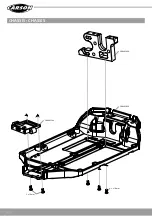
Page 24: ...24 CHASSIS CHASSIS 500405484 500405658 500405344 3 x 10 mm 3 x 10 mm ...

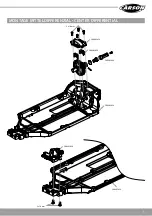
Page 25: ...25 MONTAGE MITTELDIFFERENZIAL CENTER DIFFERENTIAL 500405658 500405658 500405658 500405658 500405656 3 x 10 mm 500405664 3 x 10 mm ...

Page 26: ...TAGE VORDERACHSE ASSEMBLING FRONT UNIT 3 x 8 mm 500405650 500405658 500405359 500405652 500405650 500405656 3 x 12 mm 500405445 500405445 500405448 500405448 500405354 500405354 500405354 500405652 500405656 ...

Page 27: ...27 3 x 5 mm 500405350 500405420 3 x 5 mm 500405350 500405344 3 x 10 mm ...

Page 28: ...28 500405656 500405656 500405656 500405651 500405653 500405653 500405653 ...

Page 29: ...29 SERVOSAVER SERVOSAVER 3 x 10 mm 500405660 500405660 500405360 500405360 3 x 10 mm ...

Page 30: ...30 OBERDECK UPPERDECK 3 x 10 mm 500405360 500405360 3 x 10 mm 3 x 10 mm 3 x 12 mm 3 x 10 mm 500405658 500405658 ...

Page 31: ...31 STABILISATOR VORNE ANTI ROLL BAR FRONT LENKSERVO STEERING SERVO 500405663 3 x 8 mm 3 x 10 mm 500405653 500405653 500405658 ...

Page 32: ...32 MONTAGE MOTOR ASSEMBLING ENGINE HINTERACHSE REAR UNIT 500405659 4 x 4 mm 500405662 500405662 ...

Page 33: ...33 500405651 500405665 500405665 500405665 500405654 500405666 500405666 500405662 500405662 500405662 500405664 500405666 500405666 500405445 500405666 ...

Page 34: ...34 MONTAGE AKKUHALTERUNG ASSEMBLING BATTERYMOUNT 500405662 500405658 500405658 ...

Page 35: ...35 MONTAGE ÜBERROLLKÄFIG ASSEMBLING ROLLOVER CAGE ...

Page 36: ...36 ...

Page 37: ...37 MONTAGE STOSSDÄMPFER ASSEMBLING SHOCK ABSORBERS ...

Page 38: ...38 MONTAGE SEITENSCHUTZ ASSEMBLING SIDE PROTECTION MONTAGE KAROSSERIE ASSEMBLING BODY 500405688 ...

Page 39: ...39 MONTAGE RÄDER ASSEMBLING WHEELS 500900170 500900170 500405357 ...

Page 40: ...40 MONTAGE SPOILER ASSEMBLING WING 3 x 10 mm 500405496 ...

Page 41: ...triebswellen vorne CVD 2x Front set cvd 500405650 Obere Querlenkerhalter v h Upper turnbuckle holder f r 500405651 Kugellager Set Ball bearing set 500405496 Spoiler Wing 500405484 Motorhalter Engine mount 500405350 Querlenker Achsschenkelstifte v h Suspension c hub pin f r 500405344 Querlenkerhalter Set v h Suspension arm holder set f r 500405420 Querlenkerset Halter v h Suspensionarmset holder f ...

Page 42: ...et f r 500405659 Motorritzel Piniongear 500405656 Getriebegehäuse hinten Gearhousing rear 500405657 Schraubenset Screw set 500405658 Chassis anbauteile Set Chassis plates replacement set 500405660 Frontrammer Frontbumper 500405662 Schwingen Set hinten Rear Arms Set 500405663 Stabilisator vorne Stabilisator front 500405664 Hauptzahnrad Antriebs welle hinten Maingear rearshaft ERSATZTEILE SPARE PART...

Page 43: ...ARTS 500405665 Starrachse hinten Fixed drive rear 500405666 Hinterachse Rear axle 500900170 Räder Wheels 500800107 Karosserieteile Bodyparts 500405688 Seitenschutz 2 Side guards 2 500405661 Gitterrohrrahmen Set Rollcage set ...

Page 44: ...rvice Hotline for Germany Mo Do 8 12 Uhr 12 30 16 Uhr Fr 8 12 30 Uhr CARSON Model Sport Abt Service Mittlere Motsch 9 96515 Sonneberg TAMIYA CARSON Modellbau GmbH Co KG Werkstraße 1 D 90765 Fürth www carson modelsport com ...

Reviews: