background image


i-Vu® XT Router (drv_gen5) 


CARRIER CORPORATION ©2022   

Installation and Start-up Guide 

All rights reserved 


Using a computer and an Ethernet cable, you can communicate with the i-Vu® XT Router through a web browser 
to: 


View the router's Module Status report 


View/change router and network settings. Changes take effect immediately after clicking 


Troubleshoot 
 

You can set a site level 

Device Password

 to restrict access to the Service Port controller setup pages of a device 

with a drv_gen5 driver. Set up the password in any of the following locations: 


In SiteBuilder, in the site dialog box  


In the i-Vu® interface, on the system level, on the 

Devices 

>

 Advanced

 tab  


If you have multiple sites, in the i-Vu® interface, at the site level > 

Properties

 page 


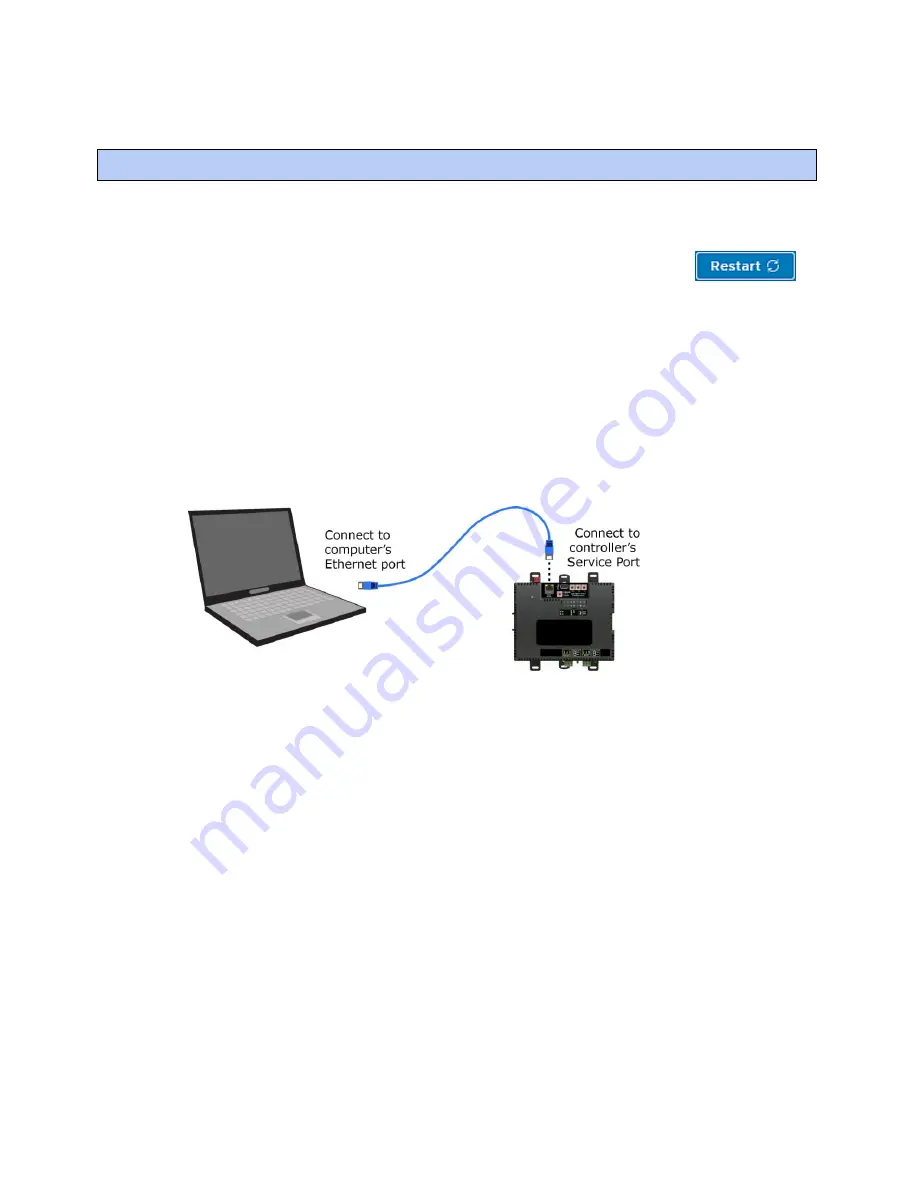
Connect an Ethernet cable from a computer to the router as shown below. 


Turn off the computer's Wi-Fi if it is on. 

If your computer uses a static IP address, use the following settings: 


Address: 169.254.1.x, where x is 2 to 7 


Subnet Mask: 255.255.255.248 


Default Gateway: 169.254.1.1  

 If it uses a DHCP address, leave the address as it is. 

Open a web browser on the computer.  

Navigate to http://local.access or http://169.254.1.1 to see the Service Port controller setup pages. 


NOTE

  The first time you access the router in the i-Vu® interface after you have changed settings through the 

Service Port, be sure to upload the changes to the system database. This will preserve those settings when you 
download memory or parameters to the router. 


Connecting to the router through the Service Port 

Summary of Contents for i-Vu XT

Page 1: ...Installation and Start up Guide i All rights reserved i i V Vu u X XT T R Ro ou ut te er r d dr rv v_ _g ge en n5 5 I In ns st ta al ll la at ti io on n a an nd d S St ta ar rt t u up p G Gu ui id de...

Page 2: ...version of this document from www hvacpartners com the Carrier Partner Community website or your local Carrier office Important changes are listed in Document revision history at the end of this docu...

Page 3: ...djusting driver properties and controller setup through the Service Port or the i Vu interface 20 Connections tabs 20 Device tab 20 Gig E Port using BACnet IPv4 22 Gig E Port using BACnet IPv6 or BACn...

Page 4: ...XT Router part no XT RB with drv_gen5 driver Provides BACnet routing between any supported BACnet communication types Supports DHCP IP addressing Can serve as a BACnet Broadcast Management Device BBM...

Page 5: ...t for BACnet IP and or BACnet Ethernet communication on the Ethernet at 10 100 or 1000 Mbps full duplex Port S1 For communication with either of the following A BACnet ARCNET network at 156 kbps A BAC...

Page 6: ...m status A TX Transmit and RX Receive LED for the following ports Gig E Port S1 Port S2 See LEDs page 36 Environmental operating range 40 to 158 F 40 to 70 C 10 95 relative humidity non condensing Phy...

Page 7: ...ubpart B Class A UL Listed to UL 916 PAZX Energy Management Equipment Canada Industry Canada Compliant ICES 003 Class A cUL Listed UL 916 PAZX7 Energy Management Equipment Europe Mark EN50491 5 2 2009...

Page 8: ...rew mounting when installing in a high temperature and high humidity environment DIN rail mount 1 Push down and pull out the center tabs shown below to clear the din rail trough on the back of the rou...

Page 9: ...reserved Screw Mount Leave about 2 in 5 cm on each side of the router for wiring Insert 6 screws through the mounting holes Use no more than 8 in lbs torque to secure plastic tab to mounting surface A...

Page 10: ...from the router s power terminals labeled 24 Vac Vdc 4 Connect the power supply s wires to the red screw terminal connector 5 Connect an 18 AWG or larger wire from the power supply s negative terminal...

Page 11: ...ave multiple sites in the i Vu interface at the site level Properties page 1 Connect an Ethernet cable from a computer to the router as shown below 2 Turn off the computer s Wi Fi if it is on 3 If you...

Page 12: ...ox In the i Vu interface on the system level on the Devices Advanced tab If you have multiple sites in the i Vu interface at the site level Properties page 5 Connect an Ethernet cable from a computer...

Page 13: ...page 15 To access the controller setup through the Service Port 1 Connect an Ethernet cable from a computer to the router as shown below 2 Turn off the computer s Wi Fi if it is on 3 If your computer...

Page 14: ...server The IP network uses a DHCP server for IP addressing NOTE Carefully plan your addressing scheme to avoid duplicating addresses If third party devices are integrated into the system make sure yo...

Page 15: ...right switch to the ones digit EXAMPLE The switches below are set to 125 2 On the Connections page under the Gig E Port tab Primary BACnet IP select Default IP Address in the drop down list for Addres...

Page 16: ...ted by a DHCP server The IP network uses a DHCP server for IP addressing Link Local This is an autogenerated private IP address used for local network segment communications Segment starts with FE80 S...

Page 17: ...s on the Connections page under the Gig E Port tab BACnet IPv6 select Default IP Address in the drop down list for Address Mode 3 Click CAUTIONS If you configure your i Vu XT Router to use link local...

Page 18: ...rt S1 tab type the address in the MAC Address field NOTE ARCNET is not supported on Port S2 For MS TP set up the port s baud rate 1 On the Connections Port S1 tab select the Baud Rate The default is 7...

Page 19: ...2 0 USB 1 Set the Port S1 Configuration rotary switch to 0 if the port is not used 1 for MS TP 2 for ARCNET 2 Default for MS TP is 76 8 kbps 3 See Connecting to the router through the Service Port pag...

Page 20: ...vice Use the BBMD Configuration Tool to Write read the Broadcast Distribution Table BDT of each BBMD device Allow controllers on one subnet to communicate with controllers on other subnets Enable the...

Page 21: ...If you are using Port S1 and the controller has a Port S1 Configuration rotary switch set it to 1 NOTE If Port S1 is not being used for any network set this rotary switch to 0 5 If the i Vu XT Router...

Page 22: ...r the controller Are you sure you want to do this When complete a check mark under Status indicates a successful upload NOTES If an error message appears click on the message to view an explanation Fo...

Page 23: ...tab to open the controller setup pages which are detailed below Connections tabs Use these pages to set up communication with the i Vu XT Router The fields are editable when the setup pages are access...

Page 24: ...depend on your Auto Name Scheme choice Location You can enter an intuitive location for the device in the i Vu interface This will be the device s display name when discovered through Find Devices Des...

Page 25: ...ation these numbers match those set using SiteBuilder Address Mode Select the type of addressing the router is to use See Addressing the i Vu XT Router Select Default IP Address to automatically assig...

Page 26: ...tem s application This sets the BACnet Address of the Device Object If the port is Enabled the user can set this port as the home network to identify it as the connection to the i Vu application Click...

Page 27: ...es a DCHP server for IP addressing Link Local An autogenerated private IP address used for local network segment communications Segment starts with FE80 SLAAC Used for Global Scope addressing and mult...

Page 28: ...et network This number must be unique for the system NOTE When downloaded from the i Vu application these numbers match those set using SiteBuilder MAC Address A factory assigned Ethernet MAC Address...

Page 29: ...stening URIs When set as a failover hub this is the web address used by network devices to connect to the hub The URI is derived from the IP Port configured on the Connections Gig E Port tab Minimum R...

Page 30: ...tion messages a controller may transmit before it must pass the token to the next controller Valid values are 1 to 255 TIP Set Max Info Frames to a number in the range 20 to 100 so that the router doe...

Page 31: ...em End of Network Indicates status of the router s End of Net switch Max Master To increase MS TP performance enter the highest address used on the MS TP network for a master controller This number mu...

Page 32: ...rough the network that the Gig E Port is connected to See Connecting to the router through the Gig E Port NOTE You must first set a password in the i Vu application BACnet Whitelist for Gig E Enable B...

Page 33: ...lass A BACnet alarm s Notification Class defines Alarm priority for Alarm Fault and Return to Normal states Options for BACnet alarm acknowledgment Where alarms should be sent recipients Alarms in the...

Page 34: ...that do not support dynamic binding When you want alarms to be broadcast you must uncheck Issue Confirmed Notifications This use is rare Complete the Network Number and MAC Address fields if you are...

Page 35: ...or an alarm source or an alarm category Priority To Fault Priority BACnet priority for Fault messages To Normal Priority BACnet priority for Return to normal messages To Off Normal Priority BACnet pri...

Page 36: ...o use names on NTP 3 Check the Enable box 4 Click Restart BACnet Time Synchronization Time Synchronization Sensitivity When the router receives a time sync request if the difference between the router...

Page 37: ...ls System Support Logs Retrieve all Downloads all logs into a zip onto your computer Specific log Allows you to choose to download the application logs by date or the system logs Delete all Delete cap...

Page 38: ...if the BACnet SC communication interface needs to get through a proxy firewall to communicate out to other networks Proxy Server Address Set the IP address of the proxy host NOTE If you have a DNS set...

Page 39: ...connection problem No Ethernet Link Connect Ethernet Cable Check other network components Red 1 blink One of the following BACnet IP Ethernet DLL reporting issue Unable to create tasks Unable to open...

Page 40: ...Blue 1 blink Invalid address selected for protocol Invalid address selection for ARCNET MSTP Change rotary switch to valid address Blue 2 blink Router has same MAC address as another connected device...

Page 41: ...en Fast blink Installation of recently downloaded driver is occurring N A No action required Blue On Router is starting up N A No action required Blue Slow blink Linux operating system is starting up...

Page 42: ...erial number when troubleshooting the number is on A Module Status report Modstat A laser etched number and QR code on the circuit board inside the router Some routers have a sticker on the front with...

Page 43: ...ead screwdriver as shown below and then gently pry up the cover until it is released from the base 4 Remove the cover from the base 5 The fuse labeled F1 is located near the power connector Use a fuse...

Page 44: ...no longer communicates properties colors trends etc 1 On the i Vu navigation tree select the i Vu XT Router 2 On the Properties page check Out of Service 3 Click Accept To troubleshoot BACnet SC conne...

Page 45: ...ordance with this document it may cause harmful interference to radio communications Operation of this equipment in a residential area is likely to cause harmful interference in which case the user wi...

Page 46: ...nual command plus commands issued during a memory download System errors Error in the router s firmware or hardware S W Watchdog timeouts Watchdog is firmware that monitors the application firmware fo...

Page 47: ...te of the driver as well as all the bundles and versions Switch Settings Protocol Rotary The router s rotary switch setting for Port S1 protocol Address Rotary The router s rotary switch address MAC a...

Page 48: ...Important changes to this document are listed below Minor changes such as typographical or formatting errors are not listed Date Topic Change description Code 1 11 22 Specifications Updated EU Compli...

Page 49: ......

Page 50: ...Carrier 2022 Catalog No 11 808 826 01 1 11 2022...

Reviews: