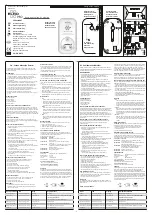
background image

3

Exhaust tube

Rubber
gasket

Cover gasket

(ordering option)

Sensor housing
and electronics

Rubber gasket

Sensor cover

Plug

Sampling tube

Collar

Power
Dirty

Trouble
Alarm

LEDs

Smoke Sensor

Fastener

(2X)

Controller cover

Conduit nuts

( field supplied )

Conduit support plate

Cover gasket

(ordering option)

Conduit couplings

Terminal block cover

Controller housing

and electronics

Power

Trouble

Alarm

LEDs

( field supplied )

Smoke Control Module

C07173

Fig. 2

---

Smoke Detector

SMOKE CONTROL MODULE

RETURN SMOKE SENSOR

A1

B1/A2

C1/B1

PLUG LOCATION

C07174

Fig. 3

---

Return Air Smoke Detector Location

ELECTRICAL SHOCK HAZARD

Failure to follow this warning could result in personal

injury and/or death.
Prior to installation of this accessory, make sure all

power is disconnected to the unit and locked out and

tagged.

!

WARNING

NOTE

: For horizontal applications it is easiest to install the

smoke detector prior to making duct connections.

1. Open the hinged electrical/compressor access door and

secure.

2. Find the 2 plugs located above compressor B1/A2,

remove and discard. Cut holes in the insulation located be-

hind the partition.

3. Remove cover from smoke detector. The screws will

remain captured in the cover.

4. Slide exhaust tube into the sensor. The exhaust tube

should be inserted from the back of the sensor, into the
hole with four slots, and locked into place. (See Fig. 2.)

5. Slide smoke detector into holes in partition with the

ter-

minal block to the right. Do not secure at this time.

6. Slide the sampling tube collar over the sampling tube un-

til the tabs lock into the tube. (See Fig. 2.)

7. Slide long sampling tube (P/N RN20ZT060) into left--

hand hole of smoke detector. It might be necessary to tilt
the smoke detector upwards in order to properly align the

sampling tube,

making sure that the sampling holes

point DOWN.

(See Fig. 4.)

8. Install plug into far end of sampling tube.
9. Remove the unit side panel at the return end of the unit.

Save screws for use later.

CR

S

M

K

Summary of Contents for 48/50HG014-028

Page 1: ...ric technology for the detection of smoke This detection method when combined with an efficient ducting design samples air passing through the unit If sufficient smoke is sensed an alarm signal is initiated and the ComfortLink controls will shut down the unit With the unit shut down the unit will not blow toxic smoke and fire gases throughout the areas served by the duct system The return air smok...

Page 2: ...UST be operated within ALL electrical and environmental specifications listed in this manual Failure to comply with these requirements may prevent the detector from activating when smoke is present in the air duct WARNING INSTALLATION EQUIPMENT DAMAGE HAZARD Failure to follow this caution may result in equipment damage When installing the smoke detector in the unit follow all local codes CAUTION C...

Page 3: ...ke detector prior to making duct connections 1 Open the hinged electrical compressor access door and secure 2 Find the 2 plugs located above compressor B1 A2 remove and discard Cut holes in the insulation located be hind the partition 3 Remove cover from smoke detector The screws will remain captured in the cover 4 Slide exhaust tube into the sensor The exhaust tube should be inserted from the bac...

Page 4: ...50PG Humidi MiZert units because they have plug 19 harness already installed in the control box The harness assembly part number 50TG403507 that came with the accessory is not used Factory installed PL 19 can be located outside the contol box by its appropriate label For Humidi MiZer smoke detector wiring refer to Fig 8 16 Connect PL 19 from the smoke detector control module to the PL 19 on the co...

Page 5: ...to installation of this accessory make sure all power is disconnected to the unit and locked out and tagged WARNING 1 Open the indoor fan access door and secure 2 Open and secure hinged electrical compressor access door 3 Disconnect wires located on the right hand side of the fan deck On gas heat units the indoor fan plug and the limit switch quick connects must be disconnected On units without ga...

Page 6: ...6 C07178 Fig 7 Smoke Detector Wiring on Electro Mechanical Control Units C07179 Fig 8 48 50PG Humidi MiZert Smoke Detector Wiring CRSMK ...

Page 7: ...On 48PG Humidi MiZer units the control box harness has a jumper plug attached This needs to be disconnected so PL 19 from the smoke detector can be snapped in 20 Route cable from supply smoke sensor along the outside of the control box through the control module knockout and connect to the J1 RJ 45 connector 21 Using wire ties secure the wiring so it does not interfere with unit operation 22 Repla...

Page 8: ...d in the unit Default password is 1111 Use the arrow keys to scroll the red LED on the display to the Configuration position and press ENTER Scroll through the menu until UNIT is found and press ENTER After reaching the UNIT sub menu scroll to FS SW Fire Shutdown Input and press ENTER twice change the value to 1 Normal Open with the arrow keys press ENTER again Press ESCAPE three times to return t...

Page 9: ...after S Perform a sensor alarm test on each sensor connected to the controller upon installation and once every 12 months thereafter S Perform a sensor dirty test upon installation and once every 6 months thereafter or more frequently as conditions warrant Sensor Tests Sensor Alarm Test The sensor alarm test checks a sensor s ability to signal an alarm state This test requires the use of a SD MAG ...

Page 10: ...nd JP3 are set correctly on the controller before applying power 2 Verify that power is applied to the controller s supply in put terminals If power is not present replace or repair wir ing as required Trouble LED Controller s Trouble LED is On 1 Check the Trouble LED on each sensor connected to the controller If a sensor s Trouble LED is on determine the cause and make the necessary repairs 2 Che...

Reviews: