background image

1-7

z

Movie recording and playback (selectable pixel size from QVGA and Q

2

VGA )

The PowerShot A200/A100 can record movies in QVGA (320 × 240 pixels) and Q

2

VGA (160 × 120 pixels)

formats at 20 frames/second (15 f/s with the PowerShot A100). Up to ten seconds continuous recording is
possible in QVGA, and up to 30 seconds in Q

2

VGA format.

The focus, exposure, WB and zoom settings are set at the start of recording, and are used until finished record-
ing. While recording, the available time remaining is displayed on the LCD. The movie file format is Motion
JPEG.

*

When the remaining capacity of the CF is less than the buffer memory capacity, recording can continue until the
time determined by the remaining capacity of the CF.

z

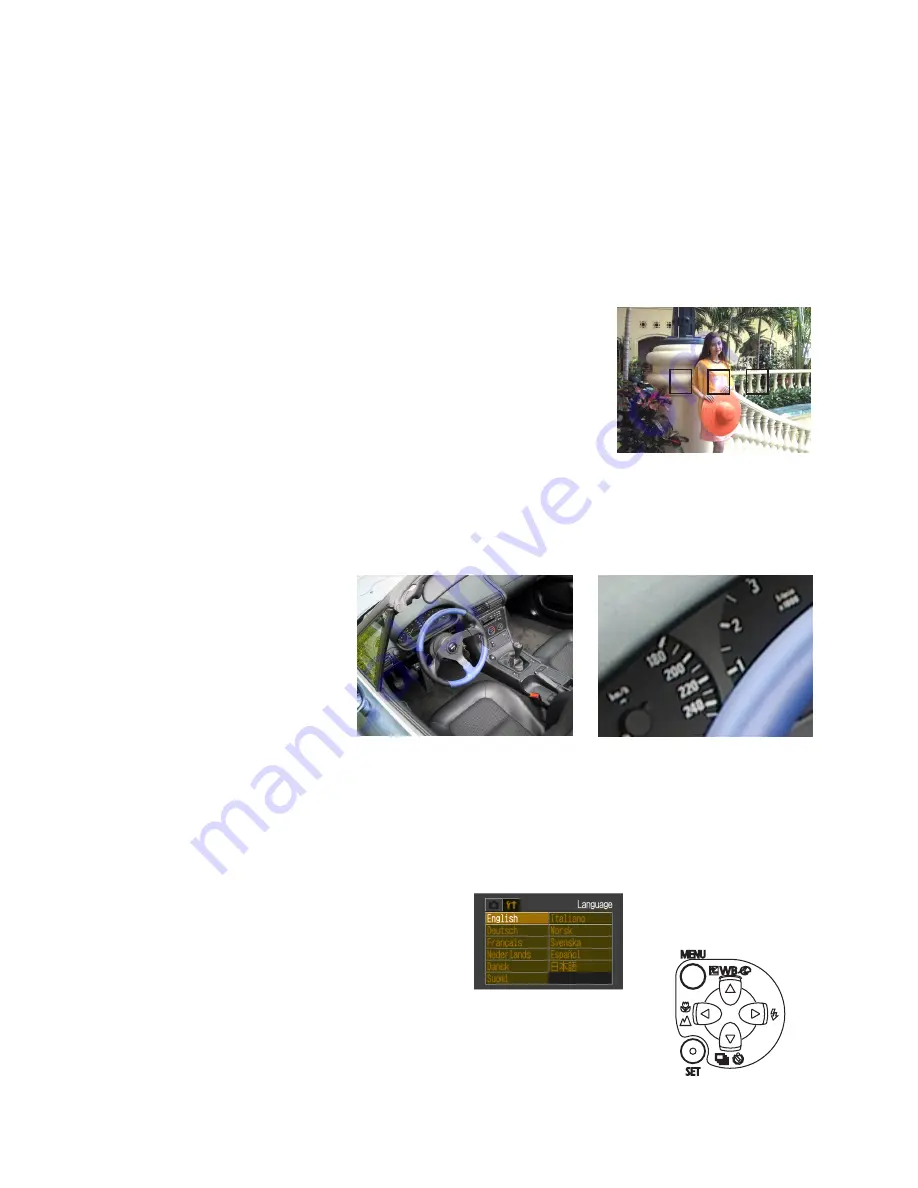
AF Frame (3-point) auto selection (AiAF) and center single-point

   selection (AF)

The PowerShot A200/A100 incorporates both the 3-point AiAF method
in which the camera automatically determines the proper AF frame from
three measurement points, and the standard AF method that uses a single
center point, so the user can select the best method depending on
photographic conditions.

z

Magnified playback for convenient image review
(from approx. 2x to 10x zoom)

During playback, the displayed image can be magnified with continuous zoom from two to ten times. Also, by
pressing the SET button when setting magnification, the magnification steps in three preset ratios of 2.5, 5 and
10x.
Magnified images can be scrolled
to view a desired region.

z

High speed continuous shooting (approx. 3 images/sec.(PA A100) when LCD monitor is off)

The PowerShot A100 can shoot continuous pictures at up to approx. 3 images per second (PS A200 : approx. 2
images per second). The maximum number of continuous images that can be taken are 10 (PS A100), 7 (PS
A200) in the Large/Fine mode.

z

Eleven-language international GUI support

The LCD menu on the PowerShot A200/A100
supports eleven languages, expanding the number
of native-language environments for the camera.
The following languages are supported.

z

Convenient operation using cross-configured buttons, with a new GUI

Despite the PowerShot A200/A100 being a low-priced model, a cross-configured
button arrangement is adopted, resulting in very easy operation. The GUI layout
 is also simplified.

Fig. 2-2  Cross-configured buttons

Photo 2-3  3-point AiAF

When AF frame is selected, frame turns on to green.

Photo 2-4  Magnified playback

<Original>

<10X>

Summary of Contents for PowerShot A100

Page 1: ......

Page 2: ...od Canon may issue new editions of this manual The following paragraph does not apply to any countries where such provisions are inconsistent with local law Trademarks The product names and company names described in this manual are the registered trademarks of the individual companies Copyright This manual is copyrighted with all rights reserved Under the copyright laws this manual may not be cop...

Page 3: ... the reading should be between 1MΩ and 5 2MΩ When the exposed metal does not have a return path to the chassis the reading must be 4 2 Leakage Current Hot Check 1 Plug the AC cord directly into the AC outlet Do not use an isolation transformer for this check 2 Connect a 1 5KΩ 10 watt resistor paralleled by 0 15µF capacitor between each exposed metallic parts on the unit and a good earth ground suc...

Page 4: ......

Page 5: ... 10 2 3 High Grade Design 1 12 2 4 System Accessories and Software 1 13 3 Exterior 3 1 Camera 1 15 3 2 6 dimensional views 1 17 3 3 Nomenclature 1 18 3 4 User Interface display 1 19 4 Specifications 4 1 Camera Specifications 1 22 4 2 System Requirements 1 28 4 3 Specifications of Major Accessories 1 29 5 System 5 1 Accessory compatibility 1 31 5 2 System Diagram 1 33 CHAPTER 1 GENERAL DESCRIPTION ...

Page 6: ......

Page 7: ... 1 3 megapixel PowerShot A100 which will be distinguished from other brands by a combination of high end features such as primary filters plus a new image engine movie recording and Camera Direct features and basic features such as a fixed focus lens and simple operation aimed at this class of users 1 2 Product Concept Because these models are aimed at users purchasing a digital camera for the fir...

Page 8: ...sly 4X PS A200 3 2X PS 100 Stress free operation with 1 4 sec interval shooting OVF PS A100 Built in flash with four flashing modes Low temperature polysilicon 1 5 inch LCD monitor with power saving backlight approx 120k pixels Total of nine image quality modes 3 recording pixels X 3 compression ratio Rec review function instant erase possible while reviewing High Speed image Transfer during playb...

Page 9: ...ts z Freshness A fresh and intimate appearance to suit an entry model that is easy for anyone to use Bright Silver color for a bright cheerful appearance Exterior design using plastic skillfully for excellent handling Details utilizing different materials such as clear plastic chrome and elastomer z Sincerity Basic ease of use camera intended to distinguish itself from the cheap Toy Cameras Adheri...

Page 10: ...At Auto setting camera automatically adjusts speed according to ambient light from ISO 64 to ISO 150 equivalent Auto 64 100 200 400 At Auto setting camera automatically adjusts speed according to ambient light from ISO 64 to ISO 150 equivalent Normal 20cm 2m Macro 5 20cm White balance Auto Preset 5 positions Shooting mode Auto manual stitch assist movie Photo effect mode Vivid Neutral Low sharpeni...

Page 11: ...int area can be positioned by the upper side center or lower side see Photo 2 1 With card size printing single stickers the size of the whole print sheet can be made as well as eight stickers per card sheet A new image engine in the camera provides the high speed color processing calculations for printing that are normally performed by the PC printer driver Photo 2 1 Printing area Card size print ...

Page 12: ... NiMH batteries may also be used so the user can choose the best battery type according to the usage situation and environment 1 Manganese batteries cannot be used Also because alkaline batteries vary considerably among manufacturers it is preferable to use brands recommonded by Canon 2 NiCd battery capacity also varies considerable among manufacturers so we do not recommend their use zOne click o...

Page 13: ...tions z Magnified playback for convenient image review from approx 2x to 10x zoom During playback the displayed image can be magnified with continuous zoom from two to ten times Also by pressing the SET button when setting magnification the magnification steps in three preset ratios of 2 5 5 and 10x Magnified images can be scrolled to view a desired region z High speed continuous shooting approx 3...

Page 14: ...h of the PowerShot A200 A100 can be set to four lighting modes auto red eye reduction auto on off and slow synchro according to the photographic situation When the flash is charging the LCD moniter turns off owing to power saving function zLow Temperature Poly Siillcon TFT LCD Monitor approx 120k pixels The LCD 1 5 inch monitor in the PowerShot A200 A100 adopts a power saving white LED backlight A...

Page 15: ...ken The PowerShot A200 A100 supplements this feature with the Erase One Image mode activated by the button with the same name This feature allows an undesired image to be erased immediately after the photo is taken so it does not take up memory space An image is displayed continuously on the LCD monitor while the shutter button is pressed and if the SET button is pressed while an image is displaye...

Page 16: ...as those in the PowerShot A20 A10 but the screen size is reduced from 1 2 7 type to 1 3 2 type making the smaller optical system possible However when images photographed with the PowerShot A200 A100 are printed on the CP 100 the resolu tions are as shown in Table 2 2 z High resolution single focus F2 8 lens 35 mm equivalent 39 mm The PowerShot A200 A100 incorporates a newly developed 5 mm F2 8 si...

Page 17: ...cent Lamp H for a total of five setting positions Recently color rendering of fluorescent lamps has varied covering a wide range of high and low color temperature objects Therefore the Fluorescent Lamp position supports relatively lower color temperatures such as white and daylight white and the Fluorescent Lamp H position supports relatively higher color temperatures such as daylight color The re...

Page 18: ...format but the image storage capacity is much less than that of the JPEG baseline recording format The Super Fine mode compression is not lossless so the original data cannot be completely restored but be cause the compression ratio is extremely low the block distortion peculiar to JPEG is practically eliminated Also this mode is good for general use because of the short processing time and abilit...

Page 19: ...n creating service My Book Cellular telephone support name undetermined DP Service prints up to L size double sided for Japanese market only ZoomBrowser EX 3 3 A100 3 4 A200 Win ImageBrowser 2 3 A100 A200 Mac featuring improved ease of operation ImageBrowser 2 3 Mac is supported by Mac OS 10 1 though not by Mac OS 10 In the previous version rotating a JPEG image required the image to be decompress...

Page 20: ...ges From this version the TWAIN driver and UI share the same development prosess Also loading RAW data into ZoomBrowser EX 3 3 3 4 Win and ImageBrowser 2 3 Mac causes RAW Image Converter 2 0 to load automatically for developing and saving the data This application is not available for the PowerShot A200 and A100 because they cannot record RAW data Apple QuickTime 5 0 Unchanged from previous versio...

Page 21: ...a These photos have slightly different exterior from mass production model because of prototype Photo 3 1 PowerShot A200 front Photo 3 2 PowerShot A200 rear Photo 3 3 PowerShot A200 top Bright silver Smoke gray Titanium metalic ...

Page 22: ... slightly different exterior from mass production model because of prototype Photo 3 4 PowerShot A100 front Photo 3 5 PowerShot A100 rear Photo 3 6 PowerShot A200 A100 operation part Bright silver Smoke blue Titanium metalic ...

Page 23: ...1 17 3 2 6 dimensional views The size of PowerShot A200 is the same as PowerShot A100 110 0 4 33 58 0 2 28 36 6 1 44 39 8 1 57 Unit mm inch ...

Page 24: ...utton Flash Lens Optical Viewfinder Window Lens Cover CFCard Slot Battery Cover Tripod Socket Strap Eyelet Date Battery Holder Shutter Button Exposure Compensation WB White Balance Photo Effect Button LCD Monitor Viewfinder Indicators Macro Infinity Button SET Button Flash Button Continuous shooting Self Timer Button Zoom Button Shooting Tele photo Wide Angle Replaying Magnifying images Index View...

Page 25: ...Deutsch y Francais y NederLands y Dansk y Suomi y Italiano y Norsk y Svenska y Espanol y A100 Rec mode Auto Although the layout of these screens may differ slightly from that of the final product there is no change operationally y On y Off File No Reset 3 4 User Interface display y On y Off AF assist Beam y Off y 2Sec y 10Sec Review Digital Zoom y On y Off ...

Page 26: ...te Blance Auto Daylight Cloudy Tungsten Fluorescent Fluorescent H Exposure Compensation 2 2 Focus Normal Macro Infinity Drive Single Shot Shooting continuously Flash Red eye reduction auto ON OFF Slow syncro speed Self timer 10sec Remaining Image Capacity ISO Speed Auto 64 100 200 400 Compression Resolution Super Fine Fine Normal 3 ...

Page 27: ...1 21 Transfer Order DPOF Order Set up Print Type Date File No Print DPOF order y Standard y Index y Both y On y Off y On y Off Transfer Mark all ...

Page 28: ...ent to 1 3 2 inch size equivalent to 1 3 2 inch size 2 75 H X 2 75 V micron 3 5 H X 3 5 V micron 0 108 X 0 108 m in 0 14 X 0 14 m in Approx 2 1 million 1 704 X 1 257 Approx 1 3 million 1 344 X 971 Primary color filter Beyer 5 mm 39 mm 35mm film equivalent 2 8 5 pieces in 5 groups include 1 aspherical lens 20 cm 0 67 ft infinity 5 cm 0 17 ft 20 cm 0 67 ft Max shooting area PS A200 46 X 34 mm 1 8 X ...

Page 29: ...he LCD monitor turns off owing to power saving function Auto Manual Stitch assist Movie Vivid color Neutral color Low sharpening Sepia Black White Approx 2 images sec PS A200 Large Fine LCD monitor OFF Approx 3 images sec PS A100 Large Fine LCD monitor OFF Number of shooting pictures Operates with 10 seconds countdown Auto ISO50 PS A200 only 64 PS A100 only 100 200 and 400 At Auto setting camera a...

Page 30: ... peripheral device DCF format are erased Regarding Canon digital cameras images taken by PowerShot Pro70 or prior models are not erased Images taken by PowerShot A50 DCF format or latest models are erased except EOS D2000 D6000 However images which are protected are not erased L SF L F L N M SF M F M N S SF S F S N File Size 957KB 611KB 302KB 450KB 294KB 155KB 208KB 141KB 79KB FC 8M 7 11 24 16 24 ...

Page 31: ...e AA battery Panasonic LCD ON Approx 90 A200 100 A100 images LCD OFF Approx 300 A200 380 A100 images Size AA NiMH battery NB 1AH LCD ON Approx 200 A200 210 A100 images LCD OFF Approx 550 A200 630 A100 images Canon s standard conditions of measuring shooting capacity are as follows Normal temperature 23 Celsius degrees LCD viewfinder is ON Shoot images with 20 seconds intervals Use flash at every 4...

Page 32: ...e Auto Red eye reduction auto ON OFF Slow syncro Macro Single Continuous Self timer Photo effect AF frame selection 3 points AiAF 1 1 1 1 1 point Exposure compensation White balance Auto only L M S Movie 320 240 Movie 160 120 Superfine Fine Normal JPEG M JPEG ISOequivalent speed Auto only Auto only Auto only Digital zoom AF assist beam off Flash Recording format Compression level Recording pixels ...

Page 33: ...le up to definite movie shooting timesize Corrupted data message displayed Since the PS G2 PS G1 Pro90 IS EOS D30 s RAW has an internal JPEG file for playback a full screen image is displayed However if the RAW from the PS A50 and previous models is played back with the PS G2 PS G1 Pro90 IS EOS D30 thumbnails will be displayed PS 350 PS A5 A5 Z PS Pro70 PS A50 PS S10 S20 IXY DIGITAL PS G1 Pro90 IS...

Page 34: ...B or more 1 ImageBrowser 2 3 20MB or more PhotoStitch 3 1 30MB or more Remotecapture 2 4 15MB or more Raw Image Converter 2 0 10MB or more USB Mounter 1 4 5MB or more USB Plug In Module 4 3 15MB or more CP 10 PrinterDriver 3 8MB or more 1 1 Capacity for installation P S A 2 0 0 ZoomBrowser EX 3 4 PhotoRecord 1 4 120MB or more PhotoStitch 3 1 40MB or more RemoteCapture 2 5 20MB or more USB TWAIN Dr...

Page 35: ...A Ni MH battery rechargeable Voltage 1 2 V DC Capacity 1600 mAH 1550 mAH min Ambient temperature 0 40 ºC Dimensions Approx 14 5 0 57 dia x 50 1 97 mm inch Weight Approx 27 0 95 oz g zBattery Charger CB 3AH Rated input 100 240 V AC 50 60 Hz 8 W Rated output Charging current 0 92 A average for 1 or 2 batteries 0 46 A average for 3 or 4 batteries Charging time Approx 110 min for 1 or 2 batteries appr...

Page 36: ...rect Interface Cable DIF 100 60 0 φ4 6 0 18 40 0 1 57 Unit mm inch zInterface Cable IFC 300PCU USB Series A 4 pin connector Series mini B 5 pin connector The dimensions are shown in Fig 4 4 zDirect Interface Cable DIF 100 Square type 10 pin connector Round type 5 pin USB connector The dimensions are shown in Fig 4 5 2 36 ...

Page 37: ...ter Charger CA PS100 100E O O O CA PS200 O CA PS300 O CA PS500 O 2 O O O 2 O CA 560 O O O CR 560 O O O CA PS800 O CB 2L 2LE O CB 2LS 2LSE O O CB 3AH O 3 O O CBK100 O 3 O O CB 2LT CB 2LTE O 2 It is possible to use by inserting the adapter s DC plug in the jack of PS A40 A30 A20 A10 cameras directly without using DC coupler 3 4 batteries 2 set of 2 can be recharged DC Coupler DR 100 100A O O O DR 20...

Page 38: ...O O O IFC 200PCS O O O IFC 200PCU O O O O O O IFC 200MC O O O IFC 300PCU O O O O O AD PC98 O O O O O O DIF 100 O O O O O O DIF 200 O 4 PS A30 only 5 PS A20 only 6 PS A40 only Case SC PS100 O O O SC PS300 O O SC PS400 O SC PS500 O SC PS600 O O SC PS700 O SHC PS200 O SHC PS300 O SC PS800 O SC PS900 O O All Weather Case Waterproof Case AW PS100 O AW PS110 O AW PS200 O O WP DC100 O WP DC200 O WP DC300...

Page 39: ...d Reader CF slot Type I PowerShot A200 A100 Waterproof Case WP DC400 Direct I F Cable DIF 100 IXY D300 A20 A10 compatible USB I F Cable IFC 300PCU IXY D300 A20 A10 compatible AC Adapter Kit ACK800 Compact Power Adapter CA PS800 Macintosh Windows Windows Macintosh Parallel I F Only Windows Digital DC CP 10 Camera direct printer CP 100 Batteries Size AA NiMH NB 1AH Battery Charger CB 3AH Canon Brand...

Page 40: ......

Page 41: ...r Supply Control 2 2 2 1 1 Power Supply Block Diagram 2 2 2 1 2 Power Control Sequence 2 2 2 2 Signal Processing 2 3 2 2 1 System Control 2 3 2 2 2 Picture Processing 2 4 3 Troubleshooting 3 1 When an Error Code is Displayed 2 5 3 2 When a Problem Occurs 2 7 CHAPTER 2 TECHNICAL DESCRIPTION CONTENTS ...

Page 42: ......

Page 43: ...rolling the power supply and the system by CPU Refer to Sections 2 1 and 2 2 4 Image processing and reading and writing the image signal to and from the CF card using DSP Refer to Section 2 2 2 5 LCD drive 6 Power supply drive DC DC converter 7 Backlight for LCD drive 1 2 FLASH UNIT 1 Flash drive and charging circuit for the flash Fig 1 FLASH UNIT MAIN PCB ASS Y RLS PCB ASS Y OPTICAL UNIT ...

Page 44: ...RTER CPU VBATT FUSE E1 OUTPUT E2 OUTPUT E3 OUTPUT VBATT for System Control for DSP for Image Process CCD etc for System Control for LCD E1 E2 E3 MAIN PCB ASS Y VCC1M 3 3V VDD2 15V VEE2 7 5V VCC2 4 2V VDD34 13 5V VCC3 4 2V for Motor Drive 3 0V REG REG REG 2 5V 2 5V VCC1 3 3V VCC1A 3 3V 2 1 2 Power Control Sequence Battery is Installed or DC IN Shooting Mode LCD OFF E2 LCD ON E2 E3 Playback Mode Tur...

Page 45: ...A D CCD signal processing and conversion of the digital data LCD Driver Driving the LCD FLASH MEMORY Firmware memory DSP Picture processing RTC Clock count for watch AF Support LED AF auxiliary self timer and red eye protection also serves as a lamp Electric Flash Flash and charging circuit CDS A D LCD Driver CCD Sensor EF LENS Motor Driver AF Support LED FINDER LED Electric FLASH CF card LCD TG R...

Page 46: ... signal of the CCD picture is converted to the signal processing and the digital data by the CDS and A D converter and is sent to the DSP 2 The DSP circuit performs the following signal processing Processes the picture data using the SDRAM Writes and reads the picture data to and from the CF card Outputs analog video signal to the LCD 3 The video signal that is supplied form the DSP is controlled ...

Page 47: ... of the image file until it can be successfully written to CF This error occurs when writing of the JPEG image file fails after 10 retries at increasingly higher compression ratios The power of the imaging circuit on the MAIN PCB ASS Y was not detected Detection of the focus PI photo interrupter failed Writing of the photograph image to SDRAM did not end within the specified time Cause and Probabl...

Page 48: ...mode The camera power was turned OFF while the image was being recorded to the CF Card The error code is displayed when the camera is next turned ON This error may occur after E23 The CF Card could not be formatted properly When image data cannot be read from CF normally Review of the photograph image failed Cause and Probable Faulty Part CF CARD MAIN PCB ASS Y The battery or DC plug was removed w...

Page 49: ...REAR COVER UNIT FLASH UNIT MAIN PCB ASS Y BUTTON PCB ASS Y LCD PANEL BACK LIGHT UNIT OPTICAL UNIT MAIN PCB ASS Y MAIN PCB ASS Y BATTERY BOX UNIT REAR COVER UNIT FLASH UNIT MAIN PCB ASS Y MAIN PCB ASS Y CF CARD REAR COVER UNIT MAIN PCB ASS Y REAR COVER UNIT RLS PCB ASS Y Problem when an error code is not displayed The camera does not work The image is not displayed on the LCD Monitor The photograph...

Page 50: ......

Page 51: ... 13 2 12 BATTERY CONTACT BATTERY CONTACT 3 14 2 13 LITHIUM CONTACT LITHIUM CONTACT 3 15 2 14 CCD ASS Y 3 16 2 15 Screw List 3 17 3 Adjustments 3 1 Replacement Parts and Adjustment Items 3 18 3 2 Adjustment Tools 3 19 3 3 Before Starting Electrical Adjustments 3 20 3 3 1 TWAIN Driver Installation 3 20 3 3 2 Installing the Adjustment Software 3 20 3 3 3 Preparation 3 22 3 3 4 Starting up the Adjustm...

Page 52: ......

Page 53: ...ive terminal of the main capacitor CAUTION Be careful of electric shock because the circuit is the high tension circuit 1 2 List of Tools The following tools are used for the re assembling during service 1 List of tools New Name of tools Part No Remarks Screwdriver Local Purchase Tweezers Local Purchase Soldering iron Local Purchase 1 3 List of Supplies The following supplies are used for the re a...

Page 54: ...hem for removal and insertion by inserting the tweezers into them as required 1 4 Flexible Connectors This product uses the three types of the flexible connectors Fig 3 3 Holes for removal Fig 3 2 Flexible connectors The contact piece should face upwards Unlocked state Locked state Unlocked state Locked state 1 Type A 2 Type B Holes LOCK UNLOCK UNLOCK The contact piece should face downwards LOCK U...

Page 55: ...s Be careful high tension CAUTION RLS PCB ASS Y 2 9 FLASH UNIT 2 10 MAIN SHIELD CASE 2 2 5 MAIN PCB ASS Y 2 7 M S FPC 2 6 M R FPC 2 6 FRONT COVER UNIT 2 3 BATTERY COVER 2 3 BARRIER PANEL 2 3 BACKLIGHT UNIT 2 4 LCD PANEL 2 4 MAIN SHIELD CASE 3 2 8 MAIN SHIELD CASE 1 2 8 CCD ASS Y 2 14 CCD UNIT 2 14 CCD RUBBER 2 14 IR FILTER 2 14 REAR COVER UNIT 2 2 BATTERY CONTACT 2 12 BATTERY CONTACT 2 12 LITHIUM ...

Page 56: ...ove the four screws b 4 Open the REAR COVER UNIT in the direction of the arrow and remove it by disconnecting the two flexible printed wired boards LCD FPC and MO FPC NOTE Assembling Align the positioning dowel of the REAR COVER UNIT b BATTERY COVER LITHIUM BATTERY REAR COVER UNIT REAR COVER UNIT LCD FPC CONNECTOR COVER MO FPC SIDE COVER Positioning when assembling 1 2 1 4 1 1 1 4 1 3 1 3 1 3 1 2 ...

Page 57: ...VER 1 Disconnect the BR FPC 2 Remove the FRONT COVER UNIT in the direction of the arrow At the same time remove the BATTERY COVER in the direction of the arrow too 3 Remove the BARRIER PANEL NOTE Assembling When assembling apply the DIA BOND1663G BR FPC FRONT COVER UNIT BARRIER PANEL BATTERY COVER 1 1 1 2 1 2 1 2 1 2 1 3 NOTE Assembling ...

Page 58: ...the two positioning dowels of the REAR COVER UNIT at each location 2 LCD PANEL 1 Release the six claws in the top bottom right and left and remove the BACKLIGHT UNIT and LCD PANEL NOTE Assembling The BACKLIGHT supplied as the service part had the protection sheet Remove it c REAR COVER UNIT Claws Claws Soldering LCD PANEL BACKLIGHT UNIT Positioning when assembling 1 1 1 3 2 1 2 1 2 1 1 2 1 2 XA4 9...

Page 59: ...3 7 CHAPTER 3 REPAIR INSTRUCTION Fig 3 7 MAIN SHIELD CASE 2 2 5 MAIN SHIELD CASE 2 1 MAIN SHIELD CASE 2 1 Remove soldering at four locations 2 Remove the MAIN SHIELD CASE 2 MAIN SHIELD CASE 2 Soldering ...

Page 60: ...ing When assembling fold the M S FPC in trisection as shown in the illustration When inserting the M S FPC into the connector on the ST PCB ASS Y side loosen the two screws of the ST PCB ASS Y 2 M R FPC 1 Disconnect the M R FPC from the connector of the RLS PCB ASS Y and the connector of the MAIN PCB ASS Y M S FPC 1 1 1 2 1 2 1 1 NOTE Assembling M R FPC RLS PCB ASS Y MAIN PCB ASS Y ST PCB ASS Y M ...

Page 61: ...ASH cables red and black NOTE Assembling After soldering apply the DIA BOND1663G 4 Disconnect the OPT FPC from the connector of the MAIN PCB ASS Y 5 Remove the four screws c 6 Remove the MAIN PCB ASS Y NOTE Assembling Align the two positioning dowels of the MAIN FRAME at each location c MAIN PCB ASS Y CCD UNIT OPTICAL UNIT OPT FPC LITHIUM LEAD Soldering Red Red Black Black Soldering Soldering Posi...

Page 62: ...ELD CASE 3 1 Remove soldering at two locations 2 Remove the MAIN SHIELD CASE 3 in the direction of the arrow 2 MAIN SHIELD CASE 1 1 Remove the EM1 SHEET 2 Remove soldering at four locations 3 Remove the MAIN SHIELD CASE 1 EM1 SHEET MAIN SHIELD CASE 1 MAIN SHIELD CASE 3 Soldering Soldering Soldering 1 2 2 2 2 2 2 1 1 1 MAIN PCB ASS Y ...

Page 63: ... 1 2 1 1 NOTE Assembling Positioning when assembling XA4 9170 407 METAL M1 7 SELF TAP 4 0mm c 2 9 RLS PCB ASS Y 1 RLS PCB ASS Y 1 Remove the screw c 2 While taking care of the claws remove the RLS PCB ASS Y NOTE Assembling Align the two positioning dowels of the MAIN FRAME at each location ...

Page 64: ...ox 5 W Discharge of Capasitor 1k 5W Orange Gray c 2 10 FLASH UNIT CAUTION Be sure to discharge the main capacitor with a discharging resistor 1 FLASH UNIT 1 Remove soldering at two locations and remove the two BATTERY LEADs red and black 2 Remove the two screws c 3 Insert the sharp point tweezers between the mold part of the FLASH UNIT and MAIN FRAME and remove the mold part of the FLASH UNIT from...

Page 65: ... 1 NOTE Assembling XA4 9170 407 METAL M1 7 SELF TAP 4 0mm Positioning when assembling c 2 11 OPTICAL UNIT 1 OPTICAL UNIT 1 Remove the three screws c 2 Remove the OPTICAL UNIT in the direction of the arrow NOTE Assembling Align the two positioning dowels of the MAIN FRAME at each location ...

Page 66: ...ND1663G 2 Remove the BATTERY CONTACT in the direction of the arrow 2 BATTERY CONTACT BATTERY LEAD 1 Remove soldering and remove the BATTERY LEAD NOTE Assembling After soldering apply the DIA BOND1663G 2 Remove the BATTERY GUARD and remove the BATTERY CONTACT in the direction of the arrow MAIN FRAME BATTERY CONTACT BATTERY LEAD BATTERY LEAD BATTERY CONTACT BATTERY GUARD 1 1 2 1 1 2 2 2 NOTE Assembl...

Page 67: ...ling NOTE Assembling c c 2 13 LITHIUM CONTACT LITHIUM CONTACT 1 LITHIUM CONTACT LITHIUM LEAD 1 Remove the screw c and remove the LITHIUM CONTACT 2 Remove soldering and remove the LITHIUM LEAD NOTE Assembling After soldering apply the DIA BOND1663G 2 LITHIUM CONTACT LITHIUM LEAD 1 Remove the screw c and remove the LITHIUM CONTACT 2 Remove soldering and remove the LITHIUM LEAD NOTE Assembling After ...

Page 68: ...three screws d 2 Remove the CCD UNIT NOTE Assembling Align the two positioning dowels of the OPTICAL UNIT at each location 3 Remove the CCD RUBBER 4 Remove the IR FILTER OPTICAL UNIT IR FILTER CCD RUBBER CCD UNIT 1 1 1 2 1 3 1 4 Positioning when assembling d XA4 9140 307 METAL M1 4 SELF TAP 3 0mm NOTE Assembling d ...

Page 69: ...HAPTER 3 REPAIR INSTRUCTION 2 15 Screw List c b XA4 9170 407 METAL M1 7 SELF TAP 4 0mm XA4 9170 557 METAL M1 7 SELF TAP 5 5mm CD1 4157 000 METAL M1 7 SELF TAP 4 0mm a d XA4 9140 307 METAL M1 4 SELF TAP 3 0mm ...

Page 70: ...IT OPTICAL UNIT FLASH UNIT MAIN PCB ASS Y LCD PANEL BACK LIGHT UNIT CCD Adjustment 1 Optical Unit Adjustment 2 Imaging Process Adjustment 3 Pixel Dot Adjustment 4 Flash Adjustment 5 Adjustment is necessary after replacement Adjustment is necessary after replacement Adjustment is not necessary only if the adjustment data has been saved and then transferred after the part is replaced Blank Adjustmen...

Page 71: ... Software CD ROM Compact Power Adapter CA PS800 INTERFACE CABLE IFC 300PCU USB Cable Brightness Box light source A Color Viewer 5600 K Standard Color Bar Chart Standard 18 Gray Chart AF Chart W 10 Filter 2 C 12 Filter ND 2 Filter ND 4 Filter ND 8 Filter Light Shielding Cloth 500 500 or larger Tripod PARTS NO CY8 4377 031 DY9 2039 100 DY9 2002 000 CY4 6016 000 CY9 1543 000 DY9 2029 000 REMARKS Loca...

Page 72: ...alling the Adjustment Software 1 Double click the icon on the launcher screen or a file in the CD ROM Model name of the camera that you are going to adjust and the name of the adjustment software are different 2 When the dialog box below appears click the OK button Camera Type Icon File Path Power Shot A100 A100_ENG_Adj Adjust A100 Eng Setup exe Power Shot A200 A200_ENG_Adj Adjust A200 Eng Setup e...

Page 73: ...hen the dialog box below appears click the Continue button In the case that you do not add a shortcut on desktop remove clicking from the check box 3 When the dialog box below appears click the button Software installation will then begin ...

Page 74: ...e Power Source with the Compact Power Adapter CA PS800 3 Set the Replay Mode on the camera and turn on 4 Connect the Camera s Digital terminal to the PC s USB Port with INTERFACE CABLE IFC 300 PCU 5 Turn on the camera Note Perform the preparation in the following order otherwise the camera won t work properly Personal Computer USB INTERFACE CABLE IFC 300PCU DIGITAL Compact Power Adapter CA PS800 C...

Page 75: ... or Loading data Save button This button saves all adjustment data stored on the camera in text format Load button This button loads all adjustment data saved in text format to the camera Saving or Loading data Save button This button saves all adjustment data stored on the camera in text format Load button This button loads all adjustment data saved in text format to the camera Notes If the adjus...

Page 76: ...mputer ND 8 Filter Compact Power Adapter CA PS800 Color Viewer 5600 K ND 2 or ND 4 Filter Adjustment Software C 12 Filter W 10 Filter 2pcs INTERFACE CABLE IFC 300PCU 2 1 When the message on the right appears check that the reference camera Merchandise is con nected to the computer 2 Click the OK button 3 When the message on the right appears go to 4 ...

Page 77: ...nd the Color Viewer 2 Place the camera so that the lens is set against the center part of the Color Viewer 3 Click the ADJUST button PowerShot A100 ND 4 PowerShot A200 ND 2 Personal Computer Power Source Brightness Box CAMERA BODY C 12 Filter Power Source Stand Color Viewer Personal Computer CAMERA BODY ND 4 or ND 2 Filter 4 1 Place the camera so that lens is set against the light source surface o...

Page 78: ...ewer Place the camera so that the lens is set against the center part of the Color Viewer 3 Click the ADJUST button 10 When the message on the right appears go to 11 11 1 Remove the two W 10 Filters 2 Attach the C 12 Filter between the Lens and the Color Viewer Place the camera so that the lens is set against the center part of the Color Viewer 3 Click the ADJUST button Power Source Stand Color Vi...

Page 79: ...or Bar Chart to the Color Viewer 2 Place the camera so that the Viewing image of the color bar chart is the full of LCD with the ND Filter attached 3 Click the ADJUST button PowerShot A100 ND 4 PowerShot A200 ND 2 14 1 Shift a black frame on the displayed screen with a mouse to choose a color of color bar 2 Click the Sampling button 15 Check Save as Reference and click the OK button to store the d...

Page 80: ...3 28 CHAPTER 3 REPAIR INSTRUCTION 16 When the message on the right appears click the FINISH button This ends the Calibration ...

Page 81: ...omputer Adjustment Software INTERFACE CABLE IFC 300PCU Compact Power Adapter CA PS800 Brightness Box light source A C 12 Filter 1 Click the CCD button 2 When the message on the right appears go to 3 3 1 Place the camera so that lens is set against the light source surface of the Brightness Box via the C 12 Filter 2 Set the Brightness Box to EV12 3 Click the ADJUST button ...

Page 82: ... 4 When the message on the right appears Set the Brightness Box to EV15 while setting the C 12 Filter between the lens Click the ADJUST button 5 When the message on the right appears click the FINISH button This ends the CCD Adjustment ...

Page 83: ...A PS800 1 Click the Optical Unit button 2 When the message on the right appears go to 3 3 1 Place the AF Chart at 52 0cm away from the front of the camera finder Place the Auto Focus Chart on a plain color wall or equivalent Adjust the light so that the brightness of the chart will be about EV8 5 2 Adjust the position of the camera finely so that the center of the Auto Focus Chart is aligned with ...

Page 84: ...3 32 CHAPTER 3 REPAIR INSTRUCTION 4 When the message on the right appears click the FINISH button This ends the Optical Unit Adjustment ...

Page 85: ...Filter 2 pcs C 12 Filter Compact Power Adapter CA PS800 1 Click the Imaging Process button 3 1 Attach the ND Filter between the Lens and the Color Viewer 2 Place the camera so that the lens is set against the center part of the Color Viewer 3 Click the ADJUST button PowerShot A100 ND 4 PowerShot A200 ND 2 Power Source Stand Color Viewer Personal Computer CAMERA BODY ND 4 or ND 2 Filter 2 When the ...

Page 86: ...the Color Viewer 3 Click the ADJUST button Power Source Stand Color Viewer Personal Computer CAMERA BODY W 10 Filter Power Source Stand Color Viewer Personal Computer CAMERA BODY C 12 Filter 6 When the message on the right appears go to 7 7 1 Remove the two W 10 Filters 2 Attach the C 12 Filter Place the camera so that the lens is set against the center part of the Color Viewer 3 Click the ADJUST ...

Page 87: ...werShot A200 ND 2 10 1 Shift a black frame on the displayed screen with a mouse to choose a color of color bar 3 Click the Sampling button 8 When the message on the right appears go to 9 11 Check Yellow and Red and click the OK button If these data are within specifications go to 13 Specification Ave_Cr Reference Camera 10 Ave_Cb Reference Camera 10 Color Viewer Color Bar Chart Personal Computer C...

Page 88: ...fications 2 If the image on the PC monitor does not satisfy the specifications change the data using UP DOWN button or change the data directly by typing the data in the text box Then click the UPDATE button 13 When the adjustment is completed click the FINISH button This ends the Imaging Process Adjustment ...

Page 89: ... A C 12 Filter Color Viewer 5600 K Light Shielding Cloth 500 500 or larger Personal Computer Power Source Brightness Box CAMERA BODY C 12 Filter 1 Click the Pixel Dot button 2 When the message on the right appears go to 3 3 1 Place the camera so that lens is set against the light source surface of the Brightness Box via the C 12 Filter 2 Set the Brightness Box to EV12 3 Click the ADJUST button ...

Page 90: ... the message on the right appears cover the camera with the Light Shielding Cloth so that the no light reasons the CCD 2 Click the ADJUST button 5 When the message on the right appears click the FINISH button This ends the Pixel Dot Adjustment ...

Page 91: ... Gray Chart INTERFACE CABLE IFC 300PCU Adjustment Software Tripod 1 Click the Flash button 2 When the message on the right appears go to 3 3 1 Set 18 Gray Chart 60cm from the Finder front 2 Make the room as dark as a darkroom 3 Click the ADJUST button Personal Computer Power Source 18 Gray Chart 60cm CAMERA BODY Tripod ...

Page 92: ...3 40 CHAPTER 3 REPAIR INSTRUCTION 4 When the message on the right appears click the FINISH button This ends the Flash Adjustment ...

Page 93: ...act Power Adapter CA PS800 INTERFACE CABLE IFC 300PCU Adjustment Software FontSet exe 1 Open the FontSet exe and click the New Connection button 2 When the message on the right appears confirm the model name and click the OK button 3 When the message on the right appears click the Oth button ...

Page 94: ...3 42 CHAPTER 3 REPAIR INSTRUCTION 4 Make sure to appear err 0 on the bottom line ...

Page 95: ...l Parts Pg2 Accessories 1 Pg3 Accessories 2 Pg4 Accessories 3 Pg5 Service Tools Pg6 Category of CLASS A Frequency of use High B Frequency of use Middle C Frequency of use Low D Safety related critical parts E Consumable parts F Standard screws and washers S Supply of the parts is limited ...

Page 96: ......

Page 97: ...PowerShot A200 PowerShot A100 Pg1 Casing Parts a a c c d d e e b b 1 2 3 4 14 15 15 15 18 16 16 17 17 15 5 6 7 8 9 10 11 12 13 N S ...

Page 98: ...AR BATTERY COVER 10 CK5 0051 000 C 1 PANEL LCD CK5 0051 001 C 1 PANEL LCD SELECTION 11 CM1 1310 000 C 1 BACK LIGHT UNIT 12 CD1 4138 000 B 1 HOLDER LITHIUM BATTERY 13 CM1 1308 000 B 1 REAR COVER UNIT 14 CY1 6158 000 B 1 PLATE BODY NUMBER J A100 CY1 6159 000 B 1 PLATE BODY NUMBER N A100 CY1 6160 000 B 1 PLATE BODY NUMBER E A100 CY1 6161 000 B 1 PLATE BODY NUMBER O A100 CY1 6181 000 B 1 PLATE BODY NU...

Page 99: ...PowerShot A200 PowerShot A100 Pg2 Internal Parts a a 1 2 3 4 5 6 7 8 9 13 11 12 10 14 19 20 29 29 29 31 32 29 29 29 29 29 29 30 21 22 23 24 25 26 27 28 15 16 17 18 ...

Page 100: ... 000 C 1 GUARD BATTERY 13 CK2 1272 000 C 1 LEAD BATTERY 14 CK9 0402 000 C 1 CAPASITOR ELECT 80µ 330V 15 CM1 1302 000 C 1 PCB ASS Y RLS 16 CD1 4125 000 C 1 PLATE BATTERY LOCK 17 CK2 1290 000 C 1 LEAD LITHIUM 18 CD1 4139 000 C 1 CONTACT LITHIUM 19 CK2 1291 000 C 1 LEAD LITHIUM 20 CD1 4140 000 C 1 CONTACT LITHIUM 21 CD1 4113 000 C 1 FRAME MAIN 22 CD1 4418 000 C 1 SHEET EM 1 23 CD1 4141 000 C 1 CASE M...

Page 101: ...Shot A100 Pg3 N Sl N S Stand for No Stock Product available Accessories 1 Wrist Strap WS 200 USB Interface Cable IFC 300PCU AC Cable CF Card FC 8M Canon Digital Camera Solution Disk N S Alkaline Batteries X2 N S N S 1 3 2 ...

Page 102: ...C84 1116 000 S 1 CD ROM SOLUTION DISK VER 9 0 E F S PS A100 FOR USA CANADA C84 1117 000 S 1 CD ROM SOLUTION DISK VER 10 0 J E PS A200 FOR JAPAN ASIA AUSTRALIA C84 1118 000 S 1 CD ROM SOLUTION DISK VER 10 0 E F S PS A200 FOR USA CANADA 3 WT3 5062 000 C 1 AC CABLE J FOR JAPAN WT3 5063 000 C 1 AC CABLE N FOR USA CANADA WT3 5064 000 C 1 AC CABLE E FOR EUROPE ASIA WT3 5115 000 C 1 AC CABLE B FOR USA WT...

Page 103: ... PowerShot A100 Pg4 N Sl N S Stand for No Stock Product available Accessories 2 Diffusion Plate Unit Grease Packing 2 Water proof Seal 1 Water proof Case WP DC400 N S Protector Moisture 3 Neck Strap 4 5 6 Wrist Strap ...

Page 104: ...N R E M A R K S PowerShot A200 PowerShot A100 Pg4 1 CY1 6175 000 B 1 PACKING RUBBER WP DC400 2 DY9 3029 000 C 1 GREASE PACKING 3 DY9 3028 000 C 1 PROTECTOR MOISTURE 4 CY1 6099 000 B 1 NECK STRAP 5 CY1 6174 000 B 1 WRIST STRAP 6 CY1 6176 000 B 1 DIFFUSION PLATE UNIT ...

Page 105: ...PowerShot A200 PowerShot A100 Pg5 Accessories 3 Camera User Guide Software Starter Guide System Map 1 2 3 ...

Page 106: ...E PS A100 FOR USA CANADA ASIA AUSTRALIA CDI F035 000 S 1 SOFTWARE GUIDE F PS A100 FOR CANADA CDI S032 000 S 1 SOFTWARE GUIDE S PS A100 FOR USA CDI J042 000 S 1 SOFTWARE GUIDE J PS A200 FOR JAPAN CDI E046 000 S 1 SOFTWARE GUIDE E PS A200 FOR USA CANADA ASIA AUSTRALIA CDI F036 000 S 1 SOFTWARE GUIDE F PS A200 FOR CANADA CDI S033 000 S 1 SOFTWARE GUIDE S PS A200 FOR USA 3 CDI J037 000 S 1 SYSTEM MAP ...

Page 107: ...Service Tools PowerShot A200 PowerShot A100 Pg6 DIA BOND NO 1663G BLACK W 10 Filter 18 Gray Chart SERVICE MANUAL CD ROM Adhesive Tape SONY T4000 Adhesive Tape 3M NO 56 C 12 Filter 1 4 2 3 5 6 7 ...

Page 108: ...0 Pg6 1 CY9 8129 000 Y 1 BOND DIA BOND NO 1663G BLACK 2 CY9 6012 000 Y 1 ADHESIVE TAPE SONY T4000 6mm X 50m roll 3 CY4 6018 000 Y 1 ADHESIVE TAPE 3M NO 56 15mm X 66m roll 4 DY9 2029 000 Y 1 FILTER C 12 5 CY9 1543 000 Y 1 FILTER W 10 6 CY4 6016 000 Y 1 CHART 18 GRAY 7 CY8 4377 031 Y 1 CD ROM SERVICE MANUAL J E ...

Page 109: ......

Page 110: ...BLOCK DIAGRAMS 2 1 OVERALL 2 2 MAIN PCB ASS Y 1 4 2 3 MAIN PCB ASS Y 2 4 2 4 MAIN PCB ASS Y 3 4 2 5 MAIN PCB ASS Y 4 4 2 6 Abbreviation in Block Diagrams 3 P C B DIAGRAMS 3 1 MAIN PCB ASS Y 3 2 FLASH UNIT 3 3 OPR PCB ASS Y 3 4 RLS PCB ASS Y 3 5 BL FPC ASS Y ...

Page 111: ......

Page 112: ...CAPCITOR CN1008 CN1502 CN1009 CN1011 CN1003 CN301 CN201 SW301 SW302 CN1701 CN104 FU102 FU101 USB Release SW CF Battery Cover Detect SW OPTICAL UNIT CCD SENSOR OPT FPC WHT GRY GRY ORG BRN BLUE RED BATTERY Barrier open Detect SW Barrier close Detect SW Direct solder BLK BLK FLASH LED FLASH UNIT LCD PANEL BACK LIGHT UNIT BL FPC ASS Y MAIN PCB ASS Y REAR COVER UNIT RLS PCB ASS Y BUZZER ...

Page 113: ...ND 9 SCAN 10 ERASE 11 MENU 12 DSIP 13 LEFT 14 DOWN 15 SET 16 RIGHT 17 UP 18 WIDE 19 TELE 20 PLAY 21 VBATT 22 BUZZER 23 C_GND CN1502 1 TESTL 2 COM 3 VST 4 VCK 5 EN 6 DWN 7 VDD 8 VSS 9 VDDG 10 VSSG 11 Not Connected 12 WIDE 13 HST 14 REF 15 Not Connected 16 CEXT REXT 17 HCK2 18 HCK1 19 PSIG 20 GREEN 21 RED 22 BLUE 23 RGT 24 Not Connected CN1503 1 VBUS 2 D 3 D 4 Not Connected 5 UV_GND CN1701 1 AFA 2 A...

Page 114: ...ATT VCC1M VCC1 VDD3 LCD Driver CDS A D T G SDRAM DC DC CONVERTER for System Control for LCD for CCD FLASH MEMORY VCC1 FINDER LED AF Support SELF Red Eye LED VCC1M CPU USB Control USB CN1503 Buzzer KEY Switch VCC1 VBATT RESET RTC BATTERY Load Test OPTICAL UNIT MAIN PCB ASS Y REAR COVER UNIT 3 3 OPT FPC REAR COVER UNIT 2 3 BATTERY BOX UNIT DC_IN Release Switch CF Open Switch TH RLS PCB ASS Y REAR CO...

Page 115: ... 27 35 34 33 AVDD DVDD AD_LD CLP0B2 CLP0B2 SLOAD CLPOB CCDIN IC1302 CDS A D VSP2260Y SSGOUT3 SSGOUT5 SSGOUT4 SSGOUT0 SSGOUT1 CCDCLK VDDH1 20 VDDL1 8 AVD1 3 VREF1 3 Q1514 BUFFER HN1804FU GR Q1515 BUFFER HN1804FU GR 5 5 2 2 6 3 3 4 4 1 1 6 Q1509 REG 2SC4617 Q1508 REG 2SC4617 VDD3 VCC1A_3 VCC1A_3 Q1512 HN2A01FU GR SCLK3 SYNC_IN SCK SDATA3 SDAT LCD_CS C1513 C1512 AVD C1511 Q1507 2SA1774 Q1013 2SA1774 ...

Page 116: ...K TDI INTR INTP1 NWAIT WAITB NCSE UBEB ALE CXIN ESREQ ESDT TRST TMS TCK TDO UBEB ALE ESREQ ESDT BUSCLK NRESET CSENGB EX42 ECLK MRDB MRWB CSMEMB IC1001 2 2 CPU µPD82434S1 023 6C D_P D_N USB_VBUS EX41 EX39 EX40 EX6 EX7 EX4 EX5 ADIN_0 INTP0 INTP2 RESETB CS2 32KIN LIVDD VDD 1 24 AVDD AVREF AIN 1 AIN 4 AIN 5 AIN 6 AIN 7 E1LAT E2LAT E3LAT 4 2 1 X1001 24MHz IC1003 AND GATE TC7SH08FU OSC1_X1 OSC1_X2 VCC_C...

Page 117: ...020 Level Shift RN47A3 Q1017 Q1016 DTC144EE 3 4 2 1 EX55 EX45 EX44 EX 2 EX51 EX20 EX19 EX25 EX24 EX16 EX17 EX18 EX28 31 EXPORT Q1004 LED SWITCH Drive RN1964 BA0 BA1 SDBS_O SDBS_1 17 18 19 20 68 67 WE CAS CS RAS CKE P3_3 NXIN SDCKE SDWE SDCLK SDCS_0 CLK SDRAS SDCAS P3_2 NXOUT CF_A_3 10 CF_D_0 15 CF_A_0 2 NPCRD NPCWR PCCE1 PCRDY PCIRQ PCIOIS P0 5 P0 1 P0 0 P0 4 PCCE2 AIN 6 DIAL1 3 3 5 5 4 4 6 6 9 10...

Page 118: ... L1911 L1910 L1909 L1908 L1907 L1912 Q1907 VCC1A 3 REG Q1905 Q1908 VEE2 REG Q1908 2SA1774 Q1905 DTC144EE Q107 2SC4617 Q1906 VDD2 REG 2SC4617 D1903 D1904 D1907 C1907 2SC4617 C1924 C1923 C1922 C1934 C1930 C1933 C1927 C1928 T1902 4 1 8 2 7 3 6 5 T1901 5 7 6 8 3 2 4 1 Q1902 PWM SW CPH3206 Q1904 PWM SW MCH3406 Q1903 PWM SW CPH3106 D1905 D1906 FU101 3 2 1 CN101 DC_IN From BATTERY CONTACT D1902 3 5 2 1 S...

Page 119: ...ts 2 devices or circuits IGBT Insulated Gate Bipolar Transistor Conductivity modulation type FET transistor INV Logic Inverter circuit IR InfraRed ray IRIS Iris LCD Liquid Crystal Device Typically LCD display LED Light Emitting Diode Typically LED display LPF Low Pass Filter NTSC National Television System Committees NTSC color TV system developed in USA OP Amp OPerational Amplifier OR Logic OR ci...

Page 120: ...C CANON INC 2002 01 June 2002 3 P C B DIAGRAMS 3 1 MAIN PCB ASS Y MAIN PCB ASS Y SOLDERING SIDE MAIN PCB ASS Y COMPONENT SIDE ...

Page 121: ...C CANON INC 2002 01 June 2002 3 2 FLASH UNIT FLASH PCB ASS Y SOLDERING SIDE FLASH PCB ASS Y COMPONENT SIDE ...

Page 122: ...C CANON INC 2002 01 June 2002 3 3 OPR PCB ASS Y ...

Page 123: ...C CANON INC 2002 01 June 2002 3 4 RLS PCB ASS Y ...

Page 124: ...C CANON INC 2002 01 June 2002 3 5 BL FPC ASS Y ...

Page 125: ...g size so that the printing size fits the size of paper 4 To cancel the printing area click an arbitrary position on the display Remarks The AF Chart of the Service Manual that is saved in this CD ROM has the colored markings in colors so that the entire page can be divided into print papers legal size x 4 pages A3 size x 3 pages Operate as follows Select Graphic Select Tool Select the 2 markings ...

Page 126: ...PowerShot A100 A200 AF Chart ...

Page 127: ......

Page 128: ...PowerShot A100 A200 AF Chart ...

Page 129: ...Dimensions 467 83mm 370 89mm 96 94mm 346 98mm 260 0mm 93 00mm ...

Reviews: