


7
4
5
6
คลิก
เพิ่มอุปกรณ์หรือคอมพิวเตอร์โดยใช้USB
แฟลชไดรฟ์
(Addthedeviceorcomputer
usingaUSBflashdrive)
เลือกชื่อเครือข่าย (SSID) จากในรายการ จากนั้นคลิก
ถัดไป
(Next)
หากไดอะลอกบ็อกซ์
การควบคุมบัญชีผู้ใช้
(UserAccount
Control)
ปรากฏขึ้น คลิก
ดำเนินการต่อ
(Continue)
หากไดอะลอกบ็อกซ์เดิมปรากฏขึ้นมาอีกในขั้นตอนหลังจากนี้
ให้คลิก
ดำเนินการต่อ
(Continue)
•
เชื่อมต่อแฟลชไดรฟ์ USB เข้ากับคอมพิวเตอร์ ตรวจ
สอบว่าชื่อของไดรฟ์แสดงขึ้น จากนั้นคลิก
ถ้ดไป
(Next)
เมื่อหน้าจอด้านบนปรากฏขึ้น นำแฟลชไดรฟ์ USB
ออกจากคอมพิวเตอร์ จากนั้นคลิก
ปิด(Close)
USB
플래시
드라이브를
사용하여
장
치나
컴퓨터
추가
(Add the device or
computer using a USB flash drive)
를
클릭합니다
.
목록에서
네트워크
이름
(SSID)
을
선택한
후
다음
(Next)
을
클릭합니다
.
사용자
계정
컨트롤
(User Account Control)
대화
상자가
나타나면
계속
(Continue)
을
클릭합니다
.
후
속
단계에서
같은
대화
상자가
다시
나타나면
계속
(Continue)
을
클릭합니다
.
•
USB
플래시
드라이브를
컴퓨터에
연결하
고
드라이브
이름이
표시되는지
확인한
후
다음
(Next)
을
클릭합니다
.
위
화면이
나타나면
컴퓨터에서
USB
플래
시
드라이브를
제거한
다음
닫기
(Close)
를
클릭합니다
.
按一下
以
USB
快閃磁碟機新增這個裝
置或電腦
(Add the device or computer
using a USB flash drive)
。
從清單中選擇網路名稱
(SSID)
,然後按一下
下一步
(Next)
。
如果出現
使用者帳戶控制
(User Account Control)
對話方塊,按一下
繼續
(Continue)
。如果在隨後的步
驟中出現相同的對話方塊,按一下
繼續
(Continue)
。
•
將
USB
快閃磁碟機連接至電腦,確保顯
示磁碟機名稱,然後按一下
下一步
(Next)
。
出現以上螢幕時,從電腦移除
USB
快閃
磁碟機,然後按一下
關閉
(Close)
。
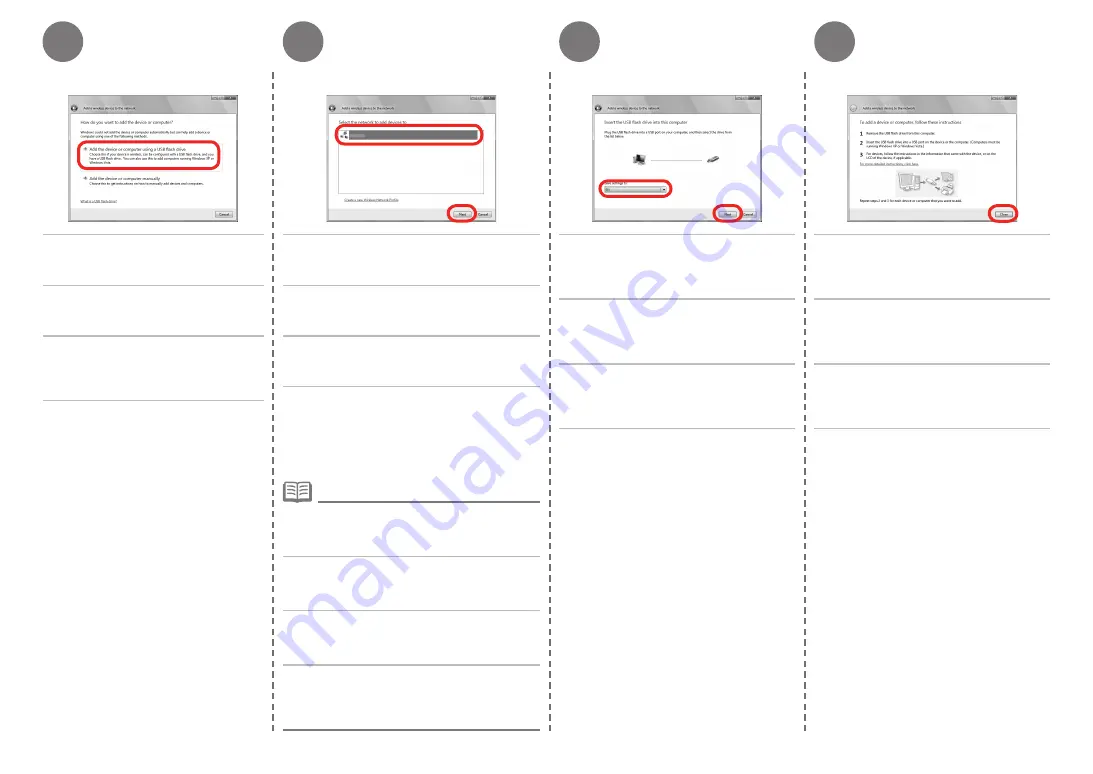
When the above screen appears,
remove the USB flash drive from the
computer, then click
Close
.
If the
User Account Control
dialog box appears,
click
Continue
. If the same dialog box reappears in
subsequent steps, click
Continue
.
•
Click
Add the device or computer
using a USB flash drive
.
From the list, select the network name
(SSID), then click
Next
.
Connect the USB flash drive to the
computer, make sure that the drive
name is displayed, then click
Next
.


