


Power Supply
0YSF-002
This machine is compatible with voltages of 220 to 240 V, and electrical frequency of 50/60 Hz.
●
Use only a power supply that meets the specified voltage requirements. Failure to do so may result in a fire
or electrical shock.
●
Do not use power cords other than the one provided, as this may result in a fire or electrical shock.
●
The provided power cord is intended for use with this machine. Do not connect the power cord to other
devices.
●
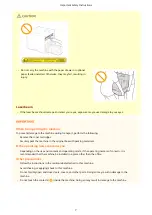
Do not modify, pull, forcibly bend, or perform any other act that may damage the power cord. Do not place
heavy objects on the power cord. Damaging the power cord may result in a fire or electrical shock.
●
Do not plug in or unplug the power plug with wet hands, as this may result in an electrical shock.
●
Do not use extension cords or multi-plug power strips with the machine. Doing so may result in a fire or
electrical shock.
●
Do not wrap the power cord or tie it in a knot, as this may result in a fire or electrical shock.
●
Insert the power plug completely into the AC power outlet. Failure to do so may result in a fire or electrical
shock.
●
Remove the power plug completely from the AC power outlet during a thunder storm. Failure to do so may
result in a fire, electrical shock, or damage to the machine.
●
Install this machine near the power outlet and leave sufficient space around the power plug so that it can be
unplugged easily in an emergency.
When connecting power
●
Do not connect the machine to an uninterruptible power source.
●
If plugging this machine into an AC power outlet with multiple sockets, do not use the remaining sockets to
connect other devices.
●
Do not connect the power cord into the auxiliary outlet on a computer.
Other precautions
●
Electrical noise may cause this machine to malfunction or lose data.
Important Safety Instructions
5
Summary of Contents for LBP710Cx
Page 1: ...LBP712Cx LBP710Cx User s Guide USRMA 0722 00 2016 04 en Copyright CANON INC 2016 ...
Page 51: ...Paper P 620 Basic Operations 45 ...
Page 58: ...4 on 1 Postcard Insert the postcard with the upper end toward the machine Basic Operations 52 ...
Page 78: ...Printing a Document 72 ...
Page 93: ...LINKS Basic Printing Operations P 73 Printing a Document 87 ...
Page 97: ...LINKS Basic Printing Operations P 73 Enlarging or Reducing P 82 Printing a Document 91 ...
Page 108: ...LINKS Basic Printing Operations P 73 Printing a Document 102 ...
Page 140: ...LINKS Using the Encrypted Print P 135 Installing an SD Card P 633 Printing a Document 134 ...
Page 195: ...LINKS Connecting to a Network P 186 Network 189 ...
Page 250: ...LINKS Entering Sleep Mode P 63 Network 244 ...
Page 290: ...Printing a Document Stored in the Machine Stored Job Print P 136 Security 284 ...
Page 296: ... Functions of the Keys Operation Panel P 24 Security 290 ...
Page 334: ...Using TLS for Encrypted Communications P 297 Configuring IPSec Settings P 301 Security 328 ...
Page 344: ...Using Remote UI 338 ...
Page 359: ...LINKS Remote UI Screens P 339 Using Remote UI 353 ...
Page 383: ...Paper Source 0YSF 05E See Select Feeder Menu P 500 Setting Menu List 377 ...
Page 516: ...Troubleshooting 510 ...
Page 600: ...LINKS Utility Menu P 491 Job Menu P 496 Maintenance 594 ...
Page 611: ...Third Party Software 0YSF 090 Appendix 605 ...
Page 630: ...Appendix 624 ...
Page 651: ...Manual Display Settings 0YSF 091 Appendix 645 ...
Page 675: ...Scalable Fonts PCL Appendix 669 ...
Page 676: ...Appendix 670 ...
Page 677: ...Appendix 671 ...
Page 678: ...OCR Code Scalable Fonts PCL Bitmapped Fonts PCL Appendix 672 ...
Page 701: ... 16 MD4 RSA Data Security Inc MD4 Message Digest Algorithm ...
Page 712: ... 27 including the GNU Public Licence ...
Page 736: ... 51 SOFTWARE ...
Page 749: ...Search Enter keyword s here 1 ...
Page 752: ...2 ...
Page 762: ...12 ...
Page 768: ...3 Click Delivered Update 4 Click Apply Firmware 5 Confirm the firmware to apply click Yes 5 ...
Page 770: ...3 Click Delivered Update 4 Click Delete Firmware 7 ...
Page 789: ...Search Enter keyword s here 1 ...
Page 810: ...Starting MEAP Applications Stopping MEAP Applications Starting Stopping MEAP Applications 10 ...
Page 818: ...4 Click License Management 5 18 ...
Page 821: ...4 Click License Management 5 21 ...
Page 822: ...Click Disable 6 Click Yes The license file is disabled 22 ...
Page 824: ...4 Click License Management 5 24 ...
Page 827: ...4 Click License Management 5 27 ...
Page 828: ...Click Delete 6 Click Yes The license file is deleted 28 ...
Page 830: ...4 Click Authentication Information Settings 5 30 ...
Page 832: ...When cancelling authentication information Click Delete 32 ...
Page 837: ...5 ...
Page 846: ...14 ...
Page 849: ...17 ...
Page 855: ...4 Click Yes The setting information of the application is deleted 23 ...