background image

Placing Originals

2-10

Basic O

p

er

ations

2

Feeder (DADF-P2) (Optional)

You should use the feeder when you want to copy several originals at a time. With 
the feeder, the machine automatically feeds the originals to the scanning area and 
scans them. If you are copying in the 2-Sided mode, two-sided originals can also be 
automatically turned over and scanned as two-sided documents.

You can place the following originals into the feeder’s original supply tray:

Weight:

- 52 g/m

2

 to 105 g/m

2

 (37 g/m

2

 to 52 g/m

2

 and 106 g/m

2

 to 128 g/m

2

 when 

scanning a single page document)

Size:

- A4, A4R, A3, A5, A5R, B4, B5, and B5R

Tray capacity:

- A4, A4R, A5, A5R, B5, and B5R: 50 sheets (80 g/m

2

)

- A3 and B4: 25 sheets (80 g/m

2

)

IMPORTANT

Do not place the following types of originals into the feeder:
- Originals with tears or large binding holes
- Severely curled originals or originals with sharp folds
- Clipped or stapled originals 
- Carbon backed paper or other originals which may not feed smoothly 
- Transparencies and other highly transparent originals 

If the same original is fed through the feeder repeatedly, the original may fold or become 
creased, and make feeding impossible. Limit repeated feeding to a maximum of 30 times. 
(This number may vary, depending on the type and quality of the original.)

If the feeder rollers are dirty from scanning originals written in pencil, clean the feeder. 
(See Chapter 6, “Routine Maintenance,” in the 

Reference Guide

.)

Always smooth out any folds in your originals before placing them into the feeder.

Set the originals one by one if they are very thin (37 g/m

2

 to 52 g/m

2

) or very thick 

(106 g/m

2

 to 128 g/m

2

).

Summary of Contents for ImageRUNNER 2420L

Page 1: ...User s Guide User s Guide Read this guide first Please read this guide before operating this product After you finish reading this guide store it in a safe place for future reference ENG ...

Page 2: ...imageRUNNER 2422L 2420L User s Guide ...

Page 3: ...ocument Basic Operations Troubleshooting Reference Guide CD ROM Copying Instructions Copying Guide CD ROM Remote User Interface Instructions Remote UI Guide CD ROM Network Connectivity and Setup Instructions Network Guide CD ROM Color Network ScanGear Instructions for Windows only Network ScanGear Guide CD ROM UFRII LT Printer Instructions UFR II Printer Guide CD ROM UFRII LT Printer Driver Instru...

Page 4: ...ANT Depending on the configuration of your computer some functions may not operate correctly If the PDF manual does not open from the CD ROM Menu open the PDF file directly from the ENGLISH folder on the User Manual CD ROM Windows Macintosh OS Windows 2000 Service Pack 4 or later Windows XP Service Pack 1a or later Windows Vista Service Pack 2 or later Windows 7 Windows Server 2003 Windows Server ...

Page 5: ...e CD ROM Menu The screen shot shown above may differ from the actual display depending on the operating system used a BROWSE MANUAL You can read any of the listed guides by clicking on the desired guide After clicking on the desired guide Adobe Reader Adobe Acrobat Reader starts and the PDF manual is displayed b INSTALL You can install the listed PDF manuals on your computer After clicking INSTALL...

Page 6: ... the descriptions of multi functional operations available paper stock and Index Chapter 1 Chapter 2 Chapter 3 Chapter 4 Chapter 5 Considerable effort has been made to ensure that this manual is free of inaccuracies and omissions However as we are constantly improving our products if you need an exact specification please contact Canon ...

Page 7: ...his Manual xi Trademarks xi Operations and Terms Used in the Manuals xii Legal Notices xiv Product Name xiv Laser Safety xiv Additional Information xv IPv6 Ready Logo xvi Copyright xvi Third Party Software xvii Disclaimers xviii Legal Limitations on the Usage of Your Product and the Use of Images xix Important Safety Instructions xx Installation xx Power Supply xxi Handling xxii Maintenance and In...

Page 8: ...ntrol Panel Power 1 15 How to Turn ON the Main Power 1 15 Control Panel Power Switch 1 17 Setting Up the Connection 1 18 Settings Flowchart 1 18 Connecting to a USB Interface 1 19 Connecting to a Network 1 20 Using Ethernet 1 20 Before Using the machine as a printer 1 22 Installing the Printer Driver 1 22 System Requirements 1 22 UFRII LT User Software CD ROM 1 23 Installation 1 23 Setting Up the ...

Page 9: ...r 3 Routine Maintenance Paper Drawers 3 2 Loading Paper 3 2 Adjusting a Paper Drawer to Hold a Different Paper Size 3 6 Replacing the Toner 3 10 Chapter 4 Troubleshooting Clearing Paper Jams 4 2 Clearing Paper Jams with On Screen Instructions 4 2 When Paper Jams Occur Frequently 4 3 List of Error Messages 4 4 Self Diagnostic Display 4 4 Service Call Message 4 11 Contacting Your Local Authorized Ca...

Page 10: ...may lead to death or injury to persons if not performed correctly To use the machine safely always pay attention to these warnings CAUTION Indicates a caution concerning operations that may lead to injury to persons if not performed correctly To use the machine safely always pay attention to these cautions IMPORTANT Indicates operational requirements and restrictions Be sure to read these items ca...

Page 11: ...strations Used in This Manual The machine illustrations used in this manual are those of the imageRUNNER 2420L with the following optional equipment attached the Feeder DADF P2 Finisher U2 Additional Finisher Tray C1 Cassette Feeding Module S1 and Cassette Feeding Module T1 Control Panel Keys Example Key icon Key icon Key Name Additional Functions Key Name OK UI Type Example Button Name OK UI Name...

Page 12: ...poration in the U S and or other countries Other product and company names herein may be the trademarks of their respective owners Microsoft Windows 2000 operating system Windows 2000 Microsoft Windows XP operating system Windows XP Microsoft Windows Vista operating system Windows Vista Microsoft Windows 7 operating system Windows 7 Microsoft Windows Server 2003 operating system Windows Server 200...

Page 13: ...r than the Copy function In this machine these operations take place in a complex way so that not only copies but also various kinds of prints may sometimes have to wait their turn before they can be printed To avoid confusion when reading the manuals the terms scanning printing and copying used throughout the manuals are defined below When making a copy the process of scanning originals and print...

Page 14: ...xiii Printing Outputting documents such as a copy or data sent from a client computer to the machine Copying Printing data scanned from an original followed by finishing options such as stapling ...

Page 15: ...is certificated as a Class 1 laser product under IEC60825 1 2007 and EN60825 1 2007 This means that the product does not produce hazardous laser radiation Since radiation emitted inside the product is completely confined within protective housings and external covers the laser beam cannot escape from the machine during any phase of user operation Do not remove protective housings or external cover...

Page 16: ...ow are attached to the laser scanner unit inside the machine and next to the toner cartridge behind the front cover This product has been classified under IEC60825 1 2007 and EN60825 1 2007 which conform to the following classes CLASS 1 LASER PRODUCT LASER KLASSE 1 APPAREIL Á LASER DE CLASSE 1 APPARECCHIO LASER DI CLASSE 1 PRODUCTO LÁSER DE CLASE 1 APARELHO A LASER DE CLASSE 1 LUOKAN 1 LASER TUOTE...

Page 17: ...ed or transmitted in any form or by any means electronic or mechanical including photocopying and recording or by any information storage or retrieval system without the prior written permission of Canon Inc The protocol stack included in this machine has obtained the IPv6 Ready Logo Phase 1 established by the IPv6 Forum ...

Page 18: ...ket distribute or transfer the SOFTWARE to any third party without prior written consent of rights holders of the SOFTWARE 5 Notwithstanding the foregoing you may transfer the SOFTWARE only when a you assign all of your rights to the PRODUCT and all rights and obligations under the conditions to transferee and b such transferee agrees to be bound by all these conditions 6 You may not decompile rev...

Page 19: ...IED WARRANTIES INCLUDING BUT NOT LIMITED TO THE IMPLIED WARRANTIES OF MERCHANTABILITY AND FITNESS FOR A PARTICULAR PURPOSE ARE DISCLAIMED IN NO EVENT SHALL THE PROJECT OR CONTRIBUTORS BE LIABLE FOR ANY DIRECT INDIRECT INCIDENTAL SPECIAL EXEMPLARY OR CONSEQUENTIAL DAMAGES INCLUDING BUT NOT LIMITED TO PROCUREMENT OF SUBSTITUTE GOODS OR SERVICES LOSS OF USE DATA OR PROFITS OR BUSINESS INTERRUPTION HO...

Page 20: ... print or otherwise reproduce any particular document and or of the use of the images scanned printed or otherwise reproduced you should consult in advance with your legal advisor for guidance Paper Money Travelers Checks Money Orders Food Stamps Certificates of Deposit Passports Postage Stamps canceled or uncanceled Immigration Papers Identifying Badges or Insignias Internal Revenue Stamps cancel...

Page 21: ...e to overheat Never place the machine on a soft surface such as a sofa or rug Do not install the machine in the following locations A damp or dusty location A location near water faucets or water A location exposed to direct sunlight A location subject to high temperatures A location near open flames Do not install the machine near alcohol paint thinner or other flammable substances If flammable s...

Page 22: ...cord in a knot as this may result in a fire or electrical shock Insert the power plug completely into the power outlet as failure to do so may result in a fire or electrical shock Do not use power cords other than the power cord provided as this may result in a fire or electrical shock As a general rule do not use extension cords Using an extension cord may result in a fire or electrical shock If ...

Page 23: ...nd creating a fire hazard always turn OFF the main power switch and unplug the interface cable when moving the machine Otherwise the power cord or interface cable may be damaged resulting in a fire or electrical shock Make sure that the power plug is firmly inserted into the power outlet if the machine was moved Do not use the machine while the connection is loose as doing so may cause a fire Do n...

Page 24: ...n personal injury or damage if the machine suddenly starts printing Paper that has just been output from the machine may be hot Be careful when removing or aligning paper from the output tray Touching paper right after it is output may result in low temperature burns Do not touch the finisher while the machine is printing as this may result in personal injury Do not place your hand in the followin...

Page 25: ...If the labels have been removed contact your local authorized Canon dealer If the laser beam escapes from the machine exposure may cause serious damage to your eyes Controlling adjusting or operating the machine in ways not mentioned in the manuals for this machine may cause dangerous radiation to escape from the machine IMPORTANT Turn OFF the control panel power switch for safety when the machine...

Page 26: ...ot allow necklaces bracelets or other metal objects to touch the inside the machine as this may result in burns or electrical shock Do not burn or throw used toner cartridges into open flames as this may cause the toner remaining inside the cartridges to ignite resulting in burns or a fire Make sure that the power plug is firmly inserted into the power outlet after cleaning the machine Do not use ...

Page 27: ... paper from scattering and getting into your eyes or mouth If the toner gets into your eyes or mouth wash immediately with cold water and immediately consult a physician When loading paper or removing jammed originals or paper take care not to cut your hands on the edges of the originals or paper When removing paper which has become jammed inside the machine take care not to cut your hands or inju...

Page 28: ...oner gets into your eyes or mouth wash immediately with cold water and immediately consult a physician If toner escapes from the toner cartridge make sure not to ingest the toner or allow it to directly touch your skin If toner touches your skin wash it away with soap and cold water If your skin still feels irritated after washing it or you ingest toner consult a doctor immediately When discarding...

Page 29: ...xxviii ...

Page 30: ... Internal View 1 11 Control Panel 1 12 Optional Equipment 1 14 Main Power and Control Panel Power 1 15 How to Turn ON the Main Power 1 15 Control Panel Power Switch 1 17 Setting Up the Connection 1 18 Settings Flowchart 1 18 Connecting to a USB Interface 1 19 Connecting to a Network 1 20 Before Using the machine as a printer 1 22 Installing the Printer Driver 1 22 Setting Up the Printer Configurat...

Page 31: ... Machine in the Following Locations Avoid locations subject to temperature and humidity extremes whether low or high For example avoid installing the machine near water faucets hot water heaters humidifiers air conditioners heaters or stoves Avoid installing the machine in direct sunlight If this is unavoidable use curtains to shade the machine Be sure that curtains do not block the machine s vent...

Page 32: ...be appropriately ventilated sufficient to maintain a comfortable working environment in areas of machine operation Avoid locations where ammonia gas is emitted Avoid locations that are subject to vibration For example avoid installing the machine on unstable floors or stands Avoid exposing the machine to rapid changes in temperature If the room in which the machine is installed is cold but rapidly...

Page 33: ... that the power supply for the machine is safe and has a steady voltage Do not connect other electrical equipment to the same power outlet to which the machine is connected Do not connect the power cord to a multiplug power strip as this may cause a fire or electrical shock The power cord may become damaged if it is often stepped on or if heavy objects are placed on it Continued use of a damaged p...

Page 34: ...llation Space Provide enough space on each side of the machine for unrestricted operation The optional Finisher U2 and Document Tray J1 are attached 100 mm or more 1 198 mm 1 249 mm 1 247 mm The width is 1 018 mm when no options are attached or 1 247 mm when the optional Document Tray J1 is attached ...

Page 35: ...ocal authorized Canon dealer beforehand The machine is heavy and requires two or more people to lift it Therefore do not attempt to move it by yourself Doing so may result in personal injury When carrying the machine be sure to hold the handles as indicated below Failure to do so may cause the machine to be dropped and result in personal injury Pull out and grasp these handles Grasp these handles ...

Page 36: ...immediately turn the main power switch OFF disconnect the power cord from the power outlet and then contact your local authorized Canon dealer Using the machine in this state may cause a fire or electrical shock Also avoid placing objects around the power plug so that the machine can be disconnected whenever necessary Do not turn the main power switch OFF or open the covers while the machine is in...

Page 37: ...e power cord when the machine will not be used for an extended period of time such as during consecutive holidays This machine generates a slight amount of ozone or other odors during normal use Although sensitivity to ozone or other odors may vary this amount is not harmful Ozone or other odors may be more noticeable during extended use or long production runs especially in poorly ventilated room...

Page 38: ...al equipment attached to it are also provided For more information on the optional equipment parts and their functions see Chapter 5 Optional Equipment in the Reference Guide External View The imageRUNNER 2420L with the optional Inner 2 Way Tray E2 Cassette Feeding Module S1 and Cassette Feeding Module T1 attached The imageRUNNER 2420L with the optional feeder DADF P2 Finisher U2 Additional Finish...

Page 39: ...er secures the originals placed on the platen glass The availability of this option may vary depending on the country or region of purchase d Feeder DADF P2 Optional Originals placed in the feeder are automatically fed sheet by sheet to the scanning area The feeder also automatically turns over two sided originals to make one or two sided copies e Main Power Switch Press to the I side to turn ON t...

Page 40: ...When the drum unit is full of waste toner replace it with a new one g Paper Drawer s Left Cover Open these covers when clearing a paper jam in Paper Drawers 2 3 and 4 h Fixing Unit If a paper jam occurs in the fixing unit remove the jammed paper carefully See Chapter 7 Troubleshooting in the Reference Guide i Duplex Unit A1 Optional The duplex unit enables you to use the 2 sided mode for copying o...

Page 41: ...panel ON or OFF When the control panel is turned OFF the machine is in the Sleep mode g Additional Functions key Press to access the Additional Functions menu h Stop key Press to stop copying or scanning i Start key Press to start an operation j Clear key Press to clear entered values or characters k ID key Press to log in to out of the machine when the machine is managed with Department IDs User ...

Page 42: ...ator Flashes or lights green when the machine is performing operations y Frame Erase key Press to set the Frame Erase mode For more information see Chapter 2 Advanced Operations in the Copying Guide z 2 Page Separation key Press to set the 2 Page Separation mode For more information see Chapter 2 Advanced Operations in the Copying Guide A Finishing key Press to set the Finishing mode For more info...

Page 43: ...ype J Optional for the imageRUNNER 2422L The availability of this option may vary depending on the country or region of purchase b Inner 2 Way Tray E2 c Cassette Feeding Module S1 d Cassette Feeding Module T1 e Duplex Unit A1 f Finisher U2 g Feeder DADF P2 h Document Tray J1 i Additional Finisher Tray C1 ...

Page 44: ...make sure that the power plug is properly inserted into the power outlet If you want to turn the main power OFF turn the control panel power switch OFF and then press the main power switch to the side If the Cassette Heater Unit 30 is attached the machine will enter the Sleep mode when you press the control panel power switch to OFF while the machine is ON For more information about the Sleep mode...

Page 45: ... Image Quality Text The default settings for the Copy function of the machine are already set at the factory but you can change them to suit your needs See Chapter 3 Customizing Settings in the Copying Guide You can select which functions to display on the Standby display when turning the main power ON according to the Additional Functions menu See Chapter 3 Useful Functions and Settings in the Re...

Page 46: ...Useful Functions and Settings in the Reference Guide The machine can receive and print documents from a computer when it is in the Sleep mode To turn the control panel ON or OFF press the control panel power switch When the control panel is turned OFF the machine is in the Sleep mode Control Panel Power Switch Machine Status ON Standby mode Ready for immediate copying or printing OFF Sleep mode ...

Page 47: ...etwork cable is not included in this package Please obtain a suitable cable for your computer or network Settings Flowchart Cable Connection Connect the cables required for your environment See p 1 18 through 1 21 Using the USB cable Connecting to a network Environment Settings Specify the System Manager settings for management operations See the Reference Guide Network Settings Enter the necessar...

Page 48: ...ine while the main power switch is ON make sure the ground line is connected If the ground line is not connected connecting the USB cable to the machine while the main power switch is ON may result in electric shock If you connect or disconnect the USB cable while the main power switch is ON do not touch the metal parts around the connector otherwise this may result in electric shock IMPORTANT Do ...

Page 49: ...3 3 or later is USB 2 0 Hi Speed USB Full Speed USB 1 1 equivalent For more information consult your local authorized Canon dealer Connecting to a Network The machine can connect to a TCP IP network The machine supports both 10BASE T and 100BASE TX connections that can be used in most LANs Using Ethernet Connect the machine s RJ 45 port to a hub port using the following types of cable depending on...

Page 50: ...ent For more information consult your local authorized Canon dealer After connecting the network cable perform the following operations For more information see the relevant descriptions Set the System Management Settings See Chapter 4 System Manager Settings in the Reference Guide Set the network settings See the Network Guide Install the printer driver if necessary See Before Using the machine a...

Page 51: ... relating to printing System Requirements The following system environments are necessary in order to use the printer driver NOTE Supported operating systems may differ according to the printer driver version used Software Operating Systems Microsoft Windows 2000 Microsoft Windows XP Microsoft Windows Vista Microsoft Windows 7 Microsoft Windows Server 2003 Microsoft Windows Server 2008 Mac OS X 10...

Page 52: ...ted to match the output data thus realizing a significant increase in speed through optimization Installation For details about the installation procedure see the Printer Driver Installation Guide or Mac UFR II Printer Driver Installation Guide CD ROM Menu Windows NOTE View the Printer Driver Installation Guide before you start the installation You cannot view the Printer Driver Installation Guide...

Page 53: ...e CD icon that appears on your desktop You can find the installer and Mac UFR II Printer Driver Installation Guide in the folder with the printer driver name Double click the installer icon in the installer set folder to start the installation Displaying the Mac UFR II Printer Driver Installation Guide In the installation folder double click Documents Guide the index html icon ...

Page 54: ...printer driver For Windows Printer options are set from the Device Settings sheet of the printer driver The Device Settings sheet is displayed by right clicking the icon of the printer you are using in the Printers Printers and Faxes or Devices and Printers folder and selecting Properties or Printer Properties and then the Device Settings tab See the Printer Driver Installation Guide or the help f...

Page 55: ...ions sheet in the Printer Info dialog box Mac OS X 10 4 or the Driver sheet in the Print Fax dialog box Mac OS X 10 5 or later of the printer driver Mac OS X 10 4 x The Installable Options sheet is displayed by the following procedure Click Print Fax on System Preferences Printing select your printer click Printer Setup select Installable Options Mac OS X 10 5 x or later The Driver sheet is displa...

Page 56: ...lating to scanning are made using the scanner driver The scanner driver is installed from the same UFRII LT User Software CD ROM as the printer driver The contents of the CD ROM are as follows Color Network ScanGear The Color Network ScanGear driver is called from TWAIN compliant applications Originals are scanned using the driver Examples of applications that support TWAIN are as follows Adobe Ph...

Page 57: ...correctly A display with a resolution of at least 640 480 800 600 or more recommended and capable of displaying at least 256 colors A network host adapter capable of TCP IP and UDP IP communication on an Ethernet network IMPORTANT If you want to use the machine as a network scanner it must be connected to a computer over an IPv4 network NOTE When scanning a large number of images or images contain...

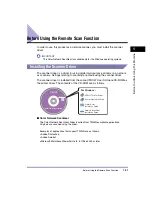
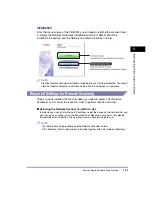
Page 58: ... the installation is in progress Required Settings for Remote Scanning Once you have installed the scanner driver you need to select Color Network ScanGear as a scanner to be used in order to perform remote scanning Selecting the Network Scanner You Want to Use In order to scan using Color Network ScanGear select the device on the network that you want to use as a scanner using the ScanGear Tool B...

Page 59: ...Before Using the Remote Scan Function 1 30 Before You Start Using This Machine 1 ...

Page 60: ...perations of the machine What This Machine Can Do 2 2 Placing Originals 2 6 Orientation 2 6 Platen Glass 2 8 Feeder DADF P2 Optional 2 10 Basic Copying 2 12 Basic Printing 2 17 Basic Remote Scanning 2 18 Canceling a Job 2 21 Using the Stop Key 2 21 Using the System Monitor Screen 2 22 ...

Page 61: ...es UFRII LT Ultra Fast Rendering II LT Technology which utilizes a newly invented printing algorithm to minimize file processing and achieve maximum performance For instructions on setting up the machine as a printer see Before Using the machine as a printer on p 1 22 For instructions on using the printer driver see the Windows Printer Driver Guide Mac Printer Driver Guide or the help on the print...

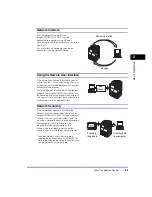
Page 62: ... 2420L can be controlled and set up through the Remote UI and network For instructions on configuring the Ethernet port see the Network Guide Network Scanning If the network connection is available the Network Scan function enables you to use the imageRUNNER 2422L 2420L as a conventional scanner You can scan a document using the machine and read the data in an application on your computer To use t...

Page 63: ...achine to enter the Sleep mode manually by pressing the control panel power switch or specify to have the machine enter the Sleep mode at a preset time To reactivate the machine press the control panel power switch again For more information on the Sleep mode see the Reference Guide Security You can protect the machine from unauthorized access by setting Department ID Management If Department ID M...

Page 64: ...print jobs see the Reference Guide For instructions on canceling a job see Canceling a Job on p 2 21 Other Useful Functions This machine provides other useful functions as listed below Auto Paper Selection APS Auto Drawer Switching ADS See the Reference Guide Auto Clear See the Reference Guide Auto Orientation See the Copying Guide 100X99 Printing 0X 0 Waiting 0X 0 Waiting 0X 0 Waiting Status Job ...

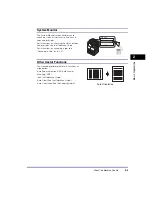
Page 65: ...t to copy several originals at a time and then press Start The machine automatically feeds the originals to the scanning area and scans them If you are copying in the 2 Sided mode two sided originals can also be automatically turned over and scanned as two sided documents Orientation You can place an original either vertically or horizontally Always align the top edge of your original with the bac...

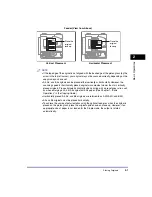
Page 66: ...ally when printing with a preset copy ratio such as when enlarging an A4 or A5 original onto A3 paper See Chapter 1 Basic Operations in the Copying Guide Horizontally placed A4 A5 and B5 originals are referred to as A4R A5R and B5R A3 and B4 originals must be placed horizontally To achieve the same output orientation using the optional feeder as when the original is placed on the platen glass plac...

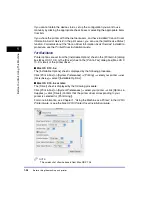
Page 67: ...ing ID cards using the ID Card Copy function you must use the platen glass See Chapter 2 Advanced Operations in the Copying Guide 1 Lift the feeder platen cover 2 Place your original face down The original that you want to copy must be placed face down Align the top edge of your original with the back edge of the platen glass by the arrow in the top left corner Place books and other bound original...

Page 68: ...rks 3 Gently close the feeder platen cover CAUTION Close the feeder platen cover gently to avoid catching your hands as this may result in personal injury Do not press down hard on the feeder platen cover when using the platen glass Doing so may damage the platen glass and result in personal injury NOTE When scanning is complete lift the feeder platen cover and remove the original from the platen ...

Page 69: ...o not place the following types of originals into the feeder Originals with tears or large binding holes Severely curled originals or originals with sharp folds Clipped or stapled originals Carbon backed paper or other originals which may not feed smoothly Transparencies and other highly transparent originals If the same original is fed through the feeder repeatedly the original may fold or become...

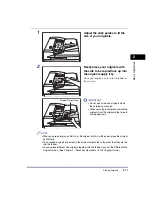
Page 70: ...e feeder if you set the Different Size Originals mode See Chapter 2 Advanced Operations in the Copying Guide 1 Adjust the slide guides to fit the size of your originals 2 Neatly place your originals with the side to be copied face up into the original supply tray Place your originals as far into the feeder as they will go IMPORTANT Do not add or remove originals while they are being scanned When s...

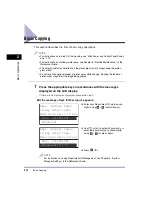
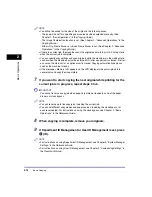
Page 71: ...er or platen cover may distort the image being copied 1 Press the appropriate keys in accordance with the messages displayed on the LCD display If there are no messages displayed proceed to step 2 If the message Dept ID Pass Input appears NOTE For instructions on using Department ID Management see Chapter 4 System Manager Settings in the Reference Guide Enter your Department ID up to seven digits ...

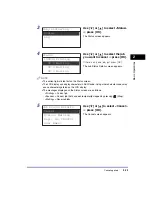
Page 72: ...use or to select Set press OK NOTE For instructions on entering characters see Chapter 2 Basic Operations in the Reference Guide Press ID NOTE For instructions on using User ID Management see Chapter 3 Customizing Settings in the Remote UI Guide ID Key after Input When done press ID key User ID Password Enter User ID Pass User01_ Set Entry Mode 12 User ID ID Key after Input When done press ID key ...

Page 73: ...settings NOTE For more information on specifying copy settings see Chapter 1 Basic Operations and Chapter 2 Advanced Operations in the Copying Guide 5 Enter the desired copy quantity from 1 to 99 using numeric keys Density Auto ImgQual Text 2 Sided Off 100 Auto Start to copy 1 Density 1 ImgQual Text 2 Sided Off 100 Auto Start to copy 1 Density 1 ImgQual Text 2 Sided Off 100 Auto Start to copy 5 ...

Page 74: ...or after a cover on the main unit or an optional unit is closed Copying automatically begins as soon as the machine is ready If the message Memory full appears on the LCD display divide your originals into several sets and copy them separately If the original is placed on the platen glass IMPORTANT You cannot change copy mode settings such as the copy quantity paper size and copy ratio while the m...

Page 75: ...g automatically begins as soon as the machine is ready If the message Memory full appears on the LCD display divide your originals into several sets and copy them separately 7 If you want to start copying the next original while printing for the current job is in progress repeat steps 3 to 6 IMPORTANT You cannot reserve a copy job when paper is jammed or loaded in none of the paper drawers or stac...

Page 76: ...ded Printing from a computer that is connected to the machine with a USB cable you must enable the optional Duplex Unit A1 from the printer driver For help see Chapter 1 Using the Machine as a Printer in the UFR II Printer Guide You can select the default printer settings on the machine from the Additional Functions menu For details see Chapter 1 Using the Machine as a Printer in the UFR II Printe...

Page 77: ...nfigurations and install the scanner driver in the computer For more information see Setting Up the Connection on p 1 18 and Before Using the Remote Scan Function on p 1 27 NOTE For instructions on turning ON the machine see Main Power and Control Panel Power on p 1 15 The quality of scans may deteriorate if the platen glass is dirty Always keep the platen glass clean Do not touch the optional fee...

Page 78: ...ed 5 Open a TWAIN compliant application on your computer desktop 6 Select the command to start scanning operation such as Scan New or Acquire The Color Network ScanGear Main Window appears NOTE For help see the documentation provided with your application 7 Specify the scan settings that suit your preferences NOTE For help see the Network ScanGear Guide 2 Press SCAN The Standby display appears for...

Page 79: ...nning progress appears If Color Network ScanGear does not automatically close after scanning click Exit to close it Be sure to close the Color Network ScanGear Main Window before exiting the application 9 When scanning is complete remove your originals 10 If Department ID Management or User ID Management is set press ID NOTE For instructions on using Department ID Management see Chapter 4 System M...

Page 80: ...handling only one job Proceed to step 4 If the machine has multiple copy or print jobs Proceed to step 2 NOTE The current job is listed first on the Status screen The LCD display can display characters in ASCII code Using other character codes may cause characters garbled on the LCD display The messages displayed on the Status screen are as follows Printing Current job Paused Current job that has ...

Page 81: ...e Using the System Monitor Screen You can cancel a copy or print job from the System Monitor screen during printing or while it is waiting to be processed 1 Press System Monitor The System Monitor screen appears on the LCD display 3 Use or to select Cancel press OK The Cancel screen appears 4 Use or to select Yes press OK The job is canceled 2 Use or to select Copy or Print press OK If you select ...

Page 82: ...job Paused Current job that has been temporarily stopped by pressing Stop Waiting Reserved jobs 3 Use or to select Status press OK The Status screen appears 4 Use or to select the job you want to cancel press OK If there is only one job just press OK The Job Status Details screen appears 5 Use or to select Cancel press OK The Cancel screen appears Status Log Copy Status Log 100X99 Printing 0X 0 Wa...

Page 83: ...can display characters in ASCII code Using other character codes may cause characters garbled on the LCD display 7 Press Reset to return to the Standby display 6 Use or to select Yes press OK If you do not want to cancel the job select No to return to the previous display The selected job is canceled Repeat steps 4 and 6 to cancel another job Yes No Cancel ...

Page 84: ...r describes how to load paper perform routine cleaning operations and replace consumables such as toner and staple cartridges Paper Drawers 3 2 Loading Paper 3 2 Adjusting a Paper Drawer to Hold a Different Paper Size 3 6 Replacing the Toner 3 10 ...

Page 85: ...prompting you to load paper appears on the LCD display and the error indicator flashes red when paper runs out in any of the paper drawers a paper drawer is not fully inserted into the machine Make sure that the paper drawer is properly set in place a paper drawer is opened even if the paper is loaded IMPORTANT Do not load nonstandard paper sizes into the paper drawers Do not load the following ty...

Page 86: ...per stack on a flat surface Never place paper or any other items in the empty part of the drawer next to the paper stack Doing so may cause paper jams NOTE If a message prompting you to load paper appears during printing the remaining prints are automatically made after you load the correct paper If you select another paper drawer the remaining prints are made after you press OK To cancel printing...

Page 87: ...s several times and align the edges to facilitate feeding 4 Load the paper stack into the paper drawer Even out the edges of the paper stack Load the paper stack against the end guide of the paper drawer When loading paper into the paper drawer for the first time set the size plate and the paper size detecting lever for the paper being loaded See Adjusting a Paper Drawer to Hold a Different Paper ...

Page 88: ... print quality or paper jams try turning the paper stack over and reload it For more information on the print direction of preprinted paper paper which has logos or patterns already printed on it see Chapter 8 Appendix in the Reference Guide IMPORTANT You will not be able to make copies or prints if you load paper that exceeds the loading limit or if the paper drawer is not completely pushed into ...

Page 89: ...aper 1 Pull out the paper drawer and remove all the loaded paper 2 Push down the metal plate to lock it 3 Detach the end guide and reattach it to the slots aligned with the mark indicating the desired paper size Detach the end guide by pressing down and forward Align the end guide with the mark indicating the desired paper size Reattach the end guide by tilting it forward and inserting the tabs at...

Page 90: ...o lock the front slide guide into place IMPORTANT Be sure to set the lock lever correctly If the lock lever is positioned incorrectly for the type of paper loaded in the paper drawer the wrong paper type will be shown on the LCD display This may also cause paper jams dirty prints or make the inside of the machine dirty 6 Load the appropriate size paper into the paper drawer CAUTION Take care not t...

Page 91: ...ectly to the size of paper loaded in the paper drawer the wrong paper size will be shown on the LCD display This may also cause paper jams dirty prints or make the inside of the machine dirty NOTE A4R and B5R displayed on the LCD display indicate the paper size label or punch mark of A4 and B5 on the paper drawers 8 Stick the appropriate paper size label on the paper size plate A3 A4 A4 A5 B5 LGL ...

Page 92: ... the new paper size 10 Gently push the paper drawer back into the machine until it clicks into place in the closed position CAUTION When returning the paper drawer to its original position be careful not to get your fingers caught as this may result in personal injury Size Plate ...

Page 93: ...elow to help you replace the toner cartridge NOTE For detailed information on the displays showing the instructions on replacing the toner or staples clearing the paper or staple jams see Chapter 7 Troubleshooting in the Reference Guide WARNING Do not burn or throw used toner cartridges into open flames as this may cause the toner remaining inside the cartridges to ignite resulting in burns or a f...

Page 94: ...ering and dispose of them in a location away from open flames IMPORTANT Use only toner cartridges intended for use with this machine Do not replace toner cartridges until the message prompting you to do so appears Do not attempt to replace the toner cartridge while the machine is printing NOTE It is recommended that you replace the toner cartridge soon after the message Toner low Prepare new toner...

Page 95: ...utine Maintenance 3 2 While pressing the unlock tab on the grip turn the toner cartridge in the direction of the arrow clockwise 3 Pressing the unlock tab pull out the toner cartridge Keep unlock tab down Unlock Tab Remove toner ...

Page 96: ...ause the toner remaining inside the cartridges to ignite resulting in burns or a fire IMPORTANT If the toner is not distributed evenly inside the cartridge the outputs may be printed uneven 4 Shake the new toner cartridge back and forth five or six times to distribute the toner evenly inside the cartridge Shake new toner 5times ...

Page 97: ...emove the protective seal by pulling it straight out with the other hand IMPORTANT Pull out the seal slowly otherwise the toner may scatter and soil your clothes or skin Make sure that you pull out the seal completely otherwise print errors may occur Make sure that you pull the seal straight out Pulling the seal upwards or downwards may break the seal If the seal breaks inside the toner cartridge ...

Page 98: ...artridge fully until it locks into place 8 Close the front cover CAUTION When closing the front cover be careful not to get your fingers caught as this may result in personal injury IMPORTANT Make sure that you clean the fixing unit every time you replace the toner cartridge See Chapter 6 Routine Maintenance in the Reference Guide Turn toner to left Unlock Tab Close front cover ...

Page 99: ...Replacing the Toner 3 16 Routine Maintenance 3 ...

Page 100: ...r jams in the machine and error messages Clearing Paper Jams 4 2 Clearing Paper Jams with On Screen Instructions 4 2 When Paper Jams Occur Frequently 4 3 List of Error Messages 4 4 Self Diagnostic Display 4 4 Service Call Message 4 11 Contacting Your Local Authorized Canon Dealer 4 11 ...

Page 101: ...s or paper take care not to cut your hands on the edges of the original or paper When removing paper which has become jammed inside the machine take care not to cut your hands or injure yourself on the parts on the inside of the machine If you cannot remove the paper please contact your local authorized Canon dealer When removing paper which has become jammed inside the machine take care not to al...

Page 102: ... though there is no apparent problem with the machine either one of the following two reasons may be the cause Follow the instructions described below to reduce the frequency of paper jams There are torn pieces of paper left inside the machine Pulling jammed paper out of the machine by force may leave parts of the paper torn inside leading to frequent paper jams If paper tears while you are trying...

Page 103: ...wsing the network Cannot staple Reduce output pages Cause The machine cannot staple the printouts because too many sheets of paper have been printed out Remedy The printouts are simply collated without stapling If necessary reduce the number of pages in the document and print again Cannot use 2 Sided Change paper size Cause When making two sided copies one of the following paper sizes has been sel...

Page 104: ...lose cover Cause The left cover of Paper Drawer 2 is open Remedy Close the paper drawer s left cover Drawer 3 cover open Close cover Cause The left cover of Paper Drawer 3 is open Remedy Close the paper drawer s left cover Drawer 4 cover open Close cover Cause The left cover of Paper Drawer 4 is open Remedy Close the paper drawer s left cover Exxx Cause An error has occurred in the machine Remedy ...

Page 105: ...Remedy 1 Make sure that the paper size loaded in the paper drawer matches the paper size set for the drawer Remedy 2 Set the size for the paper drawer to match the paper you want to load into the drawer Cause 2 The paper size selected for the stack bypass in the Stand Stack Bypass Standard Stack Bypass menu does not match the paper size loaded in the stack bypass Remedy 1 Load the correct paper si...

Page 106: ...the paper with the smallest margin is selected automatically and printing starts Not connected Check cable Cause The network cable connection has some problem Remedy Make sure that the network cable is properly connected Out of staples Replace staple cart Cause There are only a few staples remaining in the staple cartridge Remedy Replace the staple cartridge See Chapter 6 Routine Maintenance in th...

Page 107: ...Remedy Open the cover again and check if there is any jammed paper Clear the jammed paper if any and close the cover The message disappears and printing resumes Platen glass dirty Clean platen glass Cause The feeder s scanning area is dirty Remedy Clean the feeder s scanning area See Chapter 6 Routine Maintenance in the Reference Guide Restart the machine If problem persists call service rep Cause...

Page 108: ...aper size is unavailable for stapling Remedy Use the suitable paper size for stapling See Chapter 2 Advanced Operations in the Copying Guide This size cannot be offset Cause The machine cannot offset the printouts because the selected paper size is unavailable for offset copying Remedy Use the suitable paper size for offset copying See Chapter 2 Advanced Operations in the Copying Guide Toner low P...

Page 109: ...List of Error Messages 4 10 Troubleshooting 4 Tray B full Remove paper Cause Tray B is full of paper Remedy Remove the prints from Tray B See Chapter 5 Optional Equipment in the Reference Guide ...

Page 110: ... disconnect the power cord with wet hands as this may result in electrical shock CAUTION Always grasp the power plug portion when disconnecting the power cord Pulling on the cord may expose or snap the core wire or otherwise damage the power cord If the power cord is damaged this could cause current to leak resulting in a fire or electrical shock IMPORTANT If the main power switch is turned OFF al...

Page 111: ...following information available Model name Problem and status of the machine Service call message on the LCD display 2 If the machine still does not operate normally follow the procedure below and contact your local authorized Canon dealer Turn OFF the main power Disconnect the power cord from the wall outlet ...

Page 112: ... 1 CHAPTER 5 Appendix This chapter provides the specifications of the main unit and the optional equipment and other useful information Multifunctional Operations 5 2 Available Paper Stock 5 3 Index 5 5 ...

Page 113: ...the vertical columns are already being performed Example When copying is in progress you can scan originals for a copy job NOTE The machine s performance may be affected if image processing such as compression enlargement reduction or rotation are being carried out when the machine receives print data Status Description Print Copy A copy job is being printed Print Data A print or report job is bei...

Page 114: ...g m2 2 From 75 g m2 to 90 g m2 3 From 81 g m2 to 90 g m2 4 From 91 g m2 to 105 g m2 5 From 106 g m2 to 128 g m2 6 Use only A4 transparencies made especially for this machine IMPORTANT When printing on the back side of printed paper use Special Mode O to prevent paper jams See Chapter 3 Useful Functions and Settings in the Reference Guide Paper Type Paper Source Paper Drawer 64 g m2 to 90 g m2 Stac...

Page 115: ...or the imageRUNNER 2422L 2420L Paper Size Width Length Paper Source Paper Drawer 1 Paper Drawers 2 3 4 Stack Bypass A4 297 mm 210 mm A4R 210 mm 297 mm A3 297 mm 420 mm A5 210 mm 148 mm A5R 148 mm 210 mm N A N A B4 257 mm 364 mm B5 257 mm 182 mm B5R 182 mm 257 mm Envelope COM10 10 104 7 mm 241 3 mm N A N A Monarch 98 4 mm 190 5 mm N A N A DL 110 mm 220 mm N A N A ISO B5 176 mm 250 mm N A N A ISO C5...

Page 116: ...work 1 20 Connecting to a USB Interface 1 19 Control Panel 1 10 1 12 Control Panel Power Switch 1 12 1 17 COPY Key 1 12 Copy Ratio Key 1 13 Copying Definition of xiii Counters 1 11 D Density Key 1 13 Different Paper Size 3 6 Different Size Originals Key 1 13 Document Tray J1 1 14 Drum Unit 1 11 Duplex Unit A1 1 11 1 14 2 17 E Envelope 5 3 Error Indicator 1 13 Error Messages 4 4 External View 1 9 F...

Page 117: ...ys 1 12 O OK Key 1 13 On Screen Instruction 4 2 Optional Equipment Cassette Feeding Module S1 1 14 Cassette Feeding Module T1 1 14 Inner 2 Way Tray E2 1 14 P Paper Drawer s Left Cover 1 11 Paper Drawers 1 10 Adjusting a Paper Drawer to Hold a Different Paper Size 3 6 Loading Paper 3 2 Paper Jams On Screen Instruction 4 2 Reducing the Frequency of Paper Jams 4 3 Paper Select Key 1 13 Paper Stock Av...

Page 118: ...Service Call Message 4 11 Setting Up the Connection 1 18 Settings Flowchart 1 18 Sleep Mode 1 17 Slide guides feeder 2 11 Stack Bypass 1 10 Start Key 1 12 Stop Key 1 12 Symbols Used in This Manual ix System Monitor 2 22 System Monitor Key 1 12 T Tone Key 1 12 Toner Cartridge 1 11 3 10 Transparency 5 3 Troubleshooting Clearing Paper Jams 4 2 Error Messages 4 4 Service Call Message 4 11 TWAIN 2 18 V...

Page 119: ...ur regional dealer CANON LATIN AMERICA INC 703 Waterford Way Suite 400 Miami Florida 33126 U S A CANON AUSTRALIA PTY LTD 1 Thomas Holt Drive North Ryde Sydney N S W 2113 Australia CANON CHINA CO LTD 15F Jinbao Building No 89 Jinbao Street Dongcheng District Beijing 100005 China CANON SINGAPORE PTE LTD 1 HarbourFront Avenue 04 01 Keppel Bay Tower Singapore 098632 CANON HONGKONG CO LTD 19 F The Metr...

Reviews: