background image

15

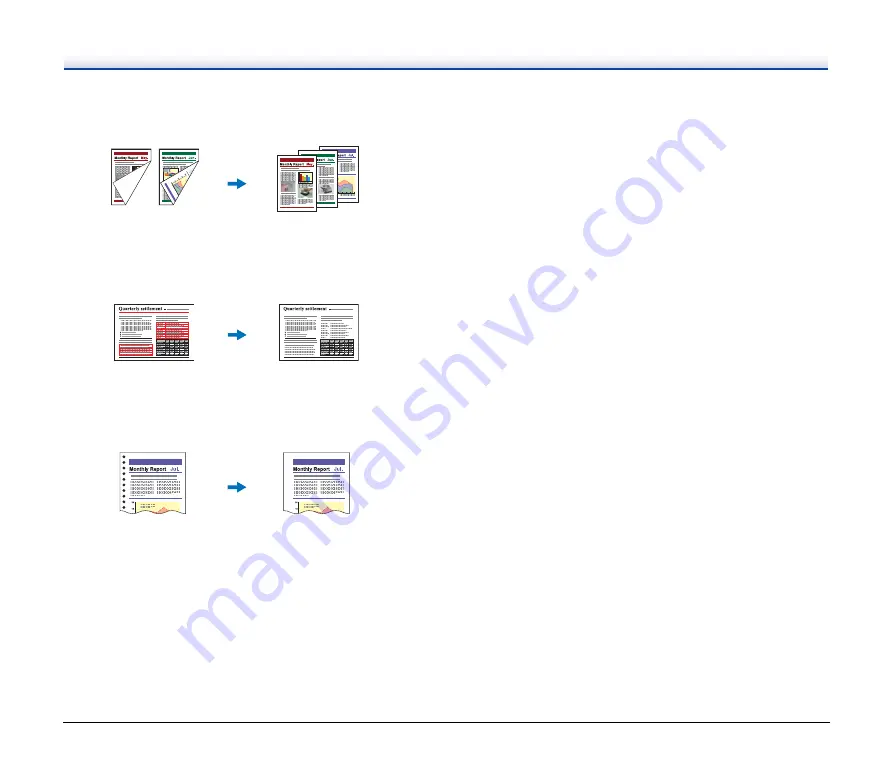
Skip Blank Page

The scanner scans both sides of a document and skips saving the 
image of any side it determines to be a blank page.

Dropout Color

Specify one color (red, blue, or green) to be omitted while scanning 
documents.

Remove Binder Holes

Erases the shadows that appear on scanned images from binding 
holes on the original document.

Two-Sided Documents 

with a Blank Side

Images with Blank Page 

Skipped

Color Document

Image with Red Dropped Out 

(Red Filtered)

Document with 

Binder Holes

Image with Binder 

Holes Removed

Summary of Contents for DR-2020OU

Page 1: ...User Manual Please read this manual before using the scanner After you finish reading this manual keep it in a safe place for future reference ...

Page 2: ...se engineer the SOFTWARE or accompanying documentation and you also shall not have any third party do so 2 BACK UP COPY You may make one copy of the SOFTWARE solely for a back up purpose or copy the SOFTWARE onto the permanent storage device e g a hard disk of your computer and retain the original for a back up purpose Except as expressly permitted under the applicable law any other copying of the...

Page 3: ...l Data and Computer Software clause at DFARs 252 227 7013 or subparagraph c 1 and 2 of the Commercial Computer Software Restricted Rights Clause at FAR 52 227 19 as applicable 7 SEVERABILITY In the event that provision of this Agreement is declared or found to be illegal by any court or tribunal of competent jurisdiction such provision shall be null and void with respect to the jurisdiction of tha...

Page 4: ...tled Digital Apparatus ICES 003 of the Industry Canada RÈGLEMENT SUR LE BROUILLAGE RADIOÉLECTRIQUE For 120 V models Cet appareil numérique respecte les limites de bruits radioélectriques applicables aux appareils numériques de Classe B prescrites dans la norme sur le matériel brouilleur Appareils Numériques NMB 003 édictée par l Industrie Canada International ENERGY STAR Office Equipment Program A...

Page 5: ...ation may be reproduced or transmitted in any form or by any means electronic or mechanical including photocopying and recording or by any information storage or retrieval system without the prior written permission of CANON ELECTRONICS INC Disclaimers The information in this document is subject to change without notice CANON ELECTRONICS INC MAKES NO WARRANTY OF ANY KIND WITH REGARD TO THIS MATERI...

Page 6: ... Manual this manual and CapturePerfect 3 0 Operation Guide which are provided in electronic form and are registered in the Canon DR 2020U menu during software installation Reference Guide This describes setup procedures and basic operations for the scanner User Manual This Manual This describes how to use the scanner CapturePerfect 3 0 Operation Guide electronic manual This is the operation guide ...

Page 7: ...rational requirements and restrictions Be sure to read these items carefully to operate the scanner correctly and avoid damaging the scanner Hint Indicates a clarification of an operation or contains additional explanations for a procedure Reading these notes is highly recommended How This Manual is Organized This manual consists of the following contents Before Using the Scanner Provides safety i...

Page 8: ...ode 23 Placing Cards into the Business Card Feeder 24 When the Scanner Is in Sleep Mode 24 Scanning 25 Supplied Software 25 Scanning with CaptureOnTouch 26 CaptureOnTouch Features 26 Outputs Methods 28 Starting CaptureOnTouch 28 Quitting CaptureOnTouch 28 Restarting CaptureOnTouch 28 Scanner Settings 29 Basic Scanner Settings 29 Scanning with the START Button 30 Scanning with the Job Buttons 34 Sc...

Page 9: ...the Roller Unit and Separation Pad 61 Removing the Roller Unit and Separation Pad 61 Attaching the Roller Unit and Separation Pad 62 Troubleshooting 64 Common Problems and Solutions 64 Software Troubleshooting 66 If scanning is too slow 66 If scanned image files cannot be opened in an application 66 If CapturePerfect cannot open some PDF files 66 Q A Useful tips 66 Paper Jams 68 Uninstalling the S...

Page 10: ...essive dust 4 3 110 mm or more Avoid warm or humid locations such as in the vicinity of a water faucet water heater or humidifier and avoid locations where the fumes from ammonia paint thinner or other volatile chemicals may be present Avoid locations that are unstable or subject to vibration Avoid exposing the scanner to rapid changes in temperature If the room in which the scanner is installed i...

Page 11: ...rous Do not place objects on or step on the AC adapter or power cord Do not use the power cord while it is coiled Do not pull directly on the power cord When disconnecting the power cord grasp the power plug and remove it from the power outlet Keep the area around the power plug clear of objects so that the power cord can be disconnected easily in an emergency Use only the AC adapter supplied with...

Page 12: ...d AC adapter provided with this scanner Do not attempt to dismantle the scanner or modify it in any way as this is dangerous and may lead to a fire or electric shock Never attempt to dismantle or modify the AC adapter in any way as doing so is dangerous Do not use flammable aerosol spray products near the scanner When cleaning the scanner turn the power switch OFF and disconnect the power cord fro...

Page 13: ...l benzene paint thinner etc to spill into the scanner as this may result in a fire or electric shock Turn OFF the power switch for safety when not using the scanner for a long period of time such as overnight Also turn OFF the power switch and disconnect the AC adapter from the scanner and disconnect the power cord from the power outlet for safety when the machine will not be used for an extended ...

Page 14: ...r smoothing mode to reduce the occurrence of moiré patterns when scanning color images from a magazine for example Prescan Function At the start of scanning this function prescans the first page of a document and pauses so that you can use the first image to adjust the brightness and contrast before scanning resumes Energy Efficient Design This scanner conforms to international Energy Star program...

Page 15: ...e color red blue or green to be omitted while scanning documents Remove Binder Holes Erases the shadows that appear on scanned images from binding holes on the original document Two Sided Documents with a Blank Side Images with Blank Page Skipped Color Document Image with Red Dropped Out Red Filtered Document with Binder Holes Image with Binder Holes Removed ...

Page 16: ...Other USB 2 0 interface CD ROM drive for software installation DVD drive for installation of supplied Adobe Acrobat 9 0 Application Software Use ISIS TWAIN compliant applications that are compatible with the above system environments Note Use the latest USB 2 0 driver made available by Microsoft For details contact your local authorized Canon dealer Operation is not guaranteed with all USB interfa...

Page 17: ...if documents scanned through the feeder hang over the edge of the eject tray F Operation Panel Buttons for operating the scanner and an LCD are located here See p 18 G Business Card Feeder Open and use this when scanning business cards H Pressure Board This presses documents placed on the flatbed against the glass I Scanning Glass Feeder J Lock Switch Use this to lock the inner parts of the scanne...

Page 18: ...button performs the following functions Executes jobs selected with the user defined job buttons or scroll keys Starts scanning when an application is used and the Feeding Option is set to Panel Feeding Launches the application configured with the Windows Events function G STOP Button Press this button to stop scan procedures or clear error displays such as those for paper jams H POWER Button Pres...

Page 19: ...nctioning if the ADF connector is disconnected C Power Connector Connect the supplied AC adapter here The business card feeder is open waiting for cards to be placed Communication error with computer When an error occurs a message indicating the nature of the error appears You can use the scroll keys to scroll longer messages For details on the error messages and their solutions see p 65 B A C ...

Page 20: ...ning glass dirty resulting in smears on the scanned image When scanning thin paper text or images on the reverse side of the page may bleed through onto the scanned image In this case adjust the brightness under the scanning conditions Always make sure to check that paper clips staples and similar objects are not mixed in with a document before loading it into the feeder The presence of such objec...

Page 21: ...dges may result in folds and paper jams Make sure to straighten out the curls before loading documents in the scanner Handle paper edges with care and be careful not to cut your fingers when loading documents Documents That Cannot Be Scanned with the Feeder Use the flatbed platen glass to scan the following types of documents Using the feeder may result in paper jams and damage to the scanner Wrin...

Page 22: ... tray Open the eject tray extension if you are scanning documents that are longer than the eject tray Documents That Contain Differently Sized Pages Place the document so that each page is centered between the document guides When the Scanner Is in the Sleep Mode When the scanner is not operated for a specific amount of time it automatically enters the sleep mode The scanner automatically exits th...

Page 23: ... gently Excessive force may result in damage to the feeder or breaking the scanning glass and personal injury When the Scanner Is in Sleep Mode When the scanner is not operated for a specific amount of time it automatically enters the sleep mode The scanner automatically exits the sleep mode if you initiate scanning from a computer However to initiate scanning from the scanner s operation panel yo...

Page 24: ...the business card feeder gently Excessive force may result in damage to the business card feeder Precautions for using the business card feeder are the same as those for the feeder See p 20 Close the business card feeder when it is not in use Business cards are ejected in reverse order after scanning from the business card feeder Scan plastic cards on the flatbed When the Scanner Is in Sleep Mode ...

Page 25: ...f the ISIS TWAIN driver is not guaranteed with all application programs Hint You must install the software from the Setup disc to use the scanner For details on installation see the Reference Guide CaptureOnTouch See p 26 This scanning application designed specifically for use with the DR 2020U allows you to scan using easy to follow on screen instructions CapturePerfect 3 0 See p 41 This scanning...

Page 26: ...g procedures without your computer The following describes the output procedures for the two screens found in CaptureOnTouch Scan First Select an output method after a document is scanned and then configure the necessary settings To use the Scan First default settings press the START button when Scan First appears on the display panel If you press the START button while a job appears on the displa...

Page 27: ...ve scanning procedures will be processed automatically when these buttons are pressed Registered jobs can be assigned to the user defined job buttons When you press a user defined job button and then press the START button the scan job assigned to the button begins You can also select registered jobs using the scroll keys When you press the START button the selected scanning job begins Register jo...

Page 28: ... taskbar and click Exit in the menu The application no longer reside in the system and the taskbar icon disappears Restarting CaptureOnTouch Press any job button on the scanner to restart CaptureOnTouch CaptureOnTouch starts and the main screen appears Hint CaptureOnTouch resides in the system when it starts and the CaptureOnTouch icon appears on the taskbar You can also restart from the Windows S...

Page 29: ...specified the scanner detects the page size of the document and the image is saved in the detected size Orientation Specify the orientation in which documents are fed into the scanner portrait or landscape This setting can only be configured when a page size that can be fed horizontally through the scanner is selected for Page Size Dots per inch Specify the scanning resolution Scanning Side Specif...

Page 30: ... The following describes the procedure for scanning 1 Place the documents into the scanner For details on loading documents see Placing Documents into the Feeder on p 22 2 When Ready appears on the display panel press the START button on the operation panel CaptureOnTouch starts and the documents are scanned Hint If Ready does not appear on the display panel for example the job title of a previous...

Page 31: ...in addition to the scanner settings When document scanning is finished the output method selection screen appears 3 Specify the output method 4 Configure settings for the output method Save to folder Specify the file name format and destination for the image file to be saved ...

Page 32: ...e file name format and destination for the image file to be saved When Using PaperPort The PaperPort application supplied with this unit uses the Documents folder by default When sending the image file to PaperPort and specifying the save destination be sure to specify the Documents folder or a folder within the Documents folder Specifying any other folder may result in an error If you want to spe...

Page 33: ...me of the output button differs depending on the selected output method The completion screen appears after the scanned images are output 6 Press the STOP button on the operation panel The display panel message clears This completes the scan procedure Output button ...

Page 34: ...e documents are scanned Hint If this procedure is performed immediately after turning the scanner ON or while the power indicator is not lit the following appears on the computer display In this case scanning begins after the scanner finishes warming up Warm up may take up to 30 seconds While scanning is in progress the number of pages scanned is displayed in addition to the scanner settings Under...

Page 35: ...operation panel The display panel message clears This completes the scan procedure Scanning with the User Defined Job Buttons You can press the user defined job buttons or scroll keys on the operation panel to recall jobs registered in CaptureOnTouch and perform scanning To do so you must first register the jobs Registering Editing Jobs Perform the following procedure to register up to 50 jobs wit...

Page 36: ...ing 5 Enter a job name and specify the output method for the job Select the output method from the Output method list box See p 31 6 Configure the job settings Configure the settings found in the following three tabs Output settings tab Configure the settings for the output method The items that appear in this tab differ depending on the Output method selected See p 31 File settings tab This tab a...

Page 37: ...is pressed If you do not want to assign a button click Do not assign button 7 Click OK The job is registered according to the configured settings and appears in the job list Hint To confirm the settings of a registered job or to change the settings click Job list edit To delete a registered job select it in the job list and click Delete E Mail Settings You must configure the e mail settings when r...

Page 38: ...on 5 Click OK to close the Environmental settings dialog box Job Settings If you selected Send by E mail for the output method in the Register new job dialog box see p 35 the Compose e mail tab appears as follows Configure the following settings regarding the destination of the e mail message Enter the recipient address in Mail address Click History to select an address from a history of previous ...

Page 39: ...r defined job button press the corresponding user defined job button In this case the title of the assigned job appears in the display panel 3 Press the START button on the operation panel CaptureOnTouch starts and the documents are scanned Hint If this procedure is performed immediately after turning the scanner ON or while the power indicator is not lit the following appears on the computer disp...

Page 40: ...e Taskbar Menu Taskbar menu Click CaptureOnTouch and click a registered job or Scan First in the menu that appears Scanning from the Main Screen Double click CaptureOnTouch to display the main screen and start Scan First or Select Scan Job For details on the procedures see Scanning with the START Button on p 30 or Scanning with the Job Buttons on p 34 ...

Page 41: ... page of the document is scanned Scan Job The scanning conditions and scan mode Scan Batch to File Scan Batch to Printer or Scan Batch to Mail are registered in advance as a job The scan job can then be executed by selecting the registered job from the drop down list A and then clicking Scan Job on the toolbar B Hint A total of 99 jobs can be registered including the following two preregistered sc...

Page 42: ... on how to scan using other methods refer to the CapturePerfect 3 0 Operation Guide 1 From the Windows taskbar click Start and select All Programs CapturePerfect 3 0 and CapturePerfect 3 0 CapturePerfect 3 0 starts 2 Select Select Scanner from the Scan menu The Select Scanner dialog box appears 3 Select CANON DR 2020U and click Settings The Configure Device Settings dialog box appears IMPORTANT If...

Page 43: ...driver appears 8 Configure the scanning conditions Hint To scan using the flatbed set Feeder Flatbed to Flatbed or Auto If Feeder Flatbed is set to Auto documents placed in the feeder are scanned If there are no documents in the feeder the flatbed is scanned 9 Specify the file name and format for the image file to be saved For details on other settings in the Scan Batch to File Setting dialog box ...

Page 44: ...amp lights Scanning begins when a document is placed in the feeder and you press the START button The Continue Scanning dialog box appears when you press the STOP button If Feeder Flatbed is set to Auto and Feeding Option is set to Automatic Feeding scanning is performed as follows Documents are automatically detected and scanned when placed in the feeder The START button lamp lights and the flatb...

Page 45: ...following to register jobs 1 Select Job from the Edit menu The Register Edit Delete dialog box appears Hint The following jobs are already registered to job numbers 01 and 02 2 Select a job number to register No and click Create Edit The Create Edit dialog box appears 3 Enter the job title Hint Job titles may consist of up to 64 alphanumeric characters 4 Specify a function in the Function list box...

Page 46: ...r the image file to be attached to the e mail message Scan To Print Specify the printer to which images will be printed Hint The Details of File Settings and JPEG compression buttons appear in the Scan Batch to File Setting and Scan Batch to Mail Setting dialog boxes These buttons are enabled when Save as type is set to a format other than BMP File bmp and you can use them to configure file format...

Page 47: ...t To delete a registered job select the job to delete and click Delete Executing Scan Jobs 1 Select a job title from the list box in the job registration toolbar 2 Place the documents into the scanner For details on placing documents see Placing Documents into the Feeder on p 22 3 Select Scan Job from the Scan menu Scanning begins according to the registered job settings ...

Page 48: ... Basic Tab Configure the basic scan settings such as the scanning mode page size resolution and scanning side You can also click Area to specify the scanning area Hint The Scanning Option drop down list does not appear if the driver is opened from an ISIS compliant application Saving Settings You can save the scanning conditions as user preferences for future use Saving Scanning Conditions Enter a...

Page 49: ...Gamma to configure gamma correction settings Image processing Tab Configure the image processing settings Hint The Reverse Image check box does not appear if the driver is opened from an ISIS compliant application Others Tab Configure the settings related to scanner operations while scanning ...

Page 50: ...xt for easy reading Page Size Select the page size of the document to be scanned Hint If Auto detection is selected the edges of the document are detected and images are saved according to the detected document size Even if a standard page size is selected the setting will automatically switch to business card size if you open the business card feeder Dots per inch Select the scanning resolution H...

Page 51: ... fixed at Business card feeder This setting is automatically set to Feeder when Rapid recovery system is enabled in the Others tab Scanning Custom Page Sizes You can name and register a non standard page size as a custom page size from the Page Size drop down list in the Scan Area dialog box which is opened by clicking Area in the Basic tab Specifying the Scanning Area Configure the following sett...

Page 52: ... page is selected the Setting button is enabled and you can adjust the density level for judging whether pages are blank When you do not want to scan colored lines and characters Specify the color to omit red blue or green from the Color drop out drop down list in the Image processing tab and the specified color is not scanned When you want to enhance a particular color Specify the color to enhanc...

Page 53: ...Removal check box in the Image processing tab The black borders that surround scanned images are removed When you want to reverse the black and white in scanned images TWAIN driver only Select the Reverse Image check box in the Image processing tab The scanned images are output with black and white colors reversed Hint The ISIS driver does not have a function for reversing black and white ...

Page 54: ...The black spots from the punch holes in the document are removed from scanned images When you want to match the orientation of images to the text while scanning documents containing pages of varying text orientations Select the Text Orientation Recognition check box in the Image processing tab The orientation of the text is detected on each page and each scanned image is rotated in 90 degree incre...

Page 55: ... may be fed even if document feeding is stopped automatically after a double feed occurs Before resuming the scanning operation use your application to check the last page that was scanned successfully Before Using Adobe Acrobat 9 0 There are two methods for scanning a document from the scanner using the bundled Adobe Acrobat 9 0 software One method is Presets Black White Document Grayscale Docume...

Page 56: ...or Showing the Native Interface in Custom Scan 1 Click Create and then select PDF from Scanner Custom Scan 2 Click Options in the Custom Scan dialog box to open the Scanner Options dialog box 3 From the User Interface drop down list select Show Scanner s Native Interface and then click OK to close the dialog box The scanner runs the Custom Scan and the Native Interface the machine s own scanner se...

Page 57: ... tab Available for setting Not available for setting Scanning Mode Contrast Enable Back Side Brightness Enable Back Side Contrast Black and White Error Diffusion Advanced Text Enhancement Advanced Text Enhancement II 256 level Gray 24 bit Color Scanning Mode Edge Emphasis Color Smoothing Reverse Image TWAIN driver only Color Drop Out Black and White Error Diffusion Advanced Text Enhancement Advanc...

Page 58: ... then click Utility Canon imageFORMULA Utility starts 2 Select CANON DR 2020U USB and then click Properties Hint If the scanner does not appear in the list check that the scanner is turned ON and connected to the computer and then click Update In Windows Vista the User Account Control screen appears If you are logged on as an administrator click OK If you are not logged on as an administrator ente...

Page 59: ...p must be adjusted before scanning operations begin As a result scanning may not immediately start in situations where the lamp brightness has not been adjusted such as immediately after turning ON the scanner or immediately after the scanner exits the sleep mode In such cases the following message appears on the computer display until the lamp brightness is adjusted Warm up may take up to 30 seco...

Page 60: ...rung out to clean the outside of the scanner and use a clean dry cloth to wipe the scanner dry Cleaning the Feed Path Dust or paper particles in the document feed inlet or inside the feeder can cause spots to appear in scanned images Use compressed air to periodically clean dust and paper particles from the inlet and inside the feeder In particular be sure to turn the scanner OFF and remove the du...

Page 61: ...uments become dirty the roller unit and separation pad may be dirty Be sure to clean them regularly Hint The roller unit and separation pad are located inside the feeder cover Be sure to remove the roller unit and separation pad as shown below before cleaning them Removing the Roller Unit and Separation Pad 1 Open the document feed tray and feeder cover 2 Raise the roller unit s lock lever Gently ...

Page 62: ...Use a cloth dampened with water and thoroughly wrung out to wipe the rollers and separation pad clean Attaching the Roller Unit and Separation Pad 1 Attach the separation pad Press the separation pad down gently until it snaps into place and make sure it is securely attached 2 Attach the roller unit Insert the shaft pin of the roller unit into the notch on the scanner A and attach the lock lever v...

Page 63: ...d tray be careful not to get your fingers caught as this may result in personal injury IMPORTANT The separation pad and roller unit are consumable parts If performance does not improve after cleaning the separation pad and roller unit the parts may need to be replaced Contact your local authorized Canon dealer When replacing the parts first replace the separation pad If performance does not improv...

Page 64: ...s so that they feed straightly 2 Enable the Deskew scanner driver setting 3 If many pages have been scanned since roller cleaning clean the rollers If documents still feed askew roller replacement or other maintenance may be needed Refer to the page 61 for roller cleaning and replacement procedures Problem 4 Both sides are not scanned even when the Duplex scanner driver setting is enabled Solution...

Page 65: ... Multiple scanned images cannot be saved in a single JPEG or BMP file Save the images in either TIFF or PDF format Problem 11 An error message is displayed Solutions Confirm the nature of the error and resolve the problem Press the STOP button to clear the error message The solution for each error is as follows Problem 12 Cannot perform ADF scanning Solutions Scanning cannot be performed from the ...

Page 66: ...fore scanning If CapturePerfect cannot open some PDF files Some PDF files created by non Canon programs cannot be opened by CapturePerfect Q A Useful tips Here are some useful tips for scanning documents Where are scanned images saved Can the save destination be changed Images are saved to the following locations according to program settings All destination locations can be changed to other folde...

Page 67: ...rt images in a scanned image file CapturePerfect includes a function to add or insert pages in scanned image files Refer to the CapturePerfect Operation Guide for details How do I paste OCR results from CapturePerfect into Excel or Word After scanning with OCR recognition enabled in CapturePerfect click Modify Barcode OCR in the Edit menu to open the Modify Barcode OCR dialog box where you can cop...

Page 68: ... the shared folder How can I attach scanned data to an e mail or send it as e mail CaptureOnTouch For Scan First scanning select Attach to E mail on the output method selection screen For selected job scanning select Attach to E mail as the Output method when registering the job CapturePerfect Scan using the Scan Batch to Mail function Alternatively register a job with the output destination as e ...

Page 69: ... it IMPORTANT Remove the document carefully and do not pull with excessive force Should the document tear always be sure to remove any pieces of paper remaining in the scanner 5 Close the feeder cover gently CAUTION When closing the feeder cover be careful not to get your fingers caught as this may result in personal injury 6 Press the STOP button to clear the error message on the display Hint Aft...

Page 70: ...Perfect 3 0 The instructions shown are when you are using the Windows Vista operating system IMPORTANT When uninstalling the software always log on to Windows as an Administrator 1 Click Start and then click Control Panel to open the Control Panel Hint For Windows 2000 and XP click Start Settings Control Panel The Control Panel appears 2 Click Programs Hint For Windows 2000 and XP click Add Remove...

Page 71: ...71 4 Click Yes 5 Click Finish ...

Page 72: ...lex Skip blank pages Scanning Modes Black and White Advanced Text Enhancement Advanced Text Enhancement II Error Diffusion 256 level Gray 24 bit Color Smoothing Color Scanning Resolution primary scan lines secondary scan lines 100 100 dpi 150 150 dpi 200 200 dpi 240 240 dpi 300 300 dpi 400 400 dpi 600 600 dpi Scanning Speed A4 200 dpi Simplex Feeder Black and White 20 ppm Gray 20 ppm Color 20 ppm ...

Page 73: ...ode 4048B001 Separation Pad Product Code 4048B002 For details on replacing the roller unit and separation pad see Cleaning the Roller Unit and Separation Pad on p 61 For further details on replacement contact your local authorized Canon dealer ...

Page 74: ...74 External Dimensions 17 3 440 mm 2 36 60 mm 1 97 50 mm 15 8 400 mm 16 3 415 mm 9 72 247 mm 7 1 180 mm 5 5 140 mm 5 91 150 mm ...

Page 75: ...ocument types 20 E Eject tray extension 17 F Feeder 22 Feeder cover 17 Feeding method Business card feeder 20 Feeder 20 Flatbed 20 Flatbed 23 H Handling 12 I Installation location 10 ISIS TWAIN driver 48 J Job buttons 18 34 COPY 18 E MAIL 18 FILE 18 L Loading documents Business card feeder 24 Feeder 22 Flatbed 23 Lock switch 12 17 M Maintenance 60 Moving the scanner 12 N Names and functions of par...

Page 76: ...s 34 Other method 40 Registered jobs 39 START button 30 User defined job buttons 35 Scanning glass Feeder 17 Flatbed 17 Scroll keys 18 Sleep mode 22 58 CCFL control 59 Power control 59 Specifications 72 START button 18 STOP button 18 T Troubleshooting 64 U Uninstalling software 70 USB connector 19 User defined job buttons 18 ...

Page 77: ...ETHERLANDS CANON LATIN AMERICA INC 703 WATERFORD WAY SUITE 400 MIAMI FLORIDA 33126 U S A CANON AUSTRALIA PTY LTD 1 THOMAS HOLT DRIVE NORTH RYDE SYDNEY N S W 2113 AUSTRALIA CANON SINGAPORE PTE LTD 1 HARBOUR FRONT AVENUE 04 01 KEPPEL BAY TOWER SINGAPORE 098632 CANON HONGKONG COMPANY LTD 19TH FLOOR THE METROPOLIS TOWER 10 METROPOLIS DRIVE HUNGHOM KOWLOON HONG KONG CANON KOREA BUSINESS SOLUTIONS INC 1...

Reviews: