Chapter 19
19-69
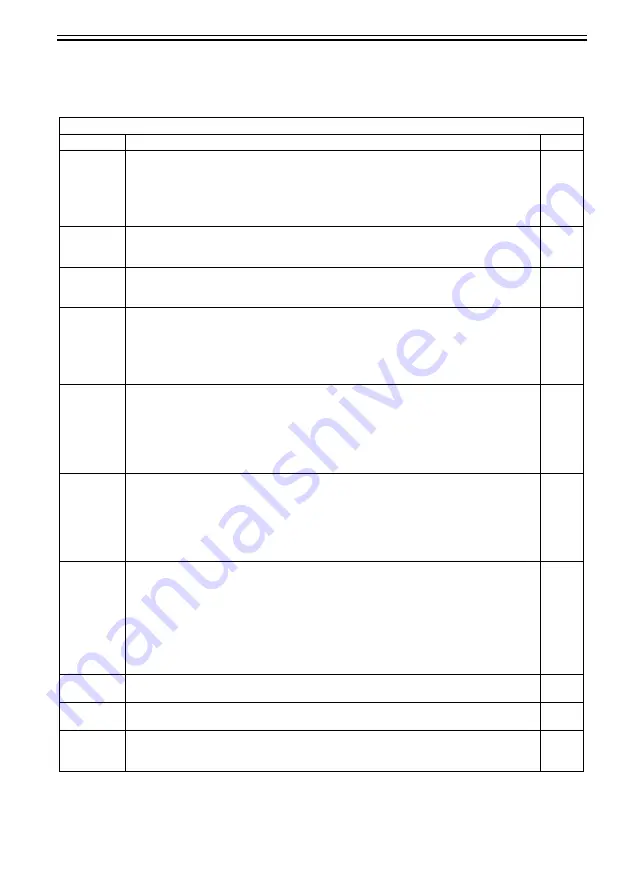
11. MISC-P
T-19-55
COPIER>FUNCTION>MISC-P
Sub item
Description
level.
P-PRINT
Prints service mode setting values.
Operation method
1) Select this item.
2) Press the OK key to print the setting values.
Reference:
Printing takes about 15 seconds to start.
1
KEY-HIST
- KEY-HIST (Prints the operation panel's key input history.)
1) Select this item.
2) Press the OK key to start printing.
1
HIST-PRT
- HIST-PRT (Prints the jam history and error history.)
1) Select this item.
2) Press the OK key to start printing.
1
USER-PRT
Prints user mode list.
Operation method
1) Select this item.
2) Press the OK key to print the list.
Reference:
Printing takes about 3 seconds to start.
1
LBL-PRNT
Prints service label.
Operation method
1) Place A4/LTR paper in the manual feed tray.
2) Select this item.
3) Press the OK key to print the label.
Reference:
Printing takes about 15 seconds to start.
1
D-PRINT
Printing out service mode (DISPLAY)
Procedure
1) Select this mode.
2) Press OK to print out.
Reference:
Only DISPLAY items are printed out. (Items of P-PRINT/LBL-PRINT/HIST-PRINT and
ALARM are excluded.)
1
ENV-PRT
Outputting logs of inside machine temperature and humidity/fixing roller surface temperature
Procedure
1) Select this mode.
2) Press OK to output logs of inside machine temperature and humidity/fixing roller surface
temperature.
Reference:
This mode is to output logs of [inside temperature(deg C)/humidity(%)/fixing roller surface
(center) temperature (deg C)] variations using signals of the attached temperature/humidity
(environmental) sensor and fixing thermistor (main). (Max. 100 records)
1
PJH-P-1
Prints print job history with detailed information (for 100 jobs).
Prints print job history with detailed information for last 100 jobs stored in copier main unit.
1
PJH-P-2
Prints print job history with detailed information (for all jobs).
Prints print job history with detailed information for all jobs stored in copier main unit.
1
TRS-DATA
- TRS-DATA (Moves the data received in memory to the BOX.)
1) Select this item.
2) Press the OK key to start printing.
2
Summary of Contents for Color imageRUNNER C4580
Page 22: ...Chapter 1 INTRODUCTION ...
Page 64: ...Chapter 2 INSTALLATION ...
Page 110: ...Chapter 3 BASIC OPERATION ...
Page 119: ...Chapter 4 BASIC OPERATIONS AS A PRINTER ...
Page 129: ...Chapter 5 MAIN CONTROLLER ...
Page 138: ...Chapter 5 5 8 F 5 8 CPU HDD ROM access to the program at time of execution ...
Page 165: ...Chapter 6 ORIGINAL EXPOSURE SYSTEM ...
Page 209: ...Chapter 7 IMAGE PROCESSING SYSTEM ...
Page 212: ...Chapter LASER EXPOSURE 8 ...
Page 239: ...Chapter 9 IMAGE FORMATION ...
Page 324: ...Chapter 10 PICKUP FEEDING SYSTEM ...
Page 435: ...Chapter 11 FIXING SYSTEM ...
Page 460: ...Chapter 11 11 23 F 11 13 SEN3 SEN2 SEN1 SEN2 SEN3 SEN1 SEN2 SEN3 SEN1 ...
Page 491: ...Chapter 12 EXTERNALS CONTROLS ...
Page 498: ...Chapter 12 12 5 F 12 2 FM1 FM7 FM9 FM2 FM13 FM14 FM12 FM11 FM10 FM5 FM3 FM4 FM8 FM6 ...
Page 512: ...Chapter 12 12 19 2 Remove the check mark from SNMP Status Enabled F 12 10 ...
Page 553: ...Chapter 13 MEAP ...
Page 557: ...Chapter 14 RDS ...
Page 569: ...Chapter 15 MAINTENANCE INSPECTION ...
Page 578: ...Chapter 16 STANDARDS ADJUSTMENTS ...
Page 597: ...Chapter 17 CORRECTING FAULTY IMAGES ...
Page 612: ...Chapter 17 17 14 F 17 7 PLG1 ELCB1 SP1 H4 H3 H2 H1 H1 H2 LA1 ...
Page 617: ...Chapter 18 SELF DIAGNOSIS ...
Page 644: ...Chapter 19 SERVICE MODE ...
Page 778: ...Chapter 20 UPGRADING ...
Page 823: ...Chapter 21 SERVICE TOOLS ...
Page 828: ...APPENDIX ...
Page 851: ......


