4-51
Loading and Outputting P
aper
4
Printing from the Multi-purpose Tray
IMPORTANT
•
Match the paper type specified in the SETUP menu of the printer and that specified in the
printer driver. If they do not match, the message <PC LOAD "size"> appears. In this
case, the setting for TRAY PAPER TYPE is changed to that in the printer driver by
pressing [Online], allowing you to continue printing.
•
If the type of the paper practically loaded in the multi-purpose tray and the setting for
TRAY PAPER TYPE do not match, this may result in crucial damage to the engine. Be
sure to match the paper type.
•
If TRAY PAPER TYPE is set to MIXED TYPES, the printer does not check the type of the
loaded paper against the paper type specified in the printer driver. Be sure to check if the
paper type specified in the printer driver matches the type of the paper loaded in the
multi-purpose tray before using the printer.
1
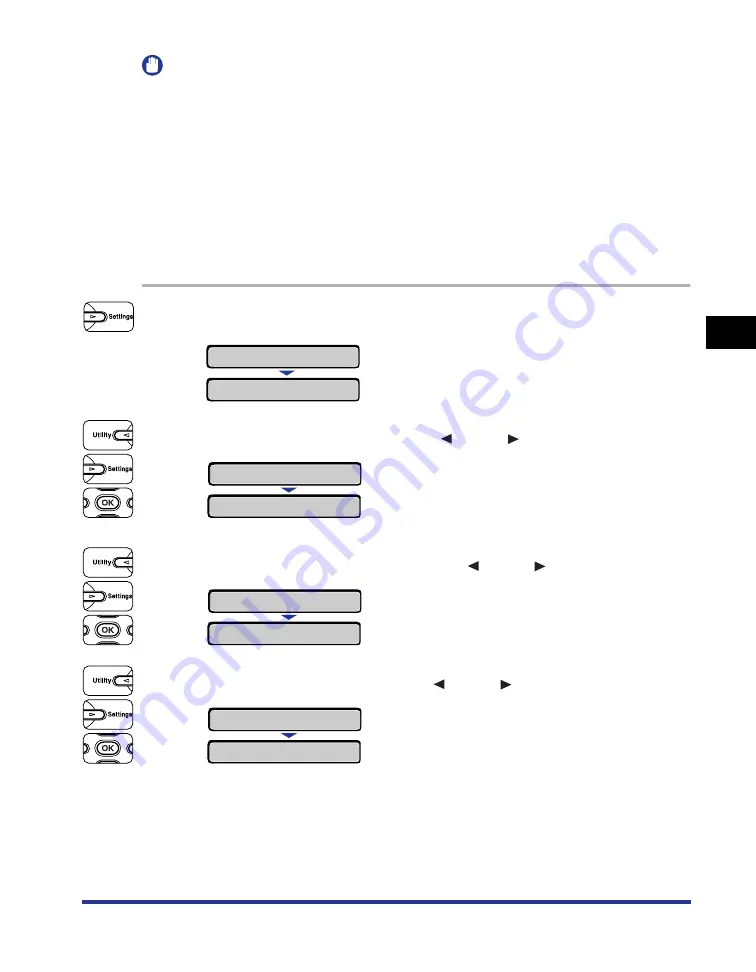
Press [Settings].
2
Select FEEDER MENU using [
] and [
], then press [OK].
3
Select TRAY PAPER TYPE using [
] and [
], then press [OK].
4
Select the paper type using [
] and [
], then press [OK].
"=" is displayed on the left of the paper type, and the paper type for the
multi-purpose tray is specified.
SETUP
CONTROL MENU
→
FEEDER MENU
→
TRAY PAPER SIZE
→
TRAY PAPER TYPE
→
=PLAIN PAPER
→
LABEL
→
=LABEL
→
Summary of Contents for Color image RUNNER LBP5360
Page 2: ...LBP5360 Laser Printer User s Guide ...
Page 27: ...xxiv ...
Page 43: ...1 16 Before You Start 1 Optional Accessories ...
Page 87: ...Turning the Printer ON and Checking the Printer Operation 2 44 Installing the Printer 2 ...
Page 105: ...3 18 Canceling a Job Using the Printer 3 ...
Page 165: ...4 60 Loading and Outputting Paper 2 sided Printing 4 ...
Page 257: ...6 74 Printing Environment Settings 6 SELECT FEEDER Menu Settings ...
Page 297: ...7 40 Routine Maintenance 7 Handling the Printer ...
Page 320: ...8 23 Troubleshooting 8 Paper Jams 1 Turn the power of the printer OFF 2 Open the top cover ...
Page 365: ...8 68 Troubleshooting 8 Adjusting the Color Balance ...
Page 401: ...Installing a Hard Disk 9 36 Installing the Optional Accessories 9 ...
Page 410: ...Symbol Sets Supported 10 9 Appendix 10 Roman 9 4U ISO 8859 1 Latin 1 0N ...
Page 411: ...Symbol Sets Supported 10 10 Appendix 10 ISO 8859 2 Latin 2 2N ISO 8859 9 Latin 5 5N ...
Page 412: ...Symbol Sets Supported 10 11 Appendix 10 ISO 8859 15 Latin 9 9N PC 8 Code Page 437 10U ...
Page 413: ...Symbol Sets Supported 10 12 Appendix 10 PC 8 D N Danish Norwegian 11U PC 850 Multilingual 12U ...
Page 414: ...Symbol Sets Supported 10 13 Appendix 10 PC 858 Multilingual with Euro 13U PC 852 Latin 2 17U ...
Page 415: ...Symbol Sets Supported 10 14 Appendix 10 PC Turkish 9T Windows 3 1 Latin 1 19U ...
Page 416: ...Symbol Sets Supported 10 15 Appendix 10 Windows 3 1 Latin 2 9E Windows 3 1 Latin 5 5T ...
Page 417: ...Symbol Sets Supported 10 16 Appendix 10 DeskTop 7J PS Text 10J ...
Page 418: ...Symbol Sets Supported 10 17 Appendix 10 Ventura International 13J Ventura US 14J ...
Page 419: ...Symbol Sets Supported 10 18 Appendix 10 Microsoft Publishing 6J Math 8 8M ...
Page 420: ...Symbol Sets Supported 10 19 Appendix 10 PS Math 5M Ventura Math 6M ...
Page 421: ...Symbol Sets Supported 10 20 Appendix 10 PI Font 15U Legal 1U ...
Page 422: ...Symbol Sets Supported 10 21 Appendix 10 Windows 3 0 Latin 1 9U ISO 8859 10 Latin 6 6N ...
Page 423: ...Symbol Sets Supported 10 22 Appendix 10 PC 775 26U PC 1004 9J ...
Page 424: ...Symbol Sets Supported 10 23 Appendix 10 Windows Baltic 19L MC Text 12J ...
Page 425: ...Symbol Sets Supported 10 24 Appendix 10 Symbol 19M Wingdings 579L ...
Page 426: ...Symbol Sets Supported 10 25 Appendix 10 Dingbats 14L PC 860 Portugal 20U ...
Page 429: ...Symbol Sets Supported 10 28 Appendix 10 ISO 11 Swedish 0S ISO 60 Danish Norwegian 0D ...
Page 430: ...Symbol Sets Supported 10 29 Appendix 10 ISO 21 German 1G ISO 69 French 1F ...
Page 431: ...Symbol Sets Supported 10 30 Appendix 10 ISO 15 Italian 0I ISO 17 Spanish 2S ...


