
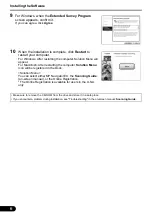


Positioning the Scanner
15
Positioning the Scanner
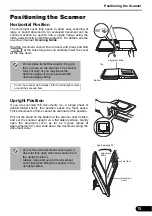
Horizontal Position
The document cover fully opens to allow easy scanning of
large or bound documents. An oversized document can be
scanned section by section into a single image using the
stitch-assist function of MP Navigator EX. For details, see the
on-screen manual:
Scanning Guide
.
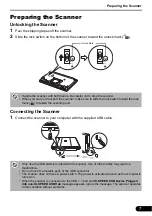
Hold the document cover with one hand, and press and hold
at the base hinge as you carefully lower the cover
all the way down.
Upright Position
If you are scanning thin documents (i.e., a single sheet or
double-folded sheet), this position saves the most space.
Thick documents or films cannot be scanned in this position.
Pull out the stand on the bottom of the scanner until it clicks,
and set the scanner upright on a flat stable surface. Gently
open the document cover as far as it goes (stops at
approximately 40°) and slide down the document along the
document cover.
Do not place items that weigh 2.0 kg (4.4
lbs.) or more on the scanner. The scanner
may not work or you may break the
document glass if you press down the
document glass firmly.
Cover the scanner with a black cloth if external light enters
around the scanned item.
• Do not force the document cover open; it
does not fully open when the scanner is in
the upright position.
• Always close and secure the document
cover first when lifting the scanner in the
upright position.
Top
Alignment Mark
Bottom
Approximately 40°
Alignment
Mark
Thin Item
Document
Cover