


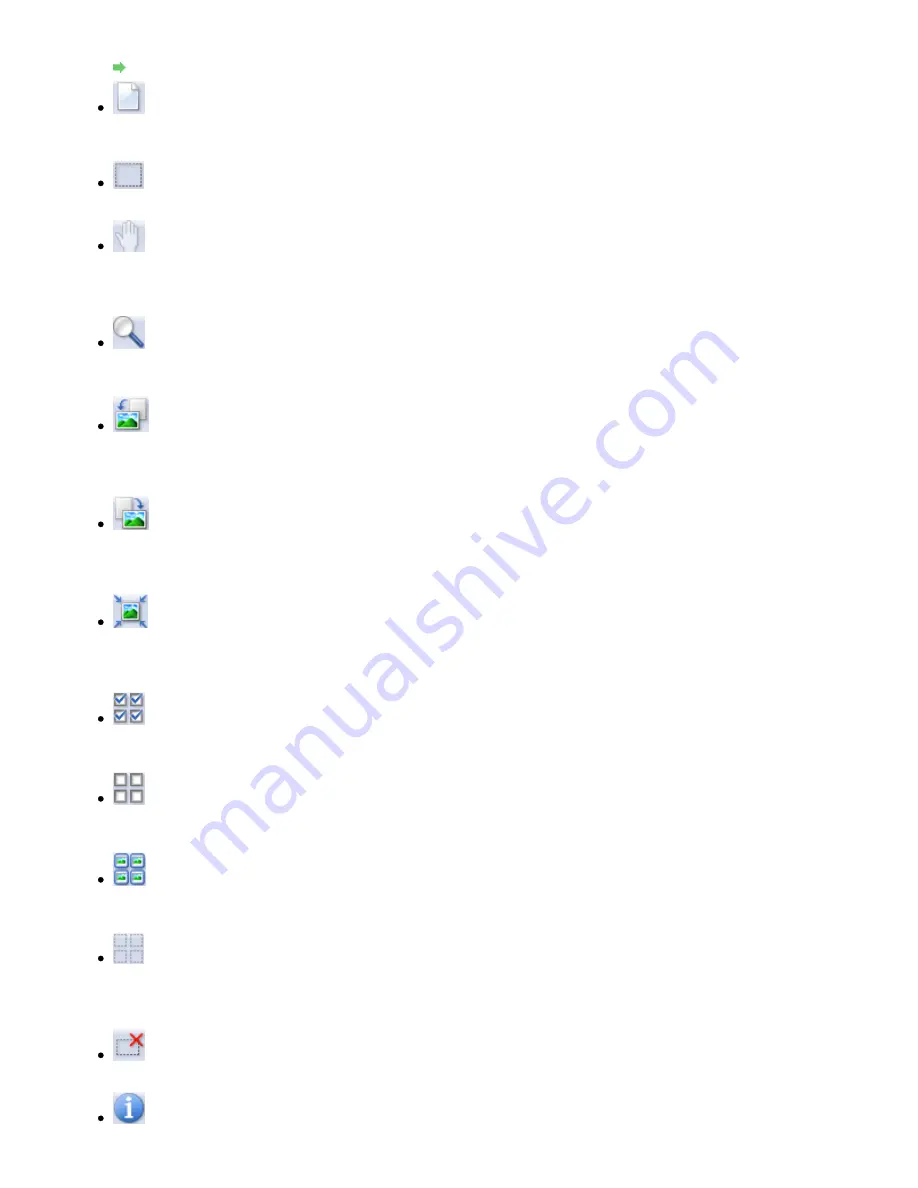
Switches the view in the Preview area.
Preview Area
(Clear)
Click this button to delete the preview image.
It also resets the Toolbar and color adjustment settings.
(Crop)
Allows you to specify the scan area by dragging the mouse.
(Move Image)
If an enlarged image is too large to fit in the Preview area, you can click this button and drag the
image across the screen until the part you want to see is displayed. You can also move the
image using the scroll bars.
(Enlarge/Reduce)
Click this button then click on the image to enlarge it (zoom in). Right-click on the image to
reduce it (zoom out).
(Rotate Left)
Rotates the preview image 90 degrees counter-clockwise.
- The result will be reflected in the scanned image.
- The image returns to its original state when you preview again.
(Rotate Right)
Rotates the preview image 90 degrees clockwise.
- The result will be reflected in the scanned image.
- The image returns to its original state when you preview again.
(Auto Crop)
Displays and adjusts the cropping frame automatically to the size of the document displayed in
the Preview area. The scan area is reduced every time you click this button if there are cropping
area within the cropping frame.
(Check All Frames)
This button is available when two or more frames are displayed.
Selects the checkbox of the image in thumbnail view.
(Uncheck All Frames)
This button is available when two or more frames are displayed.
Deselects the checkbox of the image in thumbnail view.
(Select All Frames)
This button is available when two or more frames are displayed.
Selects the image in thumbnail view and the image will be outlined in blue.
(Select All Cropping Frames)
This button is available when there are two or more cropping frames.
All cropping frames will be displayed in thick broken lines. The settings will be applied to all the
cropping frames.
(Remove Cropping Frame)
Removes the selected cropping frame.
(Information)
Page 497 of 678 pages
Advanced Mode Tab
Summary of Contents for 3743B002
Page 11: ...Page top Page 11 of 678 pages LED Display and Basic Operations ...
Page 54: ...2 Close the Document Cover gently Page top Page 54 of 678 pages Loading Originals ...
Page 109: ...Page top Page 109 of 678 pages Printing Photos ...
Page 134: ...See Help for details on the Edit screen Page top Page 134 of 678 pages Editing ...
Page 143: ...Page top Page 143 of 678 pages Printing ...
Page 152: ...Adjusting Images Page top Page 152 of 678 pages Correcting and Enhancing Photos ...
Page 189: ...Page top Page 189 of 678 pages Printing an Index ...
Page 191: ...Page top Page 191 of 678 pages Printing ID Photos ID Photo Print ...
Page 210: ...Page top Page 210 of 678 pages Printing Dates on Photos ...
Page 230: ...Page top Page 230 of 678 pages Borderless Printing ...
Page 286: ...Page top Page 286 of 678 pages Smoothing Jagged Outlines ...
Page 306: ...Page top Page 306 of 678 pages Copying without Borders Borderless Copy ...
Page 462: ...Page top Page 462 of 678 pages Scanning in Advanced Mode ...
Page 464: ...Page top Page 464 of 678 pages Scanning in Auto Scan Mode ...
Page 493: ...Scanning in Basic Mode Page top Page 493 of 678 pages Basic Mode Tab ...
Page 516: ...Page top Page 516 of 678 pages Scanner Tab ...
Page 570: ...Page top Page 570 of 678 pages If an Error Occurs ...
Page 660: ...Page top Page 660 of 678 pages Installing the MP Drivers ...
Page 674: ...Page top Page 674 of 678 pages Using Easy PhotoPrint EX ...


