


A cropping frame of the selected monitor size will be displayed and the portion within the
cropping frame will be scanned. You can drag the cropping frame to enlarge/reduce it while
maintaining the aspect ratio.
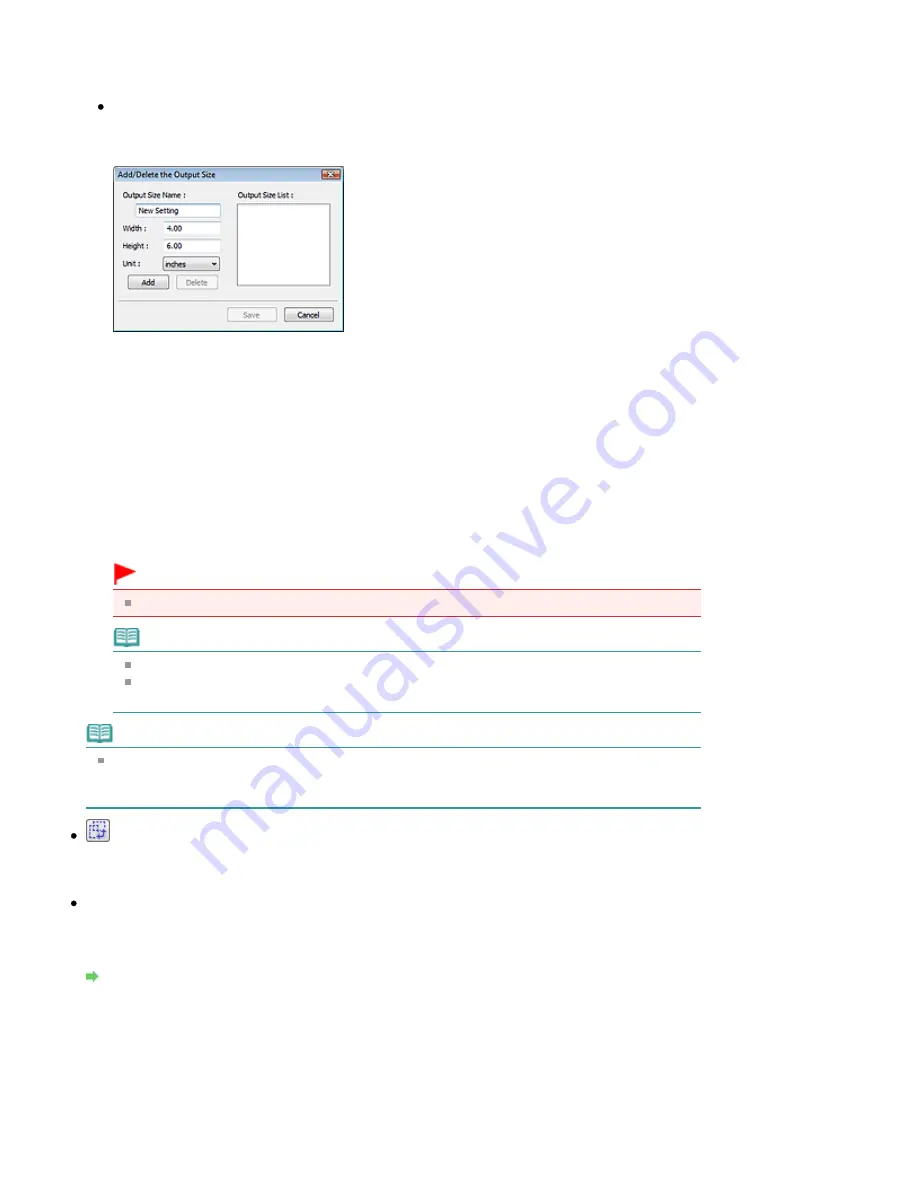
Add/Delete...
Opens the Add/Delete the Output Size dialog box, in which you can specify custom output sizes.
You can select this option when Destination is Print or Image display.
In the Add/Delete the Output Size dialog box, you can specify multiple output sizes and save
them at one time. Saved items will be registered to the Output Size list and can be selected,
along with the predefined items.
Add
To add a size, enter Output Size Name, Width and Height, then click Add. For Unit, you can
select mm or inches when Destination is Print but you can only select pixels when Destination
is Image display. The name of the added size appears in Output Size List. Click Save to save
the items listed in Output Size List.
Delete
To delete an item, select it in Output Size List and click Delete. Click Save to save the items
listed in Output Size List.
Important
You cannot delete predefined output sizes such as A4 and 1024 x 768 pixels.
Note
Save up to 10 items.
An error message appears when you enter a value outside the setting range. Enter a value
within the setting range.
Note
Whether or how the cropping frame is initially displayed on a preview image can be specified
on the Preview tab of the Preferences dialog box. See Cropping Frame on Previewed Images in
"
Preview Tab
."
Invert aspect ratio
This button is available when Output Size is set to anything but Flexible.
Click this button to rotate the cropping frame. Click again to return it to the original orientation.
Adjust cropping frames
You can adjust the scan area within the Preview area.
If an area is not specified, the document will be scanned at the document size (Auto Crop). If an area
is specified, only the portion in the cropping frame will be scanned.
Adjusting Cropping Frames
Page 489 of 678 pages
Basic Mode Tab
Summary of Contents for 3743B002
Page 11: ...Page top Page 11 of 678 pages LED Display and Basic Operations ...
Page 54: ...2 Close the Document Cover gently Page top Page 54 of 678 pages Loading Originals ...
Page 109: ...Page top Page 109 of 678 pages Printing Photos ...
Page 134: ...See Help for details on the Edit screen Page top Page 134 of 678 pages Editing ...
Page 143: ...Page top Page 143 of 678 pages Printing ...
Page 152: ...Adjusting Images Page top Page 152 of 678 pages Correcting and Enhancing Photos ...
Page 189: ...Page top Page 189 of 678 pages Printing an Index ...
Page 191: ...Page top Page 191 of 678 pages Printing ID Photos ID Photo Print ...
Page 210: ...Page top Page 210 of 678 pages Printing Dates on Photos ...
Page 230: ...Page top Page 230 of 678 pages Borderless Printing ...
Page 286: ...Page top Page 286 of 678 pages Smoothing Jagged Outlines ...
Page 306: ...Page top Page 306 of 678 pages Copying without Borders Borderless Copy ...
Page 462: ...Page top Page 462 of 678 pages Scanning in Advanced Mode ...
Page 464: ...Page top Page 464 of 678 pages Scanning in Auto Scan Mode ...
Page 493: ...Scanning in Basic Mode Page top Page 493 of 678 pages Basic Mode Tab ...
Page 516: ...Page top Page 516 of 678 pages Scanner Tab ...
Page 570: ...Page top Page 570 of 678 pages If an Error Occurs ...
Page 660: ...Page top Page 660 of 678 pages Installing the MP Drivers ...
Page 674: ...Page top Page 674 of 678 pages Using Easy PhotoPrint EX ...


