background image

49

Routine Maintenance

5

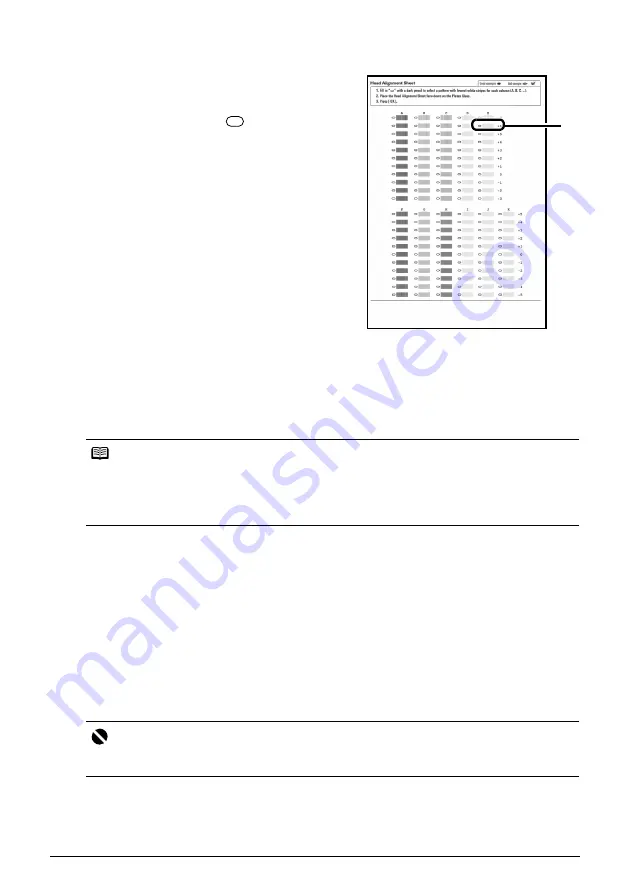
Adjust the print head position.

(1)

For each row in the Print Head Alignment 
Sheet (A, B, C, etc.), select the pattern that has 
the least noticeable streaks, and fill in the 
corresponding circle (

) with a dark pencil 

or a black ink pen.

(2)

Load the Print Head Alignment Sheet on the Platen Glass.
Place the marked side down and align the upper left corner of the sheet with the arrow 
mark (alignment mark) at the upper left corner of the Platen Glass.

(3)

Press the 

OK

 button.

The Print Head Alignment Sheet is scanned and the print head is aligned automatically.

„

Manual Print Head Alignment

If the results of Automatic Print Head Alignment are not satisfactory, follow the procedure below 
to perform Manual Print Head Alignment.
For details on performing Automatic Print Head Alignment, see “Automatic Print Head Alignment” 
on page 48.

1

Make sure that the machine is turned on, open the Front Feeder, and extend the 
Output Paper Support.

2

Load two sheets of A4 or Letter-sized plain paper in the Auto Sheet Feeder.

Set the Paper Thickness Lever to the left.

3

Press the 

Paper Feed Switch

 to select the paper source where you have loaded 

paper.

Note

z

If adjustment was not done successfully, the “Failed to scan head alignment sheet.” error 

message is displayed on the LCD. For details, see “Error Message Is Displayed on the LCD” on 

page 57.

z

If the results of Automatic Print Head Alignment are not satisfactory, perform Manual Print Head 

Alignment. For details, see “Manual Print Head Alignment” on page 49.

Important

You cannot print the print head alignment pattern if paper of size other than A4 or Letter is loaded. 

Be sure to use A4 or Letter-sized plain paper.

(1)

Summary of Contents for 1450B002 - PIXMA MP510 All-in-One Photo Printer

Page 1: ... Dixie Road Mississauga Ontario L5T 1P7 Canada Canon Latin America Inc 703 Waterford Way Suite 400 Miami FL 33126 U S A Canon Mexicana Boulevard Manuel Avila Camacho No 138 PB y Pisos 15 16 y 17 Colonia Lomas de Chapultepec Delegación Miguel Hidalgo CP 11000 Mexico D F The following ink tanks are compatible with this product QT5 0454 V01 XXXXXXXX CANON INC 2006 PRINTED IN VIETNAM ...

Page 2: ... purchased during your product s warranty period For more information and updated program specifics please visit our web site at www canontechsupport com Support program specifics are subject to change without notice Ordering Information For additional supplies use the following descriptions and order numbers Description Order Ink Tanks PGI 5 Black 0628B002 CLI 8 Cyan 0621B002 CLI 8 Magenta 0622B0...

Page 3: ...Photo All in One Quick Start Guide ...

Page 4: ...nk tanks FINE Cartridges are available for 5 years after production has stopped Trademarks z Windows and Internet Explorer are trademarks of Microsoft Corporation registered in the United States and other countries z Macintosh and Mac are trademarks of Apple Computer Inc registered in the U S and other countries z SmartMedia is a trademark of Toshiba Corporation z MEMORY STICK Memory Stick PRO MEM...

Page 5: ... 34 Keeping the Best Printing Results 39 When Printing Becomes Faint or Colors Are Incorrect 40 Printing the Nozzle Check Pattern 41 Examining the Nozzle Check Pattern 42 Print Head Cleaning 44 Print Head Deep Cleaning 46 Aligning the Print Head 48 Cleaning Your Machine 52 Troubleshooting 56 Error Message Is Displayed on the LCD 57 LCD Cannot Be Seen At All or Is Hard to See 59 An Unintended Langu...

Page 6: ...computer or a compatible device z The MP Drivers are installed 1 Open the Operation Panel and press the ON OFF button to turn on the machine The POWER lamp flashes green and changes to steady non flashing light 2 If you are using the machine connected to a computer turn on your computer Note If preparatory operations above are not complete follow the Easy Setup Instructions to complete them Note I...

Page 7: ...5 minutes Press any button to restore the display You cannot change the wait time before the LCD goes out Important About the Power Plug When removing the power plug after turing off the machine be sure to confirm that the POWER lamp is not lit If the power plug is removed from the wall outlet with the POWER lamp still lit or flashing green the machine may become unable to print See Keeping the Be...

Page 8: ...ad the original document on the Platen Glass 1 Lift the Document Cover 2 Load the original on the Platen Glass Place the original face down on the Platen Glass Align the upper left corner of your original with the alignment mark on the upper left corner of the Platen Glass Document type z Paper documents z Photographs z Books Size W x L Max 8 5 x 11 7 inches 216 x 297 mm Thickness Max 0 8 inches 2...

Page 9: ...eeding 4 4 lb 2 kg Doing so may cause the scanner to malfunction or the Platen Glass to break Note z The machine cannot scan the area within about 0 04 inches 1 mm from the far edge and within about 0 04 inches 1 mm from the left edge of the Platen Glass z You can also scan in originals that are up to 0 8 inches 20 mm thick such as books Set them on the Platen Glass in the same way as paper docume...

Page 10: ...6 x 152 4 mm Credit card Not loadable 3 Left Glossy Photo Paper Glossy Photo Paper Everyday Use GP 501 10 sheets A4 Letter 20 sheets 4 x 6 101 6 x 152 4 mm Not loadable 3 Left Glossy Photo Paper Matte Photo Paper MP 101 10 sheets A4 Letter 20 sheets 4 x 6 101 6 x 152 4 mm Not loadable 3 Left Matte Photo Paper Photo Paper Plus Glossy 4 PP 101 10 sheets A4 Letter 5 x 7 127 0 x 177 8 mm 20 sheets 4 x...

Page 11: ...ttings Refer to Setting the Page Size Media Type and Layout When Printing from a Mobile Phone in the User s Guide on screen manual z To specify the page size and media type when printing from your computer refer to the Printer Driver Guide on screen manual z To specify the page size and media type when printing photos saved on mobile phones refer to Setting the Page Size Media Type and Layout When...

Page 12: ...g your printouts in an album z Do not attempt to dry the ink with a hair dryer or by exposing printouts to direct sunlight z Do not store or display printouts in hot or humid conditions Never expose them to heat or direct sunlight z Store printouts in photo albums photo frames or presentation binders to protect them from direct exposure to air or sunlight z Do not mount printouts in an adhesive ty...

Page 13: ...urchase the machine is set to feed from the Auto Sheet Feeder If you are printing without changing paper source settings load paper in the Auto Sheet Feeder A Load plain paper in the Auto Sheet Feeder Note You cannot load paper other than A4 Letter or B5 sized plain paper in the Front Feeder When using any other type of paper load it in the Auto Sheet Feeder For details on loading paper see Loadin...

Page 14: ...z If you print regularly on photo paper as well as on plain paper If you use photo paper as much as plain paper you can load photo paper in the Auto Sheet Feeder and plain paper in the Front Feeder This way you can switch the paper source according to the type of paper just by pressing the Paper Feed Switch A Auto Sheet Feeder Load paper of various types and sizes including photo paper B Front Fee...

Page 15: ...ll be disabled when printing Confirm the setting in the printer driver See Printing with Windows on page 22 or Printing with Macintosh on page 23 z If a setting other than Paper Feed Switch is selected for Paper Source in the printer driver the printer driver settings takes precedence when printing For details on paper source selection using the printer driver refer to the Printer Driver Guide on ...

Page 16: ...tter and Legal Auto Sheet Feeder only Non standard sizes for the Auto Sheet Feeder 2 13 x 3 39 to 8 5 x 23 54 0 x 86 0 mm to 215 9 x 584 2 mm Paper weight 17 to 28 lb 64 to 105 gsm z You can load up to 150 sheets of plain paper 17 lb 64 gsm 0 52 inches 13 mm in height in the Auto Sheet Feeder and up to 110 sheets of plain paper 17 lb 64 gsm 0 39 inches 10 mm in height in the Front Feeder However p...

Page 17: ... any other type of paper See Paper Handling on page 6 Note z Align the edges of paper neatly before loading Loading paper without aligning the edges may cause paper jams z If paper is curled hold the opposing curled corners and gently bend them in the opposite direction until the paper becomes completely flat See Paper is curled on page 65 z To avoid curling handle paper as follows Put unused pape...

Page 18: ...1 Open the Front Feeder 2 Extend the Paper Output Support 3 Press the Paper Feed Switch so that the Front Feeder lamp A lights 4 Set the Paper Thickness Lever to the left Note Make sure that the Cover Guide is set upright when you load paper in the Auto Sheet Feeder Note When performing copy direct printing without using a computer press Settings to select the page size of the loaded paper When us...

Page 19: ... left side of the loaded paper stack Note z When loading paper in the Front Feeder refer to the illustration below and make sure not to load paper with the wrong side up z When performing copy direct printing without using a computer press Settings to select the page size When using the machine connected to a computer select the page size of the loaded paper in Page Size in the printer driver For ...

Page 20: ...n the printer driver select Envelope in Media Type and then select DL Env or Comm Env 10 in Page Size For details on printer driver settings see Printing with Windows on page 22 or Printing with Macintosh on page 23 Important z You need to print from the computer to print on envelopes z Do not use envelopes with embossed or treated surfaces a double flap pressure seals or sticker flaps z Select ei...

Page 21: ...ge the Settings This section describes the procedure to change the settings taking the steps to specify the page size for Memory card mode to 4 x 6 101 x 152 as an example For details on each item see Print Setting Items on page 18 1 Display the Settings screen 1 Press the Settings button The Settings screen is displayed 2 Select the Setting tab 1 Use the or button to select the Setting tab Select...

Page 22: ...Paper Pro Photo Plus Glossy Matte Photo Paper Glossy Photo Paper Note Depending on the functions specified in the Copy or Memory card mode some setting items cannot be specified in combination Note Paper size media type and print quality settings are specified for the paper source selected by the Paper Feed Switch Confirm the selected paper source Important You cannot load paper other than A4 Lett...

Page 23: ...nd type of paper bordered borderless and Date file no Note z Fast can be selected when Plain paper is selected as the media type z If you used Fast with media type set to Plain paper and the quality is not as good as expected select Standard or High and try copying again z Select High to copy in grayscale Grayscale renders tones in a range of grays instead of black or white Important Even while Au...

Page 24: ...y optimizes brightness and tone of a photo Photo optimizer pro ON Photo optimizer pro OFF 3 Activate deactivate the Noise reduction function Reduces the noise on blue areas like the sky as well as on black areas Noise reduction ON Noise reduction OFF Important You cannot load paper other than A4 Letter or B5 sized plain paper in the Front Feeder When specifying a page size other than A4 or 8 5 x 1...

Page 25: ...ge optimizer function Corrects and smooths the jagged contours for printing Image optimizer ON Image optimizer OFF 6 Adjust brightness Brightness 2 Brightness 1 Brightness standard Brightness 1 Brightness 2 7 Adjust contrast Contrast 2 Contrast 1 Contrast standard Contrast 1 Contrast 2 8 Adjust color hue Color hue red 2 Color hue red 1 Color hue original Color hue yellow 1 Color hue yellow 2 ...

Page 26: ...tion software s File menu 5 Make sure that Canon MP510 Printer is selected and click Preferences or Properties 6 Specify the required settings and click OK Make sure that Paper Feed Switch is selected in Paper Source 7 Click Print or OK Note z If you select Front for Plain Paper the machine will automatically switch to the Front Feeder when Plain Paper is specified for Media Type You cannot load p...

Page 27: ...d paper size in Paper Size 7 Click OK 8 Select Print on the application software s File menu 9 Select Quality Media in the pop up menu 10 Specify the required settings Make sure that Paper Feed Switch is selected in Paper Source 11 Click Print Note z If you select Front for Plain Paper the machine will automatically switch to the Front Feeder when Plain Paper is specified for Media Type You cannot...

Page 28: ...s of the MP Navigator refer to the Scanning Guide on screen manual Scanning Using the Operation Panel of the Machine 1 Turn on the machine See Turning the Machine On and Off on page 2 2 Load the original document on the Platen Glass See Handling the Original Document on page 4 3 Press the SCAN button 4 Use the or button to select the scan operation then press the OK button 5 Press the Color or Bla...

Page 29: ...r of copies 3 Intensity Press the button to decrease the intensity and the button to increase it 4 Load the original on the Platen Glass See Loading Original Documents on page 4 5 Press the Color button for color copying or the Black button for black white copying Using Other Copy Functions Reduced Enlarged Copy Reduces or enlarges copies Sticker Copy Makes stickers from 4 x 6 101 6 x 152 4 mm pho...

Page 30: ...pter provided with the card Memory cards that can be directly inserted into the Card Slot z Compact Flash CF Card Supports Type I II 3 3V z Microdrive z SmartMedia Supports 3 3V card only 1 MB and 2 MB cards are not supported z MEMORY STICK z MEMORY STICK PRO z SD Secure Digital memory card z MultiMediaCard v3 31 Memory cards that can be inserted in the Card Slot using the adapter xD Picture Card ...

Page 31: ...ting it into the Card Slot 4 Confirm that the Access lamp has lit up 5 Close the Card Slot Cover Card Type Inserting Card z Compact Flash CF card z Microdrive z xD Picture card z SmartMedia z MEMORY STICK z MEMORY STICK PRO z MEMORY STICK Duo z MEMORY STICK PRO Duo z SD Secure Digital memory card z MiniSD Card z MultiMediaCard v3 31 Lights up Insert into the left Card Slot Insert into the right Ca...

Page 32: ...See Inserting the Memory Card on page 27 4 Press the MEMORY CARD button 5 Use the or button to select Single photo print then press the OK button 6 Use the or button to display the photo to print and press the Color button 7 Specify print settings 1 Page size media type image quality The settings you made in the Settings screen of the Memory card mode is displayed 2 Number of copies Use the or but...

Page 33: ...mory card into the Card Slot See Inserting the Memory Card on page 27 4 Press the Photo Index Sheet button 5 Use the or button to select Photo Index Sheet print then press the OK button 6 Use the or button to select a range of images to include in the Photo Index Sheet then press the OK button 7 Press the Color button 8 Fill in the appropriate circles in the Photo Index Sheet 9 Load the type of pa...

Page 34: ...or the model as long as it complies with the PictBridge standard z You can select the images to print and specify various print settings from your camera or mobile phone PictBridge compatible digital still cameras digital camcorders and camera equipped mobile phones are hereafter collectively referred to as PictBridge compliant device Caution Do not connect any equipment other than PictBridge comp...

Page 35: ...ge Print Settings from Your Camera To change the page size or media type operate the device to select the PictBridge print setup mode and confirm or change the settings About the Settings Explained Below Some setting items explained below may not be available on some devices In this case the Default setting explained below is applied for the setting item In the following description names of setti...

Page 36: ...Bridge compliant device that correspond to 16 up printing on stickers is not possible When printing on Photo Stickers PS 101 do not set Layout to Borderless z Image Optimize Setting If Image optimize is set to Default the setting to follow that of the machine on the PictBridge compliant device the print setting specified in tab 2 of the Setting screen of the Memory card mode of the machine is appl...

Page 37: ...File No or Both the date and or file number will be printed over the date printed by the camera s function Note z Never disconnect the USB cable during printing unless when explicitly allowed to by the PictBridge compliant device When disconnecting the USB cable between the PictBridge compliant device and machine follow the instructions given in the device s instruction manual z You cannot set or ...

Page 38: ... can continue printing for a while but we recommend you to have a replacement ink tank available Ink is out Repeats The ink lamp flashes quickly at around 1 second intervals Replace the ink tank with a new one If an ink tank related error message is displayed on the LCD an ink tank error has occurred and the machine is unable to print For details see Error Message Is Displayed on the LCD on page 5...

Page 39: ...n with the ink tank installed Then printing can continue Replacing the ink tank is recommended after the printing The machine may be damaged if printing is continued under the ink out condition If an empty ink tank is displayed distinctly from other ink tanks C Ink tank that has run out of ink z Ink has run out Replace the ink tank Printing under the current condition may damage the machine z If y...

Page 40: ...y when it is reinstalled To maintain optimal printing quality use an ink tank within six months of first use z Color ink may be consumed even when printing a black and white document or when black and white printing is specified Color ink is also consumed in Print Head Cleaning and Print Head Deep Cleaning which may be necessary to maintain the machine s performance When an ink tank is out of ink ...

Page 41: ...in the exact order shown in step 4 1 as failure to follow this step may cause the ink to leak and stain your clothes and hands z Do not squeeze the side of ink tanks as this may cause the ink to leak out and stain your clothes and hands z Do not re attach the protective cap once you have removed it Discard it according to the local laws and regulations regarding disposal of consumables z Do not to...

Page 42: ...t Printer Cover Important The machine cannot be used unless all the ink tanks are installed Caution Be sure to hold the Scanning Unit Printer Cover firmly and be careful not to get your fingers caught Note z If the error message is still displayed after the Scanning Unit Printer Cover is closed see Error Message Is Displayed on the LCD on page 57 z When you start printing after replacing the ink t...

Page 43: ...e done properly causing the Print Head to dry and clog When You Are Not Using the Machine for a Long Time When you are not using the machine for a long time print or copy in both black white and in color or perform Print Head Cleaning about once a month to prevent degradation of the Print Head Numerous nozzles are installed in the Print Head for high precision printing Just as the uncapped tip of ...

Page 44: ...amp is flashing fast even though ink remains in that ink tank it is inserted in the wrong position Make sure that the ink tank of the correct color is inserted in each position matching the label See Replacing an Ink Tank on page 34 If the ink lamp is not lit the tank is not set properly Press the mark on the ink tank until the tank clicks into place Make sure that all packaging material is peeled...

Page 45: ... 4 Print the nozzle check pattern 1 Press the Menu button 2 Use the or button to select Maintenance settings then press the OK button The Maintenance settings screen is displayed 3 Use the or button to select Maintenance then press the OK button The Maintenance screen is displayed 4 Use the or button to select Nozzle check and then press the OK button The pattern print confirmation screen is displ...

Page 46: ...aks in this pattern A Good B White streaks present 2 The confirmation screens for white streaks and missing lines are displayed alternately Select the pattern that is closer to the nozzle check pattern that you printed z If There Are No Missing Lines and No White Streaks 1 Select All A and press the OK button The LCD returns to the Maintenance screen Note If the ink level is low the nozzle check p...

Page 47: ...s Are Missing or White Streaks Are Present 1 Select Also B and press the OK button The cleaning confirmation screen is displayed 2 Select Yes and press the OK button to start Print Head Cleaning See Print Head Cleaning on page 44 1 2 ...

Page 48: ... have loaded paper 4 Start Print Head Cleaning 1 Press the Menu button 2 Use the or button to select Maintenance settings then press the OK button The Maintenance settings screen is displayed 3 Use the or button to select Maintenance then press the OK button The Maintenance screen is displayed 4 Use the or button to select Cleaning and then press the OK button The confirmation screen is displayed ...

Page 49: ...45 Routine Maintenance Note If the problem is not resolved after performing steps 4 and 5 twice try Print Head Deep Cleaning See Print Head Deep Cleaning on page 46 ...

Page 50: ...Menu button 2 Use the or button to select Maintenance settings then press the OK button The Maintenance settings screen is displayed 3 Use the or button to select Maintenance then press the OK button The Maintenance screen is displayed 4 Use the or button to select Deep cleaning and then press the OK button The confirmation screen is displayed 5 Use the or button to select Yes and then press the O...

Page 51: ...47 Routine Maintenance 3 If this does not solve the problem the Print Head may be damaged Contact your Canon service representative ...

Page 52: ...er source where you have loaded paper 4 Print the Print Head Alignment Sheet 1 Press the Menu button 2 Use the or button to select Maintenance settings then press the OK button The Maintenance settings screen is displayed 3 Use the or button to select Maintenance then press the OK button The Maintenance screen is displayed 4 Use the or button to select Auto head align and then press the OK button ...

Page 53: ...nment For details on performing Automatic Print Head Alignment see Automatic Print Head Alignment on page 48 1 Make sure that the machine is turned on open the Front Feeder and extend the Output Paper Support 2 Load two sheets of A4 or Letter sized plain paper in the Auto Sheet Feeder Set the Paper Thickness Lever to the left 3 Press the Paper Feed Switch to select the paper source where you have ...

Page 54: ... Did the patterns print correctly is displayed confirm that the pattern is printed correctly use the or button to select Yes then press the OK button The input screen for the head position adjustment values is displayed 6 Adjust the print head position 1 Check the printed patterns and use the or button to input the number of the pattern in column A that has the least noticeable streaks 2 Move the ...

Page 55: ...that has the least noticeable horizontal streaks 5 When you have finished inputting all pattern numbers press the OK button Note If it is difficult to pick the best pattern pick the setting that produces the least noticeable vertical white streaks Note When you turn off the machine be sure to press the ON OFF button on the machine Otherwise the settings made here will not be saved A B ...

Page 56: ...due especially on the Platen Glass Caution z Be sure to turn off the power and disconnect the power cord before cleaning the machine z Do not use tissue paper paper towels or similar materials for cleaning Paper tissue powders or fine threads may remain inside the machine and cause problems such as a blocked Print Head and poor printing results Use a soft cloth to avoid scratching the components z...

Page 57: ...intenance screen is displayed 4 Use the or button to select Roller cleaning then press the OK button The confirmation screen is displayed 5 Use the or button to select Yes then press the OK button The Paper Feed Rollers will rotate as they clean 4 Repeat step 3 twice 5 Open the Front Feeder and extend the Paper Output Support 6 Load three or more sheets of A4 or Letter sized plain paper in portrai...

Page 58: ...o we recommend performing cleaning regularly 1 Make sure that the machine is turned on and then remove any paper from the Auto Sheet Feeder 2 Open the Front Feeder and extend the Paper Output Support 3 Fold a single sheet of A4 or Letter sized plain paper in half widthwise and then unfold the paper Caution Do not touch the small rollers A located on the right and left of the paper feed roller as t...

Page 59: ...press the OK button The paper cleans the inside of the machine as it feeds through the machine If the ejected paper is smudged clean the inside of the machine again If the problem is not resolved after performing cleaning again the protrusions inside the machine may be stained Clean them according to instructions See Cleaning the Protrusions Inside the Machine on page 55 Cleaning the Protrusions I...

Page 60: ... page 62 z Colors Are Unclear on page 62 z Ink Does Not Come Out Printing Does Not Start Printing Is Blurred Colors Are Wrong Straight Lines Are Misaligned on page 63 z White Streaks on page 64 z Printed Paper Curls or Has Ink Blots on page 64 z Printed Surface Is Scratched Paper Is Smudged on page 64 z Colors Are Uneven or Streaked on page 66 z Printing Problems When Copying on page 66 z Printing...

Page 61: ...rinting press the OK button with the ink tank installed Then printing can continue Replacing the ink tank is recommended after the printing The machine may be damaged if printing is continued under the ink out condition See Replacing an Ink Tank on page 34 Note If multiple ink lamps are flashing red check how fast they are flashing Fast flashing at about 1 second intervals indicates the tank is em...

Page 62: ...ility that you are using a digital camera or digital video camcorder that is not supported by this machine Use a digital camera or digital video camcorder compatible with this machine The remaining level of the ink cannot be correctly detected U130 The remaining ink level cannot be correctly detected Replace the ink tank and close the Scanning Unit Printer Cover Printing with an ink tank that was ...

Page 63: ...and the LCD will display a message z If the POWER lamps is lit The LCD may be in the screen saver mode On the Operation Panel press a button other than the ON OFF button Cause Action The language you want to be displayed is not selected Select the language you want to be displayed according to the following procedure 1 Press the COPY button wait for 5 seconds and then press the MENU button 2 Press...

Page 64: ...e click the CD ROM icon In non XP Windows open the My Computer window and then double click the CD ROM icon Note To use the Run command to start the setup program specify your disc drive and then the name of the setup program Msetup4 exe The drive letter of the disc drive depends on your computer Double click the CD ROM icon on your desktop to start installation If the CD ROM icon is not displayed...

Page 65: ... speed provided under USB 1 1 In this case the machine operates properly but printing speed may slow down due to communication speed Check the following to ensure that your system environment supports USB 2 0 Hi Speed connection z The USB port on your computer supports USB 2 0 Hi Speed connection z The USB cable and the USB hub if you are using one support USB 2 0 Hi Speed connection Be sure to us...

Page 66: ...If the Page Size setting set in the Operation Panel does not match the actual size of the printing paper part of the page may not be printed Check the Page Size setting on the Operation Panel Cause Action Media Type setting in the Operation Panel does not match the actual type of paper Check that the Media Type set in the Operation Panel when performing wireless printing the Media Type setting in ...

Page 67: ...l off the tape completely along the perforation Media Type setting in the Operation Panel does not match the actual type of paper Make sure that the Media Type set in the Operation Panel when perfuming wireless printing the Media Type setting in Wireless print settings matches the type of the loaded printing paper See Changing the Print Settings on page 17 Print Head nozzles are clogged Print the ...

Page 68: ... increasing the Print Quality setting in the printer driver settings is effective in reducing white streaks Cause Action Paper is too thin When printing data with high color saturation such as photographs or images in deep color we recommend using Photo Paper Pro or other Canon specialty paper See Media Types You Cannot Use on page 7 Media Type setting on the Operation Panel does not match the act...

Page 69: ... the printing content the printing surface may become scratched even for the types of paper to set the lever to the left In this case set the Paper Thickness Lever to the right Reset the Paper Thickness Lever to the left when you finish printing If the lever is not set back to the left the inside of the machine is more likely to get dirty due to the wider clearance between the print head and the l...

Page 70: ...ocuments on page 4 The print quality setting is not suitable for the original Set the image quality to suit the type of your document See Copy Mode on page 18 The original document is not loaded with the side to be copied faced down When loading the original on the Platen Glass the side to be copied should be faced down The original document is a printout from this machine Print quality may be red...

Page 71: ...ut 3 second intervals indicates ink is low For details on different flashing speeds see Getting the Ink Level Information on page 34 Ink tank not installed in proper position Open the Scanning Unit Printer Cover and check the ink lamps If there is still sufficient ink but its ink lamp is flashing red an ink tank may be installed in a wrong position Confirm that the ink tanks are installed in the a...

Page 72: ... are printing on is not too thick or curled See Media Types You Cannot Use on page 7 Paper Feed Rollers are dirty If paper is not feeding properly clean the Paper Feed Rollers Cleaning the Paper Feed Rollers of the Auto Sheet Feeder will wear the rollers so perform this procedure only when necessary For details on cleaning see Cleaning the Paper Feed Rollers Roller Cleaning on page 53 Paper not lo...

Page 73: ...n stack height However proper feeding of paper may not be possible at this maximum capacity depending on the type of paper or environmental conditions either very high or low temperature and humidity In such cases reduce the sheets of paper you load at a time to around half around 0 2 inches 5 mm in paper stack height For details on loading paper see Loading Paper on page 12 Foreign object in the ...

Page 74: ...achine in step 1 all print jobs in queue are canceled Reprint if necessary Note z For details on how to load paper see Loading Printing Paper on page 6 z When reloading the paper in the machine see Paper Does Not Feed Properly on page 68 to confirm that you are using the correct paper and are loading it into the machine correctly z A5 sized paper are suited to print documents consisting mainly of ...

Page 75: ...s firmly on the Rear Cover until it is fit squarely in the rear of the machine If the Rear Cover is not reattached properly paper may not be fed properly and cause paper jams 4 If you were not able to remove the paper out in step 2 remove it from the Front Feeder See Paper jammed in the Paper Output Slot the Auto Sheet Feeder or the Front Feeder on page 70 5 Reload the paper in the Front Feeder an...

Page 76: ... click Start Settings Printers 2 Click the Canon MP510 Printer icon 3 Open the File menu and select Properties 4 Click the Ports tab to confirm the port settings Make sure that a port named USBnnn Canon MP510 Printer where n is a number is selected for Print to the following port s In Windows Me or Windows 98 click the Details tab and make sure that MPUSBPRNnn Canon MP510 Printer is selected for P...

Page 77: ... is not selected in Printer on the Print dialog box Select MP510 in Printer on the Print dialog box If MP510 does not appear in Printer follow the procedure below to check that the driver for your machine is installed to your computer 1 Select Print and Fax Preferences from Printer In Mac OS X v 10 2 8 or 10 3 x select Edit Printer List from Printer 2 Check that MP510 is displayed in the list of p...

Page 78: ...s the error message For details on dismissing an error message from the machine see Error Message Is Displayed on the LCD on page 57 z A communication time out occurs if printing takes a long time or if it takes too much time to send data This may cancel printing In such cases disconnect the cable between the machine and the camera and then reconnect it Turn the camera on if it does not turn on au...

Page 79: ...electing Continue 1 on the display on your camera However because printing is disabled once the ink absorber becomes completely full and until the ink absorber is replaced you are recommended to contact a Canon service representative as early as possible You will need to replace a particular part of the machine No ink An ink tank is not installed properly or is out of ink Confirm the error message...

Page 80: ...n and orientation on the Platen Glass z Make sure the Platen Glass and the Photo Index Sheet are not dirty z Make sure all required circles on the Photo Index Sheet are filled in If the filled circles on the sheet are not marked dark enough the machine may not read the settings Refer to Printing by Using the Photo Index Sheet in Other Useful Functions of the User s Guide on screen manual ...

Page 81: ...e desktop System Requirements Browser Help Viewer Note z Microsoft Internet Explorer 5 0 or later must be installed z The on screen manual may not be displayed properly depending on your operating system or Internet Explorer version We recommend that you keep your system up to date with Windows Update Note If you installed the User s Guide from the Manual folder in the Setup CD ROM open the folder...

Page 82: ...max for Borderless Printing 8 5 inches 216 mm Acoustic noise level Approx 36 dB A when printing in the highest quality mode on Photo Paper Pro Operating environment Temperature 5 to 35 C 41 to 95 F Humidity 10 to 90 RH no condensation Storage environment Temperature 0 to 40 C 32 to 104 F Humidity 5 to 95 RH no condensation Power supply AC 100 240 V 50 60 Hz Power consumption Printing Copy Approx 2...

Page 83: ...18 cm Photo Paper Plus Glossy 2 8 5 x 11 A4 Photo Paper Plus Glossy Photo Paper Pro Photo Paper Plus Semi gloss Glossy Photo Paper Glossy Photo Paper Everyday Use Plain Paper Credit card 5 4 x 8 6 cm Glossy Photo Paper Card Size 1 Canon brand sticker Printing on this paper is available only when the Layout function on your camera has a 16 up option See Recommended Paper and Requirements on page 6 ...

Page 84: ...eed Windows XP SP1 SP2 Pentium III 3 Celeron 566 MHz 128 MB 550 MB Windows 2000 Professional SP4 USB Windows XP SP1 SP2 Pentium II 300 MHz 3 Windows 2000 Professional SP2 SP3 SP4 Windows Millennium Edition Windows 98 5 98 Second Edition 2 Interface Operating System Processor RAM Hard Disk Space 4 USB 2 0 Hi Speed USB Mac OS X v 10 4 Intel processor PowerPC G3 G4 G5 256 MB 450 MB Mac OS X v 10 2 8 ...

Page 85: ...he setting items available in the Menu z For details on maintenance see When Printing Becomes Faint or Colors Are Incorrect on page 40 and Cleaning Your Machine on page 52 For various settings refer to Changing the Machine Settings in the User s Guide on screen manual z Copy Mode Menu button Special copy Sticker copy Borderless copy Image repeat Maintenance settings Settings button Page size Media...

Page 86: ...rint Print all photos Set no of copies Search Scan sheet and print Available only when the optional Bluetooth unit is attached z Maintenance settings Maintenance Nozzle check Cleaning Deep cleaning Auto head align Manual head align Head alignment print Roller cleaning Bottom plate cleaning Device settings Print settings Quiet mode Extended copy amount Wireless print settings Page size Media type I...

Page 87: ...or knotted If you detect smoke unusual smells or strange noises around the machine immediately unplug the machine at the power supply and call for service Periodically unplug the machine and use a dry cloth to wipe off any dust or dirt collected on the plug and the power outlet If the machine is placed at a location exposed to a lot of dust smoke or high humidity the dust collected on the plug abs...

Page 88: ... is unstable or subject to excessive vibration Do not install the machine in locations that are very humid or dusty in direct sunlight outdoors or close to a heating source To avoid the risk of fire or electric shocks install the machine in a location with an ambient temperature range of 5 C to 35 C 41 F to 95 F and humidity of 10 to 90 condensation free Do not place the machine on a thick rug or ...

Page 89: ...on a slant vertically or upside down as the ink may leak and damage the machine When loading a thick book on the Platen Glass do not press hard on the Document Cover The Platen Glass may break and cause injury Print Heads and ink tanks For safety reasons store Print Heads and ink tanks out of the reach of small children If a child ingests any ink consult a doctor immediately Do not shake Print Hea...

Page 90: ...ney orders z Certificates of deposit z Postage stamps canceled or uncanceled z Identifying badges or insignias z Selective service or draft papers z Checks or drafts issued by governmental agencies z Motor vehicle licenses and certificates of title z Traveler s checks z Food stamps z Passports z Immigration papers z Internal revenue stamps canceled or uncanceled z Bonds or other certificates of in...

Page 91: ...uired to comply with Class B limits in Subpart B of Part 15 of the FCC Rules Do not make any changes or modifications to the equipment unless otherwise specified in the manual If such changes or modifications should be made you could be required to stop operation of the equipment Canon U S A Inc One Canon Plaza Lake Success NY 11042 1 516 328 5600 Canon U S A INC LIMITED WARRANTY USA Only The limi...

Page 92: ...ACTORY LOADED ON THE PRODUCT OR CONTAINED ON THE SOFTWARE DISKETTES OR CD ROMS ENCLOSED WITH OR ACCOMPANYING THE PRODUCT AND ANY UTILITY SOFTWARE DISTRIBUTED WITH OR FOR THE PRODUCT IS SOLD AS IS AND WITHOUT WARRANTY BY CANON USA THE SOLE WARRANTY WITH RESPECT TO SUCH SOFTWARE IS CONTAINED IN THE SOFTWARE MANUFACTURER S LICENSE AGREEMENT DISTRIBUTED THEREWITH INCLUDING ANY LIMITATIONS AND DISCLAIM...

Page 93: ...eet address The Canon USA repair facility will ship out the replacement Product via 2nd day Air freight service prepaid by Canon USA After receipt of the replacement Product with instructions and a prepaid waybill follow the enclosed instructions on how to ship the defective Product to the Canon USA repair facility The defective Product must be returned in the shipping carton in which the replacem...

Page 94: ...ct to the availability of refurbished or new replacement units Canon U S A Inc One Canon Plaza Lake Success NY 11042 USA 2006 Canon U S A Inc Canon is a registered trademark of Canon Inc in the United States and may also be a registered trademark in other countries ...

Page 95: ...eck Pattern examining 42 printing 41 P PGI 5BK Black 34 Print Head automatic print head alignment 48 cleaning 44 deep cleaning 46 manual print head alignment 49 Printing from a Memory Card 26 Photo Index Sheet 29 Single photo Print 28 Printing from Your Computer 22 Macintosh 23 Windows 22 Printing Photographs Directly from a Compliant Device 30 connecting 30 PictBridge 31 R Replacing Ink Tanks 36 ...

Page 96: ...terials related to such distribution and use acknowledge that the software was developed at Cygnus Support Inc Cygnus Support Inc may not be used to endorse or promote products derived from this software without specific prior written permission THIS SOFTWARE IS PROVIDED AS IS AND WITHOUT ANY EXPRESS OR IMPLIED WARRANTIES INCLUDING WITHOUT LIMITATION THE IMPLIED WARRANTIES OF MERCHANTABILITY AND F...

Page 97: ... purchased during your product s warranty period For more information and updated program specifics please visit our web site at www canontechsupport com Support program specifics are subject to change without notice Ordering Information For additional supplies use the following descriptions and order numbers Description Order Ink Tanks PGI 5 Black 0628B002 CLI 8 Cyan 0621B002 CLI 8 Magenta 0622B0...

Page 98: ...Photo All in One Quick Start Guide The following ink tanks are compatible with this product QT5 0454 V02 XXXXXXXX CANON INC 2006 PRINTED IN VIETNAM ...

Reviews: