background image

The EdgeAccess Universal Chassis System 

2361 Modem Users Manual


4-6

4.4  System Configuration 

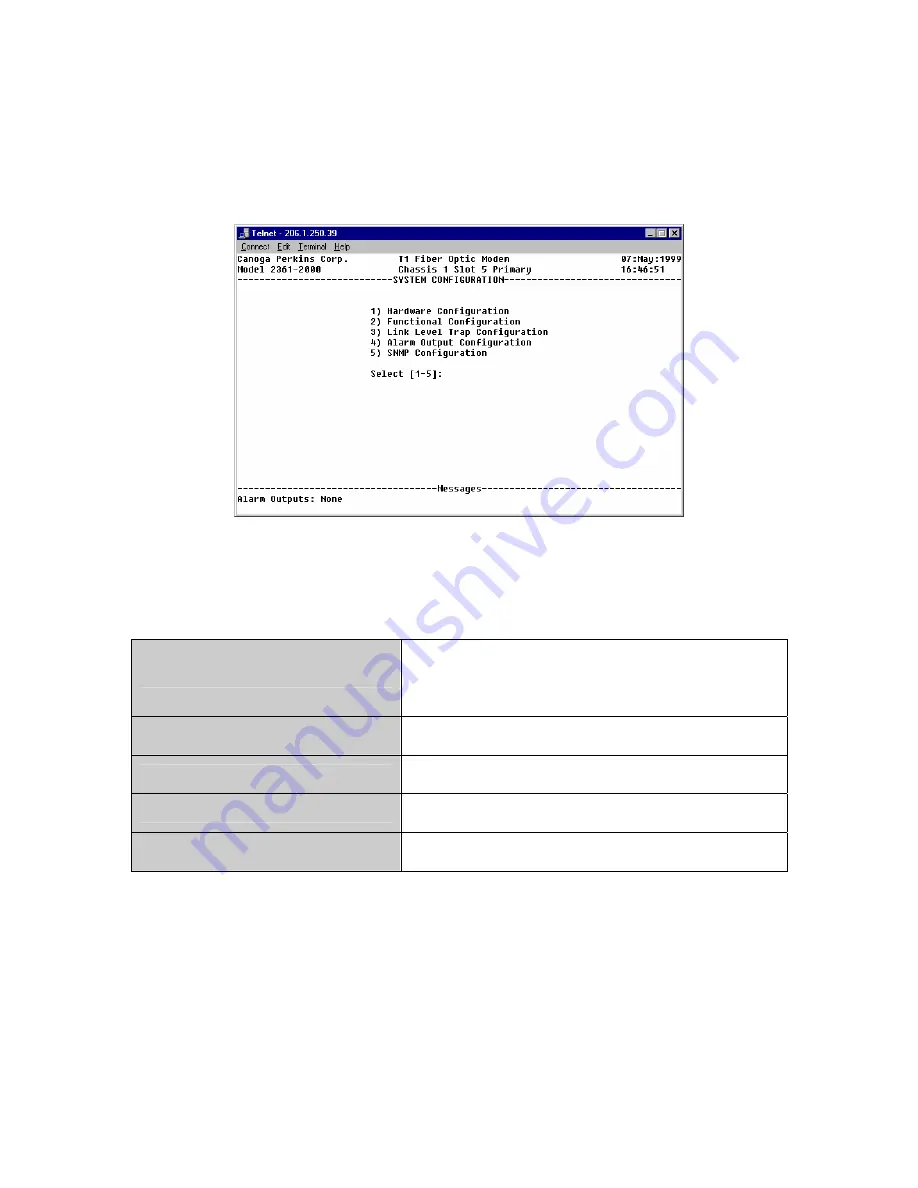
The System Configuration screen provides access to most 2361 modem configuration options. To 
access it, type "1" from the Main Menu. The System Configuration screen will appear. Table 3 
details some of the main features of each System Configuration submenu.  


Figure 25. The System Configuration Screen 


Table 3: System Configuration Option Definitions 


Hardware Configuration 

Displays the Model, Type, Revision number, and 
Power Supply options for the modem and its 
ELIMs and OLIMs. Also displays the modem's 
SNMP status, if applicable. 

Functional Configuration 

Provides functional configuration settings for 
Framing Pattern, Line Length and Coding. 

Link Level Trap Configuration 

Enables or disables traps to the customer's 
Network Manager 

AlarmOutput Configuration 

Allows regulation of Major/Minor and On/Off 
conditions for each alarm condition 

SNMP Configuration 

Set up SNMP, if a Network Manager is in use 
(Standalone only) 


What follows is a suggested order for viewing and configuring the 2361 modem's parameters. 
The screens can actually be accessed and configured in any desired sequence. 

Summary of Contents for EdgeAccess Universal Chassis System 2361 T1

Page 1: ...2361 T1 Modem User Manual...

Page 2: ...a Perkins personnel as a guide for the proper installation operation and or maintenance of Canoga Perkins equipment The drawings specifications and information contained in this document are the prope...

Page 3: ...ent shall either supply signals with B8ZS encoding or be approved to be connected directly to the PSTN ATTENTION Cet quipement peut avoir une diode laser mettant des longueurs d onde allant de 1300nm...

Page 4: ...ations 1 6 1 5 2361 Modem Operating At E1 Rate 1 7 1 6 Applications 1 7 Chapter 2 Installation 2 1 2 1 Unpacking and Installing the Rackmount Modem 2 1 2 1 1 Inserting an ELIM or OLIM 2 2 2 2 Unpackin...

Page 5: ...iguring Modem Alarms 4 8 4 4 4 Alarm Functions and Default Settings 4 9 4 4 5 Interpreting System Alarms 4 10 4 4 6 Configuring Modem Traps 4 13 4 4 7 Standalone Modem Alarm Input Settings 4 14 Chapte...

Page 6: ...ancy ELIMs and Cables 7 4 7 2 Setting Up Redundancy 7 4 7 2 1 Redundancy Mode Options 7 5 7 3 Important Definitions for Redundant Configurations 7 5 7 3 1 Standby Modem State and Activity 7 6 Chapter...

Page 7: ...he Standalone Modem 3 3 Figure 22 All Modem Screens Have Common Navigational Methods 4 1 Figure 23 The Modem Main Menu Screen 4 3 Figure 24 The Utilities Screen 4 4 Figure 25 The System Configuration...

Page 8: ...Tables Table 1 RJ 45 8 pin Modular Pin Out 4 2 Table 2 EIA 232 DE 9 Pin Out 4 3 Table 3 System Configuration Option Definitions 4 6 Table 4 Alarm Output Configuration Option Definition 4 9 Table 5 Sys...

Page 9: ...llic T1 regardless of line coding Figure 3 Several 2361 Modems Installed in a Universal Chassis System The 2361 is available as a rackmount card or a standalone unit Both versions are available as 120...

Page 10: ...rom the optical receiver will be amplified and then restored to TTL logic levels before being delivered to the modem board All three components are hot swappable meaning that a module can be replaced...

Page 11: ...s data to switch over to the alternate path Bit Error Rate testing is continually passing through the redundant path to insure its operability 1 1 3 Interchangeable Interfaces A variety of ELIMs and O...

Page 12: ...M TRM switch In the MDM position the modem transmits a modem signal via the serial port port is emulating DTE The modem will therefore support modem dial up connections In the TRM position the port em...

Page 13: ...Receiving below acceptable Signal Quality Level 1 1 10 Rackmount Modem On the front panel the rackmount modem includes the following 1 RJ 45 EIA 232 port for terminal port management It is available i...

Page 14: ...Bm ST Multimode 1310nm Laser 26dBm ST FC PC SC Single mode 1310nm Laser 17dBm ST FC PC SC Single mode 1550nm Laser 26dBm ST FC PC SC Single mode 1 4 Loss Budget Considerations The maximum possible dis...

Page 15: ...reaching inside between the ELIM and the OLIM and toggling the switch Figure 8 T1 E1 Switch on a Standalone Modem 1 6 Applications The modem s general purpose is to extend the reach of a pair of T1 si...

Page 16: ...The EdgeAccess Universal Chassis System 2361 Modem Users Manual 1 8 Figure 10 2361 Modem Applications...

Page 17: ...e inserted into any numbered available slot in the UCS 1000 chassis The slots are numbered on the Chassis metal strips near where the screws are inserted Note If a redundant application will be used t...

Page 18: ...e Modules slide in and out of the modem s main module much as the modem itself slides into the Chassis The rackmount cards and the standalone units use the same LIMs ELIMs are always positioned in the...

Page 19: ...cates the holes required for each configuration Figure 13 Screw Hole Locations for Mounting Modem in Various Configurations 2 2 2 Cabling the Standalone Modem Make sure all cables are clearly labeled...

Page 20: ...t Alarms J19 alarm input connector pinout 1 Chassis Gnd 2 Minor alarm contact a 3 Minor alarm contact b 4 Chassis Gnd 5 Major alarm contact a 6 Major alarm contact b Operation An external contact clos...

Page 21: ...als Note Check signal ground GND of the source supply and orient it to the Modem GND or chassis ground Verify with a ohmmeter that and are not shorted prior to applying power Figure 16 DC Power Entry...

Page 22: ...terminal to red lead GND b terminal to black lead 48VDC 5 Tighten the two captive wire installation screws on the terminal block 6 Plug the terminal block into the rear of the unit Verify that the so...

Page 23: ...The EdgeAccess Universal Chassis System 2361 Modem Users Manual 2 7 2 5 2 DA 15 Pin Out DA 15 pin outs PIN Direction 1 Rx Input 9 Rx Input 3 Tx Output 11 Tx Output Pin 1 Pin 15 Figure 18 DA 15 Pin Out...

Page 24: ...The EdgeAccess Universal Chassis System 2361 Modem Users Manual 2 8 This page is intentionally left blank...

Page 25: ...r more of the following reasons can be the cause of a red CFG LED OS The active firmware version is differenteither at the local local redundant remote or remote redundant unit OLIM type The local and...

Page 26: ...loss of sync TST Test Mode LED Solid Yellow The local modem is in local or local bi directional loopback mode Flashing Yellow The remote modem is in local or local bi directional loopback mode Solid R...

Page 27: ...m the MDM TRM switch indicates if the EIA 232 interface is configured for connecting to another modem or a terminal Selects DTE DCE on the RS 232 interface Figure 20 LEDs Interface and Switches on the...

Page 28: ...trical loss of signal Flashing Red The remote modem has detected an electrical loss of signal AIS All 1s indicator LED Solid Yellow The local modem has detected an al 1 electrical signal Flashing Yell...

Page 29: ...n Messages and urgent status information is found below this line Figure 22 All Modem Screens Have Common Navigational Methods When viewing modem configuration screens keep in mind that not all menus...

Page 30: ...Modem port for connection to a terminal or modem The rack modem requires an RJ 45 connection and the port is a DCE requiring a DTE connection The standalone requires a DE 9 connection This port can be...

Page 31: ...rmits connection to a serial port on a typical dial up modem device For accessing the terminal screens through the DMM please consult the DMM manual regarding two important issues Accessing a specific...

Page 32: ...3 If you are changing the password rather than creating a new one the existing password is prompted before a new one can be set up 4 Type the new password Confirm your choice when prompted 5 The pass...

Page 33: ...Values If you have changed the major and minor alarm switchover or redundancy mode settings you can reset to the factory defaults from the Utilities screen by performing the following 1 From the Main...

Page 34: ...Revision number and Power Supply options for the modem and its ELIMs and OLIMs Also displays the modem s SNMP status if applicable Functional Configuration Provides functional configuration settings f...

Page 35: ...ollowing 1 From the Main Menu type 1 to enter the System Configuration Screen 2 Type 1 to view the Hardware Configuration screen 3 The Hardware Configuration Screen appears This is a status reporting...

Page 36: ...n determining adequate signal at the electrical interface If a low signal situation exists such as can be caused by excessive line length between hardware or inadequate transmission output this status...

Page 37: ...default setting Table 4 Alarm Output Configuration Option Definition Alarm Name Function Default Factory Setting 1 Active Composite Link Alarm Enables or disables alarms 2 through 9 Major 2 Electrica...

Page 38: ...nserted ELIMs and OLIMs This screen is most useful when a problem in the link or data flow is detected Note Many of the alarms on this screen correlate to an LED alarm on the modem face To access the...

Page 39: ...cation Signal Receiving AIS OK AIS on ELIM Link Self Test Status The auxiliary BERT which is always running is out of sync OK Bad and NA NA indicates composite loss of sync TST SQL Primary Indicates i...

Page 40: ...backplane has a problem The Configuration Error Line Notifications are interpreted as follows OS active software version is different either at the local local redundant remote or remote redundant un...

Page 41: ...et Modem Traps do the following 1 From the Main Menu type 1 and press Enter to open the System Configuration screen 2 Type 3 to open the Link Level Trap Configuration screen See Figure 31 3 The Link L...

Page 42: ...Bit Error Rate Test BERT or failure in the continuous self test operation 7 Link Self Test Failure of fiber between Local and Remote units 8 Power On Self Test Failure of Power On self test 9 Inactiv...

Page 43: ...rkins and runs at 48 Kbps The BERT detector will be read once a second It is a 7 bit counter up to 127 If the fiber composite signal is out of sync the BERT detector will be in N A State The software...

Page 44: ...nter press Tab then enter as indicated on the screen 5 3 Standalone Modem Diagnostic Tools The 2361 rackmount modem has no panel switches for loopbacks All loopback tests are controlled via software T...

Page 45: ...space bar to toggle through the following loopback options Local Local electrical interface looped back AIS sent on the Fiber Optic towards the remote modem Remote Loopback at the remote unit on the...

Page 46: ...Hardware Hardware options are only available on the standalone modem and are set with a switch on the modem front panel Software loopback options will override hardware options On the standalone mode...

Page 47: ...ux Dec Demux Dec Mux Enc Fiber Logic Fiber Figure 34 The Modem in Normal Operation 5 4 2 Local Loopback Operation When activated the Local Loopback test will cause all data transmission from the local...

Page 48: ...Figure 36 The Modem in Remote Loopback Operation 5 4 4 Remote Loopback with BERT When activated the Remote Loopback with BERT test will cause all data transmission from the local user device to be loo...

Page 49: ...x Logic LIU Mux Enc Demux Dec Demux Dec Mux Enc Fiber Logic Fiber Tx Rx Tx Figure 38 Local Bi directional Loopback 5 4 6 Remote Bi directional Loopback When activated the Remote Bi directional Loopbac...

Page 50: ...om the local user device to be looped back toward the receive side of that same local device At the same time all data transmissions from the remote unit will be looped back towards the receive side o...

Page 51: ...tant to make sure that the installation has been done correctly After complete installation to determine that the system is functioning correctly make sure that all LEDs are OFF except for STA and SQL...

Page 52: ...get is within the modem specifications Most fiber cabling problems will generate a Fiber Local Remote Loss notification alarm on the Fiber Loss of Signal entry of the System Alarms screen 6 3 Connecti...

Page 53: ...the current configuration OLIM type The OLIM model or type is not correct for the current configuration An incompatible ELIM interface will also be reported as an error in the ELIM Model line of the H...

Page 54: ...T LED on the front panel If it is OFF proceed by verifying the Link Self Test status on the System Alarms screen Loopback tests are the best place to start troubleshooting transmission data errors Pro...

Page 55: ...screen Press Tab to reset the counter and verify the type and frequency of errors that occur The types of errors that accumulate help indicate which link or module is failing Please refer to the Link...

Page 56: ...The EdgeAccess Universal Chassis System 2361 Modem Users Manual 6 6 This page intentionally left blank...

Page 57: ...he actual data payload Personnel can freely troubleshoot the problem without disrupting data transmission To ensure that the inactive circuit is truly ready to begin transmitting data at any time a da...

Page 58: ...Access Universal Chassis System 2361 Modem Users Manual 7 2 Full Modem Redundancy The entire modem hardware each with its own fiber path is made redundant as shown in Figure 40 Figure 42 Full Redundan...

Page 59: ...able from Canoga Perkins Redundant ELIM cards Y Cable Two connectors at one end one at the other for inserting into the remote and local modem s electrical data link The Remote ELIMs Redundancy cable...

Page 60: ...ms are returned to non redundant configuration 2 Y cables are required to duplicate not split the data coming from the data source One Y cable is required at each end handling the customer data 3 A re...

Page 61: ...n working order primary or secondary If the system detects a fault the data will switch Possible data switch causes would include An ELIM or OLIM is removed Loss of Signal Modem Failure Composite erro...

Page 62: ...s are open but can be forced closed The electrical signal is not making it to the composite STA LED is solid yellow Rackmount unit will not send traps to the DMM Payload QRSS pattern BERT is sent and...

Page 63: ...n an unknown intermittent error and determine if this modem is the source of it Note Switching from redundant mode to a non redundant modem mode does not require that you replace the redundant ELIMs Y...

Page 64: ...The EdgeAccess Universal Chassis System 2361 Modem Users Manual 7 8 This page intentionally left blank...

Page 65: ...automatic uploading of software revisions to all modems directly from the software source The steps are as follows 1 Determining the software revision currently being used by the modem 2 Determining i...

Page 66: ...mple 1 07 If the modem has not been upgraded yet then both the Active and Inactive Firmware versions will most likely be the same 8 2 Obtaining the Software If a software version exists that is newer...

Page 67: ...oga Perkins to activate it To upgrade and install the new software version perform the following The following steps assume that the TCP IP stack has been activated for this modem Figure 47 To Downloa...

Page 68: ...d back again made active should a problem occur After swapping software versions the older version now resides in the inactive flash memory bank If the module displays unexpected behavior using the ne...

Page 69: ...upgrade the modem s firmware use the following argument C dwnfirm 2x6x0173 zip Note Please look at the command line carefully before beginning the download process Make sure you include the entire pa...

Page 70: ...The EdgeAccess Universal Chassis System 2361 Modem Users Manual 8 6 This page intentionally left blank...

Page 71: ...only Redundancy Fiber Path or Full Modem Physical Dimensions Standalone 11 50 L x 8 450 W x 1 72 H 292 x 215 x 44mm Rackmount 10 4 L x 7 9 W x 1 0 H 264 x 218 x 25mm Weight Standalone 3 2 lb 1 45kg Ra...

Page 72: ...ors Management Local Terminal VT100 GUI through the chassis DMM only SNMP option for standalone Test Functions Local Loopback Remote Loopback Remote Loopback with BERT Bi directional Loopback Continuo...

Page 73: ...User Manual A 1 Appendix A Warranty Information Current Warranty information is available on line in the Client Login Area of the Canoga Perkins web site www canoga com or by contacting Technical Supp...

Page 74: ...CANOGA PERKINS CORPORATION 20600 Prairie Street Chatsworth California 91311 6008 USA Phone 818 718 6300 FAX 818 718 6312 Web Site www canoga com Email fiber canoga com...

Reviews: