background image

focus point any focus adjustment method can be 

used. However, after a point has been set only 

incremental focus adjustments can be used. Touch 

focus or manual lens cannot be used as there is then 
no way to track the focus changes that have been 

made. If one of these methods is used to change focus then any focus points that were set 

may be automatically cleared.

Once the two focus points are set, pressing the bullseye button will move the focus to that 

position. It will not be able to achieve a cinematic quality follow focus, but can be useful to 
return the lens to a particular focus point. Pressing clear will clear that focus point so it can be 

reset. 

After the focus points are set, the Start button will be enabled and pressing it will start the 

focus stacking process.

For Canon cameras, the CamRanger can only know the lens focal length by downloading an 

image. If an image has not been downloaded in that session yet, the focus stacking section 

will be disabled and instead a button will be shown to take a configuration shot. Pressing the 

button will result in the camera capturing an image, downloading the image to determine the 

lens focal length and then immediately deleting the image.

Advanced Focus Stacking

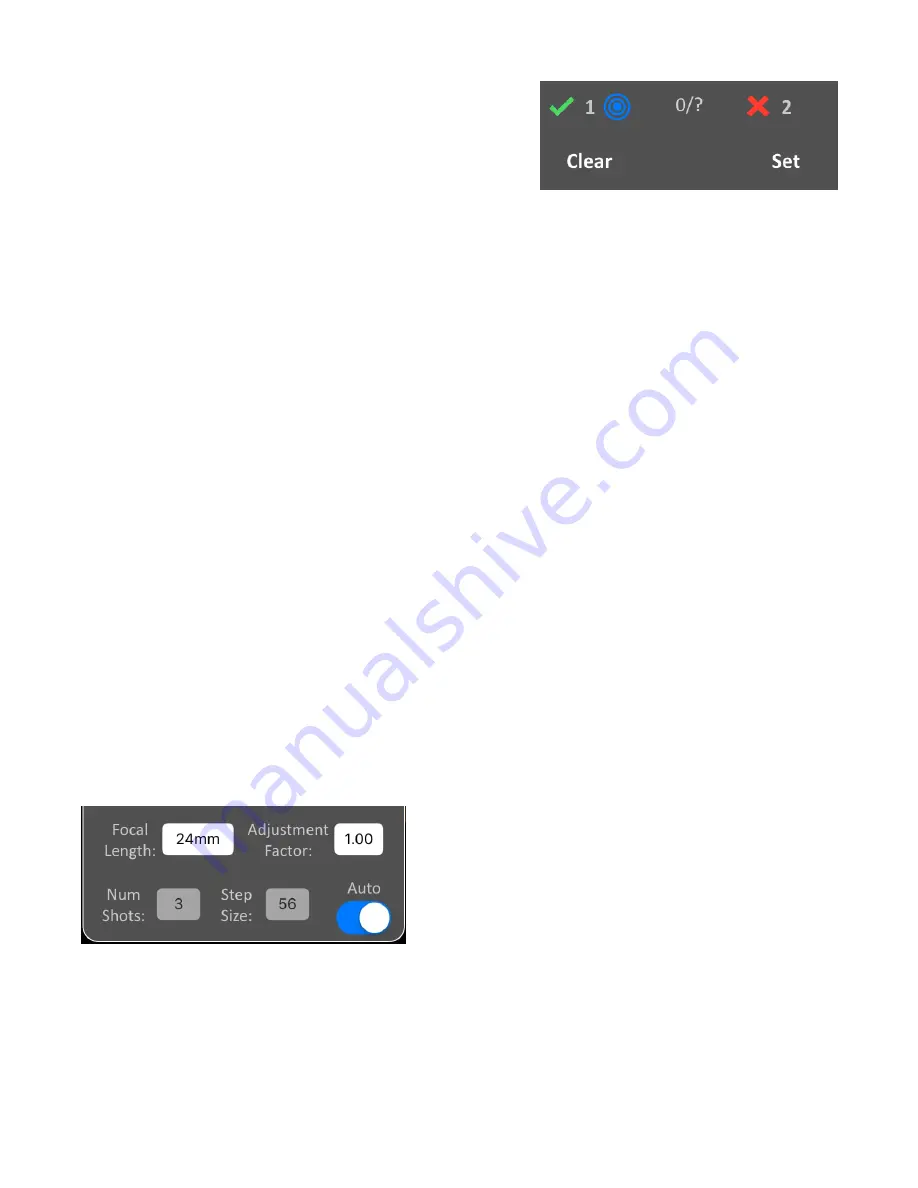
Pressing the plus button will reveal the advanced 

focus stacking options and provide additional 
feedback.

The focal length is automatically determined, 

however, it can be changed if it needs to be 

manually overridden. The CamRanger 2 does a 

pretty good job determining a reasonable number of shots and step sizes for a given 

scenario. However, the user may want to adjust this. The simplest way is to change the 

© CamRanger, 2019 

US Patent 9712688

10/04/19

22

Summary of Contents for CamRanger 2

Page 1: ...iOS User s Manual for the CamRanger 2 CamRanger 2019 US Patent 9712688 10 04 19 1 ...

Page 2: ...2 Main Screen 13 Status Bar 13 Recent Thumbnails 14 Main Image View 14 Captured Image 14 Live View Stream 15 Camera Properties 16 Camera Actions 17 HDR Advanced Bracketing Tab 18 Timer Tab 19 Focus Tab 21 Focus Adjustments 21 Focus Stacking 21 Advanced Focus Stacking 22 Card Contents 23 Settings 24 Image and Live View Overlays 24 CamRanger 2019 US Patent 9712688 10 04 19 2 ...

Page 3: ...d 33 PT Hub Hardware 33 MP 360 Motorized Tripod Head Hardware 33 Specifications 34 Setup 35 App Additions with the PT Hub and Tripod Head 36 Camera Setup 36 Canon 36 Nikon 37 Sony 37 Fujifilm 38 Tips Troubleshooting 38 Connection 39 Performance 39 Images 39 Important Information 41 CamRanger 2019 US Patent 9712688 10 04 19 3 ...

Page 4: ... to turn on press and hold 1 2 seconds to turn off Press and hold 15 seconds to force power off 7 SD Card Port SD SDHC SDHX compatible required for Sony and Fuji 8 USB Port Connect camera with appropriate USB cable 9 1 4 20 Socket not pictured located on bottom on device for attachment to hot shoe adapter L bracket quick release plate etc The CamRanger 2 is not water resistant and should not get wet...

Page 5: ... battery lasts about 5 6 hours in normal usage The number and range of wireless connections as well as how much data is being transmitted are the largest factors in battery life The battery can be charged in the CamRanger 2 using a micro USB cable 5V 2A input is ideal Lower current input can be used but charging may take longer While charging the charging light will turn orange If there is a failu...

Page 6: ...orkflows that save images to the CamRanger 2 s SD card Antennas Generally the position of the antennas it not very important However when trying to maximize range antenna placement could make a difference Please use care not to bend or break the antennas and to always store the CamRanger 2 with the antennas folded down Configuration Web GUI The CamRanger 2 can be configured using the web GUI To acc...

Page 7: ... MAC address is also displayed For nearly all circumstances LAN is the correct Ethernet port mode WAN can be used when the CamRanger 2 is connected to an existing router with an Ethernet cable The CamRanger 2 will then be able to be assigned an IP address from the existing router WiFi The WiFi tab allows the user to configure the wireless networks CamRanger 2019 US Patent 9712688 10 04 19 7 ...

Page 8: ...he CamRanger 2 can then be used from the normal CamRanger 2 network as well as the existing network The CamRanger 2 will continue to attempt to rejoin this network upon start up To join an existing WiFi network press the Configure button for the appropriate network frequency and follow the prompts If the CamRanger 2 has properly joined the WiFi network the network name status and assigned IP addre...

Page 9: ...be Diagnostic battery statistics can also be displayed Sharing Direct The CamRanger 2 is typically used with the CamRanger 2 application However there are a couple options for transferring images without using the CamRanger software printing with a DNP wireless print server or uploading to an FTP server Both methods and transferring images require an SD card and for the CamRanger to able to commun...

Page 10: ... USB mini cable is provided which works for many cameras However some cameras use different cable types The camera came with the correct cable or another cable can be purchased The CamRanger 2 should not be allowed to hang from the camera by the USB cable The USB cable connections should not be stressed The CamRanger 2 can be attached using the provided hot shoe adapter and 1 4 20 mount The mount c...

Page 11: ...in the CamRanger serial code are listed followed by 2 4 or 5 designating the 2 4 or 5 GHz network In general the 5 GHz network should be used though the 2 4 GHz network may have better range The WiFi password is the CamRanger 2 serial code in all CAPS To the right is an example of what your password will look like Launch app Ensure the camera is turned on and awake and launch the CamRanger 2 app C...

Page 12: ...can be useful for quickly viewing recent images without being connected to the CamRanger and camera It should be noted that if an image was not viewed previously then it will not be available in the cache The View Ratings button will show a listing of images that have been rated on this particular device A listing of the ratings can also be exported via email Please see the Ratings section for mor...

Page 13: ...t the available space on the SD card The gear button the right will open the app settings The settings are covered in depth in Settings section The exposure icon to the left of the settings button accesses the camera presets list The user can save the camera s current settings and then change back to those settings at a later time Note that particular presets may no longer be valid in all situatio...

Page 14: ...is configured within the app settings Depending on compression and resolution settings and the WiFi speed downloads can be very time consuming However it can be a convenient feature to check a short clip or a view a small portion Main Image View The main image view displays both captured images and the live view stream Captured Image The picture to the right shows a captured image with a number of...

Page 15: ...iting window to crop rotate and adjust the image Please see the image editing section for more information Live View Stream When live view is on the image in the main image view is automatically updated as new live view frames are received The frame rate can vary greatly based on a number of parameters such as the signal strength and camera model However assuming a good connection about 15 fps wou...

Page 16: ...ntation and camera model Auto exposure mode shutter speed ISO white balance focus mode image format drive capture mode and metering are displayed as shown The exposure meter can have different meanings It shows exposure bracketing and then either exposure compensation or exposure metering depending on the context If the property can be changed then it will be white Disabled properties are grey The ...

Page 17: ...utton will appear at the top left of the Capture button This button is the equivalent of performing a half press of the camera s shutter button This is useful for getting auto focus and determining the camera s exposure metering If the camera s exposure mode is set to manual the exposure meter will briefly show the exposure level If set to an automated exposure mode the exposure parameters calcula...

Page 18: ... the exposure between each shot The number of shots specifies the number of shots in the sequence The maximum number of shots is dynamically calculated based on the mid point and the possible camera values The minimum and maximum exposure values for the sequence will be displayed above the Start button Press the Start button to begin the sequence Because the CamRanger is actually changing the came...

Page 19: ...e Timer tab is accessed by pressing the stopwatch button and is used to configure the CamRanger as an intervalometer as well as specify exposure times when the camera is bulb mode The initial delay is the amount of time to delay before the sequence is started This can be useful for making a custom timer mode with a set delay The number of shots to take must be entered as well as the time between s...

Page 20: ...a single shot However time lapse can be combined with bulb mode to perform a time lapse with each bulb duration set by the shot duration Bulb ramping can also be configured by pressing the ramp button and can be used to slowly adjust exposure over time by varying the duration of shutter The exposure change over the entire sequence is set by the EV Change field This value can be positive to increas...

Page 21: ... pointing down move the focus in closer while the arrows pointing up move the focus further away Focus Stacking A new focus stacking method is available which automates more of the process Changing to the previous focus stacking method is still possible by turning on Classic Focus Stacking in the settings The new focus stacking method requires the user to specify the nearest and furthest focus poi...

Page 22: ...t will start the focus stacking process For Canon cameras the CamRanger can only know the lens focal length by downloading an image If an image has not been downloaded in that session yet the focus stacking section will be disabled and instead a button will be shown to take a configuration shot Pressing the button will result in the camera capturing an image downloading the image to determine the ...

Page 23: ...ils can be filtered by type by selecting the filter option at the bottom left The filter options are All JPG RAW and Video To view an individual image double tap on the thumbnail Multiple images can be selected by tapping on the thumbnails The images can then be deleted or shared with the Delete and Share buttons on the bottom right Multiple images can also be compared by pressing the Compare butt...

Page 24: ...er 2 can control more camera settings In Camera mode shooting from the camera is possible but changing certain settings with the CamRanger 2 is not Fuji When set to PC the camera can be controlled with the CamRanger 2 but is physically locked out from being operated manually When set to camera the camera can be controlled like normal but the CamRanger 2 cannot control the camera only receive image...

Page 25: ... photo library Opacity Use the slider to set the image overlay opacity alpha value Other Overlays File Name shows the captured image file name at the bottom left of the image Exif Data displays basic meta data for captured images at the top of the image Histogram shows an RGB histogram at the top left for both live view and captured images Highlights Over exposed areas of captured images are overl...

Page 26: ...t be individually selected to be viewed ON Captured images are automatically displayed as they are taken Camera Images are not automatically displayed but can be displayed as controlled by the photographer at the camera To display an image it must be modified on the camera this can be done a few ways but theses methods may work well Canon Give the image a rating Nikon lock the image Sony Fujifilm ...

Page 27: ...ber of shots Movie Restart Interval Configure the CamRanger 2 to automatically stop and restart recording to help handle video recording time limits Note that there will be a second or two gap in between the two recordings Save Fuji RAWs For quickest previews the suggested setting is to configure the camera to save RAW images to the camera s SD card The process of saving the RAW image to the CamRa...

Page 28: ...ing section for more details on how to use CamRanger Share to share images with multiple devices CamRanger Share Enables and disables CamRanger Share Auto Share Images If enabled all images viewed for the first time will be shared Auto Share Thumbnail Automatically share all thumbnails Share Live View Share the live view feed with clients Clients can save images Allows clients to save the image to...

Page 29: ...Cache Size The size in GB of the cache This will affect how many images are able to be stored before being deleted Clear Cache If strange issues are occurring such as the wrong image being displayed clearing the cache may fix it Image Ratings List Show Ratings Display a list and thumbnails of images that have been rated within the CamRanger 2 app User Manual view this document Email Support Opens a...

Page 30: ...will be displayed as well as used for exporting saving The picture above shows the image editing screen From left to the right the controls at the bottom are Cancel Undo Image Adjustments Crop and Rotate Resize and Save The Cancel button will revert any changes and close the editing screen The Undo button will revert all changes Selecting the Image Adjustments button will display the image adjustm...

Page 31: ...ferring images where full resolution is not necessary Image Sharing and Transfer The CamRanger 2 provides a number of options for saving uploading and transferring images To access the sharing options select the context button when viewing an image and select Share The Save Share dialog will then appear The options are as follows CamRanger Share Share with other clients using the CamRanger Share a...

Page 32: ...Note that many of these options require Internet connectivity requiring bridging the CamRanger into an existing WiFi network SD Card Access The SD card on the CamRanger 2 enables a two different ways of viewing accessing images saved on the SD card in addition to using the CamRanger app or physically moving the SD card Web Viewer Thumbnails and images saved on the CamRanger 2 SD card can be accesse...

Page 33: ...nd motorized tripod head a CamRanger and supported camera are required PT Hub Hardware 1 USB A Connector Connects to CamRanger 2 Serial Connector Connects to PT Hub 3 USB B Connector Connections to camera MP 360 Motorized Tripod Head Hardware Threaded Mounting Point 1 4 20 threaded female opening for mounting to an existing tripod head does NOT mount directly onto tripod legs CamRanger 2019 US Pat...

Page 34: ...LED Green when power is on cannot be used to determine battery level Power Switch To turn on set to M Camera Mounting Screw 1 4 20 mounting screw Specifications Power Source 4 AA batteries or A C adapter neither included Vertical Tilt 15 degrees Horizontal Pan 360 degrees with unlimited rotation Maximum Camera Weight 6 lb 2 7 kg Size LxHxW 5 75 x 4 5 x 4 inches 145 x 115 x 103 mm Weight 1 75 lb 80...

Page 35: ...ed with PT Hub USB A to B cable included with PT Hub Camera Mobile Device iOS Android Connect the CamRanger 2 PT Hub tripod head and camera as shown in the above diagram Set the tripod head power switch to M to turn on the tripod head Setup and start the rest of the equipment as normally done CamRanger 2019 US Patent 9712688 10 04 19 35 ...

Page 36: ...ibration is valid for four hours or until the session is restarted or the tripod head speed is adjusted After calibrating the number of shots total number of degrees and panorama direction can be specified before pressing Start to begin the process Camera Setup Canon Exposure Simulation Camera setting that controls if the live view exposure should match the camera s exposure settings or always sho...

Page 37: ...mera setting that enables the CamRanger to control the Camera This must be turned on USB Connection Camera setting that must be set to PC Remote USB LUN Setting Camera setting that should be set to Multi USB Power Supply Camera setting that controls if the camera should charge from the USB port Generally this should be turned off as it will drastically reduce the CamRanger s battery life Control wi...

Page 38: ...ly compatible with select focus modes Fujifilm An SD card is required in the CamRanger 2 when using a Fuji camera Some Fuji camera s will also draw power over USB whenever possible This results in much lower battery life about 2 5 hrs instead of 5 hrs Wireless All WiFi settings and connections should be disabled off Power Management Auto Power Off Camera setting that controls the camera powering off ...

Page 39: ...one is to the CamRanger 2 the faster image transfer and live view will be Environmental interference can reduce performance Displaying high resolution images requires a lot of device RAM If the amount of available RAM is low then poor performance or crashes may occur Restarting the iPad iPhone will make more RAM available Exact features are camera dependent Unfortunately some cameras do not suppor...

Page 40: ... setting Quick Raw enabled Nikon RAW only app setting Quick Raw enabled Fuji RAW JPG camera setting USB Tether Shooting Auto app setting Fuji Save RAWs disabled Sony If camera supports camera setting Still Image Save Dest PC Camera shoot RAW JPG For more detailed descriptions and examples please refer to the CamRanger Knowledge Base on the CamRanger website If the camera has multiple memory cards ...

Page 41: ...n be determined by turning the equipment off and on the user is encouraged to try to correct the interference by one or more of the following measures Reorient or relocate the receiving antenna Increase the separation between the equipment and receiver Connect the equipment into an outlet on a circuit different from that to which the receiver is connected Consult the dealer or an experienced radio T...

Reviews: