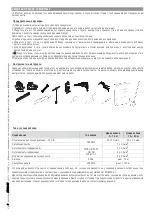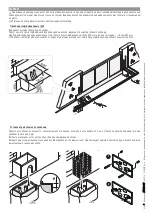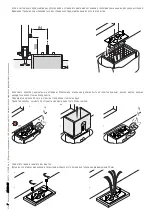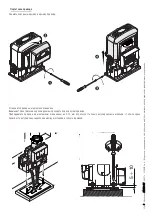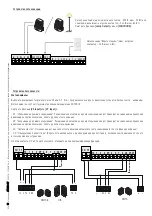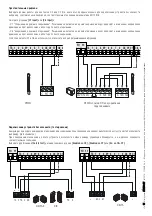
background image

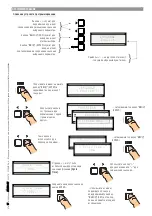
< New User >

n.001 Wait code
>>>>>>

Related func.

< 2-7 function >

Saved

Another usr?

< No >

Related func.
< Only Open >

n.001 existing

< New User >

Another usr?

< Yes >

Related func.

< 2-7 function >

Ст

р.

 1

919

 - И

н

ст

ру

кц

и

я: 

FA

0

11

3

0

-R

U

FA

0

11

3

0

-R

U

 - 0

4

/2

0

18 - © C

A

M

E

 S

.p

.A

. - В

се д

ан

н

ы

е,

 с

од

ержа

щ

и

ес

я в э

то

й

 и

н

ст

ру

кц

и

и

, м

огут б

ы

ть

 и

зм

ен

ен

ы

 в л

ю

бо

е в

р

ем

я и б

ез п

р

ед

вари

те

ль

ног

о у

ве

д

ом

лени

я.

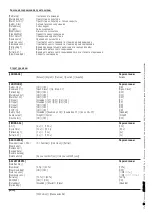
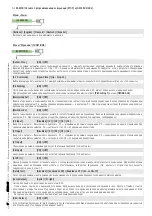
[Partial op.]

[10%]


[80%]

Регулировка точки частичного открывания ворот.
Конечная точка частичного открывания определяется в процентном отношении (от 10 до 80%) от полного хода ворот.

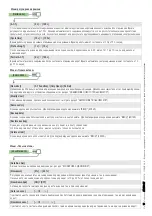
[ENCODER]

[ON] / [OFF]

Функция управления замедлением, обнаружением препятствий и чувствительностью системы защиты.


 Если функция "Encoder" отключена, плата управления работает только с механическими упорами.

[NET address]

[Disabled] / [Master] / [Slave]

Для установки платы управления режим Master или Slave в случае работы в синхронном режиме.

[Startup Msg.]

Отображает приветственное сообщение. Для изменения текста нажмите клавишу "ВВОД" (ENTER). Используйте клавишу "ВВОД" 
для перемещения курсора вперед, "ВЫХОД" (ESC) для перемещения курсора назад и < > для выбора цифр или букв. Для 
подтверждения удерживайте ENTER в течение нескольких секунд.

Меню «Информация»

[FW Version]

Отображает версию прошивки.

[Manoeuvres No]

Указывает число циклов работы привода.

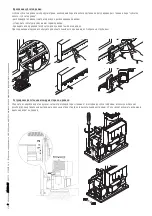
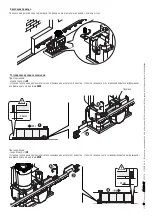
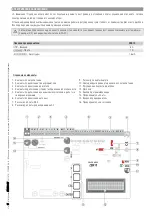
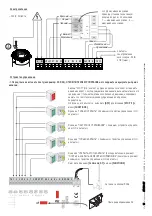
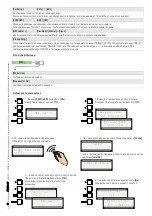
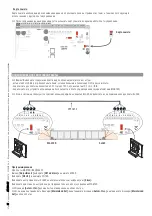
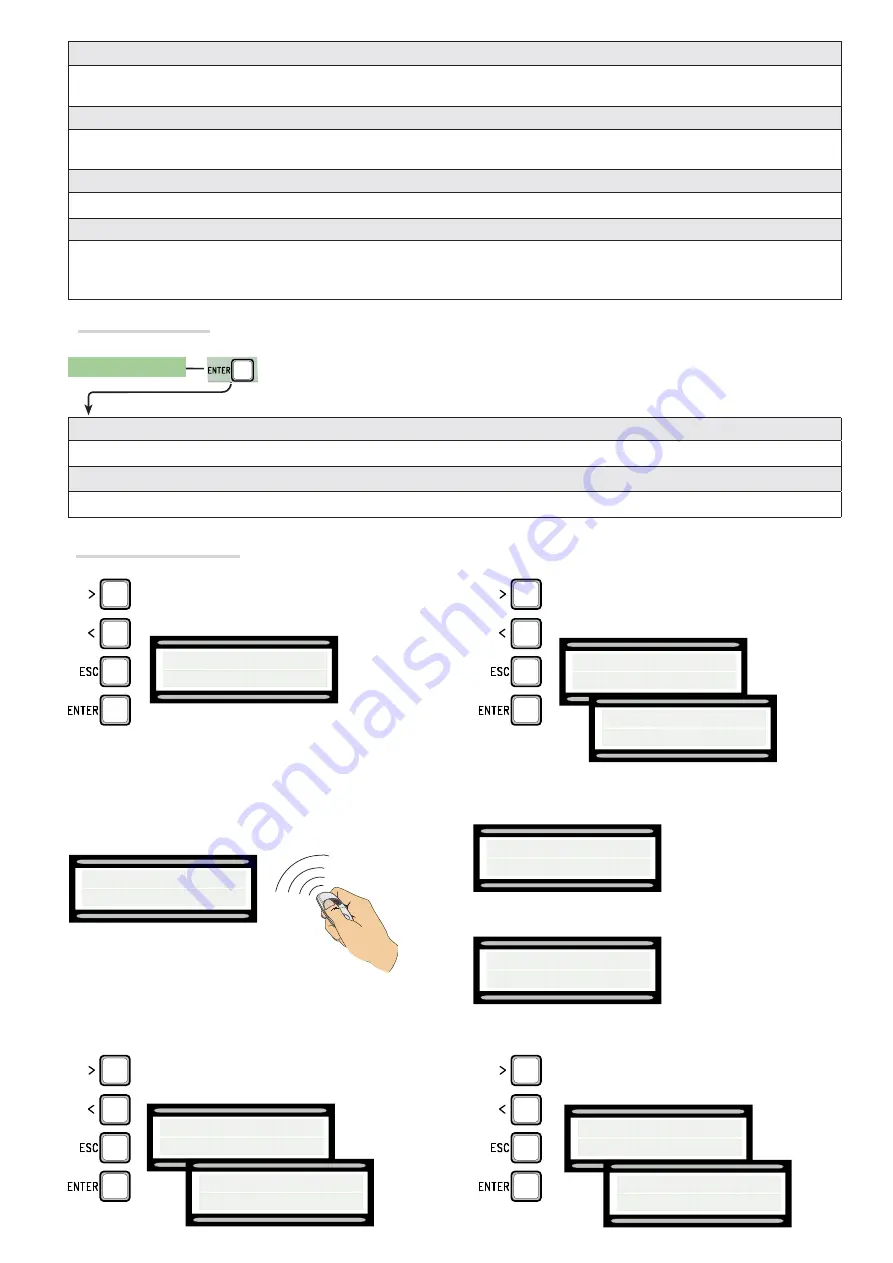
2. Выберите присваиваемую пользователю 
функцию. Подтвердите, нажав кнопку ENTER...

1. В меню 

[RADIO USRS]

 выберите 

[New 

User].

 Подтвердите, нажав ENTER.

4. После введения кода на дисплее появится надпись 

[Saved] ...

... или, если код уже был введен, появится номер пользователя 
с надписью 

[existing]

.

3. Система войдет в режим ожидания кода.
Отправьте код с брелока-передатчика.

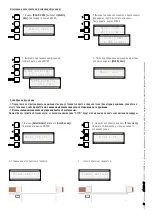
Добавление пользователя

5. ... ниже попросят добавить другого пользователя.
При выборе и подтверждении ответа 

[Нет] 

процедура создания пользователей будет 
завершена

6. При выборе и подтверждении ответа 

[Да] 

процедура повторится, начиная с пункта 2.

[INFO]

Summary of Contents for BK-221

Page 1: ...IT Italiano EN English FR Français RU Русский BK 221 MANUALE DI INSTALLAZIONE Automazione per cancelli scorrevoli FA01130M04 ...

Page 2: ...R GLI UTENTI TENERE LIBERE DA INGOMBRI E PULITE LE AREE DI MANOVRA DEL CANCELLO CONTROLLARE CHE NON VI SIA VEGETAZIONE NEL RAGGIO D AZIONE DELLE FOTOCELLULE E CHE NON VI SIANO OSTACOLI SUL RAGGIO D AZIONE DELL AUTOMAZIONE NON PERMETTERE AI BAMBINI DI GIOCARE CON I DISPOSITIVI DI COMANDO FISSI O DI SOSTARE NELL AREA DI MANOVRA DEL CANCELLO TENETE FUORI DALLA LORO PORTATA I DISPOSITIVI DI COMANDO A ...

Page 3: ...C 150 Peso kg 21 DESCRIZIONE Automazione completa di scheda elettronica con display grafico per la programmazione delle funzioni dispositivo per il controllo del movimento e rilevazione dell ostacolo per cancelli scorrevoli fino a 2 200 kg e 20 m di lunghezza Destinazione d uso L automazione è stata progettata per motorizzare cancelli scorrevoli per uso condominiale o industriale Ogni installazione ...

Page 4: ... Scheda elettronica 4 Coperchio frontale 5 Piastra di fissaggio 6 Porta scheda elettronica 7 Alette di finecorsa 8 Finecorsa meccanico 9 Ventola 10 Trasformatore 11 Sportello di sblocco 12 Chiave di sblocco Impianto tipo 1 Automazione 2 Alette di finecorsa 3 Cremagliera 4 Selettore a chiave 5 Lampeggiatore 6 Antenna 7 Fotocellule 8 Colonnina per fotocellule 9 Battuta di arresto 10 Bordo sensibile ...

Page 5: ... interne al contenitore eseguite per la continuità del circuito di protezione siano provviste di isolamento supplementare rispetto ad altre parti conduttrici interne predisporre adeguate tubazioni e canaline per il passaggio dei cavi elettrici garantendone la protezione contro il danneggiamento meccanico Attrezzi e materiali Assicurarsi di avere tutti gli strumenti e il materiale necessario per ef...

Page 6: ...per la cassa matta Preparare i tubi corrugati necessari per i collegamenti provenienti dal pozzetto di derivazione Per il collegamento del motoriduttore si consiglia un tubo corrugato Ø 40 mm per gli accessori invece si consigliano tubi Ø 25 mm Il numero di tubi dipende dal tipo di impianto e dagli accessori previsti Posa della piastra di fissaggio Preparare una cassa matta di dimensioni maggiori ...

Page 7: ...ispettando le misure riportate sul disegno Attenzione I tubi devono passare attraverso i fori predisposti Riempire la cassa matta di cemento la piastra deve essere perfettamente in bolla e con il filetto delle viti completamente in superficie Attendere che si solidifichi per almeno 24h Togliere la cassa matta e riempire di terra lo scavo attorno al blocco di cemento Togliere i dadi dalle viti Inse...

Page 8: ...izionare il motoriduttore sopra la piastra di fissaggio Attenzione I cavi elettrici devono passare sotto la cassa del motoriduttore Sollevare il motoriduttore di 5 10 mm dalla piastra agendo sui piedini filettati per permettere eventuali regolazioni successive tra pignone e cremagliera Preparazione del motoriduttore Rimuovere il coperchio frontale e il coperchio del motoriduttore ...

Page 9: ...OCCO DEL MOTORIDUTTORE appoggiare la cremagliera sopra il pignone del motoriduttore saldare o fissare la cremagliera al cancello in tutta la sua lunghezza Per assemblare i moduli della cremagliera utilizzarne un pezzo di scarto appoggiandolo sotto il punto di giuntura e bloccandolo con due morsetti Regolazione accoppiamento pignone cremagliera Aprire e chiudere il cancello manualmente e registrare...

Page 10: ...tura aprire il cancello n infilare l aletta di finecorsa di apertura sulla cremagliera fino a far scattare il micro molla e fissarla con i grani op In chiusura chiudere il cancello q infilare l aletta di finecorsa di chiusura sulla cremagliera fino a far scattare il micro molla e fissarla con i grani rs Molla Fissaggio del motoriduttore Completata la regolazione fissare il motoriduttore alla piastra con g...

Page 11: ...o impostate e visualizzate sul display grafico Tutte le connessioni sono protette da fusibili rapidi L automazione è predisposta per l installazione a sinistra In caso di installazione a destra invertire i cavi del motoriduttore U V e dei finecorsa FA FC Descrizione delle parti 1 Morsettiera per alimentazione 2 Morsettiera per trasformatore 3 Morsettiera per motoriduttore 4 Morsettiera per disposi...

Page 12: ...e l arresto del cancello con l esclusione della chiusura automatica Per riprendere il movimento premere il pulsante di comando o altro dispositivo di comando Se non utilizzato selezionare OFF dalla funzione STOP 1 nel menu FUNZIONI Funzione SOLO APRE da dispositivo di comando contatto NO Funzione APRE STOP CHIUDE STOP sequenziale o APRE CHIUDE INVERSIONE passo passo da dispositivo di comando conta...

Page 13: ... l inversione del movimento fino alla completa apertura C2 richiusura durante l apertura In fase di apertura del cancello l apertura del contatto provoca l inversione del movimento fino alla completa chiusura C3 stop parziale Arresto del cancello se in movimento con conseguente predisposizione alla chiusura automatica se la funzione di chiusura automatica è stata attivata C4 attesa ostacolo Arrest...

Page 14: ...ingresso C7 o ingresso C8 in C7 riapertura durante la chiusura In fase di chiusura del cancello l apertura del contatto provoca l inversione del movimento fino alla completa apertura C8 richiusura durante l apertura In fase di apertura del cancello l apertura del contatto provoca l inversione del movimento fino alla completa chiusura Se non vengono utilizzati i contatti C7 e C8 vanno disattivati i...

Page 15: ... attualmente selezionata PROGRAMMAZIONE Descrizione dei comandi di programmazione Per entrare nel menu tenere premuto il pulsante ENTER per almeno un secondo Per scegliere la voce di menu spostarsi con le frecce poi premere ENTER anche per i sotto menu spostarsi con le frecce Se le frecce sono sulla funzione Tempo Lavoro è possibile modificarne il valore Per aumentare o diminuire il valore usare l...

Page 16: ...10 s 5 s T C A Parziale 0 s 120 s 5 s RADIO UTENTI Default Nuovo utente 250max Funzione 2 7 Solo Apre Parziale Modifica Ut Rimuovi Ut Salva memoria Carica memoria Cancella tutti Confermi no Confermi si TARATURE Default Taratura corsa Rallentamento 0 40 10 Vellocità Rall ON OFF OFF Sens corsa Sens rall Ap parziale 10 80 30 ENCODER ON OFF ON Ind rete Disattivato Master Slave Disattivato Msg iniziale...

Page 17: ...o anche radio sono esclusi Ingresso CX Disattivato C1 C2 C3 C4 Ingresso NC Possibilità di associare C1 riapertura durante la chiusura per fotocellule C2 richiusura durante l apertura per fotocellule C3 stop parziale C4 attesa ostacolo Ingresso CY Disattivato C1 C2 C3 C4 Ingresso NC Possibilità di associare C1 riapertura durante la chiusura per fotocellule C2 richiusura durante l apertura per fotoc...

Page 18: ...i essi di una funzione a scelta tra quelle previste L inserimento va fatto con trasmettitore o altro dispositivo di comando vedi paragrafo INSERIMENTO NUOVO UTENTE Modifica Ut Per modificare la funzione associata all utente vedi paragrafo MODIFICA UTENTE Rimuovi Ut Per rimuovere un utente Confermare la rimozione con ENTER Salva memoria Per salvare gli utenti e le impostazioni dell impianto nella Mem...

Page 19: ...ll indietro e per selezionare la lettera o cifra Confermare il testo premendo il tasto ENTER per alcuni secondi Menu info Versione fw Visualizza la versione del firmware N manovre Visualizza il numero di manovre effettuate 2 Scegliere la funzione da associare all utente Premere ENTER per confermare 1 Dal menu RADIO UTENTI selezionare Nuovo Utente Premere ENTER per confermare 4 Una volta inserito il...

Page 20: ...emere ENTER per confermare 4 successivamente esuguirà una in chiusura fino alla battuta 3 Il cancello eseguirà una manovra di apertura fino alla battuta d arresto Taratura corsa Prima di effettuare la taratura della corsa posizionare il cancello a metà corsa controllare che l area di manovra sia libera da qualsiasi ostacolo e verificare la presenza di una battuta d arresto meccanico in apertura e u...

Page 21: ...enti operazioni su entrambe le automazioni inserire la scheda RSE con i DIP posizionati in OFF sul connettore della scheda collegare le due schede con un cavo tipo CAT 5 max 1 000 m sui morsetti 2 2 A A B B collegare tutti i dispositivi di comando e di sicurezza sulla scheda dell automazione MASTER Se nell impianto sono presenti dei bordi sensibili sull anta SLAVE collegarli sulla morsettiera dell...

Page 22: ...zioni finali sono da effettuare a collegamenti terminati e messa in funzione SBLOCCO DEL MOTORIDUTTORE L operazione deve essere effettuata in assenza di tensione Lo sblocco manuale dell automazione può causare un movimento incontrollato del cancello se questo presenta problemi meccanici o se non è bilanciato Con lo sportello di sblocco aperto impedisce il funzionamento dell automazione SBLOCCO BLOC...

Page 23: ...ire le batterie altrimenti rivolgersi all assistenza Il cancello si apre ma non si chiude Le fotocellule sono sporche Pulire e verificare il corretto funzionamento delle fotocellule altrimenti rivolgersi all assistenza MESSAGGI DI ERRORE I messaggi di errore appaiono a display Sblocco Attivo Sportello di sblocco aperto STOP Attivo Contatto 1 2 NC aperto Errore test servizi Malfunzionamento dei dis...

Page 24: ..._______________________________________________________________________________ DISMISSIONE E SMALTIMENTO CAME S p A implementa all interno dei propri stabilimenti un Sistema di Gestione Ambientale certificato e conforme alla norma UNI EN ISO 14001 a garanzia del rispetto e della tutela dell ambiente Vi chiediamo di continuare l opera di tutela dell ambiente che CAME considera uno dei fondamenti d...

Page 25: ...INSTALLATION MANUAL BK 221 Sliding gate operator English FA01130 EN ...

Page 26: ...OCELLS ARE FREE OF ANY OVERGROWN VEGETATION AND THAT THE OPERATOR S AREA OF OPERATION IS FREE OF ANY OBSTRUCTIONS DO NOT ALLOW CHILDREN TO PLAY WITH FIXED COMMANDS OR TO LOITER IN THE GATE S MANEUVERING AREA KEEP ANY REMOTE CONTROL TRANSMITTERS OR ANY OTHER COMMAND DEVICE AWAY FROM CHILDREN TO PREVENT THE OPERATOR FROM BEING ACCIDENTALLY ACTIVATED THE APPARATUS MAY BE USED BY CHILDREN OF EIGHT YEA...

Page 27: ...ght Kg 21 DESCRIPTION Operator fitted with control board and graphic functions programming display movement control and obstruction detection devices for sliding gates weighing up to 2 200 Kg and measuring up to 20 m Intended use The operator is designed to power sliding gates used in apartment blocks and industrial plants Any installation and or use other than that specified in this manual is forbi...

Page 28: ...rol board 4 Front cover 5 Anchoring plate 6 Control board holder 7 Limit switch fins 8 Mechanical limit switch 9 Fan 10 Transformer 11 Release hatch 12 Release key Standard installation 1 Operator 2 Limit switch fins 3 Rack 4 Key switch selector 5 Flashing light 6 Antenna 7 Photocells 8 Photocells post 9 Mechanical gate stop 10 Sensitive safety edge 11 Junction pit ...

Page 29: ...circuit are fitted with additional insulation with respect to those of other electrical parts inside set up suitable tubes and conduits for the electric cables to pass through making sure they are protected from any mechanical damage Tools and materials Make sure you have all the tools and materials you will need for installing in total safety and in compliance with applicable regulations The figu...

Page 30: ...t up the corrugated tubes needed for making the connections coming out of the junction pit For connecting the gearmotor we suggest using a Ø 40 mm corrugated tube and Ø 25 mm tubes for the accessories The number of tubes depends on the type of system and the accessories you are going to fit Laying the anchoring plate Set up a foundation frame that is larger than the anchoring plate and sink it int...

Page 31: ...the drawing Careful The tubes must pass through their corresponding holes Fill the foundation frame with concrete The plate must be perfectly level with the bolts which are entirely above surface Wait at least 24 hrs for the concrete to solidify Remove the foundation frame and fill the hole with earth around the concrete block Remove the nuts from the bolts Fit the electric cables into the tubes s...

Page 32: ...t notice Place the gearmotor above the anchoring plate Careful The electric cables must pass under the gearmotor case Raise the gearmotor by 5 to 10 mm from the plate by turning the threaded feet to make room for further pinion and rack adjustments Setting up the gearmotor Remove the front cover and gearmotor cover ...

Page 33: ...SING THE GEARMOTOR paragraph rest the rack above the gearmotor pinion weld or fasten the rack to the gate along its entire length To assemble the rack modules use an extra piece and rest it under the joint then fasten it using two clamps Adjusting the pinion rack coupling Manually open and close the gate and adjust the pinion rack coupling distance using the threaded feet vertical adjustment and t...

Page 34: ...opening limit switch tab onto the rack until the micro switch activates spring and fasten it using the grub screws op For closing close the gate q fit the closing limit switch fin into the rack until the micro switch is activated spring and fasten it using the grub screws rs Spring Fastening the gearmotor Once adjusting is complete fasten the gearmotor to the plate using the plates and nuts 20 mm 20...

Page 35: ... management are set and viewed on the graphic display All connections are quick fuse protected The operator is designed to be fitted on the left If installing on the right invert the gearmotor s U V and the limit switches FA FC cables Description of parts 1 Power supply terminals 2 Transformer terminals 3 Terminal for gearmotors 4 Terminals for control and safety devices 5 Terminal board for limit...

Page 36: ...topping the gate while excluding automatic closing To resume movement either press the control button or any other control device If unused select OFF from the STOP 1 in the FUNCTIONS menu ONLY OPEN function from control device NO contact OPEN STOP CLOSE STOP sequenziale function or OPEN CLOSE INVERT step by step from a control device NO contact See the 2 7 Command function in the FUNCTIONS menu P...

Page 37: ...uses the inversion of movement until opening is complete C2 close back up during opening When the gate is opening opening the contact triggers the inversion of movement until the gate is completely closed C3 partial stop Gate stop if moving with resulting automatic closing if the automatic closing function is activated C4 obstruction wait Gate stops if it is moving and once the obstruction is remo...

Page 38: ...input or C8 input in C7 reopening during closing when the gate is closing opening the contact causes the inversion of movement until opening is complete C8 reclosing during opening When the gate is opening opening the contact triggers the inversion of movement until the gate is completely closed If they are unused deactivate contacts C7 and C8 during programming Connecting the safety devices the s...

Page 39: ...ected item PROGRAMMING Description of programming commands To enter the menu keep the ENTER button pressed for at least one second To select menu items use the arrow keys then press ENTER also for the submenus use the arrow keys to select If the arrows are set to the Cycle Time you may edit their value To increase or reduce the value use the arrows the press ENTER to confirm to exit the menu wait ...

Page 40: ...0 s 5 s RADIO USRS Default New user 250 max 2 7 function Only Open Partial Modify user Remove user Backup data Restore backup Delete all usr Do you confirm no Do you confirm yes ADJUSTMENTS Default Gate run adj Slowdown 0 40 10 SlowDown speed ON OFF OFF Gate run sens Slowdown sens Partial Op 10 80 30 ENCODER ON OFF ON NET address Disabled Master Slave Disabled Standby Msg INFO FW version Manoeuvre...

Page 41: ... devices even radio based ones are excluded CX Input Desabled C1 C2 C3 C4 NC input Can associate C1 reopening during closing by photocells C2 reclosing during opening by photocells C3 partial stop C4 obstruction wait CY Input Desabled C1 C2 C3 C4 NC input Can associate C1 reopening during closing by photocells C2 reclosing during opening by photocells C3 partial stop C4 obstruction wait C7 Input O...

Page 42: ...ing to each one a function of choice among those included Enter by using a transmitter or other control device see the ENTERING A NEW USER paragraph Modify user To edit the function associated to the user see EDIT USER paragraph Remove Usr To remove a user Confirm removal with ENTER Backup data To save system users and settings in Memory Roll Confirm saving with ENTER Restore backup For uploading th...

Page 43: ...er of figure Confirm text by pressing the ENTER key for some seconds Info menu FW version View the firmware version Manoeuvres no View the number of completed maneuvers 2 Select the function to associate to the user Press ENTER to confirm 1 From the RADIO USRS menu select New User Press ENTER to confirm 4 Once the code is entered the following wording will appear Saved or if the code is already in...

Page 44: ...ess ENTER to confirm 4 it will then close until the strike plate 3 The gate will open until the mechanical stop Gate run adjustments Before calibrating the gate travel position the gate half way check that the maneuvering area is clear of any obstruction and check that there are mechanical opening and closing stops The mechanical end stops are obligatory Important During the calibration all safety...

Page 45: ...ches set to OFF into the control board s connector connect the two control boards using a CAT 5 type cable max 1 000 m to terminals 2 2 A A B B connect the control and safety devices onto the MASTER operator s control board If the system fits sensitive safety edges on the SLAVE gate leaf connect them to the terminals on the SLAVE control board Programming For the MASTER control board from the Adju...

Page 46: ... only once the connections are complete and the system is started up RELEASING THE GEARMOTOR This procedure must be done with the main power cut off Manually releasing the operator may result in uncontrolled movement of the gate if this has any mechanical problems or is unbalanced When the release hatch door is open the operator cannot work RELEASING LOCKING ...

Page 47: ... batteries of call for assistance The gate opens but does not close The photocells are soiled Clean and check that the photocells work properly Otherwise call for assistance ERROR MESSAGE Error messages appear on the display Release Active Open release hatch door STOP Active Contact 1 2 NC open Services test Error Malfunctioning safety devices or wrong connection Cycle Time Insufficient working ti...

Page 48: ..._____________________________________ __________________________________________________________________________________________ DISMANTLING AND DISPOSAL CAME S p A applies a certified Environmental Management System at its premises which is compliant with the UNI EN ISO 14001 standard to ensure the environment is safeguarded Please continue safeguarding the environment At CAME we consider it one ...

Page 49: ...MANUEL D INSTALLATION BK 221 Automatisme pour portails coulissants Français FA01130 FR ...

Page 50: ...BSTACLE DANS CELUI DE L AUTOMATISME NE PAS PERMETTRE AUX ENFANTS DE JOUER AVEC LES DISPOSITIFS DE COMMANDE FIXES OU DE STATIONNER DANS LA ZONE DE MANŒUVRE DU PORTAIL CONSERVER HORS DE LEUR PORTÉE LES DISPOSITIFS DE COMMANDE À DISTANCE ÉMETTEURS OU TOUT AUTRE DISPOSITIF DE COMMANDE AFIN D ÉVITER L ACTIONNEMENT INVOLONTAIRE DE L AUTOMATISME L APPAREIL PEUT ÊTRE UTILISÉ PAR DES ENFANTS ÂGÉS D AU MOIN...

Page 51: ...moteur C 150 Poids Kg 21 DESCRIPTION Automatisme avec carte électronique afficheur pour la programmation des fonctions dispositif de contrôle du mouvement et détection de l obstacle pour portails coulissants jusqu à 2200 kg et 20 m de long Utilisation prévue L automatisme a été conçu pour motoriser des portails coulissants à usage collectif ou industriel Toute installation et toute utilisation aut...

Page 52: ...ue 4 Couvercle frontal 5 Plaque de fixation 6 Support de carte électronique 7 Ailettes de fin de course 8 Fin de course mécanique 9 Ventilateur 10 Transformateur 11 Volet de déblocage 12 Clé de déblocage Installation standard 1 Automatisme 2 Ailettes de fin de course 3 Crémaillère 4 Sélecteur à clé 5 Feu clignotant 6 Antenne 7 Photocellules 8 Colonne pour photocellules 9 Butée d arrêt 10 Bord sens...

Page 53: ...rcuit de protection sont bien dotées d une isolation supplémentaire par rapport aux autres parties conductrices internes Prévoir des tuyaux et des conduites pour le passage des câbles électriques afin de les protéger contre la détérioration mécanique Outils et matériel S assurer de disposer de tous les instruments et de tout le matériel nécessaire pour effectuer l installation en toute sécurité et...

Page 54: ...annelées Creuser la fosse pour le coffrage Préparer les gaines annelées pour les raccordements issus du boîtier de dérivation Il est conseillé de prévoir un tuyau annelé Ø 40 mm pour la connexion du motoréducteur et des tuyaux Ø 25 mm pour les accessoires Le nombre de gaines dépend du type d installation et des accessoires prévus Pose de la plaque de fixation Préparer un coffrage plus grand que la...

Page 55: ...ndiquées sur le dessin Attention Les tuyaux doivent passer à travers les trous prévus Remplir le coffrage de ciment la plaque doit être parfaitement nivelée et avec le filetage des vis totalement en surface Attendre que le tout se solidifie pendant au moins 24 heures Enlever le coffrage et remplir de terre le trou autour du bloc de ciment Enlever les écrous des vis Introduire les câbles électrique...

Page 56: ...otoréducteur sur la plaque de fixation Attention Les câbles électriques doivent passer sous le carter du motoréducteur Soulever le motoréducteur de 5 à 10 mm de la plaque en intervenant sur les pieds filetés afin de permettre par la suite les éventuels réglages entre pignon et crémaillère Préparation du motoréducteur Enlever le couvercle frontal et le couvercle du motoréducteur ...

Page 57: ... poser la crémaillère sur le pignon du motoréducteur souder ou fixer la crémaillère au portail sur toute sa longueur Pour l assemblage des modules de la crémaillère positionner un morceau de rebut de cette dernière sous le point de jonction et le bloquer au moyen de deux mors Réglage de l accouplement pignon crémaillère Ouvrir et fermer le portail manuellement et régler la distance de l accoupleme...

Page 58: ...l ailette de fin de course d ouverture sur la crémaillère jusqu au déclic du micro interrupteur ressort et la fixer à l aide des goujons op En phase de fermeture fermer le portail q enfiler l ailette de fin de course de fermeture sur la crémaillère jusqu au déclic du micro interrupteur ressort et la fixer à l aide des goujons rs Ressort Fixation du motoréducteur Au terme du réglage fixer le motoréducte...

Page 59: ...es les connexions sont protégées par des fusibles rapides L automatisme a été prévu pour une installation à gauche En cas d installation à droite inverser les câbles du motoréducteur U V et des butées de fin de course FA FC Description des parties 1 Bornier d alimentation 2 Bornier de connexion du transformateur 3 Bornier de connexion pour motoréducteur 4 Bornier de connexion des dispositifs de co...

Page 60: ...Pour reprendre le mouvement appuyer sur le bouton de commande ou celui d un autre dispositif de commande S il n est pas utilisé sélectionner OFF par le biais de la fonction STOP 1 dans le menu FONCTIONS Fonction OUVERTURE UNIQUEMENT depuis un dispositif de commande contact NO Fonction OUVERTURE ARRÊT FERMETURE ARRÊT séquentielle ou OUVERTURE FERMETURE INVERSION pas à pas depuis un dispositif de co...

Page 61: ... provoque l inversion du mouvement jusqu à ouverture totale du portail C2 pour la refermeture durant l ouverture Durant la phase d ouverture du portail l ouverture du contact provoque l inversion du mouvement jusqu à fermeture totale du portail C3 arrêt partiel Arrêt du portail en mouvement avec fermeture automatique si la fonction de fermeture automatique a été activée C4 attente obstacle Arrêt d...

Page 62: ...réouverture durant la fermeture Durant la phase de fermeture du portail l ouverture du contact provoque l inversion du mouvement jusqu à ouverture totale du portail C8 refermeture durant l ouverture Durant la phase d ouverture du portail l ouverture du contact provoque l inversion du mouvement jusqu à fermeture totale du portail En cas de non utilisation des contacts C7 et C8 les désactiver durant...

Page 63: ...commandes de programmation Pour entrer dans le menu maintenir la touche ENTER enfoncée pendant au moins une seconde Pour choisir l option de menu se déplacer à l aide des flèches puis appuyer sur ENTER Utiliser les flèches également pour se déplacer dans les sous menus Si les flèches sont sur la fonction Durée Fonctionn il est possible d en modifier la valeur Se servir des flèches pour augmenter o...

Page 64: ... Défaut Nouv Utilisa 250 max Fonction 2 7 Seul Ouv Partiel Modif Utilis Sup Utilisa Sauv mémoire Charg mémoire Annuler tous Confirmer Non Confirmer Oui ÉTALONNAGE Défaut Auto app Course Ralentissement 0 40 10 Vitesse Ralent ON OFF OFF Sens course Sens ralenti Ouv Partielle 10 80 30 ENCODEUR ON OFF ON Ad réseau Désactivé Master Slave Désactivé Message Ini INFO Version fw Nbre manœuvres Significatio...

Page 65: ...ande même radio sont désactivés Entrée CX Désactivé C1 C2 C3 C4 Entrée NF Possibilité d associer C1 réouverture durant la fermeture pour photocellules C2 refermeture durant l ouverture pour photocellules C3 arrêt partiel C4 attente obstacle Entrée CY Désactivé C1 C2 C3 C4 Entrée NF Possibilité d associer C1 réouverture durant la fermeture pour photocellules C2 refermeture durant l ouverture pour p...

Page 66: ...voir paragraphe INSERTION NOUVEL UTILISATEUR Modif Utilis Pourmodifier la fonction associée à l utilisateur voir paragraphe MODIFICATION DE L UTILISATEUR Sup Utilisa Pour l élimination d un utilisateur Confirmer l élimination au moyen de la touche ENTER Sauv mémoire Pour sauvegarder les utilisateurs et les configurations de l installation dans la mémoire Confirmer la sauvegarde au moyen de la touche E...

Page 67: ...re ou le chiffre Confirmer en appuyant quelques secondes sur ENTER Menu infos Version fw Visualise la version du firmware Nbre manœuvres Visualise le nombre de manœuvres effectuées 2 Choisir la fonction à associer à l utilisateur Appuyer sur ENTER pour confirmer 1 Dans le menu RADIO UTILISA sélectionner Nouv Utilisa Appuyer sur ENTER pour confirmer 4 Après la saisie du code l écran affichera le mes...

Page 68: ...ctionner Auto app Course Appuyer sur ENTER pour confirmer 4 puis une manœuvre de fermeture jusqu à la butée 3 Le portail exécutera une manœuvre d ouverture jusqu à la butée d arrêt Auto apprentissage de la course Avant de régler la course amener le portail à mi course s assurer que la zone d actionnement ne présente aucun obstacle et s assurer de la présence d une butée d arrêt mécanique aussi bie...

Page 69: ...tions suivantes sur les deux automatismes Insérer la carte RSE avec micro interrupteurs DIP sur OFF sur le connecteur de la carte connecter les deux cartes à l aide d un câble CAT 5 max 1000 m sur les bornes 2 2 A A B B connecter tous les dispositifs de commande et de sécurité sur la carte de l automatisme MAÎTRE En présence de bords sensibles sur le vantail ESCLAVE les connecter sur le bornier de...

Page 70: ... connexions et après avoir contrôlé que tout fonctionne correctement y compris le moteur DÉBLOCAGE DU MOTORÉDUCTEUR Mettre hors tension avant d effectuer cette opération Le déblocage manuel de l automatisme peut provoquer un mouvement incontrôlé du portail si ce dernier présente des problèmes mécaniques ou s il n est pas équilibré Avec le volet de déblocage ouvert il empêche le fonctionnement de l...

Page 71: ...en s adresser à l assistance Le portail s ouvre mais ne se ferme pas Les photocellules sont sales Nettoyer et contrôler le fonctionnement correct des photocellules ou s adresser à l assistance MESSAGES D ERREUR Les messages d erreur sont affichés à l écran Déblocage Activé Volet de déblocage ouvert STOP Activé Contact 1 2 NF ouvert Erreur test services Mauvais fonctionnement des dispositifs de séc...

Page 72: ...EBUT ET ÉLIMINATION CAME S p A adopte dans ses établissements un Système de Gestion Environnementale certifié et conforme à la norme UNI EN ISO 14001 qui garantit le respect et la sauvegarde de l environnement Nous vous demandons de poursuivre ces efforts de sauvegarde de l environnement que CAME considère comme l un des fondements du développement de ses propres stratégies opérationnelles et de m...

Page 73: ...ИНСТРУКЦИЯ ПО МОНТАЖУ BK 221 Автоматика для откатных ворот RU Pусский FA01130 RU ...

Page 74: ...ТЕ СВОБОДНЫМ И ЧИСТЫМ УЧАСТОК ДВИЖЕНИЯ ВОРОТ СЛЕДИТЕ ЗА ТЕМ ЧТОБЫ В ЗОНЕ ДЕЙСТВИЯ ФОТОЭЛЕМЕНТОВ НЕ БЫЛО РАСТИТЕЛЬНОСТИ И ПРЕПЯТСТВИЙ ДЛЯ ДВИЖЕНИЯ ВОРОТ НЕ ПОЗВОЛЯЙТЕ ДЕТЯМ ИГРАТЬ С ПЕРЕНОСНЫМИ ИЛИ ФИКСИРОВАННЫМИ УСТРОЙСТВАМИ УПРАВЛЕНИЯ ИЛИ НАХОДИТЬСЯ В ЗОНЕ ДВИЖЕНИЯ ВОРОТ НЕОБХОДИМО ДЕРЖАТЬ БРЕЛОКИ ПЕРЕДАТЧИКИ И ДРУГИЕ УСТРОЙСТВА УПРАВЛЕНИЯ В НЕДОСТУПНОМ ДЛЯ ДЕТЕЙ МЕСТЕ ВО ИЗБЕЖАНИЕ СЛУЧАЙНОГО ЗАП...

Page 75: ...ИСАНИЕ Автоматический привод укомплектованный блоком управления дисплеем для программирования функций и энкодером с функцией контроля движения и обнаружения препятствий для откатных ворот массой до 2200 кг и шириной до 20 м Назначение Привод предназначен для автоматизации откатных ворот в кондоминиумах и на промышленных объектах Запрещается использовать устройство не по назначению и устанавливать ...

Page 76: ...едняя крышка 5 Монтажное основание 6 Держатель платы 7 Упоры концевых выключателей 8 Механический концевой выключатель 9 Вентилятор 10 Трансформатор 11 Дверца разблокировки 12 Устройство разблокировки Вариант типовой установки 1 Автоматика 2 Упоры концевых выключателей 3 Рейка 4 Ключ выключатель 5 Сигнальная лампа 6 Антенна 7 Фотоэлементы 8 Стойки под фотоэлементы 9 Механические упоры 10 Чувствите...

Page 77: ...стями была предусмотрена дополнительная изоляция Приготовьте лотки и каналы для проводки кабеля гарантирующие надежную защиту от механических повреждений Инструменты и материалы Перед началом монтажных работ убедитесь в наличии всех необходимых инструментов и материалов которые позволят произвести установку системы в полном соответствии с действующими нормами безопасности На рисунке представлен ми...

Page 78: ...б Выполните выемку грунта под опалубку Подготовьте трубы и гофрошланги для проводов и кабелей идущих от разветвительного колодца Для подключения привода рекомендуется использовать гофрированную трубу Ø40 мм а для аксессуаров трубы Ø25 мм Количество гофрошлангов зависит от варианта автоматической системы и предусмотренных дополнительных устройств Установите монтажное основание Подготовьте опалубку ...

Page 79: ...ия Внимание Трубы должны проходить через специально предусмотренные для этого отверстия Заполните опалубку цементным раствором Монтажное основание должно быть абсолютно ровным резьба винтов должна находиться полностью на поверхности Подождите не менее 24 часов чтобы раствор полностью затвердел Удалите опалубку засыпьте пространство вокруг цементного блока землей Отвинтите гайки и снимите их с винт...

Page 80: ...го уведомления Установите привод на монтажное основание Внимание Электрические кабели должны проходить под корпусом привода Приподнимите привод над монтажным основанием на 5 10 мм используя стальные регулировочные шпильки чтобы позднее произвести регулировку зацепления между шестерней и зубчатой рейкой Подготовка привода Снимите переднюю крышку и крышку привода ...

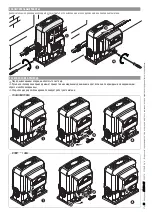
Page 81: ...привод смотрите раздел о разблокировке привода установите зубчатую рейку на шестерню привода приварите или прикрепите зубчатую рейку к воротам по всей длине При соединении модулей используйте дополнительный кусок рейки и две С образные струбцины Регулировка расстояния между шестерней и рейкой Откройте и закройте ворота вручную затем отрегулируйте расстояние от шестерни до зубчатой рейки используя ...

Page 82: ...овите упор концевого выключателя открывания на зубчатую рейку так чтобы он соприкасался с микровыключателем пружиной и зафиксируйте его винтами op При закрывании закройте ворота q установите упор концевого выключателя закрывания на зубчатую рейку так чтобы он соприкасался с микровыключателем пружиной и зафиксируйте его винтами rs Пружина Крепление привода По окончании регулировки зафиксируйте прив...

Page 83: ...ляется с помощью графического дисплея Все подключения защищены плавкими предохранителями Автоматика предназначена для левосторонней установки В случае правосторонней установке поменяйте местами фазы привода U V и концевых выключателей FA FC Основные компоненты 1 Контакты электропитания 2 Контакты подключения трансформатора 3 Контакты подключения двигателя 4 Контакты подключения устройств управлени...

Page 84: ...движение ворот с последующим исключением цикла автоматического закрывания Чтобы автоматика возобновила движение необходимо нажать соответствующую кнопку управления или брелока передатчика Если не используется выберите OFF для функции STOP 1 в меню FUNCTIONS Функция ТОЛЬКО ОТКРЫТЬ с помощью устройства управления Н О контакты Функция ОТКРЫТЬ СТОП ЗАКРЫТЬ последовательный режим ОТКРЫТЬ ЗАКРЫТЬ ИЗМЕНИ...

Page 85: ...о время закрывания ворот приводит к изменению направления движения на противоположное вплоть до полного открывания C2 Закрывание в режиме открывания Размыкание контактов во время открывания ворот приводит к изменению направления движения на противоположное вплоть до полного закрывания С3 Частичный стоп Остановка ворот и начало отсчета времени автоматического закрывания если эта функция выбрана C4 ...

Page 86: ...t в C7 Открывание в режиме закрывания Размыкание контактов во время закрывания ворот приводит к изменению направления движения на противоположное вплоть до полного открывания C8 Закрывание в режиме открывания Размыкание контактов во время открывания ворот приводит к изменению направления движения на противоположное вплоть до полного закрывания Если контакты C7 и C8 не используются отключите их при...

Page 87: ...значения выбранного параметра Символы на дисплее отмечают текущий выбранный пункт меню ПРОГРАММИРОВАНИЕ Описание устройств программирования Чтобы войти в меню нажмите кнопку ВВОД ENTER и удерживайте ее не менее 1 секунды Используйте кнопки со стрелками для перемещения с одной строки меню на другую затем нажмите кнопку ВВОД ENTER Те же кнопки используются для перехода в подменю Стрелки могут быть и...

Page 88: ...Partial Modify User Remove Usr Backup data Restore backup Delete all Usr Do you confirm no Do you confirm yes ADJUSTMENTS По умолчанию Gate Run Adj Slowdown 0 40 10 Slow Down Spd ON OFF OFF Gate run sens Slowdown sens Partial op 10 80 30 ENCODER ON OFF ON Net address Disabled Master Slave Disabled Startup Msg INFO FW Version Manoeuvres No Значение сокращений в пунктах меню Partial op Частичное отк...

Page 89: ...ройства управления включая брелоки передатчики заблокированы CX Input Disabled C1 C2 C3 C4 Вход Н З контакты Возможность присвоить C1 открывание в режиме закрывания C2 закрывание во время открывания при срабатывании фотоэлементов C3 частичный стоп C4 обнаружение препятствия CY Input Disabled C1 C2 C3 C4 Вход Н З контакты Возможность присвоить C1 открывание в режиме закрывания C2 закрывание во врем...

Page 90: ... Добавление осуществляется с помощью брелока передатчика или другого устройства управления см раздел ДОБАВЛЕНИЕ НОВОГО ПОЛЬЗОВАТЕЛЯ Modify User Об изменении функции присвоенной пользователю смотрите раздел ИЗМЕНЕНИЕ ПОЛЬЗОВАТЕЛЯ Remove Usr Функция удаления пользователя Для подтверждения удаления нажмите ВВОД ENTER Backup data Функция сохранения пользователей и настроек системы в карте памяти Для п...

Page 91: ...боты в синхронном режиме Startup Msg Отображает приветственное сообщение Для изменения текста нажмите клавишу ВВОД ENTER Используйте клавишу ВВОД для перемещения курсора вперед ВЫХОД ESC для перемещения курсора назад и для выбора цифр или букв Для подтверждения удерживайте ENTER в течение нескольких секунд Меню Информация FW Version Отображает версию прошивки Manoeuvres No Указывает число циклов р...

Page 92: ...ию Подтвердите нажав ENTER Изменение пользователя изменение функции 2 На дисплее появится надпись Press a key Нажмите любую кнопку чтобы выполнить калибровку хода 1 В меню Adjustments выберите Gate Run adj Подтвердите нажав ENTER 4 затем полностью закроется 3 Створка ворот полностью откроется Калибровка движения Перед тем как отрегулировать движение створок установите ворота в средней точке траект...

Page 93: ...ствия для обеих автоматических систем вставьте плату RSE с dip переключателями установленными в положение OFF в разъем платы подключите две платы кабелем типа CAT 5 макс 1000 м к контактам 2 2 A A B B подключите все устройства управления и безопасности к плате управления ведущей автоматики MASTER Если в системе используются чувствительные профили на воротах SLAVE подключите их к клеммной колодке п...

Page 94: ...ЕЛЬНЫЕ РАБОТЫ Заключительные проверки необходимо осуществить после выполнения всех подключений и включения автоматики РАЗБЛОКИРОВКА ПРИВОДА Перед выполнением операции обесточьте систему Ручная разблокировка привода может привести к неожиданному движению ворот если они повреждены или надлежащим образом несбалансированы Открытая дверца разблокировки блокирует работу автоматики РАЗБЛОКИРОВКА БЛОК ...

Page 95: ...Ворота только открываются Загрязнились фотоэлементы Очистите фотоэлементы и проверьте их исправность Если это не решает проблемы обратитесь к установщику СООБЩЕНИЯ ОБ ОШИБКАХ На дисплее появляются сообщения об ошибках Unlock active Дверца доступа к системе разблокировки открыта STOP active Контакты 1 2 Н З разомкнуты Safety test error Неисправность устройств безопасности или неправильное подключен...

Page 96: ...__________________________________________________________ УТИЛИЗАЦИЯ CAMES p A имеетсертификатсистемызащитыокружающейсредыUNIENISO14001 гарантирующийэкологическуюбезопасность на ее заводах Мы просим чтобы вы продолжали защищать окружающую среду САМЕ считает одним из фундаментальных пунктов стратегии рыночных отношений выполнение этих кратких руководящих принципов УТИЛИЗАЦИЯ УПАКОВКИ Упаковочные к...

Reviews: