Caliber AN-3012 User Manual Download Page 23

◄/►

▲/▼

▲/▼

In DVD mode, when the disc is playing or
in stop mode, press the

button to

enter the setup menu.
1. When the SYSTEM SETUP icon in the
upper part of the menu is highlighted, use
the

button to move between the

different setting pages.
2. Press the

button to move the cursor

to the list of options below. Then you can
use the

button to move between the

different setup options
3. Press the

or

button to move

to list of setup options, and the use
button and

button to adjust you

selection.
4. When the setting is finished, press the

button to return to normal mode.

When setting are changed, the

old settings are overwritten. Make note of
the current settings before making
changes. If the vehicle’s battery is
disconnected, the settings will be cleared
and will return to the factory settings
when power is next applied.

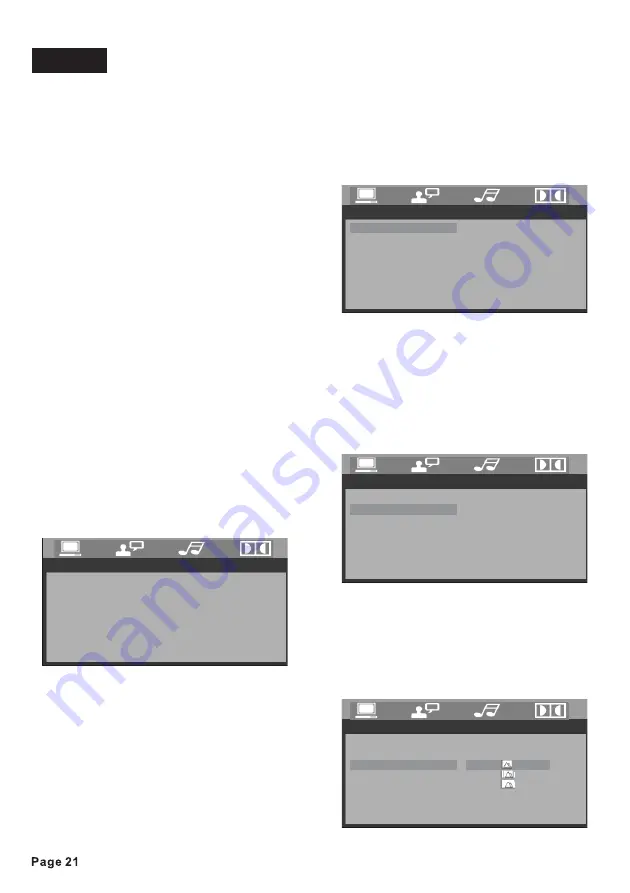
When you first open the setup menu, you
will see the System Setup page:

TV SYSTEM is used to select the TV
output mode. This player can play discs
recorded in either PAL or NTSC formats.

- Select NTSC format when the unit is

connected to an NTSC TV.

- Select PAL format when the unit is

connected to a PAL TV.

- You can also choose AUTO SELECT,

SETUP

ENTER

ENTER

SETUP

NOTE:

System Setup

1) TV SYSTEM

Setup

which will sense the type of monitor
attached to the output and select NTSC
or PAL as need. If you know the type of
monitor, you should choose the type in
this menu rather than letting AUTO select
do it for you. This is because there may
be an small undesirable delay and
flickering of the screen during the AUTO
select process.

Like a computer monitor, video screens
can “burn in” if a still image is displayed
too long on the screen.
This unit features a “screen saver” which
produces a moving image to avoid burn-
in, if SCREEN SAVER is enabled in the
Setup menu.

TV types can vary based on their aspect
ratio. The common monitors fall into one
of three catergories: 4:3 (PS/Pan and
Scan), 4:3 (LB/ Letterbox) or 16:9
(Widescreen).

2) SCREEN SAVER

3) SETTING the TV TYPE

SYSTEM SETUP

EXIT SETUP

TV SYSTEM
SCREEN SAVER
TV TYPE
PASSWORD

RATING
DEFAULT

SYSTEM SETUP

EXIT SETUP

SCREEN SAVER
TV TYPE
PASSWORD
RATING
DEFAULT

AUTO

PAL
NTSC

TV SYSTEM

SYSTEM SETUP

EXIT SETUP

TV TYPE
PASSWORD
RATING
DEFAULT

ON

OFF

TV SYSTEM

SCREEN SAVER

SYSTEM SETUP

EXIT SETUP

PASSWORD
RATING
DEFAULT

TV SYSTEM

SCREEN SAVER

TV TYPE

4:3PS

4:3LB
16:9

Summary of Contents for AN-3012

Page 1: ...t Port Remote Control 4 x 40 W High Power Output AM FM 2 Band Radio 3 0 Widescreen Digital TFT LCD Display Fold Down Detachable Panel Anti Shock Mechanism ISO Connectors for Power Supply and Speaker O...

Page 2: ...rations 18 AV in operations Setup 2 Attachment 2 Trouble hooting 2 Specifications Location and function of keys ing the remote control 9 o 10 o 11 AV menu settings 13 Disc o 5 Special disc o 17 Data d...

Page 3: ...disassembly is prohibited Region Management Information This Mobile DVD Player is designed and manufactured to respond to the Region Management Information that is recorded on a DVD disc If the Regio...

Page 4: ...it where it would be subject to high temperature such as from direct sunlight or from hot air from the heater or where it would be subject to dust dirt or excessive vibration Din Front Rear Mount This...

Page 5: ...r Not all tabs will be able to make contact so examine which ones will be most effective Bending open the appropriate tabs behind the dashboard to secure the sleeve in place 1 DIN FRONT MOUNT Method A...

Page 6: ...t out to remove it 5 Insert both of the supplied keys into the slots at the middle left and right sides of the unit then pull the unit out of the dashboard Using the detachable front panel 2 Grasp the...

Page 7: ...to remain the insulation covering to prevent short circuit or occurs some interfere or burned the unit Ensure insulate all the exposed cable or lead avoid short circuit The PINK BLACK PARKING BRAKE w...

Page 8: ...ine to taillight on the car Taillight To Car Battery To reversing line To taillight Taillight line After connecting at power on state when you start up the reverse gear the unit will receive the pictu...

Page 9: ...Button AS PS Automatic Search Preset memory Scan Button Button UP Button Tune up Seek up next track fast forward BAND Button Button Mini USB Port IR Remote Control Sensor Open Key ST Stereo mono Butto...

Page 10: ...3 19 20 21 22 23 24 25 26 28 29 30 1 2 3 4 5 6 7 8 9 10 11 12 13 14 15 16 17 18 19 20 21 22 Power on off Button MUTE Button DISP Display Button A B Button RPT Repeat Button ZOOM Zoom in Zoom out Butto...

Page 11: ...roof feature So that if the unit skips due to rough road conditions the music or video will be uninterrupted This time of the buffered content varies depending on the disc type In power on mode press...

Page 12: ...on within the current band For fast manual searching press and hold the on the front panel or press and hold the button on the remote control In manual search process if the both buttons haven t been...

Page 13: ...previously stored station PICTURE DEFAULT BRI 32 CON 32 COL 32 TINT 32 Clock AM10 06 System TIME M 12 Setup MENU AV menu settings AV Menu Overwiew MENU MENU ENTER VOL VOL MODE MENU You can adjust var...

Page 14: ...on on the remote control Audio Menu Volume level Bass level Treble level Balance Fader Equalization Loudness Sub woofer 1 the button on the front panel or press the or button on the remote control the...

Page 15: ...Default VOL VOL MENU ENTER 1 the button on the front panel or press the or button on the remote control the item you have selected 0 63 Adjust this setting if the picture is too bright or too dark 0...

Page 16: ...modes ENTER FORWARD BACKWARD RPT Single Track Selection Fast Forward Fast Reverse Pause Playback Stopping Playback Repeat Playback 2 For different kinds of disc pressing the button has different effe...

Page 17: ...nging the audio language during playback In these cases select audio language from the TITLE PBC ENTER For DVD SUB T Notes For DVD AUDIO Note Special Disc operations DVD s menu Some VCD SVCD discs whi...

Page 18: ...Information PROG PLAY CLEAR PROG PLAY CLEAR For VCD CD MP3 JPEG 1 Disc type 2 Playback information TT 1 3 CH 1 1 TRK 9 18 3 Time indication T T C C 4 Audio language or audio channel indication 5 Subti...

Page 19: ...insert a data disc containing audio MP3 movie MPEG4 or picture JPEG files into the disc slot the following main menu will appear Press the button on the remote control to switch to the following inter...

Page 20: ...e battery burst USB operations Using the SD MMC card MODE Note The DVD player features a SD MMC memory card slot When you insert a SD MMC card into the memory card slot the DVD player will read the SD...

Page 21: ...inuously on the TFT LCD display You have to active automatic call reception so that the mobile phone accepts incoming calls automatically In many countries this is a prerequisite for legal operation o...

Page 22: ...on on the remote control or Note If a new phone number has been saved the previous number has been deleted at the same time c Dialling from the phone number memory d Switch auto or manual answer 10 Vo...

Page 23: ...ct PAL format when the unit is connected to a PAL TV You can also choose AUTO SELECT SETUP ENTER ENTER SETUP NOTE System Setup 1 TV SYSTEM Setup which will sense the type of monitor attached to the ou...

Page 24: ...he Parental Controls settings to prevent a young person from changing the settings without permission The factory default password is 0000 If you wish to change it enter 0000 and when prompted enter a...

Page 25: ...GLISH GERMAN SPANISH FRENCH PORTUGUESE ITALIAN RUSSIAN POLISH ENGLISH GERMAN SPANISH FRENCH PORTUGUESE ITALIAN RUSSIAN POLISH 1 AUDIO OUT Change among SPDIF OFF SPDIF RAW and SPDIF PCM 2 KEY Change am...

Page 26: ...censorship has occurred Attachment 1 2 3 4 5 6 7 8 Unlock Unlock KID SAFE G PG PG 13 PG R R NC 17 ADULT Playing MP3 discs What is MP3 Corresponding file systems Playing a JPEG disc MP3 MPEG 1 Audio L...

Page 27: ...s faulty please first consult this checklist It may be that something simple has been overlooked Under no circumstances should you try to repair the player yourself as this will void the warranty Only...

Page 28: ...Resolution 240RGB 400 pixels Specifications No Sound The Player Does Not Respond to the Remote Control Check the audio connections Aim the remote control directly at the sensor on the front of the pla...

Page 29: ......

Reviews: