Caliber AN-3012 User Manual Download Page 12

LOC

VOL 32

1

Radio operations

playback, press the

button to

switch to a different mode, when you next
return to the previous disc, USB, SD/
MMC card playback mode again, the unit
will resume playing from the point that it
was interrupted.

MODE

To select the radio mode

Press the

button to access the

source interface, then

to select

MODE

press the

/

or

/

button on the front panel or press

the

/

,

/

or

button on the

remote control

the radio mode.

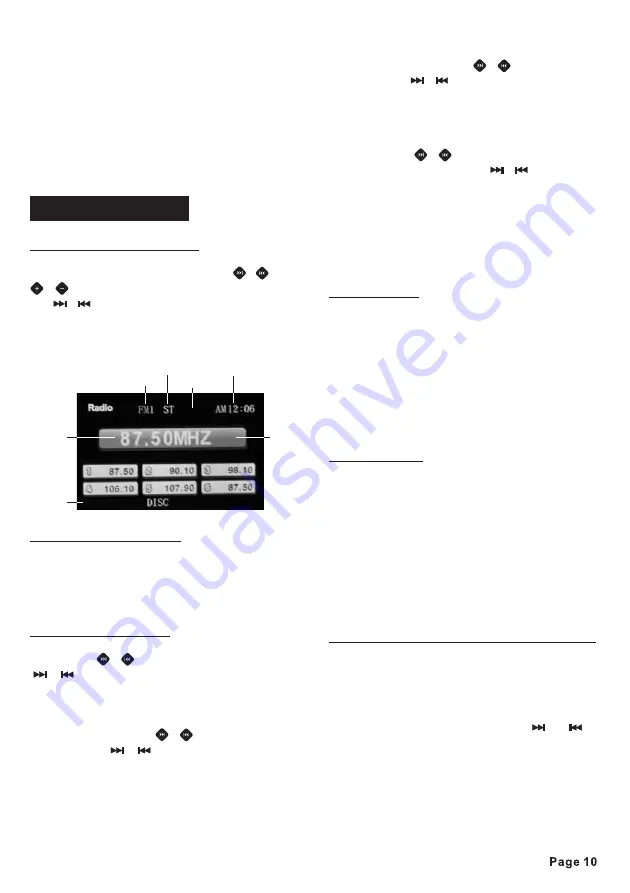
You will see the following radio screen on
the

one of the five

◄ ►

▲/▼

TFT screen.

In radio mode, Press the

button

repeatedly to select

radio

broadcasting bands: ->FM 1-> FM 2 ->
FM 3 -> AM 1 -> AM 2.

Press the

/

on the front panel or the

/

button on the remote control, the

automatic search will start. It will search
upward or downward for the strong signal
radio station within the current band.
Press and hold the

/

on the front

panel or the

/

button on the remote

control, until “MANU” appears on the TFT
screen, it will change into manual
searching mode. Press the ▲/▼ button
on the remote control can also change
into manual searching mode.

To select a radio band

Auto/ Manual tuning

BAND

- Automatic search mode:

- Manual search mode:

Repeatedly press the

/

on the front

panel or the

/

or ▲/▼ button on the

remote control to manually search
upward or downward step by step for the
desired radio station within the current
band. For fast manual searching, press
and hold the

/

on the front panel, or

press and hold the ▲/▼,

/

button on

the remote control.
In manual search process, if the both
buttons haven’t been pressed within 5
seconds, it will change into automatic
search mode automatically. “MANU”
disappears on the TFT screen.

FM station is received in stereo mode.
However, if the signal weak or reception
is not as good as you would like,
switching to MONO mode usually
improves the overall sound quality

preset station button

to save the station you

are listening to

Stereo/Mono

Local/Distant

Press the

button on the front

panel or briefly press

on the

remote control to choose FM STEREO or
MONO audio effect.

In urban settings, most stations are
strong enough and it should be set in
LOCAL mode.
Switch to DX (distant) mode to search for
stations with weaker signals.
Press and hold the

button on the

front panel or briefly press the
button on the remote control to choose
local reception or DX(distant) reception
mode.

You can store up to a total of 30 radio
stations in the memory (18 FM,12 AM),
manually or automatically.

- Select a band (if needed)
- Select a station by using the

or

button, refer to auto / manual tuning.

- Hold a

(1-6) for at

least 2 seconds

.

- Select a band (if needed).
- Press a preset button (1-6) briefly to

ST/LOC

MO/ST

ST/LOC

LO/DX

- To store a station:

- To recall a station:

To store / recall a preset radio stations

Stereo/mono

Local/distant

Radio band

Frequency

Clock

Volume

Preset
station
number

Summary of Contents for AN-3012

Page 1: ...t Port Remote Control 4 x 40 W High Power Output AM FM 2 Band Radio 3 0 Widescreen Digital TFT LCD Display Fold Down Detachable Panel Anti Shock Mechanism ISO Connectors for Power Supply and Speaker O...

Page 2: ...rations 18 AV in operations Setup 2 Attachment 2 Trouble hooting 2 Specifications Location and function of keys ing the remote control 9 o 10 o 11 AV menu settings 13 Disc o 5 Special disc o 17 Data d...

Page 3: ...disassembly is prohibited Region Management Information This Mobile DVD Player is designed and manufactured to respond to the Region Management Information that is recorded on a DVD disc If the Regio...

Page 4: ...it where it would be subject to high temperature such as from direct sunlight or from hot air from the heater or where it would be subject to dust dirt or excessive vibration Din Front Rear Mount This...

Page 5: ...r Not all tabs will be able to make contact so examine which ones will be most effective Bending open the appropriate tabs behind the dashboard to secure the sleeve in place 1 DIN FRONT MOUNT Method A...

Page 6: ...t out to remove it 5 Insert both of the supplied keys into the slots at the middle left and right sides of the unit then pull the unit out of the dashboard Using the detachable front panel 2 Grasp the...

Page 7: ...to remain the insulation covering to prevent short circuit or occurs some interfere or burned the unit Ensure insulate all the exposed cable or lead avoid short circuit The PINK BLACK PARKING BRAKE w...

Page 8: ...ine to taillight on the car Taillight To Car Battery To reversing line To taillight Taillight line After connecting at power on state when you start up the reverse gear the unit will receive the pictu...

Page 9: ...Button AS PS Automatic Search Preset memory Scan Button Button UP Button Tune up Seek up next track fast forward BAND Button Button Mini USB Port IR Remote Control Sensor Open Key ST Stereo mono Butto...

Page 10: ...3 19 20 21 22 23 24 25 26 28 29 30 1 2 3 4 5 6 7 8 9 10 11 12 13 14 15 16 17 18 19 20 21 22 Power on off Button MUTE Button DISP Display Button A B Button RPT Repeat Button ZOOM Zoom in Zoom out Butto...

Page 11: ...roof feature So that if the unit skips due to rough road conditions the music or video will be uninterrupted This time of the buffered content varies depending on the disc type In power on mode press...

Page 12: ...on within the current band For fast manual searching press and hold the on the front panel or press and hold the button on the remote control In manual search process if the both buttons haven t been...

Page 13: ...previously stored station PICTURE DEFAULT BRI 32 CON 32 COL 32 TINT 32 Clock AM10 06 System TIME M 12 Setup MENU AV menu settings AV Menu Overwiew MENU MENU ENTER VOL VOL MODE MENU You can adjust var...

Page 14: ...on on the remote control Audio Menu Volume level Bass level Treble level Balance Fader Equalization Loudness Sub woofer 1 the button on the front panel or press the or button on the remote control the...

Page 15: ...Default VOL VOL MENU ENTER 1 the button on the front panel or press the or button on the remote control the item you have selected 0 63 Adjust this setting if the picture is too bright or too dark 0...

Page 16: ...modes ENTER FORWARD BACKWARD RPT Single Track Selection Fast Forward Fast Reverse Pause Playback Stopping Playback Repeat Playback 2 For different kinds of disc pressing the button has different effe...

Page 17: ...nging the audio language during playback In these cases select audio language from the TITLE PBC ENTER For DVD SUB T Notes For DVD AUDIO Note Special Disc operations DVD s menu Some VCD SVCD discs whi...

Page 18: ...Information PROG PLAY CLEAR PROG PLAY CLEAR For VCD CD MP3 JPEG 1 Disc type 2 Playback information TT 1 3 CH 1 1 TRK 9 18 3 Time indication T T C C 4 Audio language or audio channel indication 5 Subti...

Page 19: ...insert a data disc containing audio MP3 movie MPEG4 or picture JPEG files into the disc slot the following main menu will appear Press the button on the remote control to switch to the following inter...

Page 20: ...e battery burst USB operations Using the SD MMC card MODE Note The DVD player features a SD MMC memory card slot When you insert a SD MMC card into the memory card slot the DVD player will read the SD...

Page 21: ...inuously on the TFT LCD display You have to active automatic call reception so that the mobile phone accepts incoming calls automatically In many countries this is a prerequisite for legal operation o...

Page 22: ...on on the remote control or Note If a new phone number has been saved the previous number has been deleted at the same time c Dialling from the phone number memory d Switch auto or manual answer 10 Vo...

Page 23: ...ct PAL format when the unit is connected to a PAL TV You can also choose AUTO SELECT SETUP ENTER ENTER SETUP NOTE System Setup 1 TV SYSTEM Setup which will sense the type of monitor attached to the ou...

Page 24: ...he Parental Controls settings to prevent a young person from changing the settings without permission The factory default password is 0000 If you wish to change it enter 0000 and when prompted enter a...

Page 25: ...GLISH GERMAN SPANISH FRENCH PORTUGUESE ITALIAN RUSSIAN POLISH ENGLISH GERMAN SPANISH FRENCH PORTUGUESE ITALIAN RUSSIAN POLISH 1 AUDIO OUT Change among SPDIF OFF SPDIF RAW and SPDIF PCM 2 KEY Change am...

Page 26: ...censorship has occurred Attachment 1 2 3 4 5 6 7 8 Unlock Unlock KID SAFE G PG PG 13 PG R R NC 17 ADULT Playing MP3 discs What is MP3 Corresponding file systems Playing a JPEG disc MP3 MPEG 1 Audio L...

Page 27: ...s faulty please first consult this checklist It may be that something simple has been overlooked Under no circumstances should you try to repair the player yourself as this will void the warranty Only...

Page 28: ...Resolution 240RGB 400 pixels Specifications No Sound The Player Does Not Respond to the Remote Control Check the audio connections Aim the remote control directly at the sensor on the front of the pla...

Page 29: ......

Reviews: