background image

Product Description 1-9

What Is the DIGITAL MultiSwitch Fast Ethernet Hub 924TX?

DIGITAL MultiSwitch Fast Ethernet Hub 924TX Back Panel

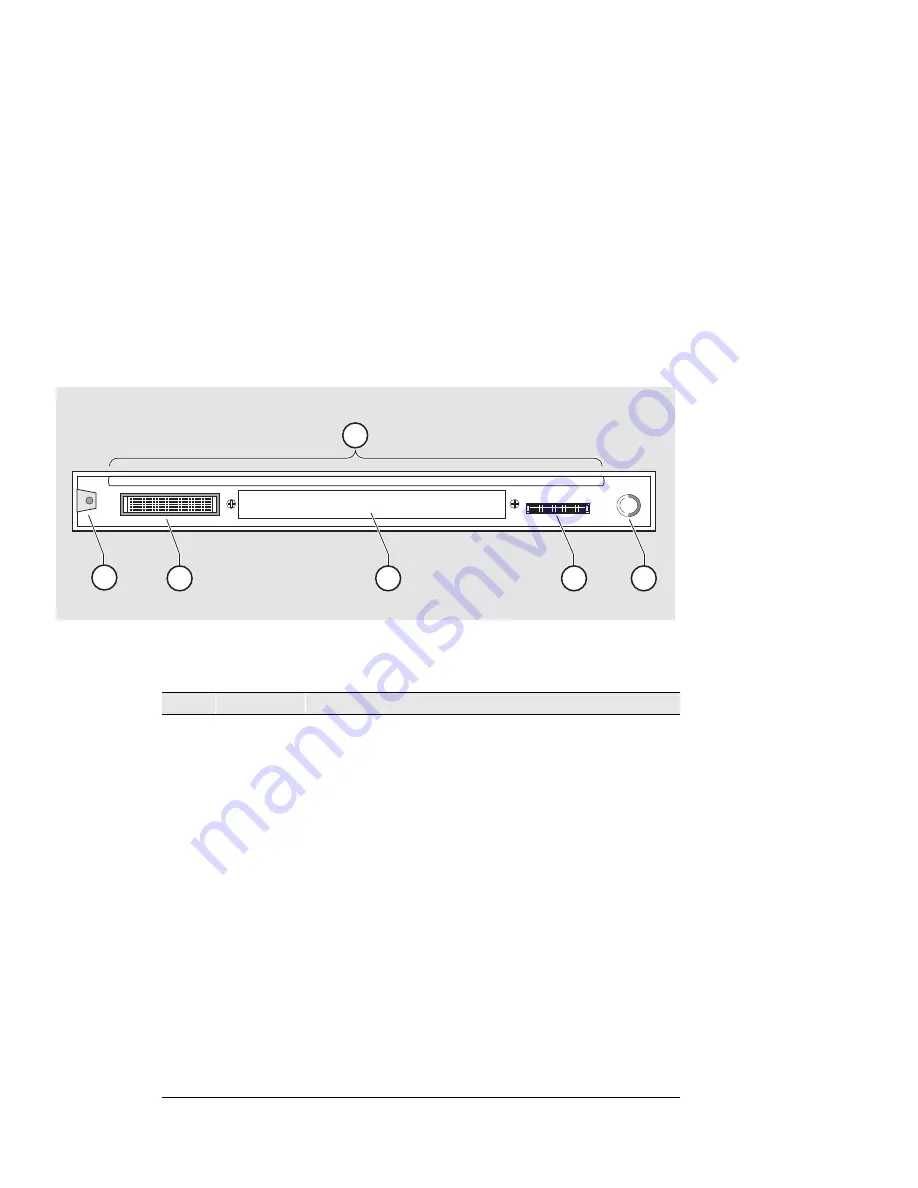
Figure 1-3 shows the location of the DIGITAL MultiSwitch Fast Ethernet Hub 924TX 
back panel components and Table 1-2 describes these components.

Figure  1-3: 

DIGITAL MultiSwitch Fast Ethernet Hub 924TX Back Panel

Table  1-2: 

DIGITAL MultiSwitch Fast Ethernet Hub 924TX Back Panel 

Features

Item 

Name

Description

1

Locking 
Tab

Secures the DIGITAL MultiSwitch Fast Ethernet Hub 
924TX to a DIGITAL MultiSwitch 900 chassis or a 
DIGITAL MultiSwitch 900-4.

2

48-pin 
Connector

Provides network and power connections to the DIGITAL 
MultiSwitch Fast Ethernet Hub 924TX when it is installed 
in a DIGITAL MultiSwitch 900 chassis, a DIGITAL 
MultiSwitch 900-4, DEChub ONE docking station or 
DEChub ONE-MX docking station.

3

Manufac-
turing 
Label

Lists the DIGITAL MultiSwitch Fast Ethernet Hub 924TX 
module part number, serial number, revision level, and 
power requirements.

4

160-pin 
Connector

Provides network and power connections to the DIGITAL 
MultiSwitch Fast Ethernet Hub 924TX when it is connected 
to a the DIGITAL MultiSwitch 900 chassis, a DEChub ONE 
docking stations or DEChub ONE-MX docking stations.

5

Mounting 
Tab

Attaches the DIGITAL MultiSwitch Fast Ethernet Hub 
924TX to a DIGITAL MultiSwitch 900, locking receptacle.

6

Grounding 
Strip

Provides chassis grounding between the DIGITAL 
MultiSwitch Fast Ethernet Hub 924TX and the DIGITAL 
MultiSwitch 900 chassis, or the DEChub ONE or DEChub 
ONE-MX docking stations.

NPB-1068-98F

6

4

5

3

1

2

Summary of Contents for 924TX

Page 1: ...This manual describes how to install cable and configure the DIGITAL MultiSwitch Fast Ethernet Hub 924TX when residing in a DIGITAL MultiSwitch 900 formerly the DEChub 900 MultiSwitch DIGITAL MultiSwi...

Page 2: ...o frequency interference Operation of this equipment in a residential area may cause interference in which case the user at his own expense will be required to take whatever measures may be required t...

Page 3: ...Switch Fast Ethernet Hub 924TX Management 1 5 Port Group Switching 1 5 DIGITAL MultiSwitch Fast Ethernet Hub 924TX Port Configuration 1 5 MIB Support 1 6 Remote Monitoring RMON 1 6 DIGITAL MultiSwitch...

Page 4: ...00 2 5 3 Module Installation and Setup Port Cabling Overview 3 1 Introduction 3 1 In This Chapter 3 1 Installing the DIGITAL MultiSwitch Fast Ethernet Hub 924TX in a DIGITAL MultiSwitch 900 3 2 Task 1...

Page 5: ...ess is Complete 4 24 Verifying the Upgrade 4 24 5 Configuring the Module in a DEChub ONE or DEChub ONE MX Overview 5 1 Introduction 5 1 In This Chapter 5 1 Configuring the Module 5 2 1 Restart with Fa...

Page 6: ...m Solving Overview A 1 Introduction A 1 In This Appendix A 1 DIGITAL MultiSwitch Fast Ethernet Hub 924TX LED States A 2 DIGITAL MultiSwitch Fast Ethernet Hub 924TX Problem Solving Using the LEDs A 4 B...

Page 7: ...is Appendix D 1 Ordering Options D 2 E Associated Documentation Overview E 1 Introduction E 1 In This Appendix E 1 Documentation E 2 Accessing Online Information E 4 Documentation Comments E 4 Online...

Page 8: ...viii Glossary Overview Glossary 1 Introduction Glossary 1 In This Glossary Glossary 1 Terms Glossary 2 Index...

Page 9: ...banks of 12 ports each or operate as a single 24 port hub Each bank can have a separate uplink The module has 24 8 pin MJ ports for 100BASE TX connections The 25th and 26th ports support optional Mod...

Page 10: ...Hub 924TX module 4 Provides instructions for configuring the DIGITAL MultiSwitch Fast Ethernet Hub 924TX in a DEChub ONE or a DEChub ONE MX 5 Provides instructions for configuring the DIGITAL MultiSw...

Page 11: ...onventions Conventions This book uses the following conventions Convention Description Bold Type Indicates user input Monospaced Type Indicates system output Return Indicates that you press the Return...

Page 12: ......

Page 13: ...to prevent damage to equipment VORSICHT Enth lt Informationen die beachtet werden m ssen um den Benutzer vor Schaden zu bewahren ACHTUNG Enth lt Informationen die beachtet werden m ssen um die Gerate...

Page 14: ...s de configuraci n y los sustituir por valores por defecto definidos de f brica Se perder n todos los par metros de configuraci n WARNING To prevent personal injury or equipment damage do not insert t...

Page 15: ...uen Gehen Sie immer davon aus da Lichtleiterkabel mit einer Lichtquelle verbunden sind DANGER Certains quipements fibre optique peuvent mettre un rayonnement laser ou infra rouge pouvant provoquer des...

Page 16: ...so DLU puede da arse la imagen del firmware No se debe apagar la unidad ni realizar ninguna operaci n que pueda causar una interrupci n del suministro de la unidad durante la Etapa 3 del mencionado pr...

Page 17: ...age What Is the DIGITAL MultiSwitch Fast Ethernet Hub 924TX 1 3 DIGITAL MultiSwitch Fast Ethernet Hub 924TX Features 1 5 DIGITAL MultiSwitch Fast Ethernet Hub 924TX Management 1 5 Port Group Switching...

Page 18: ...ures 1 14 What is the DIGITAL MultiSwitch 900 4 1 16 DIGITAL MultiSwitch 900 4 Features 1 16 The Management Agent Module 1 17 What are Docking Stations 1 18 DEChub ONE and DEChub ONE MX Docking Statio...

Page 19: ...ort Group Switching In addition each group can have a separate uplink using optional MM 100 option cards Figure 1 1 DIGITAL MultiSwitch Fast Ethernet Hub 924TX and Optional MM 100s The DIGITAL MultiSw...

Page 20: ...hnology to extend the cabling distance to 2 kilometers Installs quickly and can be hot swapped in a DIGITAL MultiSwitch 900 Upgradeable device firmware in nonvolatile flash memory using Trivial File T...

Page 21: ...ce the light network traffic users on the other group Segmenting this way minimizes the number of collisions for both groups Port group configurations can be changed using clearVISN MultiChassis Manag...

Page 22: ...Remote Network Monitoring Information Base RMON MIB The following RMON features and options are available RMON functions are performed concurrently with the module s hub function RMON within the modu...

Page 23: ...L MultiSwitch Fast Ethernet Hub 924TX front panel components and Table 1 1 describes these components For detailed information about the LEDs refer to Appendix A Figure 1 2 DIGITAL MultiSwitch Fast Et...

Page 24: ...A6 B1 through B6 C1 through C6 and D1 through D6 or activity across A1 through A6 and B1 through B6 in one bank 5 Network Activity LEDs Indicates activity across 12 ports in one bank C1 through C6 an...

Page 25: ...Hub 924TX when it is installed in a DIGITAL MultiSwitch 900 chassis a DIGITAL MultiSwitch 900 4 DEChub ONE docking station or DEChub ONE MX docking station 3 Manufac turing Label Lists the DIGITAL Mul...

Page 26: ...a single Class II hub configuration with a switch 1 connected to a DIGITAL MultiSwitch Fast Ethernet Hub 924TX module 2 This connection is made using 100Mb s Fast Ethernet MM 100 Cards The combination...

Page 27: ...wo Class II Hub Configuration 100BufFX Uplink Configuration The 100BASE FX and 100BufFX MMIs are based on the100BASE FX standards When installed in a DIGITAL MultiSwitch Fast Ethernet Hub 924TX the 10...

Page 28: ...ons Configuration Module s Collision Domains Total Uplink s per Configuration Maximum Users A 1 DIGITAL MultiSwitch Fast Ethernet Hub 924TX 1 1 23 B 1 DIGITAL MultiSwitch Fast Ethernet Hub 924TX 2 2 2...

Page 29: ...h 900 DIGITAL MultiSwitch 600 or DEChub 90 modules These modules can be installed in any combination in slots 1 to 8 It has the following advanced hardware features Feature Description 90 Series Compa...

Page 30: ...ors the power system and displays power system messages in the Chassis Status Display The messages provide you with information about the power system status and the amount of power available in the D...

Page 31: ...the power status and available power to its LCD display Allocates power to network modules Deallocates power from network modules when there is a power system failure in a non redundant power configu...

Page 32: ...bility Uses any combination of MultiSwitch 600 modules These separately orderable hardware modules support various networking requirements 900 Series and 600 Seriesmodule Compatibility Uses any combin...

Page 33: ...the DIGITAL MultiSwitch 900 4 Installation and Configuration manual Redundant Power Has an optional power supply available to provide the MultiSwitch 900 4 with a redundant source of power If a singl...

Page 34: ...terminal server In addition the docking station is designed to provide power failover capability and can be configured into a redundant power system with a cable included in a separately orderable re...

Page 35: ...the module The installation and removal instructions in this chapter are applicable to all the cards For detailed information on the available option cards refer to the 100 Mb s Fast Ethernet Modular...

Page 36: ...sections provide instructions for installing and removing an option card Figure 2 1 Optional MMI Cards NOTE When you insert an MM 100 card into option slot A1 or C1 the fixed port for that slot A1x o...

Page 37: ...tents from the box and be sure to keep all original packing materials The card comes packed in protective antistatic material You should not remove the card from the antistatic wrapping material until...

Page 38: ...orm the following steps Figure 2 2 Dust Cover Removal Step Action 1 Using a Phillips head screwdriver loosen the two captive screws on the dust cover 2 Save the dust cover and its attached captive scr...

Page 39: ...on manual Step Action 1 Remove the contents from the box and be sure to keep all original packing materials The card comes packed in protective antistatic material You should not remove the card from...

Page 40: ...Insert the card into the slot opening and slide the card along the card guides until the card s bezel is flush with the module Note To prevent the screws from interfering with the card insertion make...

Page 41: ...iSwitch 900 In This Chapter Topic Page Installing the DIGITAL MultiSwitch Fast Ethernet Hub 924TX in a DIGITAL MultiSwitch 900 3 2 Task 1 Compare the Power Ratings 3 3 Task 2 Seat the Module in the DI...

Page 42: ...ITAL MultiSwitch 900 without turning off power If you are using an MM 100 you may install it in the module before or after installing the module in the DIGITAL MultiSwitch 900 because MM 100s are hot...

Page 43: ...from the 15V power source Although it is listed separately in the Product Specification for the DIGITAL MultiSwitch Fast Ethernet Hub 924TX the 12V requirements are included in the DIGITAL MultiSwitc...

Page 44: ...DIGITAL MultiSwitch 900 as shown in Figure 3 2 Figure 3 2 Seating the Module Step Action 1 Place the module s mounting tab into a mounting slot 1 on the DIGITAL MultiSwitch 900 2 Pull up the release l...

Page 45: ...f the LEDs do not operate as described refer to Appendix A Figure 3 3 LED Verification Stage Description 1 The Power LED lights when power is applied to the module then the module performs a self test...

Page 46: ...tch 900 setup port to a setup port device use the following cables and adapters 1 xx indicates cable length in meters For information on pin assignments refer to Appendix B To connect the DIGITAL Mult...

Page 47: ...t Ethernet Hub 924TX in a DIGITAL MultiSwitch 900 Figure 3 4 Setup Port Cabling Item Description 1 OBM port 2 Setup port 3 Setup port cable 4 Setup port device BN24H H8571 J H8575 A NPG 0020 95F DIGIT...

Page 48: ...s connect correctly to the connected device Before connecting the cables to the port note the guidelines in Table 3 1 and Table 3 2 These guidelines ensure that the sum of crossovers always equal an o...

Page 49: ...ectors and Pin Assignments To disconnect the cables refer to Chapter 6 Step Action 1 Align the release tab 1 on the cable plug with the connector 2 on the module s 100BASE TX port connector 2 Insert t...

Page 50: ......

Page 51: ...E The module must be installed and cabled prior to configuration After configuring the DIGITAL MultiSwitch Fast Ethernet Hub 924TX you can manage the module in the DIGITAL MultiSwitch 900 using clearV...

Page 52: ...mware of an existing module use the Downline Upgrade procedures provided later in this chapter To access the module s setup screen you must choose option 9 Start Redirect Mode Examples of the setup sc...

Page 53: ...se the Start Redirect Mode option from the DIGITAL MultiSwitch 900 INSTALLATION MENU the screen display prompts you for a slot number Type the slot number in which the DIGITAL MultiSwitch Fast Etherne...

Page 54: ...top of the menu The following example shows the dialog associated with this option The installation menu options are as follows Topic Page 1 Restart with Factory Defaults 4 5 2 Restart with Current Se...

Page 55: ...X INSTALLATION MENU Allow approximately one minute for the module to reboot and complete self test CAUTION This action deletes all configured settings and replaces them with factory default values All...

Page 56: ...gured NVRAM storage parameters at their current values Allow approximately one minute for the module to restart The following example shows the dialog associated with this option Enter selection 2 MS...

Page 57: ...module HW B The hardware version RO V1 0 The boot ROM version SW V1 0 The current software version number SysUpTime 00 31 18 Indicates how long the system has been up since the last reset 8 resets Th...

Page 58: ...ails about the last firmware upgrade These lines will not be displayed if a Downline Upgrade has never been performed Interface The In Band or Out of Band Management interface IP Address The IP addres...

Page 59: ...ration options Topic Page 1 Set SNMP Read Write Community 4 10 2 Add SNMP Trap Addresses 4 11 3 Delete SNMP Trap Addresses 4 12 4 Set In Band Interface IP Address 4 13 5 Enable Disable BootP 4 14 Ente...

Page 60: ...ter selection 1 MS FE Hub 924TX slot 8 SET SMNP READ WRITE COMMUNITY Format The format for a community name is a string consisting of 4 to 31 printable Ascii characters that describes the relationship...

Page 61: ...l point for example 16 20 54 156 The following example shows the dialog associated with this option Line Field Description Configure SNMP Trap Addresses 16 20 216 81 This line appears only if the modu...

Page 62: ...NMP Trap Addresses 16 20 216 81 This line appears only if the module has been previously configured Trap address 16 20 216 81 Return Enter the trap address that you have choosen then press the Return...

Page 63: ...ar as 16 20 54 156 Enter the module s new IP address then press the Return key 255 255 255 0 This cell data represents a previously set Subnet Mask During the initial setup this cell default will appe...

Page 64: ...e shows the dialog associated with this option Enter selection 5 MS FE Hub 924TX slot 8 ENABLE DISABLE BOOTP BOOTP is the IP bootstrap protocol BOOTP may be used to obtain the module s IP address subn...

Page 65: ...is displayed first Firmware upgrades are also recorded in the error log The following example shows the display associated with this option NOTE The format for some entries in the error log may be dif...

Page 66: ...dress at the completion of the DLU process If the module has Then you can Been assigned an IP address Use the module s in band interface IP address Not been assigned an IP address Use the IP address o...

Page 67: ...n display appears This screen identifies the option and alerts the user not to interrupt power during the downline load Enter selection 6 DEChub 900 MultiSwitch OWNLINE UPGRADE This process upgrades t...

Page 68: ...le name and press Return The TFTP load host conventions specify the format of the firmware image file name If the file is not in the default TFTP directory enter the complete path name and press Retur...

Page 69: ...The DLU process consists of four stages Table 4 1 explains what happens during each stage of the DLU process Stage Description 1 Transferring the image to the module s temporary storage buffer 2 Veri...

Page 70: ...s stage normally takes 1 minute to complete However due to variations in network configurations load path and traffic levels this stage can take 10 minutes or more The following states indicate that t...

Page 71: ...nagement requests LED display normal operation Hub Manager display 3 The DLU process transfers the new image from the module s temporary storage buffer to the nonvolatile flash memory overwriting the...

Page 72: ...lay Power LED is on Module OK LED is on Port State LED 4 lights green for up to 2 minutes Port State LED 5 lights green for successful completion of the DLU process Port State LED 6 lights green for f...

Page 73: ...e that this stage is in progress Module status not functional or manageable Module cannot respond to management requests LED display Power LED is on Module OK LED is off Port State LEDs flash indicati...

Page 74: ...e The Module OK LED turns on The module becomes fully operational The Hub Manager status display shows the following message Verifying the Upgrade After the DLU process has completed you can verify th...

Page 75: ...ONE MX docking station For installation procedures refer to the DEChub ONE MX Installation or DEChub ONE MX Installation manual NOTE The module must be installed and cabled prior to configuration In...

Page 76: ...dialog associated with this option The installation menu options are as follows Topic Page 1 Restart with Factory Defaults 5 3 2 Restart with Current Settings 5 4 3 Show Current Settings 5 5 4 Configu...

Page 77: ...924TX INSTALLATION MENU Allow approximately one minute for the module to reboot and complete self test CAUTION This action deletes all configured settings and replaces them with factory default value...

Page 78: ...configured NVRAM storage parameters at their current values Allow approximately one minute for the module to restart The following example shows the dialog associated with this option Enter selection...

Page 79: ...e current software version number SysUpTime 00 31 18 Indicates how long the system has been up since the last reset 8 resets The reset count at the time that the last Downline Upgrade was performed En...

Page 80: ...Provides details about the last firmware upgrade These lines will not be displayed if a Downline Upgrade has never been performed Interface The In Band or Out of Band Management interface IP Address T...

Page 81: ...P Read Write Community 5 8 2 Add SNMP Trap Addresses 5 9 3 Delete SNMP Trap Addresses 5 10 4 Set In Band Interface IP Address 5 11 5 Set Out of Band Interface IP Address 5 12 6 Enable Disable BootP 5...

Page 82: ...on Enter selection 1 MS FE Hub 924TX SET SMNP READ WRITE COMMUNITY Format The format for a community name is a string consisting of 4 to 31 printable Ascii characters that describes the relationship b...

Page 83: ...decimal point for example 16 20 54 156 The following example shows the dialog associated with this option Line Field Description Configure SNMP Trap Addresses 16 20 216 81 This line appears only if t...

Page 84: ...gure SNMP Trap Addresses 16 20 216 81 This line appears only if the module has been previously configured Trap address 16 20 216 81 Return Enter the trap address that you have chosen then press the Re...

Page 85: ...l appear as 16 20 54 156 Enter the module s new IP address then press the Return key 255 255 255 0 This cell data represents a previously set Subnet Mask During the initial setup this cell default wil...

Page 86: ...156 This cell data represents a previously set IP address During the initial setup this cell default will appear as 16 20 54 157 Enter the module s IP address then press the Return key 255 255 255 0...

Page 87: ...xample shows the dialog associated with this option Enter selection 6 MS FE Hub 924TX ENABLE DISABLE BOOTP BOOTP is the IP bootstrap protocol BOOTP may be used to obtain the module s IP address subnet...

Page 88: ...s displayed first Firmware upgrades are also recorded in the error log The following example shows the display associated with this option NOTE The format for some entries in the error log may be diff...

Page 89: ...teps The module retains the IP address at the completion of the DLU process If the module has Then you can Been assigned an IP address Use the module s in band interface IP address Not been assigned a...

Page 90: ...screen display appears This screen identifies the option and alerts the user not to interrupt power during the downline load Enter selection 6 OWNLINE UPGRADE This process upgrades the module s firmw...

Page 91: ...ile name and press Return The TFTP load host conventions specify the format of the firmware image file name If the file is not in the default TFTP directory enter the complete path name and press Retu...

Page 92: ...ng module and self test Stage Description 1 The DLU process transports the new firmware image across the network from the TFTP load host and places it into a temporary storage buffer in the module Thi...

Page 93: ...verwriting the old image CAUTION If power is interrupted during Stage 3 of the DLU process the firmware image can become corrupted Do not turn off power to the unit or perform any action that can caus...

Page 94: ...tional Stage Description 4 The module resets runs self test and then begins executing the new firmware image This stage normally takes 1 minute to complete The following states indicate that this stag...

Page 95: ...rade After the DLU process has completed you can verify the firmware upgrade by completing the following steps Step Action 1 Select Option 3 Show Current Settings from the MS FE Hub 924TX INSTALLATION...

Page 96: ...e module is installed into a DEChub ONE or DEChub ONE MX docking station This option provides you with two configuration selections Set port speed Enable or disable Request to Send RTS The following e...

Page 97: ...BM port speed that you select must match the speed of your OBM device NOTE The port speeds at both ends of the communications link must be identical The following example shows the dialog associated w...

Page 98: ...ter selection 2 MS FE Hub 924TX ENABLE DISABLE OUT OF BAND PORT RTS Enable Disable request to send RTS option allows additional control to modem communications When the RTS option is disabled the RTS...

Page 99: ...ow to remove a module and MM 100 option cards from the DIGITAL MultiSwitch 900 In This Chapter Topic Page Removing Modules from the DIGITAL MultiSwitch 900 Hot Swappable 6 2 Removing Cables from the 1...

Page 100: ...e the module from the DIGITAL MultiSwitch 900 complete the following steps see Figure 6 1 Figure 6 1 Removing the Module from a DIGITAL MultiSwitch 900 Step Action 1 Lift the release lever 1 located a...

Page 101: ...rom the module as shown in Figure 6 2 Figure 6 2 100BASE TX Cable Removal on the Module Step Action 1 Push in on the release tab 1 and remove the connector 2 from the module s 100BASE TX port 2 Remove...

Page 102: ...Installation manual Step Action 1 Attach one end of the antistatic wrist strap to your wrist and the other end to the chassis ground CAUTION Static electricity can damage modules and electronic compon...

Page 103: ...s that hold the card in place 4 Grasp the captive screws and disconnect the card from the host module by pulling on the screws 5 Gently slide the card out of the slot 6 Replace the dust caps on the ca...

Page 104: ...924TX Figure 6 4 shows dust cover location and the table describes how to replace the cover Figure 6 4 Dust Cover Replacement Step Action 1 Align the two captive screws with the threaded holes in the...

Page 105: ...DIGITAL MultiSwitch Fast Ethernet Hub 924TX For detailed information about modular media interface LEDs refer to the 100 Mb s Fast Ethernet Modular Media Cards Installation manual In This Appendix To...

Page 106: ...g Yellow On Yellow Blinking 1 Power OK LED Module is not receiving power Module has power N A N A N A 2 Module OK LED Module failed self test or module problem exists Module passed self test Non fatal...

Page 107: ...will blink when LAN2 Group C and D is active 4 Port Status LEDs 1 6 Bad or no connection Port is connected to another operational network device The associated port is disabled by network management...

Page 108: ...MultiSwitch Fast Ethernet Hub 924TX s LEDs Table A 2 lists the states of the LEDs for various error conditions the probable causes and corrective action to take NOTE If sufficient power becomes unava...

Page 109: ...representative to correct the problem Module OK LED is off The module Self test in progress Self test failed Wait for self test to complete If the LED does not light within 60 seconds disconnect the m...

Page 110: ...alized Power off and on If the problem persists either replace the module or contact your service representative to correct the problem Port Status LED is off 1 Connection is bad loose or incorrect ca...

Page 111: ...r to the 100 Mb s Fast Ethernet Modular Media Cards Installation manual In This Appendix Topic Page DIGITAL MultiSwitch Fast Ethernet Hub 924TX Connectors and Pin Assignments B 2 100BASE TX 8 pin MJ P...

Page 112: ...4 fixed port connectors on the DIGITAL MultiSwitch Fast Ethernet Hub 924TX are 100BASE TX 8 pin MJ crossover connectors Table B 1 defines the 8 pin MJ connector pin assignments Figure B 1 shows their...

Page 113: ...nnector pin assignments used on the DIGITAL MultiSwitch 900 and Figure B 2 shows their location Figure B 2 OBM Port 9 Pin Connector Table B 2 OBM Port 9 Pin Connector Pin Assignments Pin No Assignment...

Page 114: ...hrough connector and its pin assignments Table B 3 describes the 8 pin MJ straight through connector and its pin assignments used on the DEChub ONE and DEChub ONE MX Figure B 3 10BaseT 8 pin MJ Connec...

Page 115: ...its pin assignments Table B 4 describes the shielded 8 pin MJ Twisted Pair 15 pin AUI connector and its pin assignments used on the DEChub ONE and DEChub ONE MX Figure B 4 AUI 15 Pin Port Connector Ta...

Page 116: ...sed on the DIGITAL MultiSwitch 900 and Figure B 5 shows their location Figure B 5 OBM Port 9 Pin Connector Table B 5 OBM Port 9 Pin Connector Pin Assignments Pin No Assignment 1 Data Carrier Detect DC...

Page 117: ...o the OBM port on the DIGITAL MultiSwitch 900 EOS ESD protection devices are not shown in the illustration Figure B 6 H8571 J Adapter H8575 A Adapter Figure B 7 shows the H8575 A adapter 6 pin MMJ con...

Page 118: ...cables 2 for connecting straight through 3 and crossover 4 types of devices The module uses crossover connectors Figure B 8 Crossover Configurations 1 If screened cabling is required use BN26M MultiS...

Page 119: ...is appendix lists product and acoustical specifications for the DIGITAL MultiSwitch Fast Ethernet Hub 924TX and connectors used with these products In This Appendix Topic Page Product Specifications f...

Page 120: ...95 noncondensing Altitude Operating Non operating Sea level to 4 267 m 14 000 ft Sea level to 12 192 m 40 000 ft Power 49 5 W total power 8 4 A 5 Vdc 0 0 A 12 Vdc 0 5 A 15 Vdc Physical Height installe...

Page 121: ...Values per ISO 9296 and ISO 7779 1 1 Current values for specific configurations are available from Cabletron Systems representatives 1 B 10 dBA Product Sound Power Level LWAd B Sound Pressure Level Lp...

Page 122: ...bletron Systems Vertretungen erh ltlich 1 B 10 dBA Produkt Schalleistung spegel LWAd B Schalldruckpegel LpAm dBA Zuschauer positionen Leerlauf Betrieb Leerlauf Betrieb DIGITAL MultiSwitch Fast Etherne...

Page 123: ...ptions D 1 Appendix D Ordering Options Overview Introduction This appendix describes the ordering information for the DIGITAL MultiSwitch Fast Ethernet Hub 924TX In This Appendix Topic Page Ordering O...

Page 124: ...MultiSwitch Fast Ethernet Hub 924TX fixed 24 port 100 Mb s Hub DLMT2 MA Expansion Slot MM 100 Options 100BASE FX 100BufFX DEXYM AA DEXYM BA Straight through Cable BN25G xx Crossover Cable BN24Q xx Ad...

Page 125: ...E Associated Documentation Overview Introduction This appendix describes the associated documentation how to order additional documentation and correspondence In This Appendix Topic Page Documentation...

Page 126: ...h Fast Ethernet Hub 924TX installed in a DIGITAL MultiSwitch 900 DIGITAL MultiSwitch 900 Owner s Manual EK DH2MS OM Provides installation use security and troubleshooting information for the DIGITAL M...

Page 127: ...the DIGITAL MultiSwitch 900 DEChub Network Modules 900 Series Switch Reference EK SWTCH HR Describes the functions and features of DIGITAL s HUB based 900 Series switching products OPEN DECconnect Ap...

Page 128: ...suggestions about this document send them to TechWriting cabletron com Online Services To locate product specific information refer to one of the following World Wide Web sites Americas http www netw...

Page 129: ...ing and Configuring RMON Groups Overview Introduction This appendix describes how to access the four RMON groups and how to configure the Alarms and Events groups In This Appendix Topic Page What Is R...

Page 130: ...s information by examining each packet passed on a network segment Segment statistics are stored in counters within the module The counters are continuously updated and reset at powerup RMON also capt...

Page 131: ...et packets 128 to 255 octet packets 256 to 511 octet packets 512 to 1023 octet packets 1024 to 1518 octet packets History Obtain a historical representation of statistics for individual ports for cust...

Page 132: ...1757 S Waldbusser Remote Network Monitoring Management Information Base 02 10 1995 The event group consists of the eventTable and the logTable The alarmTable contains configuration entries that define...

Page 133: ...y supports up to 32 characters The maximum number of entries that can be placed in the alarmTable is 20 For the eventTable the maximum is 32 Alarm and Event Table Entries Alarm table entries can only...

Page 134: ...ble to be sampled alarmSampleType The method of sampling the selected variable and calculating the value to be compared against the thresholds alarmValue The value of the statistic during the last sam...

Page 135: ...cts the trap IP address can also be added via SNMP set requests to the device s private MIB pcomSnmpAuthTrapAddressTable You can specify that when an alarm condition is reached a trap is generated and...

Page 136: ......

Page 137: ...lossary 1 Glossary Overview Introduction This glossary lists and defines terms used in the DIGITAL MultiSwitch Fast Ethernet Hub 924TX module documentation In This Glossary Topic Page Terms Glossary 2...

Page 138: ...thernet Hot swappable The removal or insertion of a module into the DIGITAL MultiSwitch 900 without disrupting power to the unit or affecting the connectivity to other modules in the stack or chassis...

Page 139: ...hernet connection Twisted Pair Twisted pair cable 10 Mb s Ethernet connection This is wiring similar to that found in the telephone system consisting of two insulated wires loosely twisted around each...

Page 140: ......

Page 141: ...16 management features 1 14 DEChub ONE 1 3 DEChub ONE Docking Station 1 18 DEChub ONE MX 1 3 1 18 Delete SNMP Trap Addresses 5 10 DIGITAL MultiSwitch 900 1 3 1 13 1 16 900 Connectors and Pin Assignme...

Page 142: ...ith Factory Defaults 4 5 5 3 RMON Alarm and Event Table Entries F 5 description F 2 Groups Supported F 3 How to Access RMON Groups F 4 How Traps Work F 7 trap messages F 7 What Is RMON F 2 S Safety xi...

Reviews: