background image

34

Installation in a pipe

Type 8098 FLOWave L

8. 

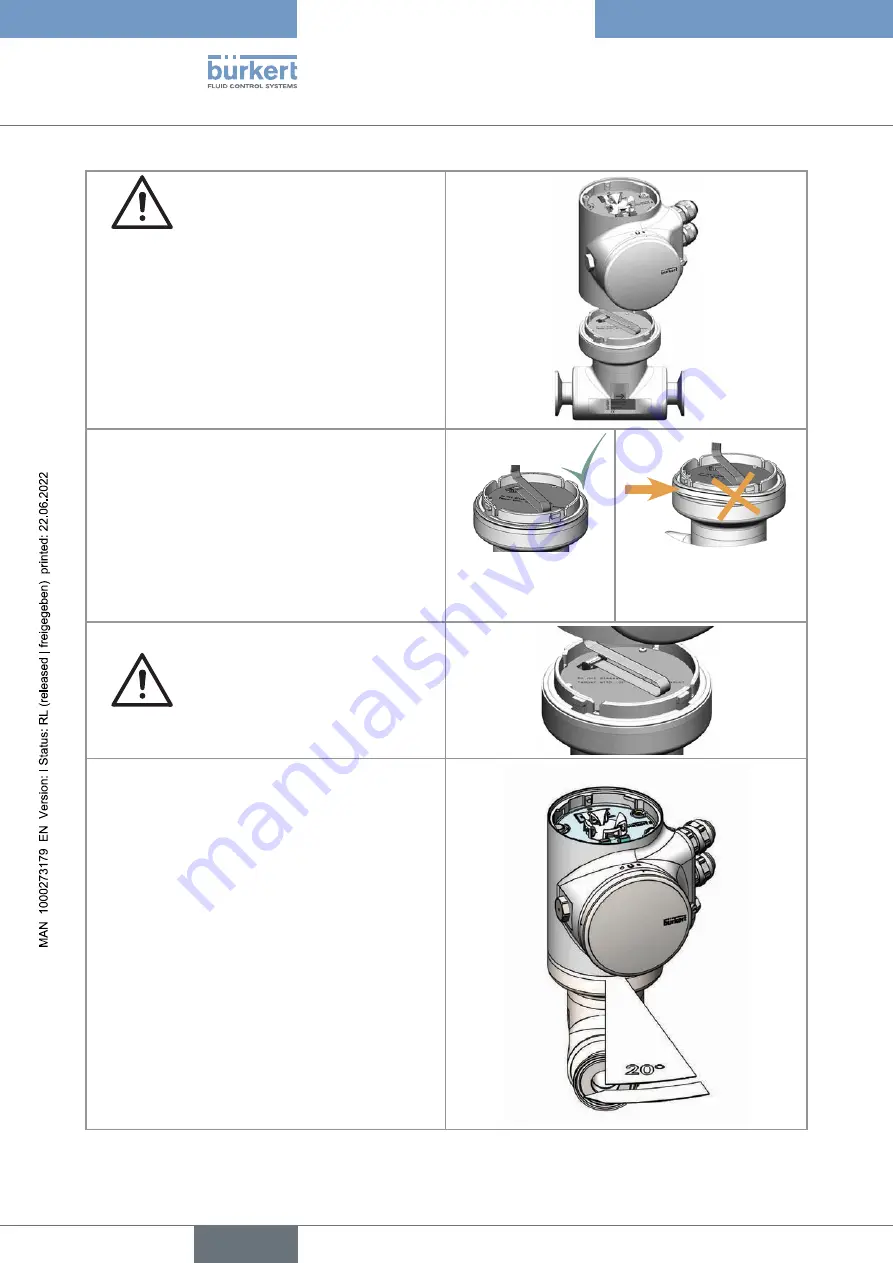
 Lift the transmitter carefully because a 

cable connects the transmitter to the flow sensor.

9. 

If the seal is damaged, replace it. Apply a layer 

of lithium soap grease to the new seal before you 

put it in place.

10. If the seal is not located in the groove, put it back 

in the groove.

Seal in the groove: 

correct

Seal not in the 

groove: NOT correct

11. Turn the transmitter to the desired position.

12. 

 Fold the cable in a Z-shape and make 

sure the cable stays inside the transmitter.

13. 

Turn the transmitter by about 20 degrees 

clockwise. 

English

Summary of Contents for FLOWave L 8098

Page 1: ...QUICKSTART English Software version A 04 00 00 and higher Type 8098 FLOWave L SAW Flowmeter...

Page 2: ...We reserve the right to make technical changes without notice B rkert SAS 2015 2022 QUICKSTART 2203 09_EU EN 00567159 Original EN...

Page 3: ...3 Information on the Internet 12 5 DESCRIPTION 13 5 1 Device variants 13 5 2 Wi Fi module 15 5 3 Unlocking magnetic key 15 5 4 Type labels 16 5 4 1 Adhesive labels 16 5 4 2 Laser marking 18 5 5 Markin...

Page 4: ...r and the display module or the Wi Fi module 35 7 4 Recommendations for the installation into the pipe 38 7 5 Installing the device into the pipe 41 7 5 1 Before installing the device into the pipe 41...

Page 5: ...two 4 pin M12 female connectors Ethernet device variant 60 8 17 Specifications of the cables and conductors for the 4 pin M12 female connectors 61 8 18 Connecting the device to an Ethernet network dev...

Page 6: ...missioning for detecting bubbles in the pipe 73 11 MAINTENANCE AND TROUBLESHOOTING 74 11 1 Safety instructions 74 11 2 Information on returning the device to the manufacturer or to the reseller 75 11...

Page 7: ...ER Warns against an imminent danger Failure to observe this warning results in death or in serious injury WARNING Warns against a potentially dangerous situation Failure to observe this warning can re...

Page 8: ...g guide available in English and in Japanese Cabling_ guide_for_b S EDIP pdf at country burkert com For more information on CANopen which is related to the device refer to the Operating Instructions C...

Page 9: ...and the conditions of commissioning and use specified in the contractual documents and in the Operating Instructions Protect the device against electromagnetic interference ultraviolet rays and when i...

Page 10: ...equipment Risk of injury due to pressure in the installation Before any intervention in the installation stop the circulation of liquid cut off the pressure and drain the pipe Before any intervention...

Page 11: ...the general technical rules 1 only applicable for devices without ATEX IECEx certification CAUTION Risk of injury due to a heavy device A heavy device can fall down during transport or during install...

Page 12: ...local B rkert sales office The addresses of our international sales offices are available on the internet at country burkert com 4 2 Warranty conditions The condition governing the legal warranty is t...

Page 13: ...ector or display module Type ME31 Device status indicator seal Transmitter housing including the electronic modules Type SE98 transmitter Type S097 flow sensor M20x1 5 cable glands in nickel plated br...

Page 14: ...cover Sensor housing Process connection 1 Type 8098 FLOWave L flowmeter Sensor measurement tube 4 pin M12 female connectors with screwed plugs Blind cover Pressure compensating element Seal Functional...

Page 15: ...if the following requirements are met Windows 7 8 1 10 IE11 Edge Google Chrome from version 53 Android with Google Chrome from version 53 Apple Safari from iOS 9 3 5 For more informations about the W...

Page 16: ...3 11 7 1 Supply voltage 2 Type of the device 3 Power consumption 4 IP Code NEMA protection type 5 Ambient temperature range 6 Pin assignment of the 5 pin M12 male connector 7 Manufacturing code 8 Ser...

Page 17: ...10 Certification Fig 5 Type label of the Type 8098 FLOWave L flowmeter example of a non UL Ethernet device S097 FLOWave Flow sensor Pipe 316L 1 4435 Housing 304 1 4301 DIN 11866 C Clamp D50 5 DIN 326...

Page 18: ...ing the device take into account the technical specifications given in the Operating Instructions 9 Certifications 10 Power consumption 11 Operating voltage 12 IP Codes NEMA protection type 13 Ambient...

Page 19: ...nterface such as the B rkert Communicator software Table 1 Device status indicator in accordance with NAMUR NE 107 edition 2006 06 12 Colour according to NE 107 Colour code for a PLC Diagnostics event...

Page 20: ...of pollution Degree 2 according to UL EN 61010 1 IP Code according to IEC EN 60529 IP651 IP671 if the following conditions are observed The device must be wired The cable glands must be tightened The...

Page 21: ...le 4 Paragraph 1 of the Pressure Equipment Directive 2014 68 EU under the following conditions Device used on a pipe PS maximum admissible pressure in bar DN nominal dimension of the pipe no unit Type...

Page 22: ...to SMS 3008 DN25 DN40 DN50 Flange connections according to DIN 11864 2 series A DIN 11864 2 series B DN08 DN15 DN25 DN40 DN50 External threaded 2 connections according to DIN 11851 series A DN65 DN80...

Page 23: ...y between the liquid temperature and the ambient temperature device variant with two 4 pin M12 female connectors and one 5 pin M12 male connector Ethernet device variant Liquid temperature 20 110 C Up...

Page 24: ...BPE DIN 32676 series C PN25 1 2 3 4 1 1 1 2 clamp DIN 11864 3 series C PN25 flange DIN 11864 2 series C PN25 DN40 clamp DIN 11864 3 series B DIN 32676 series B PN16 DIN 11864 3 series A DIN 32676 seri...

Page 25: ...Adjustable 1 Measurement bias as defined in standard JCGM 200 2012 2 Determined under the following reference conditions liquid water free of gas bubbles and solids water and ambient temperatures 23 C...

Page 26: ...ng on the DN of the sensor Measurement deviation1 2 for a mass flow rate between 10 of the full scale and the full scale of the volume flow rate 2 4 of the measured value Measurement deviation1 2 for...

Page 27: ...ture and the liquid temperature device variant with two M20x1 5 cable glands and one 5 pin M12 male connector 0 10 20 30 40 50 60 70 80 20 0 20 40 60 80 100 120 140 160 10 20 5 10 15 20 25 30 35 Liqui...

Page 28: ...variant with two 4 pin M12 female connectors and one 5 pin M12 connector Ethernet device variant 8 W Polarity reversal Protected Analogue output 1 also output 3 if configured as an analogue output 4...

Page 29: ...Screwed plug Sealing Stainless steel Stainless steel EPDM Pressure compensating element Stainless steel External M4 screw for earth connection Stainless steel A4 Display Float glass stainless steel 30...

Page 30: ...ng used If switched on for a prolonged time risk of burns or fire due to hot device surfaces Do not touch with bare hands Keep the device away from highly flammable substances and liquids Risk of burn...

Page 31: ...mperature see Fig 9 and Fig 10 7 2 Additional documentation If the device is an ATEX IECEx device variant then refer to the ATEX IECEx supplement for Type 8098 FLOWave L available on the internet at c...

Page 32: ...ansmitter The blind cover the display module or the Wi Fi module is locked 1 Put the magnetic key on the mark related to the display module You should hear a soft click indicating that the display mod...

Page 33: ...dule or the Wi Fi module from the transmitter 5 Remove the display module or the Wi Fi module and put it on a clean surface to protect the seal from dirt Push the tab to unlock the cable connector 6 U...

Page 34: ...f lithium soap grease to the new seal before you put it in place 10 If the seal is not located in the groove put it back in the groove Seal in the groove correct Seal not in the groove NOT correct 11...

Page 35: ...ansmitter housing until the mark is on the locked position You should hear a click 7 3 2 Switching positions of the blind cover and the display module or the Wi Fi module CAUTION Risk of injury due to...

Page 36: ...play module or the Wi Fi module 2 While the magnetic key is on the mark turn the display module or the Wi Fi module by hand only from the locked position to the unlocked position If you cannot turn th...

Page 37: ...odule or the Wi Fi module through the front opening 9 Connect the cable to the connector as shown in the figure 10 Put the mark of the display module or the Wi Fi module on the unlocked marking of the...

Page 38: ...ailable at country burkert com The device is not intended to measure the flow rate of liquids if gas bubbles are present whatever the origin of the bubbles air intake cavitation degassing Choose a loc...

Page 39: ...lf draining Type of process connection Standards the process connections conform to Angle against the horizontal clamp DIN 32676 series A DIN 11864 3 series A SMS 3017 ISO 2852 for pipes according to...

Page 40: ...mended Recommended 1 Recommended 1 1 These orientations are valid for all the positions of the Type SE98 transmitter on the Type S097 flow sensor Refer to Fig 13 Possible positions of the transmitter...

Page 41: ...the EHEDG Position Paper available on the EHEDG website The clamp connections according to DIN 11864 3 series A B and C are hygienic connections You can use any gaskets that are adapted to the proces...

Page 42: ...one of the fol lowing type ASEPTO STAR k flex upgrade gaskets from Kieselmann GmbH Germany SKS gaskets set DIN 11851 EHEDG with EPDM or FKM inner gasket from Siersema Komponenten Service S K S B V Net...

Page 43: ...due to hot device surfaces Do not touch with bare hands Keep the device away from highly flammable substances and liquids Risk of burns due to high liquid temperatures Do not touch with bare hands th...

Page 44: ...stop If you turn beyond the stop the cable gland unscrews from the device and the device is no longer tight NOTICE If the screwed plug of a 5 pin M12 male connector is removed the device is not tight...

Page 45: ...or Connect the device with two 4 pin M12 female connectors Ethernet device variant to a 12 35 V DC power supply through the 5 pin M12 male connector Refer to chapter 8 4 A device with two 4 pin M12 fe...

Page 46: ...a 12 35 V DC power supply and or To the b S CANopen network To connect the device remove the screwed plug of the 5 pin M12 male connector and store the screwed plug in a safe and clean place Risk of...

Page 47: ...2 12 35 V DC Pin 3 GND Pin 4 CAN_H Pin 5 CAN_L Fig 22 Pin assignment of the 5 pin M12 male connector Cable and conductors connected inside the device to the 5 pin M12 male connector Fig 23 Wiring ex w...

Page 48: ...ications of the cables for the M20x1 5 cable glands in nickel plated brass Specification of the cables Recommended value Electromagnetic protection EMC Shielded Diameter 5 14 mm Maximum operating temp...

Page 49: ...nally connected to the 5 pin M12 male connector Terminal 2 CAN_L grey conductor factory wired internally connected to the 5 pin M12 male connector Terminal 3 CAN_shield brown conductor factory wired i...

Page 50: ...Turn the blind cover by hand to the unlocked position and remove it Fig 26 Procedure to open the front of the transmitter if the blind cover is on the front of the device Procedure to open the front...

Page 51: ...or Fig 27 Procedure to open the front of the transmitter if the display module or the Wi Fi module is on the front of the device 8 10 Wiring the device through the M20x1 5 cable glands in stainless st...

Page 52: ...the blind plug in a safe and clean place 9 Put the cable through the cable gland as shown in the figure 10 Use a size 22 hexagonal key to tighten the cable gland to a torque of 5 Nm 3 7 ft lbf 11 Att...

Page 53: ...n nickel plated brass device variant with cable glands Put only one cable in each cable gland Prepare cables that obey the specifications given in chapter 8 6 and chapter 8 7 To open the front of the...

Page 54: ...the cable gland to a torque of 10 Nm 7 4 ft lbf 10 Attach each cable to the functional earth plate The shield must be in contact with the functional earth plate 11 Put the functional earth plate in i...

Page 55: ...e glands refer to chapter 8 13 15 To connect the outputs refer to chapter 8 14 and chapter 8 15 16 Connect the functional earth conductor See chapter 8 12 17 If the display module or the Wi Fi module...

Page 56: ...or either to the functional earth plate in the transmitter housing see Fig 31 in chapter 8 13 or to the functional earth screw on the outer surface of the transmitter housing see Fig 30 If you connect...

Page 57: ...te conductor 3 Connect the power supply as shown in Fig 31 1 1 2 3 4 5 6 7 8 9 1 1 2 1 0 Internally connected to the 5 pin M12 male connector Insulated white conductor To connect to the positive 12 35...

Page 58: ...e wiring output 3 as an analogue output make sure output 3 is configured as an analogue output in the Parameter menu of the outputs See chapter 9 8 Changing the type of output 3 An analogue output can...

Page 59: ...make sure output 3 is configured as a digital output in the Parameter menu of the outputs See chapter 9 8 Changing the type of output 3 A digital output can be wired either in NPN mode or in PNP mode...

Page 60: ...nk Act LED green Fig 35 Status LEDs of the industrial communication module Description of the LEDs Table 16 Status LEDs for the connection to the PLC LED status Connection status What to do RUN LED gr...

Page 61: ...Risk of damage to the device if any M12 connector is unused Put a screwed plug on all the unused M12 connectors Screw the plug to the 4 pin M12 female connector to a torque of 1 3 Nm 0 96 ft lbf If a...

Page 62: ...ice with two 4 pin M12 female connectors Ethernet device variant 8 19 Connecting the functional earth device variant with two 4 pin M12 female connectors Ethernet device variant For a proper function...

Page 63: ...ettings as described in the Operating Instructions To use some specific functions that are only available with the B rkert Communicator software refer to the Type 8920 Operating Instructions available...

Page 64: ...0 Insert the b S stick into a USB port of the PC 11 Wait until the Windows pilot of the b S stick has been completely installed on the PC 12 Connect the AC DC adapter to the power supply 13 Start the...

Page 65: ...play and touch sensitive keys Display Navigation keys OK key BACK key View 1 of 4 CONFIGURATION Volume flow 30 1 l min View 2 Fig 40 Overview of the user interface 9 5 Available login user levels The...

Page 66: ...bar only if the adjustment is protected through passwords If you have forgotten your passwords you can restore the default passwords with the Type 8920 B rkert Communicator software Refer to the rela...

Page 67: ...assword Confirm The user level is changed The related symbol is displayed in the information bar To deactivate the adjustment protection through passwords refer to the Type 8098 FLOWave L Oper ating I...

Page 68: ...is automatically taken into account or not setting the date and time choosing the unit system for all the measurements When the device has finished the uploading step the first screen of the Quick sta...

Page 69: ...nstaller user level Even if the menu Outputs is available on an Ethernet device variant we recommend to not use the outputs By default the output 3 is configured as an analogue output It can be config...

Page 70: ...nformation on the settings search the highlighted term in the Type 8098 FLOWave L Operating Instructions available at country burkert com 1 Energise the device 2 Connect the device to the B rkert Comm...

Page 71: ...e Cut off function 10 Set the parameter K factor 11 Check the correct behaviour of the device by using the menu Simulation 12 With the B rkert Communicator software print a pdf report of the new setti...

Page 72: ...volume flow rate to None 10 To monitor the mass flow rate set the parameter Damping of the mass flow rate To measure a stable mass flow rate or to conduct a teach in procedure depending on the mass f...

Page 73: ...uick start menu Refer to chapter 9 7 4 If the liquid is not water then read out the value of the Acoustic transmission factor If the value is higher than 20 5 then the flow rate of the liquid can be m...

Page 74: ...ime risk of burns or fire due to hot device surfaces Do not touch with bare hands Keep the device away from highly flammable substances and liquids Risk of burns due to high liquid temperatures Do not...

Page 75: ...rom which the device is made Pay special attention to the cable glands which are made of nickel plated brass The outer surface device can be cleaned with a cloth slightly dampened water or with a dete...

Page 76: ...e list can be accessed via the context menu See chapter 9 5 1 Table 20 Device status symbols Symbol Status Description Failure error or fault Malfunction or monitored values in the error range Functio...

Page 77: ...ginal replacement parts from B rkert Spare part or accessory Article number Unlocking magnetic key 690309 5 pin M12 female and 5 pin M12 male straight cable plugs moulded at each end of a 1 m shielded...

Page 78: ...the admissible storage temperature range Protect the electrical interfaces using protective plugs 14 STORAGE CAUTION Risk of injury due to a heavy device A heavy device can fall down during transport...

Page 79: ......

Page 80: ...www burkert com...

Reviews: