background image

Page 6

For technical questions, please call 1-888-866-5797.

Item  62463        

SAFET

y

ADV
ANCED

OPERA

TION

SETUP

BASIC 

MAINTENANCE 

TROUBLESHOOTING

Components and Controls

  Read the ENTIRE IMPORTANT SAFETy INFORMATION section at the beginning of this 

manual including all text under subheadings therein before set up or use of this product.

IMPORTANT:  If Mouse, Remote, and DVR buttons won't work, 

press and hold REW button on front of DVR until unit beeps.

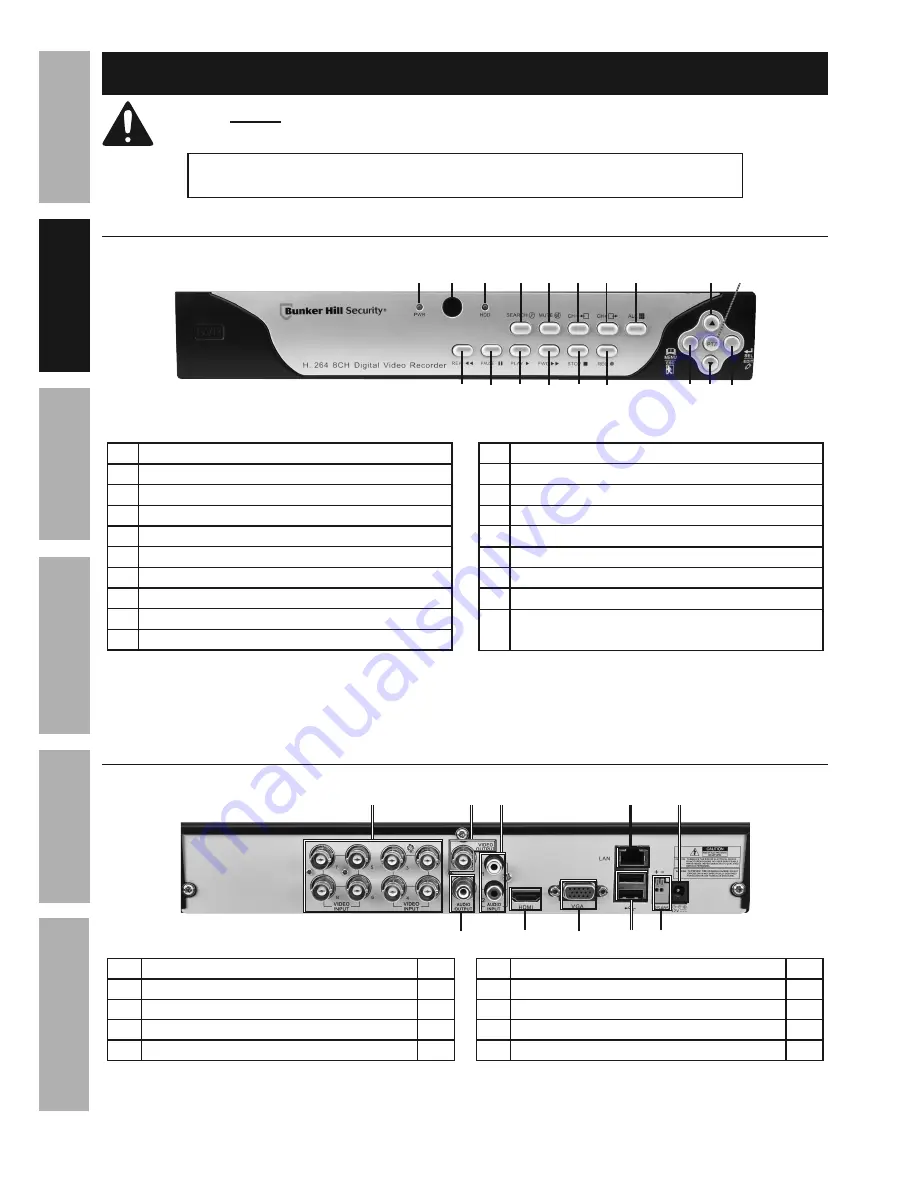
DVR Front Panel 

9 10

1

18

17

11 12 13 14 15 16

19

2

3

4

5

6  7

8


1 Green Power Indicator - glows when power is on
2 Remote Control IR Receiver
3 Red Hard Drive Light - flashes when recording
4 Search Recordings
5 Mute
6 Previous Channel
7 Next Channel
8 Toggle between single, 4 and 8 Screen Displays
9 Menu Up / 

PTZ Up*

10

PTZ Control Mode*

11 Rewind / Lock and Unlock Controls

12 Pause
13 Play
14 Fast Forward
15 Stop
16 Start Manual Recording
17 Open Menu / Escape / 

PTZ Left*

18 Menu Down / 

PTZ Down*

19 Confirm Selection / Edit Selected Setting / 

PTZ 

Right*

*Controls for PTZ mode are 

italicized

.  PTZ is optional Pan/Tilt/Zoom camera (sold separately).

Figure B

DVR Back Panel

2

6

8

1

3

4

5

9 10

7

1 BNC Video Input

8

2 BNC Video Output

1

3 RCA Audio Input

2

4 RJ45 LAN Ethernet Port

1

5 12VDC Power Input

1

6 RCA Audio Output

1

7 HDMI Video Output

1

8 VGA Video Output

1

9 USB 2.0 Port

2

10 RS485 PTZ Connector

1

Figure C

Summary of Contents for 62463

Page 1: ...afe and dry place for future reference When unpacking make sure that the product is intact and undamaged If any parts are missing or broken please call 1 888 866 5797 as soon as possible Copyright 2014 by Harbor Freight Tools All rights reserved No portion of this manual or any artwork contained herein may be reproduced in any shape or form without the express written consent of Harbor Freight Too...

Page 2: ...6 Advanced Network Configuration Software and Notification Settings 27 Computer and Smartphone Access 28 Software 32 Notifications 34 Warranty 36 WARNING SYMBOLS AND DEFINITIONS This is the safety alert symbol It is used to alert you to potential personal injury hazards Obey all safety messages that follow this symbol to avoid possible injury or death Indicates a hazardous situation which if not a...

Page 3: ...ase the risk of electric shock 3 Do not abuse the Power Adapter cord Never use the cord for unplugging the plug from the outlet Keep cord away from heat oil sharp edges or moving parts Damaged or entangled cords increase the risk of electric shock 4 Handle Camera with care Camera could be damaged by improper handling or storage DVR Safety Warnings 1 Maintain adequate airflow around DVR 2 Use suppl...

Page 4: ... plug Do not use the tool if the power cord or plug is damaged If damaged have it repaired by a service facility before use If the plug will not fit the outlet have a proper outlet installed by a qualified electrician Figure A Outlets for 2 Prong Plug 1 The included Power Adapters do not require grounding 2 The Power Adapters may be used in either of the 120 volt outlets shown in the preceding ill...

Page 5: ... PTZ Interface RS485 Supports Pelco D P camera sold separately Network Interface RJ 45 10m 100m Ethernet Interface USB Interface USB 2 0 DVR Input Rating 12VDC 2A Power Adapter Rating 12VDC 2A Operating Temperature 32º 131ºF Cameras Lens Type Fixed 6 mm Horizontal Resolution 550 TVL Effective Pixels 648H x 488V Night Vision Type Infrared LEDs with Low Light Sensor Image Type Daylight Color Infrare...

Page 6: ...R Receiver 3 Red Hard Drive Light flashes when recording 4 Search Recordings 5 Mute 6 Previous Channel 7 Next Channel 8 Toggle between single 4 and 8 Screen Displays 9 Menu Up PTZ Up 10 PTZ Control Mode 11 Rewind Lock and Unlock Controls 12 Pause 13 Play 14 Fast Forward 15 Stop 16 Start Manual Recording 17 Open Menu Escape PTZ Left 18 Menu Down PTZ Down 19 Confirm Selection Edit Selected Setting P...

Page 7: ... 0 Lock and Unlock Controls ALL Toggle between single 4 and 8 Screen Displays MENU Open Menu MUTE Mute SUBMENU Open Pop Up Menu Menu Up Menu Down Menu Left Menu Right SEL Confirm Selected Operation Rewind Play Search Records Fast Forward Record ll Pause Stop Figure D Camera and Accessories Video from Camera Video to DVR Power to Camera Power from Splitter Cable 60 ft Screws Anchors Mounting Hardwa...

Page 8: ... SAFETY INFORMATION section at the beginning of this manual including all text under subheadings therein before set up or use of this product NOTICE CHECK FEDERAL STATE AND LOCAL SURVEILLANCE LAWS BEFORE INSTALLING VIDEO AND OR AUDIO SURVEILLANCE EQUIPMENT IMPORTANT If Mouse Remote and DVR buttons won t work press and hold REW button on front of DVR until unit beeps ...

Page 9: ...m Cables to DVR 4 Connect Power from Cables to Splitter 5 Connect Splitter to Camera Power Adapter 6 Protect connections from moisture with electrical tape 7 Audio Connect audio surveillance microphone sold separately to Audio Input and speaker sold separately to Audio Output Go to Record MainStream Set Resolution FPS Bitrate and Audio on page 17 to enable audio Go to Network SubStream Set Resolut...

Page 10: ...After boot up system will initialize Note It may take up to a minute for initialization to complete 8 After initialization is complete system will beep then display Live View Live View VIDEO LOSS VIDEO LOSS VIDEO LOSS VIDEO LOSS CH7 CH5 CH8 CH6 R R R R 06 17 2015 09 23 14 CH3 CH2 CH1 CH4 Figure F Live View Note R will display on Live View and red HDD light on DVR s front panel will flash to indica...

Page 11: ...he Camera is securely attached to the mounting surface Hollow Surface 1 Using a drill bit slightly smaller than the Anchors drill holes in the marked locations 2 Tap Anchors into the holes until they are almost flush with mounting surface 3 Position Camera so that mounting holes align with anchors Note Route Cable through slot on Base to keep Base flush with mounting surface 4 Drive Screws through...

Page 12: ...atio WD1 Resolution 960 x 480 11 Frames per Second FPS 768 Bitrate Go to page 17 Pop Up Menu To access Pop Up Menu right click anywhere on screen or hover over bottom of screen Controls for PTZ mode are italicized PTZ is optional Pan Tilt Zoom camera sold separately Main Menu 4 way Split Screen Start PTZ Cruise PTZ 9 way Split Screen Record Search Zoom Record Stop Record Start SEQ PIP x1 Mute Figu...

Page 13: ...itor Settings p 15 RECORD Main Stream Set Resolution FPS Bitrate and Audio p 17 Schedule Recording Settings p 16 REC Para Recording Parameters p 17 General Date Time Language and Menu Settings p 14 Users Password Settings p 15 SYSTEM SYSTEM Operation ADVANCED DEVICE SEARCH Log View DVR s Activity p 19 Event Search Playback and Backup Recordings p 18 Maintain Maintain Hard Drive Update Software Fir...

Page 14: ...twork for this feature to work Go to Time Settings on page 22 4 Language English is selected by default Change if desired System needs to restart before Language changes will apply Click Apply and OK then Exit Right click on screen and DVR will prompt restart Click OK 5 Video Format Default is NTSC which is the standard in the United States LEAVE IT SET TO NTSC 6 Menu Time Out Select how long menu...

Page 15: ...mation to display on monitor U Figure L 1 Channel Select which Channel to set up 2 Name Enter Channel name up to 8 characters For example Garage or Backyard 3 Position Select where Channel Name will appear on the monitor a U L Upper Left b D L Lower Left c U R Upper Right d D R Lower Right e Disable No name will appear 4 Color Click Setup to adjust Hue Brightness Contrast and Saturation Changes wi...

Page 16: ...4 N M Normal with Motion When both green and yellow boxes are selected DVR will record constantly during selected time frames and red R will display on Live View DVR will record separate event during selected time frames when a camera detects motion and red M will display on Live View Note To start motion event recording several seconds BEFORE motion is detected ensure that Pre record is set to EN...

Page 17: ...8 768 768 768 768 768 11 11 11 11 11 11 11 Figure Q 1 Mode and Resolution a Select Mode 960H for 16 9 wide screen view Resolution Choices WD1 960 x 480 default WHD1 960 x 240 WCIF 480 x 240 b Select Mode D1 for 4 3 standard screen view Resolution Choices D1 720 x 480 default HD1 720 x 240 CIF 360 x 240 c System needs to restart before Mode changes will apply Click Apply and OK then Exit Right clic...

Page 18: ...art automatically a Playback Bar will appear at bottom of screen Functions are shown below Rewind Play Fast Forward Backup Slow Motion Pause Zoom Mute Figure T Playback Bar b Zoom Click then drag a box over area to zoom in on Right click to exit 7 Backup Recordings Insert a USB flash drive into either USB port on back of DVR Note Some flash drives include special file handling software and may not...

Page 19: ... Date Today s date is selected by default Change date to search a different day 3 Log Type All is selected by default Change to search for specific type a System Logs when DVR starts up shuts down reboots or time settings are changed b Config Logs when settings are changed c Alarm Logs when motion events start and end and when there is video loss d Account Logs when users login and logout e Record...

Page 20: ...ustom settings you have made c System needs to restart before changes will apply Click Apply and OK then Exit Right click on screen and DVR will prompt restart Click OK 6 Reboot Click to manually reboot system 7 Shut Down Click to manually shut down system Unplug DVR and plug back in to restart 8 Load Settings Import settings using a USB flash drive 9 Save Settings Export settings using a USB flas...

Page 21: ...on Software Versions p 24 Monitor Settings Display Output Figure AB 1 Video Output Cannot modify 2 View Setup Disable is set by default Choose Enable to modify View Mode 3 SEQ Sequence Time Amount of time in seconds that each Channel will display in Live View when Start SEQ is activated from the Pop Up Menu 4 VGA HDMI Resolution Select resolution for monitor or TV see monitor s or TV s user manual...

Page 22: ...User Management Settings System Users Set up additional users passwords and permissions To set password for main user go to Password Settings on page 15 Figure AD Set up Additional Users 1 User Enable Select Enable 2 User Name Enter User Name up to 8 characters 3 Password Enable Select Enable or Disable a Password Enter Password up to 6 characters b Confirm Enter Password again to confirm Changes ...

Page 23: ...otion detection will trigger an event Right click to exit Note If no areas are set the entire camera view will trigger an event 4 Sensitivity Set sensitivity level 1 is lowest and 10 is highest 5 Show Message Set to ON by default When motion is detected by a camera M will appear on Live View for that camera 6 Buzzer Set to OFF by default To turn on click drop down box and choose length of time for...

Page 24: ...ding to PTZ camera manufacturer instructions Figure AH System Information System Info DVR 08D1 Figure AI 1 Device Name Set to DVR 08D1 by default Change if desired up to 21 characters 2 Device ID Set to 000000 by default Change if desired up to 6 numbers 3 The rest of settings are informational and cannot be changed Changes will be saved when you click Apply then OK Changes will not be saved if yo...

Page 25: ...its safe operation 2 PERIODICALLY wipe external surfaces of DVR with clean cloth 3 ONCE A MONTH blow compressed air into vents to remove dust buildup Camera Maintenance TO PREVENT SERIOUS INJURY FROM ELECTRIC SHOCK Unplug the Power Adapter from its electrical outlet before inspection maintenance or cleaning 1 PERIODICALLY inspect the general condition of the Camera Check for loose hardware damaged...

Page 26: ... won t work 1 Batteries need replacing 2 Controls are locked 1 Replace batteries 2 Press and hold REW button on front of DVR until unit beeps or press 0 button on Remote Control to unlock controls Mouse won t work Controls are locked Press and hold REW button on front of DVR until unit beeps or press 0 button on Remote Control to unlock controls DVR buttons won t work Controls are locked Press and...

Page 27: ...h these instructions you will need to contact your Router Manufacturer or Internet Service Provider You may also need to hire an IT Specialist Computer and Smartphone Access NETWORK Network Connect DVR to Network p 28 Set up DDNS p 28 Access DVR with Smartphone p 29 Access DVR with computer p 30 SubStream Set Network Resolution FPS Bitrate and Audio p 31 RTSP Set up RTSP p 31 Software Video Player...

Page 28: ...ay or Router Figure AJ Figure AK 1 Set up user name and password according to Password Settings on page 15 2 Connect DVR to Router via Ethernet Cable sold separately Note If you are not familiar with your router contact your Router s Manufacturer or Internet Service Provider 3 Find out if you have a Static or Dynamic external IP Address a If Static get external IP address It can usually be found o...

Page 29: ... v4 Address 192 168 001 012 200 Example e Set Subnet Mask and Gateway to ones from Chart f Set DNS1 to the same as Gateway g Enable Auto Port Forwarding h Click Apply and OK then Exit i Right click on screen and DVR will prompt restart Click OK Access DVR with Smartphone IMPORTANT Set up network access first according to Connect DVR to Network on page 28 Keep the Ethernet Cable connected to the DV...

Page 30: ... preferred browser a Open Internet Explorer b Type Static IP Address or DDNS Host Name and HTTP Port into address bar NOT search bar and press ENTER Example http xxx xxx xxx xxx 3001 c Allow ActiveX control to install Note If Internet Explorer will not allow ActiveX to install change Download unsigned ActiveX controls to Prompt d Repeat Step b then allow ActiveX Control to install e Login to DVR E...

Page 31: ... 4 4 4 4 Figure AP 1 Video Enable is set as default 2 FPS Frames per second Change if desired 3 Bitrate Kbps Change if desired 4 Audio Check box to record audio if audio surveillance microphone sold separately is hooked up To hook up audio equipment go to B Connect Cameras and Audio on page 9 Note Audio is available on Channel 1 and Channel 2 only 5 Copy Copy settings from one Channel to other Cha...

Page 32: ... programs or firewalls may prevent full installation 1 Insert Software CD into computer 2 Open Software for PC or Software for Mac folder 3 Open Surveillance client folder 4 Install Surveillance Client 5 A wizard will open click Next 6 Click Add Device Figure AQ 7 Fill in Device Name Find Device Name on DVR in System Info For inputting numbers use regular keyboard numbers NOT keypad 8 Use Static I...

Page 33: ...on USB flash drive select them then click Open Choose File Type Figure AT 8 Recordings will show on File list Full Screen Click for full screen Press Esc button to return to normal view Advanced Config Advanced configurations Watermark The word Watermark will appear on recordings Click to remove watermark from recordings Snapshot Saves bmp image to VideoPlayer Picture folder Open and close List Sh...

Page 34: ... Apply then OK Changes will not be saved if you click Exit or right click on screen Click Default to restore default settings Device Cloud Storage Set up Cloud Notifications IMPORTANT Set up Network access first according to Connect DVR to Network on page 28 Keep the Ethernet Cable connected to the DVR at all times Note You will need a Dropbox account and be familiar with the Cloud to set up this ...

Page 35: ...he instructions may cause harmful interference to radio communications However there is no guarantee that interference will not occur in a particular installation If this equipment does cause harmful interference to radio or television reception which can be determined by turning the equipment off and on the user is encouraged to try to correct the interference by one or more of the following meas...

Page 36: ...e liable for any damage to your computer or loss of data Some states do not allow the exclusion or limitation of incidental or consequential damages so the above limitation of exclusion may not apply to you THIS WARRANTY IS EXPRESSLY IN LIEU OF ALL OTHER WARRANTIES EXPRESS OR IMPLIED INCLUDING THE WARRANTIES OF MERCHANTABILITY AND FITNESS To take advantage of this warranty the product or part must...

Reviews: