


Page 20
For technical questions, please call 1-888-866-5797.
Item 62463
SAFET
y
ADV
ANCED
OPERA
TION
SETUP
BASIC
MAINTENANCE
TROUBLESHOOTING
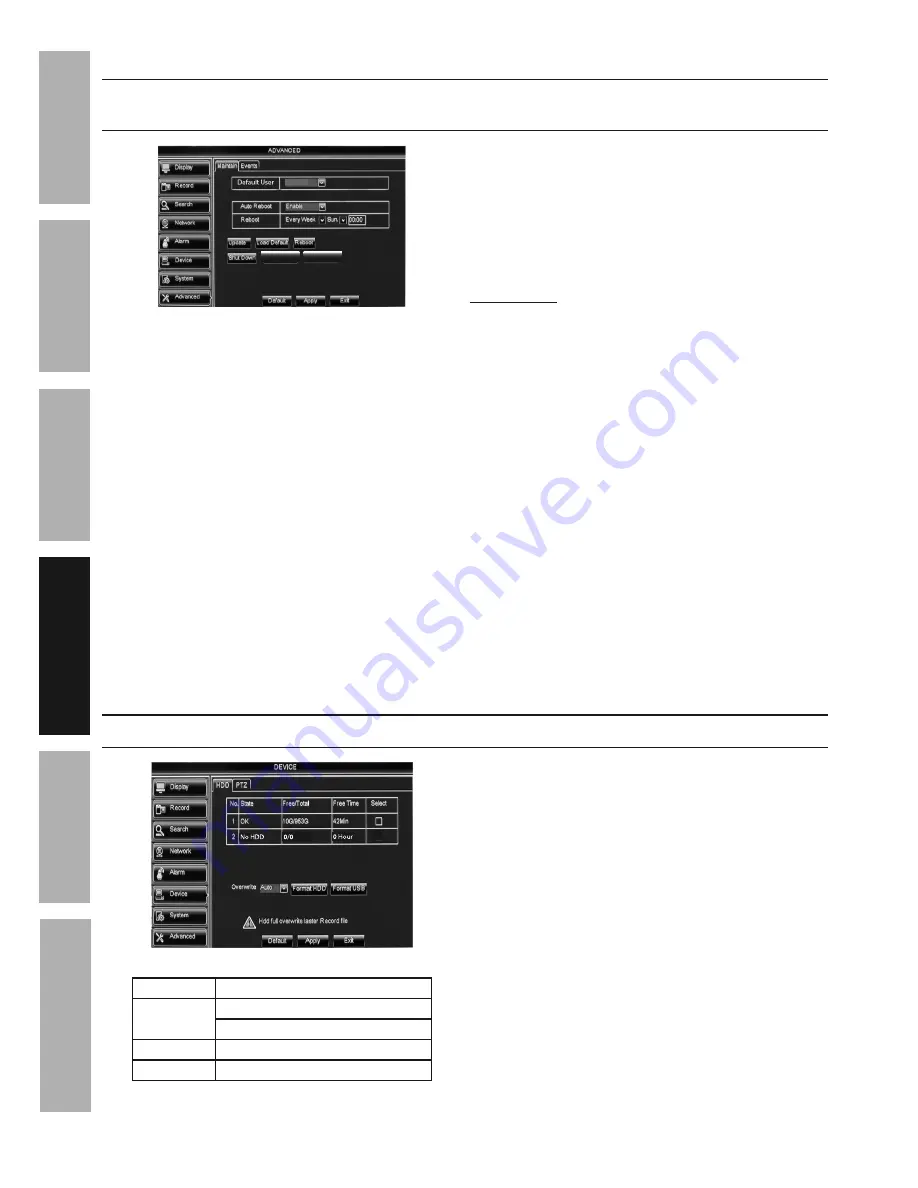
Maintain Hard Drive
Advanced > Maintain - Set up Reboot Cycle, Update Software &
Firmware, Restore Default Settings, Reboot And Shut Down
Load Settings Save Settings
OFF
Figure y
1.
Default User:
a.
OFF
is selected by default so that any
user can access this function.
b. Select
Admin
so that only the main
user can access
this function.
2.
Auto Reboot: Enable
is selected by default.
3.
Reboot:
By default DVR will Reboot every
Sunday at midnight. To change:
a. Select when to
Auto Reboot.
•
Everyday
•
Every Week
•
Every Month
b. Enter time according to which time format you are
using. For example, to auto reboot at 9:00 PM:
• 24 Hour = 21:00
• 12 Hour = 09:00 PM
4.
Update:
For updating firmware using a
USB flash drive.
(Find the most recent
firmware updates at harborfreight.com.)
5.
Load Default:
a. Click to restore system default settings.
b. Check the settings to restore,
click
APPLy
then
OK.
IMPORTANT!
Clicking
OK
will delete
custom settings you have made.
c. System needs to restart before changes will apply.
Click
Apply
and
OK
, then
Exit
. Right click on
screen and DVR will prompt restart. Click
OK
.
6.
Reboot:
Click to manually reboot system.
7.
Shut Down:
Click to manually shut down system.
Unplug DVR and plug back in to restart.
8.
Load Settings:
Import settings
using a USB flash drive.
9.
Save Settings:
Export settings
using a USB flash drive.
Changes will be saved when you click Apply then OK.
Changes will not be saved if you click
Exit or right click on screen.
Format Hard Drive and USB Flash Drive
Device > HDD
Figure Z
No.
ID number of drives
State
OK -
Hard drive installed
No HDD -
No hard drive installed
Free/total
Free Space/Total Space
Free Time
Recording time available
Figure AA
1.
Overwrite: Auto
is selected by default.
The Hard Disk Drive will overwrite itself
when full. Change if desired.
2.
Format Hard Drive:
a. Click
Select
box.
b. Click
Format HDD.
c. Click
OK.
d. When formatting is finished, click
OK.
3.
Format USB Flash Drive:
a. Install USB flash drive into back of DVR.
b. Click
Format USB.
c. Click
OK.
d. When formatting is finished, click
OK.
Changes will be saved when you click Apply then OK.
Changes will not be saved if you click
Exit or right click on screen.


