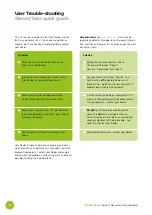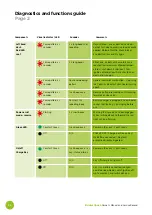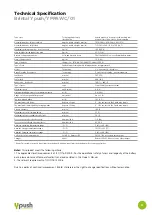
37
Servicing the Ypush
Engineer’s service basic checklist
•
Chassis, general parts and fixtures for damage, corrosion or
cracks.
•
Fold and unfold the Ypush to check for smoothness of oper-
ation - check chassis pivots, seat clips, footrests and all fasten-
ings are correct tightness.
•
Check walking stick holders and other chassis parts for damage.
•
Push handle hinges and retaining lock - check for play, and
tighten if necessary.
•
General damage, tears, or excessive wear to seat back and
seat base.
•
Ankle straps and leg protector material and Velcro fastenings.
•
Armrest hinges opening, closing, and locking correctly.
Check for play and tighten hinge bolts if armrest closes under
its own weight.
•
Front wheels for tyre damage or wear, axle for
tightness, and for any play in the bearings.
•
Rear wheels for tyre wear and any other cosmetic damage.
•
Check tightness of nuts and bolts fastening the throttle
assemble, handlebar collars, brake handles, brake calipers, and
rear dash panels.
•
Test for smooth operation of brake handles when pressed
down and then released - also check override lever holds
brakes "OFF" effectively.
•
Check "play" when brake handles are released, and they
pivots back so brakes are "ON" Should be 10mm of "play" at
handle end. Adjust cable accordingly using knob above brake
calipers. See page 14.
•
Remove Battery Pack and check for signs of damage or
corrosion.
•
Controller "beeps" on start up
•
Dash lights illuminate correctly
•
Electronic Anti-tip/Occupant sensor operates correctly both
sides – check "switch" point is half way by observing warning
LED and adjust if necessary
Next:
Elevate the rear wheels so they are off the ground
by rotating the mechanical Anti-tip wheel assembly by 180
degrees from the storage position. Put a weight on the seat
to de-activate the Anti-tip cut out. Add the battery, connect
and turn ON the ignition.
1
Hold the brake handles down and unlock the override levers
so the brakes are held "OFF" so the wheels can freewheel.
2
Press the throttle and check throttle response and function.
Release throttle, press reverse button and check function and
user warnings.
3
Hold with thumb throttle on full power so the wheels freely
rotate.
4
Test and adjust the Pre-set maximum speed knob to check
it is functioning correctly and the wheels speed up and slow
down. Set to FULL speed.
5
Press the turn buttons one by one to check that the wheel
on that side slows down when you press it.
6
Whilst the wheels are spinning under power, adjust brake
pad/disc alignment with sprung adjusters to reduce any disc
rubbing to a minimum.
7
Releasing Override levers one at a time, test brake per-
formance and override cut out. Allow brake handle to spring
UP to stop/lock the wheel. The brake should completely stop
the wheel rotating and 2-3 seconds later the power will be cut
with 2 warning beeps. Re-set throttle and test other brake.
8
Spin rear wheels by hand and adjust brake pads tolerance
to brake disc.
Obtain all comments from the customer
on the
condition and serviceability of the Ypush and then
complete an initial diagnostic test. Record all defects
to be corrected. Test and check the following:
Fit battery
and turn the ignition on to make the
following checks:


