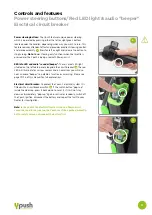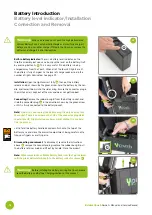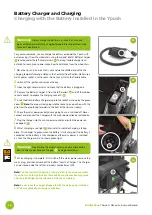
Built-in battery indicator:
There is a battery level indicator on the
throttle assembly, but you can also check the level on the battery itself,
by pressing button A.
27
This is very useful if the battery is being
charged away from the Ypush. When all of the four LED lights are lit,
the battery is fully charged. As the level of charge reduces so do the
number of lights illuminated. See page 33.
Installation:
Open the right armrest fully
28
then pull the battery
release knob as shown by the green arrow, hold the battery by the han-
dle, and lower it down into the side casing. Ensure the connector plug in
the white circle is kept out of the way and does not get trapped.
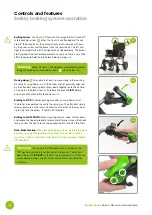
Connecting:
Remove the rubber bung B from the battery socket, and
slide the connector plug
29
in the direction shown by the green arrow
until it is firmly connected to the battery socket.
Note:
Similar to a house plug, the battery plug fits only one way into
the socket. There is an arrow on the TOP of the connector plug which
should face UP. Slight rotation each way whilst sliding it in can help
line the pins up.
Lastly, fold the battery handle back down flush onto the top of the
battery case, and close the armrest compartment, being careful not to
trap your fingers or anything else.
Disconnecting and removal:
To disconnect, reverse the instructions
above
30
remove the connector plug, replace the rubber bung B, pull
the battery retainer knob and lift out by handle. Close the armrest.
Note:
When removing the Lithium Battery Pack from the Ypush always
refit the grey cap/isolator bung B to the battery socket as shown
29
Battery Introduction
Battery level indicator/Installation
Connection and Removal
Brintal Ypush
Owner’s Manual and Service Record
18
Warning!
When you receive your Ypush, the high performance
Lithium Battery Pack is only partially charged – always fully charge it
before use. You can either charge it fitted in the Ypush, or remove the
battery and charge it in another location.
Warning!
Before installing the battery or using the Ypush, please
read the Battery and Battery Charging sections of this manual.
29
30
28
27
A
B


