background image

The Brintal Ypush

 is an attendant controlled, hybrid 

manual & Power-assisted wheelchair providing a  
comfortable ride for adults with disabilities. It provides 
the attendant with an effortless means of transporting an 
occupant using Power-assist, the option to push  
manually, or a seamless combination of both.

The Ypush is easy to use, lightweight, and can be quickly 
and easily folded for transportation.

Provided that the Ypush is maintained and operated in 
accordance with this manual, it will last for many years.

Please read this manual thoroughly before using the 
Ypush. If you have any doubts about warnings or instruc-
tions, ask your Dealer for an explanation. If at any time 
you feel you may not be able to control the wheelchair 
safely, do not drive, but consult your Dealer for a solution.

You must keep this manual in a safe place. It  
contains essential information on the operation of the 
Ypush wheelchair and also includes the service records.

If you think the Ypush wheelchair may be damaged, or 
otherwise faulty, do not drive it, but contact your Dealer 
for advice. 

Warning! 

This manual contains important safety 

information. Please take time to read and understand 
it. Never ignore the guidance in this manual, doing so 
may endanger you and or others.


5

Model: Ypush

 (YPPAWC/01)

Rehacare 2019

World Launch

Rehacare 2019

Exclusive product launch - visit us at Rehacare 2019 Dusseldorf Stand C16

Summary of Contents for YPPAWC/01

Page 1: ...sted Pushing Aid Owner s Manual Service Record Brintal Limited Marion Place Port Grat St Sampsons Guernsey GY2 4TD www ypush com E and 0 E Issue 3 02 2021 World Launch Rehacare 2019 Model Ypush YPPAWC...

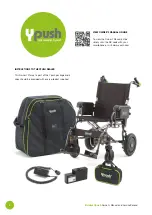
Page 2: ...visit us at Rehacare 2019 Dusseldorf Stand C1 INSTRUCTIONS TO THE YPUSH DEALER This Owner s Manual is part of the Ypush package and a copy should be provided with every product supplied VIEW OWNER S...

Page 3: ...moval 18 Battery care and Charging warnings 19 BATTERY CHARGER AND CHARGING Charging with the Battery installed in the Ypush 20 Charging with the battery removed from the Ypush 21 SETTING UP THE YPUSH...

Page 4: ...ted to create a solution that would ensure the Carer and occupant could both enjoy access to places and activities and most importantly could really look forward to spending stress free quality time t...

Page 5: ...bout warnings or instruc tions ask your Dealer for an explanation If at any time you feel you may not be able to control the wheelchair safely do not drive but consult your Dealer for a solution You m...

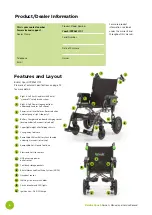
Page 6: ...and fuel gauge right side only 4 Battery Charger and on board charging socket located under left armrest pivots up 5 Super lightweight alloy folding chassis 6 Swing away foot rests 7 Removable Lithiu...

Page 7: ...ravel Roller Bag Model YP TRB 01 1 x Lithium Battery Pack Model YPE 01 1 1 x Battery Charger Model YPCv1 1 x Battery Pack Carry Case Model YPBPC 1 1 x Ypush Attendant Controlled Power assisted Wheelch...

Page 8: ...Ypush is designed for indoor and light outdoor use and can be used manually or with Power assist or a seamless combination of both The light weight construction enables the Ypush to be easily transpor...

Page 9: ...Battery always check the Battery Charger and Battery Pack for damage Never use a charger or battery that is damaged or malfunctioning Warning Never stand or store the Ypush on its end or side as it ma...

Page 10: ...own for turns and reduce speed when amongst pedestrians to ensure you do not run into them Warning Slopes and slippery surfaces On steep slopes the Ypush could topple over Always try to avoid crossing...

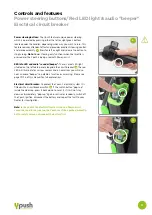
Page 11: ...lit indicates a full battery The fewer LEDs that are lit the more discharged the battery has become The red LED will flash to indicate the battery is almost empty and power could be cut at any time I...

Page 12: ...he Ypush is switched back to forward by pressing the Reverse button again Be very careful that there is ample space behind you the attendant to be able to safely complete a reversing manoeuvre If you...

Page 13: ...rious reasons and on occasions you will also hear an audio beeper to indicate a function or a warning Please see page 33 34 of this manual for full explanations Electrical circuit breaker To protect t...

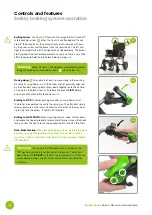
Page 14: ...ing Power assist the brakes are operated in exactly the same way The attendant simply releases pressure on the levers to allow them to pivot all the way back up to fully lock the brakes Thumb OFF thro...

Page 15: ...il you hear a click to confirm it is in the correct position Locking Override lever SAFE BRAKES ON Before using the Ypush check that the override levers are both in the SAFE BRAKES ON position If they...

Page 16: ...l assembly inside the rear of the mounting tube Note Wheels face downwards for use 21 3Make sure that the spring button reappears through the hole to confirm that the wheels are locked securely in pla...

Page 17: ...hown by the green arrow on either of the foot bars to tilt the Ypush back and assist in briefly lifting the front wheels off the ground 25 Note Never stand on the foot bars with your full weight one f...

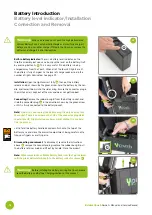
Page 18: ...w on the TOP of the connector plug which should face UP Slight rotation each way whilst sliding it in can help line the pins up Lastly fold the battery handle back down flush onto the top of the batte...

Page 19: ...ry and or charger Warning If the charger or battery pack appears damaged in any way do not try to use it Contact your Dealer as soon as possible for a replacement Warning NEVER smoke or charge batteri...

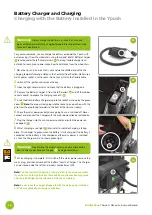
Page 20: ...ains power socket you are going to use is switched off Never connect or disconnect the Charger with the mains power already switched on 7Plug the Charger into the mains power socket and switch the pow...

Page 21: ...indicate charging is taking place This changes to green when the battery is fully charged If no battery is connected or the battery is fully charged and the mains power is switched on then the Charge...

Page 22: ...hands to apply downward force to click the seat in place 46 8 Pivot both footrests into place as shown 47 9 Raise both handles together 48 until they both click into the locked position Pull backward...

Page 23: ...23 B Setting up the Ypush Unpacking and assembly see text page 22 39 43 40 42 41 46 45 44 48 49 47 50...

Page 24: ...lt and buckle 12 Whilst squeezing the seat rails towards each other with one hand line up the pack up clip 58 in position above the inner chassis tube and press down to click the pack up clip into pla...

Page 25: ...25 Packing up the Ypush For transport or storage see text page 24 51 55 59 53 58 62 52 57 61 56 60 54 B...

Page 26: ...ctising Power assist driving Fit the battery as described on page 18 and switch the ignition on You should hear a single beep and the green LED light should be lit If the red light is also lit you may...

Page 27: ...the green circle IMPORTANT Ensure that the footrest brackets lock securely into the chassis Failure to lock in properly could result in injury 7 Fit the seatbelt and adjust accordingly 70 The belt ca...

Page 28: ...manually pushing 3 To slow down first take your thumb off the throttle lever and then evenly reduce pressure on the brake levers If you become unsure or feel unsafe completely relax your grip on the...

Page 29: ...d to disconnect the battery place the isolation bung in place and leave the battery inside the armrest compartment of the Ypush Alternatively the airline or carrier may ask you to remove the battery s...

Page 30: ...occasional clean are designed to be maintenance free Can I take the Ypush on an aircraft Yes in many cases this is possible BUT depends on the carriers specific regulations on batteries see page 29 fo...

Page 31: ...amps the Service Record page 38 on completion of all servicing carried out Keep all receipts for servicing and repairs with this manual Contact your Dealer for advice before you consider dis posing of...

Page 32: ...board Ignition on red and green dash lights on but throttle does not operate Power assist Brake lever fully pressed down but when wheels rotate they are noisy and or bind Brake lever is locked in the...

Page 33: ...o LED s are lit then the charger is faulty Stop using the charger and order a replacement if you suspect it to be faulty or damaged Check the battery is connected and the ignition key is on Check batt...

Page 34: ...ke applied Release throttle check brakes and obstructions and try again Either one or both of the motors have reached their maximum allowed temper atures shut down is imminent Turn ignition off and al...

Page 35: ...d width m ft 1 25 4 3 The maximum safe slope degrees of slope 6 Do not exceed the Ypush may topple The maximum climbing ability facing upwards degrees of slope 6 Do not exceed the Ypush may topple Gro...

Page 36: ...the electrical source voltage as it relates to the distance away from the object being considered in meters Resistance of a scooter wheel chair to certain EMI intensity is commonly called its immunit...

Page 37: ...heck switch point is half way by observing warning LED and adjust if necessary Next Elevate the rear wheels so they are off the ground by rotating the mechanical Anti tip wheel assembly by 180 degrees...

Page 38: ...led receipt in support of stamps entered to validate this record Dealer stamp 1st Service Date Invoice reference Dealer stamp 3rd Service Date Invoice reference Dealer stamp 5th Service Date Invoice r...

Page 39: ...39 Servicing notes and reminders...

Page 40: ...Model Ypush YPPAWC 01 Hybrid Manual Power assisted Pushing Aid Owner s Manual Service Record Brintal Limited Marion Place Port Grat St Sampsons Guernsey GY2 4TD www ypush com E and 0 E Issue 3 02 2021...

Reviews: