background image

Wraptor A6200 User Manual

25

3

General Operation

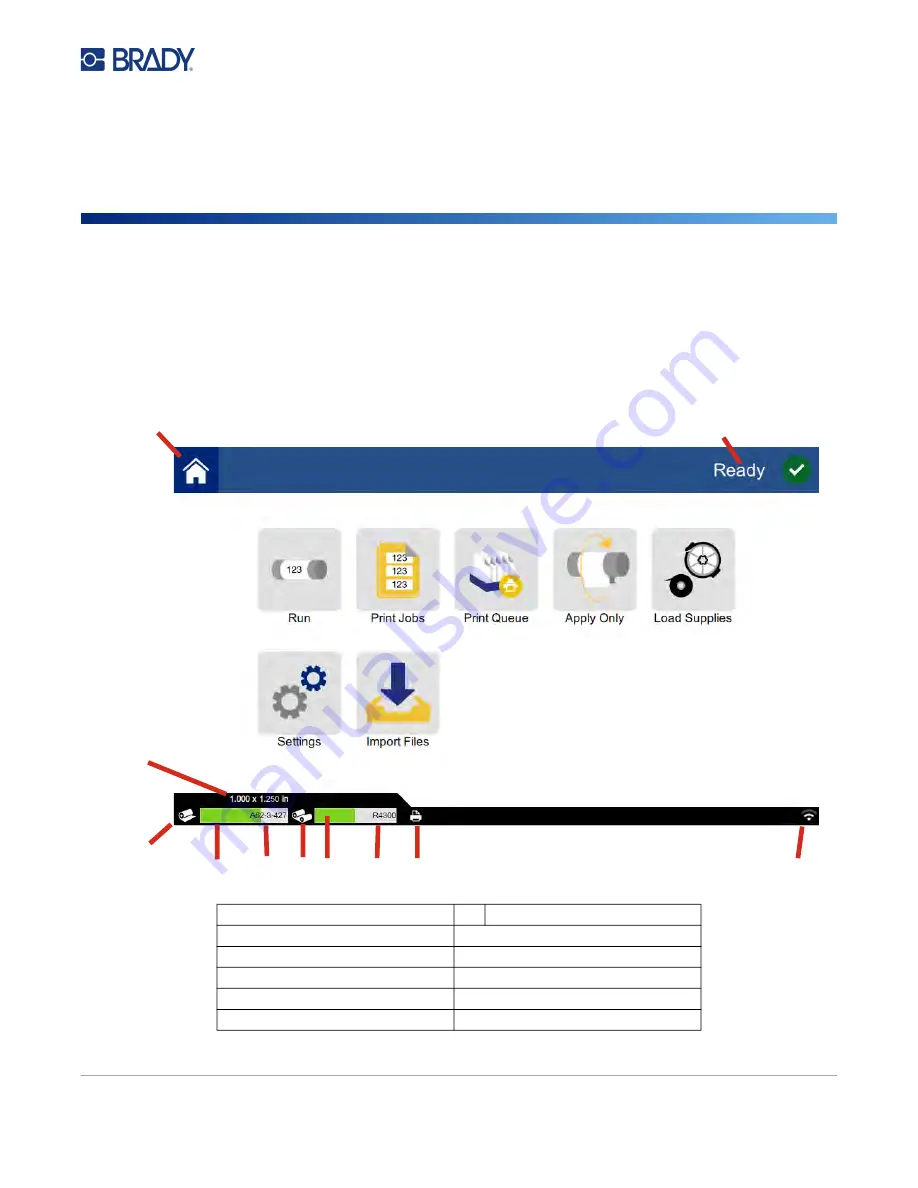
Using the Touch Screen

Use the printer’s touch screen to configure settings, check status, and print and wrap labels, among 

other functions. Touch the screen with your finger to make a selection. The screen is hinged so that 

you can adjust the viewing angle up or down.

Note: 

Do not use a writing pen or other sharp object. Doing so may mar the touch screen surface. 


1

Home

7

Ribbon status

2

Printer status

8

Ribbon remaining

3

Supply size

9

Ribbon part number

4

Supply status

10

Print job status

5

Supply remaining

11

Wi-Fi on and signal

6

Supply part number

1

2

3

4

5

6

7 8

9

10

11

Summary of Contents for Wraptor A6200

Page 1: ...User Manual...

Page 2: ...lity arising out of the application or use of any product or system described herein nor any liability for incidental or consequential damages arising from the use of this document Brady disclaims all...

Page 3: ...ADY BE LIABLE FOR ANY LOSS DAMAGE EXPENSE OR CONSEQUENTIAL DAMAGES OF ANY KIND ARISING IN CONNECTION WITH THE USE OR INABILITY TO USE BRADY S PRODUCTS Safety and Environment Please read and understand...

Page 4: ...anding Canada www bradycanada ca Latin America www bradylatinamerica com Registration Information To register your printer go to www bradycorp com register Repair and Return If for any reason you need...

Page 5: ...Registration 5 Printer Components 6 Power 7 Printer Settings 7 Advance to Next Label 8 Wire or Cable Tension 8 File Location 8 Keyboards 9 Language 9 Units of Measure 10 Date and Time 10 Printer Name...

Page 6: ...tments 34 Print Queue 35 Transferring Print Jobs Between Printers 35 Import Print Jobs 36 Running a File Using a Barcode Scanner 36 Set Up the Scanner 37 Set Up the Label Files and Barcodes 37 Print f...

Page 7: ...e and Approvals 52 United States 52 FCC Notice 52 Canada 52 Mexico 52 Europe 53 RoHS Directive 2011 65 EU 2015 863 EU 53 Batteries Directive 2006 66 EC 53 Turkey 53 China 54 Wireless Regulatory Inform...

Page 8: ...s per second 38 1 mm per second print speed Wrap speed 7 seconds or less to print and apply Accommodates wires between 0 06 1 524 mm and 0 25 6 35 mm in diameter Supports label widths of 1 25 4 mm or...

Page 9: ...he Wraptor A6200 Printer Driver Operating system Microsoft Windows 7 Microsoft Windows 8 Microsoft Windows 10 Safety The following information is necessary for the safe operation of the Wraptor A6200...

Page 10: ...p when the top cover is open Moving parts in the wrapper mechanism stop when the wrapper module is open Wrapper Module WARNING Do not wear loose clothing such as long sleeves or scarves that could bec...

Page 11: ...the top cover is opened The top cover must be closed to feed labels WARNING Do not disable the automatic stop mechanisms Doing so may cause injury CAUTION Make sure the power outlet is grounded WARNI...

Page 12: ...Quick Start Guide Print Driver Driver Installation Guide Printed Quick Start Guide Brady Workstation Product Wire Identification Software Suite with download instructions and license key Power cord an...

Page 13: ...oading labels and cleaning The wrapper automatically stops when the wrapper module is open 4 Wrapper Mechanism that wraps a label around the wire 5 Tear blade Use to tear spent liner off the printer 6...

Page 14: ...th America or Europe use a safety certified power cord with the Brady provided18 V adapter 2 Connect the power cord to the power supply provided and to an electrical outlet 3 Connect the power supply...

Page 15: ...wrapping a label on a wire the wrapper jaws clamp on the wire and hold it taught for wrapping To turn tension on or off 1 From the home screen tap Settings 2 Tap System Configuration 3 Tap Apply Tens...

Page 16: ...erent character sets By default the printer uses the appropriate keyboard for the language setting For example if the printer language is set to Simplified Chinese the printer will automatically displ...

Page 17: ...PM When the switch is red the printer uses 12 hour format When the switch is green the printer uses 24 hour format Set date Tap to display date controls To change the date either tap on an elements an...

Page 18: ...simplify label creation for specific purposes It also provides easy to use apps for custom label design The printer comes with a license for the Brady Workstation Product Wire Identification Suite To...

Page 19: ...mmunicate with devices on that network Note The on screen keyboard for entering passwords and user names contains only the characters allowed for network user names and passwords Thus you may see a ke...

Page 20: ...ss network 1 Make sure the printer is turned on 2 Tap Settings 3 Tap Connection 4 Tap Advanced Network Settings 5 Tap Wi Fi 6 Tap IP Settings and then tap one of the following DHCP DHCP addressing is...

Page 21: ...reen Get assistance from your network administrator to fill in the IP address and other settings on the Network screen 6 Tap the home button to return to the home screen Installing the Windows Driver...

Page 22: ...Pull up on the latch and lift open the cover on the printer 2 To remove the ribbon in the printer pinch together the tabs on either side of the ribbon cartridge and pull the ribbon cartridge out of t...

Page 23: ...he print head pushing slightly to snap it into place If the ribbon cartridge has been used turn the top spool to wind used ribbon onto the spool leaving only new unused ribbon exposed 4 Close the cove...

Page 24: ...reen then tap Load Supply See Using the Touch Screen on page 25 2 Pull up on the latch and lift open the cover on the printer 3 Remove the existing label roll The printer comes with a liner installed...

Page 25: ...the leading end of the labels on the new label roll 5 With labels coming off the bottom of the spool toward the front of the printer grasp the roll with the rabbit ears pointing up and insert the lab...

Page 26: ...printer The first few inches of the roll should have just the liner without any labels on it 8 Slide the liner to the right between the peel plate and peel assist plate CAUTION Feeding labels past th...

Page 27: ...x inches of liner through to the front 10 Insert the liner into the yellow and black opening behind the two rollers until it hits a stop 11 Lift the peeler door up to close it 12 Turn the thumbwheel t...

Page 28: ...ly used printer and can jam the printer if it interferes with label liner exiting the printer The rewinder weighs 3 2 lbs 1 5 kg Installing the Rewinder To install the rewinder 1 Prepare a clear space...

Page 29: ...on the printer so that the screw hole in the bottom of the printer lines up with the screw in the rewinder 4 Tighten the screw 5 Attach the cable from the rewinder to the rewinder port on the back of...

Page 30: ...g to the rewinder spool 1 Load the label supply in the printer if you have not already done so See Loading Label Supply on page 17 2 Print labels until approximately six inches of backing is discharge...

Page 31: ...ve spent material from the spool 1 Use the tear blade to separate spent backing from the label roll 2 Open the door on the front of the rewinder 3 Pull out the yellow knob on the left side of the spoo...

Page 32: ...finger to make a selection The screen is hinged so that you can adjust the viewing angle up or down Note Do not use a writing pen or other sharp object Doing so may mar the touch screen surface 1 Hom...

Page 33: ...lly detects the labels installed in the printer See Software for Creating Labels on page 11 For help using the software refer to the documentation within the software Tap the home button at any time t...

Page 34: ...ign labels on your computer using Brady Workstation software 2 Send your completed labels to the printer with the Print command On the printer 1 On the home screen tap Print Jobs 2 Tap the check box f...

Page 35: ...sure that there is no adhesive build up See Cleaning the Rollers and Peel Plate on page 41 for cleaning and maintenance recommendations Printing Without Wrapping Print Only On your computer 1 Design l...

Page 36: ...labels to the wire or cables without printing To apply labels without printing 1 On the home screen tap Apply Only 2 Insert the wire into the printer jaws The printer wraps the pre printed label onto...

Page 37: ...The green bar gives a visual indication of the percent full The bar turns red when memory is low Finding a Print Job If the list of jobs is long you can find the job that you want faster by sorting or...

Page 38: ...ueue and tap the check box for that print job 2 Tap the Add button If the Add button is not visible when you have multiple jobs selected then you need to enable the print queue To do so go to Settings...

Page 39: ...can only have one job at a time in the queue unless you enable the print queue in Settings Print Queue See Print Queue on page 35 To add a job to the queue use the Print Jobs screen See Adding a Job t...

Page 40: ...ting Quick Start on page 27 The following table describes the controls and information on the touch screen when running a print job CAUTION If the wrong label material for the file is in the printer a...

Page 41: ...useful for braided wires because there is less contact area for the labels to adhere to Setting this too high can cause labels to jam Wrap Count Use the slider to change the number of times that the w...

Page 42: ...tically deletes a print job when it closes Load Last Job If this setting is on the last job that was running at the time the printer was turned off remains in the print queue so that you can continue...

Page 43: ...abels on a computer that is not connected to the printer use BradyWorkstation software to create the labels and a USB drive to import them 1 Create the labels with Brady Workstation software and save...

Page 44: ...to operators To put the label files in printer memory 1 Make sure the printer is set to use internal memory Settings System Configuration File Location 2 Use your labeling software to create and send...

Page 45: ...e by tapping Details is primarily for use when instructed by Brady Support Installing an Upgrade Upgrades to firmware printer system software are available online For information on how to locate the...

Page 46: ...See Technical Support and Registration on page iv 2 Find firmware updates and the most recent Wraptor A6200 database Y and B update 3 Download the database update 4 Save the downloaded file to a USB f...

Page 47: ...for cleaning 5 Using the moistened swab clean the tarp Make sure the tarp is free of dust debris and label adhesive build up 6 Close the wrapper module Cleaning the Print Head To clean the print head...

Page 48: ...de the label supply through the printer Also see Cleaning the Tarp on page 39 To clean the rollers 1 Turn off the printer and unplug it 2 Press the gray button on the front of the printer to open the...

Page 49: ...ke sure each roller is free of dust debris and label adhesive Use as many swabs as necessary so that you are always using a fairly clean swab 7 Dip a clean swab in isopropyl alcohol and clean the edge...

Page 50: ...in the printer chassis Ribbon out sensor in the printer chassis Smart cell contacts in the cover behind the ribbon Trigger sensors on the wrapper module To clean the sensors 1 Turn off the printer and...

Page 51: ...l 44 Maintenance Cleaning 4 Clean the label notch sensor in the printer chassis with a clean swab dipped in isopropyl alcohol 5 Clean the ribbon out sensor in the printer chassis with a clean swab dip...

Page 52: ...cell contact in the top cover with a clean swab dipped in isopropyl alcohol 7 Clean the trigger sensors located on either side of the wrapper mechanism with a clean swab dipped in isopropyl alcohol 8...

Page 53: ...ed on the back of the printer 2 Remove the filter 3 Clean the filter using either of these methods Blow clean air through it Wash it with a mild detergent and allow it to dry 4 Replace the clean filte...

Page 54: ...ge 49 Print quality is poor on page 50 Print is too light on page 50 Nothing happens when I place a wire in the jaws on page 51 No print jobs are in the printer on page 51 Wrap is not applied correctl...

Page 55: ...not wrapped around the rollers See Loading Label Supply on page 17 The label notch sensors may need to be cleaned See Cleaning the Sensors on page 43 The grooved roller may be dirty or have adhesive...

Page 56: ...and jams Solutions Make sure the label supply is loaded correctly and is not wrapped around the rollers See Loading Label Supply on page 17 The rollers may be dirty or contaminated with adhesive See...

Page 57: ...print looks stretched the rollers may have debris or adhesive on them See Cleaning the Rollers and Peel Plate on page 41 If the print looks grainy or overlapped the platen roller may be dirty See Clea...

Page 58: ...nning See Printing Details on page 29 Alternatively turn the Auto Queue Job setting on so that jobs are automatically placed in the queue when received See Print Queue on page 35 The trigger sensors m...

Page 59: ...which case the user will be required to correct the interference at his own expense Changes or modifications not expressly approved by the party responsible for compliance could void the user s autho...

Page 60: ...Directive determines the framework for the return and recycling of used batteries and accumulators that are to be collected separately and recycled at end of life Please dispose of the battery accord...

Page 61: ...diate radio frequency energy and if not installed and used in accordance with the instruction manual may cause harmful interference to radio communications Operation of this equipment in a residential...

Page 62: ...including interference that may cause undesired operation of the device Co located statements To comply with FCC RF exposure compliance requirement the antenna used for this transmitter must not be co...

Page 63: ...equipment operates 20dBm EIRP 100mW International The Wi Fi radio module used in Brady host printers comply with internationally recognized standards covering human exposure to electromagnetic fields...

Page 64: ...RMINE THAT THE SOFTWARE IS SUITABLE FOR SUCH USE NO WARRANTIES FOR THE SOFTWARE The SOFTWARE is provided as is and with all faults THE ENTIRE RISK AS TO SATISFACTORY QUALITY PERFORMANCE ACCURACY AND E...

Page 65: ...permanently transfer rights under this End User License Agreement only as part of a permanent sale or transfer of the Device and only if the recipient agrees to this End User License Agreement If the...

Reviews: