background image

Climate 5000 MS – 6720887246 (2018/04) 

3

 Accessories

Accessories

The air conditioning system comes with the following accessories. Use all of the installation parts and accessories to install the air conditioner. Improper 

installation may result in water leakage, electrical shock and fire, or equipment failure.

Name

Shape

Quantity

Installation plate

1

Plastic expansion sheath

5-8 

(depending on model)

Self-tapping screw A ST3.9X25

5-8 

(depending on model)

Drain joint (some models)

1

Seal ring (some models)

1

Connecting pipe assembly

Liquid side

Ø1/4 in

Parts you must purchase. Con-

sult a technician for the proper 

size.

Ø3/8 in

Gas side

Ø3/8 in
Ø1/2 in
Ø3/4 in

Owner’s manual

1

Installation manual

1

Transfer connector (packed with the indoor or outdoor unit, depending on models)
NOTE: Pipe size may differ from appliance to appliance. To meet different pipe size 

requirements, sometimes the pipe connections need a transfer connector installed 

on the outdoor unit.

(one piece/one indoor unit)
1-5 

(1-5 pieces for outdoor unit, 

depending on models)

Magnetic ring  

(Fit the connective cable between the indoor unit and outdoor unit after installation.)

(one piece/one cable)

Table 1. 

Optional Accessories

There are two types of remote controls: wired and wireless.
Select a remote controller based on customer preferences and requirements and install in an appropriate place.
Refer to catalogues and technical literature for guidance on selecting a suitable remote controller.

Summary of Contents for Climate 5000 MS 18

Page 1: ...OU OUE Installation Manual IMPORTANT NOTE Read this manual carefully before installing or operating your new air conditioning unit Make sure to save this manual for future reference This manual only describes the installation of outdoor units When installing an indoor unit refer to the installation manual of the indoor unit ...

Page 2: ...ion 9 6 3 Notes on Drilling Hole in Wall 9 6 4 When Selecting 7 1KW units 9 7 Refrigerant Piping Connection 10 8 Wiring 12 8 1 Outdoor Unit Wiring 13 8 2 Wiring Figure 14 9 Air Evacuation 18 9 1 Evacuate Instructions 18 9 2 Note on Adding Refrigerant 18 9 3 Safety and Leakage Check 19 10 Test Run 20 11 Function of Automatic Wiring Piping Correction 20 12 European Disposal Guidelines 21 13 Informat...

Page 3: ...n Ø1 2 in Ø3 4 in Owner s manual 1 Installation manual 1 Transfer connector packed with the indoor or outdoor unit depending on models NOTE Pipe size may differ from appliance to appliance To meet different pipe size requirements sometimes the pipe connections need a transfer connector installed on the outdoor unit 1 one piece one indoor unit 1 5 1 5 pieces for outdoor unit depending on models Mag...

Page 4: ...ssment specification Servicing shall only be performed as recommended by the equipment manufacturer Maintenance and repair requiring the assistance of other skilled personnel shall be carried out under the supervision of the qualified personnel in the use of flammable refrigerants The appliance shall be stored so as to prevent mechanical damage from occurring Keep ventilation openings clear of obs...

Page 5: ... fire CAUTION This symbol shows that the opera tion manual should be read carefully CAUTION This symbol shows that service personnel should be handling this equipment with reference to the installation manual CAUTION CAUTION This symbol shows that information is available such as the operating manual or installation manual 3 Installation Overview INSTALLATION ORDER L N 1 2 3 MC MC 4 5 Install the ...

Page 6: ... Four One Five More than 12 cm More than 12 cm More than 12 cm More than 12 cm More than 12 cm More than 12 cm Morethan 60cm More than 30 cm Morethan200cm Morethan200cm More than 60 cm More than 30 cm More than 30 cm M o r e t h a n 3 0 c m More than 60 cm More than 60 cm Air filter Air filter Air filter Air out Air out Safety Precautions CAUTION To prevent wall damage use a stud finder to locate ...

Page 7: ...s f f Place the outdoor unit as close to the indoor unit as possible f f Ensure that there is enough room for installation and maintenance f f The air inlet and outlet must not be obstructed or exposed to strong wind f f Ensure the location of the unit will not be subject to snowdrifts accumulation of leaves or other seasonal debris f f The installation area must be dry and well ventilated f f The...

Page 8: ...and maintenance Split Type Outdoor Unit Refer to Fig 7 8 9 12 and Table 5 W H Fig 7 W H Fig 8 D A H Fig 9 OutdoorUnitDimensions WxHxD MountingDimensions DistanceA DistanceB 760x590x285 530 290 810x558x310 549 325 845x700x320 560 335 900x860x315 590 333 945x810x395 640 405 990x965x345 624 366 938x1369x392 634 404 900x1170x350 590 378 800x554x333 514 340 845x702x363 540 350 946x810x420 673 403 946x8...

Page 9: ...2 B do the following 1 Insert the drain joint into the hole in the base pan of the unit The drain joint will click in place 2 Connect a drain hose extension not included to the drain joint to redirect water from the unit during heating mode NOTE Ensure the water drains to a safe location where it will not cause water damage or become a slipping hazard A B Seal Seal Drain joint Base pan hole of out...

Page 10: ...t gas is both toxic and flammable Ensure there is no refrigerant leakage after completing the installa tion work Refrigerant Piping Connection Instructions CAUTION The branching pipe must be installed horizontally An angle of more than 10 may cause malfunction DO NOT install the connecting pipe until both indoor and outdoor units have been installed Insulate both the gas and liquid piping to preve...

Page 11: ... clockwise until the pipe is fully flared Flare the pipe in accordance with the dimensions shown in table 8 Pipe gauge Tightening torque Flare dimension A Unit mm Inch Flare shape Min Max Ø 6 4 18 20 N m 183 204 kgf cm 8 4 8 7 Flare shape R0 4 0 8 45 2 90 4 A Fig 18 Ø 9 5 25 26 N m 255 265 kgf cm 13 2 13 5 Ø 12 7 35 36 N m 357 367 kgf cm 16 2 16 5 Ø 15 9 45 47 N m 459 480 kgf cm 19 2 19 7 Ø 19 1 6...

Page 12: ... for this unit DO NOT plug another appliance or charger into the same outlet If the electrical circuit capacity is not enough or there is a defect in the electrical work it can lead to shock fire unit and property damage Connect the power cable to the terminals and fasten it with a clamp An insecure connection may cause fire Ensure that all wiring is done correctly and the control board cover is p...

Page 13: ...abels on the terminal block and firmly screw the u lug of each wire to its corresponding terminal 4 Clamp down the cable with designated cable clamp 5 Insulate unused wires with electrical tape Keep them away from any electrical or metal parts 6 Reinstall the cover of the electric control box Harmonic Declaration The equipment M4OB 36HFN8 Q complies with IEC 61000 3 12 provided that the short circ...

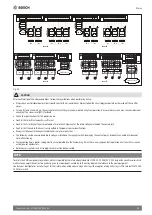
Page 14: ...through the lower line outlet of the cord clamp One twin models L A S A N A L B N B S B W L N L 1 POWER POWER POWER POWER SUPPLY POWER POWER Model B Model A Model E Model F Model G Model C Model D POWER OPTIONAL OPTIONAL OPTIONAL OPTIONAL OPTIONAL OPTIONAL OPTIONAL OPTIONAL OPTIONAL OPTIONAL OPTIONAL OPTIONAL OPTIONAL OPTIONAL OPTIONAL OPTIONAL OPTIONAL OPTIONAL OPTIONAL OPTIONAL OPTIONAL TO A TO ...

Page 15: ...to the following figures if end users wish to perform their own wiring One three models L A N A S A L B N B S B L C N C S C N L OPTIONAL OPTIONAL OPTIONAL OPTIONAL OPTIONAL OPTIONAL OPTIONAL OPTIONAL OPTIONAL OPTIONAL OPTIONAL OPTIONAL OPTIONAL OPTIONAL OPTIONAL OPTIONAL OPTIONAL OPTIONAL OPTIONAL OPTIONAL OPTIONAL OPTIONAL OPTIONAL OPTIONAL POWER POWER POWER SUPPLY POWER POWER POWER TO A TO A TO ...

Page 16: ...PTIONAL OPTIONAL OPTIONAL OPTIONAL OPTIONAL OPTIONAL OPTIONAL OPTIONAL POWER POWER POWER POWER POWER POWER SUPPLY TO A TO A TO A TO A TO A TO A TO B TO B TO B TO B TO B TO B TO C TO C TO C TO C TO C TO C TO D TO D TO D TO D TO D TO D Model A Model C Model C Model B Model D Model D Y G Y G Y G Y G Fig 26 One five models OPTIONAL OPTIONAL OPTIONAL OPTIONAL OPTIONAL OPTIONAL OPTIONAL OPTIONAL OPTIONA...

Page 17: ...ly fastened Check the specifications for the power source Confirm that electrical capacity is suffi cient Confirm that starting voltage is maintained at more than 90 percent of the rated voltage marked on the name plate Confirm that the cable thickness is as specified in the power source specifications Always install an earth leakage circuit breaker in wet or moist areas The following can be cause...

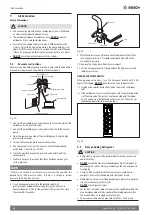
Page 18: ...ge in system pressure there may be a gas leak 8 Insert a hexagonal wrench into the packed valve high pressure valve and open the valve by turning the wrench 1 4 counterclockwise Listen for the gas to exit the system then close the valve after 5 seconds Flare nut Valve body Valve stem Cap Fig 30 9 Watch the pressure gauge for one minute to make sure that there is no change in pressure It should rea...

Page 19: ...ation Cover the following areas 1 Insulated resistance The insulated resistance must be more than 2MО 2 Earthing work After finishing earthing work measure the earthing resistance by visual detection using the earthing resistance tester Make sure the earthing resistance is less than 4О 3 Electrical leakage check perform test while unit is on During a test operation after completed installation the...

Page 20: ...s unimpeded and draining smoothly g Ensure there is no vibration or abnormal noise during operation 5 For the Outdoor Unit a Check to see if the refrigeration system is leaking b Ensure there is no vibration or abnormal noise during operation c Ensure the wind noise and water generated by the unit do not disturb the surrounding area or pose a safety hazard NOTE If the unit malfunctions or does not...

Page 21: ...ble refrigerants i e no sparking that it is adequately sealed and intrinsically safe 5 Presence of fire extinguisher If any hot work is to be conducted on the refrigeration equipment or any associated parts appropriate fire extinguishing equipment shall be available Have a dry power or CO2 fire extinguisher next to the charging area 6 No ignition sources No person carrying out work on a refrigerat...

Page 22: ... The check shall also take into account the effects of aging or continual vibration from sources such as compressors or fans 13 Detection of flammable refrigerants Under no circumstances shall potential sources of ignition be used in the search for or detection of refrigerant leaks A halide torch or any other detector using a naked flame may not be used 14 Leak detection methods The following leak...

Page 23: ...When transferring refrigerant into cylinders ensure that only appro priate refrigerant recovery cylinders are employed Ensure that the correct numbers of cylinders for holding the total system charge are available All cylinders to be used are designated for the recovered refrigerant and labelled for that refrigerant i e special cylinders for the recovery of refrigerant Cylinders shall be completed...

Page 24: ...Bosch Thermotechnology Ltd Cotswold Way Warndon Worcester WR4 9SW mailto Commercial enquiry uk bosch com Contact Number 03301233004 Web address www bosch industrial co uk ...

Reviews: