20
Climate 5000 MS – 6720887246 (2018/04)
Test Run
10
Test Run
Before Test Run
A test run must be performed after the entire system has been completely
installed. Confirm the following points before performing the test:
a. The indoor and outdoor units are properly installed.
b. Piping and wiring are properly connected.
c. There are obstacles near the inlet and outlet of the unit that might
cause poor performance or product malfunction.
d. The refrigeration system does not leak.
e. Drainage system is unimpeded and drains to a safe location.
f. The heating insulation is properly installed.
g. The earthing wires are properly connected.
h. Length of the piping and additional refrigerant stow capacity have
been recorded.
i. The power voltage is the correct voltage for the air conditioner.
CAUTION
Failure to perform the test run may result in unit damage, property
damage or personal injury.
Test Run Instructions
1. Open both the liquid and gas stop valves.
2. Turn on the main power switch and allow the unit to warm up.
3. Set the air conditioner to COOL mode.
4. For the
Indoor Unit
a. Ensure the remote control and its buttons work properly.
b. Ensure the louvres move properly and can be changed using the
remote control.
c. Double check to see if the room temperature is being registered
correctly.
d. Ensure the indicators on the remote control and the display panel on
the indoor unit work properly.
e. Ensure the manual buttons on the indoor unit work properly.
f. Check to see if the drainage system is unimpeded and draining
smoothly.
g. Ensure there is no vibration or abnormal noise during operation.
5. For the
Outdoor Unit
a. Check to see if the refrigeration system is leaking.
b. Ensure there is no vibration or abnormal noise during operation.
c. Ensure the wind, noise, and water generated by the unit do not
disturb the surrounding area or pose a safety hazard.
NOTE:
If the unit malfunctions or does not operate according to your
expectations, refer to the
Troubleshooting section
of the Owner’s
Manual before calling customer service.
11
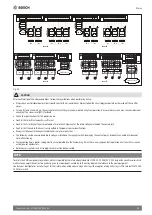
Function of Automatic Wiring/Piping
Correction
Automatic Wiring/Piping Correction Function
More recent models now feature automatic correction of wiring/piping
errors. Press the “check switch” on the outdoor unit PCB board for
5 seconds until the LED displays “CE”, indicating that this function is
working. Approximately 5-10 minutes after the switch is pressed, the
“CE” disappears, meaning that the wiring/piping error is corrected and
that all wiring/piping is properly connected.
B
A
B
A
B
A
B
A
B
A
B
A
Check switch
LED display
Correct
Incorrect wiring
Incorrect wiring
Indoor unit B
Indoor unit B
Indoor unit B
Outdoor unit
Outdoor unit
Outdoor unit
Indoor unit A
Indoor unit A
Indoor unit A
Terminal
block
Terminal
block
Terminal
block
Liquid/
Gas pipe
Liquid/
Gas pipe
Liquid/
Gas pipe
Fig. 33.
How to Activate This Function
1. Check that outside temperature is above 5°C.
(This function does not work when outside temperature is not above
5°C)
2. Check that the stop valves of the liquid pipe and gas pipe are open.
3. Turn on the breaker and wait at least 2 minutes.
4. Press the check switch on the outdoor PCB board until the LED
displays “C E”.


