13
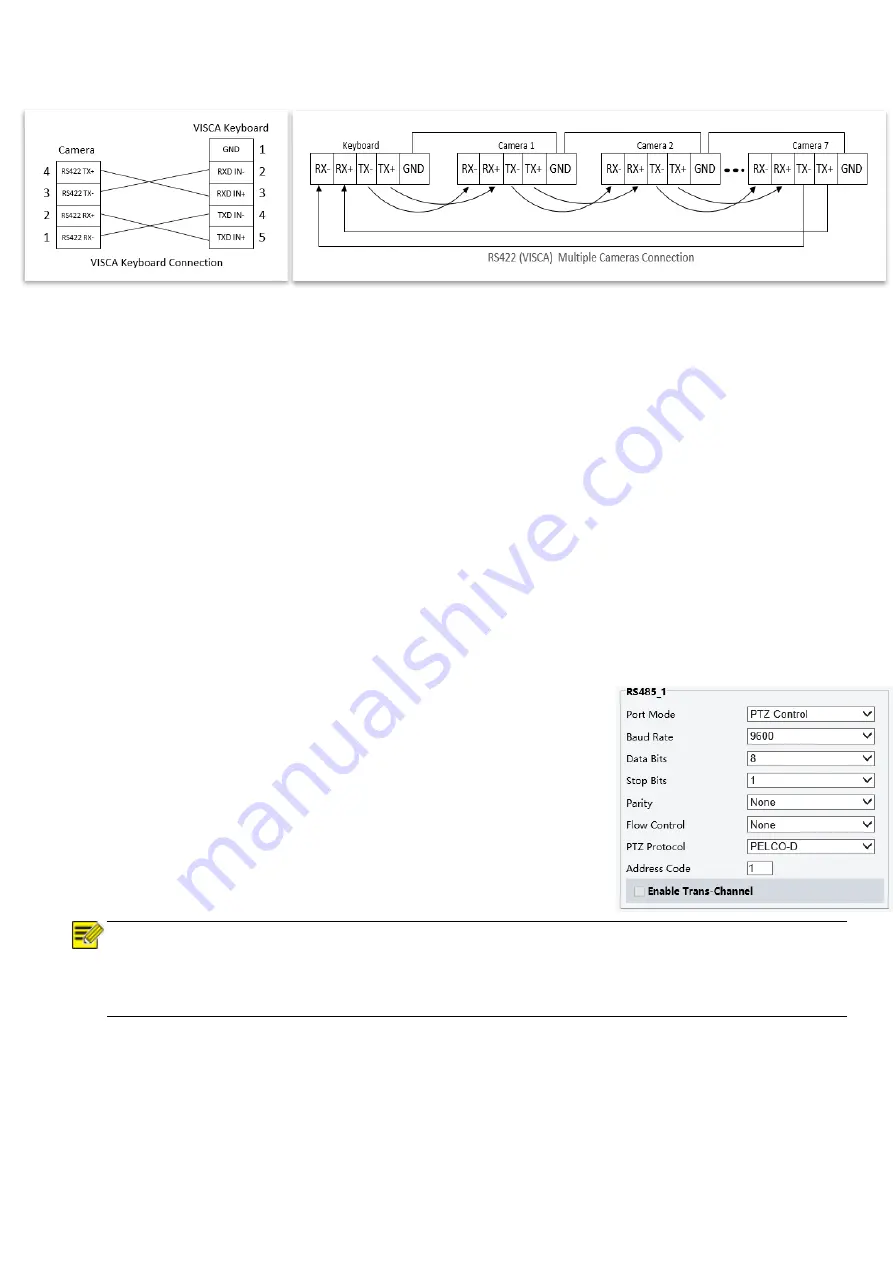
VISCA (None-Sony) Keyboard RS422 Connection
2. Setup Camera ID, Baud Rate and Control Protocol
In order for you to control a camera, the camera ID, baud rate and control protocol have to be set up in advance,
Baud rate and the camera ID setting on the camera have to be the same as baud rate and camera ID setting on the
system/control keyboard. The camera can auto detect the VISCA and PELCO-D, only need to set up the camera address
and baud rate.
Connect the camera to a monitor. There is an initial setting page displaying on the screen for 5 seconds when the camera is
powered on. On the page, it shows the factory default setting of the camera ID, baud rate and other information. Suggest
taking a picture of this default setting information for setting keyboard use. Set the keyboard or control system to match
the camera ID, baud rate setting with the camera.
1.
Camera supports VISCA and PELCO-D protocols, protocol is detected automatically by the camera.
2.
Factory Default Setting: For both SDI and IP video, Baud Rate: 9600, Camera ID: 001, Pelco Protocol.
3.
Use RS485 Pelco-D can control up to 255 cameras, camera ID from 001 to 255 has to be set.
4.
Use RS422 VISCA protocol can control up to 7 cameras, camera ID from 1 to 7 has to be set.
5.
Supports baud rate of 2400bps, 4800bps, 9600bps and 38400bps.
6.
How to set up the address and baud rate of the camera for SDI, please see the Page19.
7.
On the keyboard side, for RS485 control, go into the camera setting menu, select the camera address/ID you want
to set up for, set the baud rate to match the same as the one has been set on camera side, select protocol Pelco D
for RS485 control. (How to set up the menu of the keyboard, please refer to the instruction of the keyboard you
are using.)
8.
On the keyboard side, for VISCA control, select RS232/RS422 control
method, set the baud rate to match the same as the one has been set on
camera side. (How to set up the VISCA keyboard, please refer to the
instruction of the keyboard you are using.)
9.
On IP control side, go into the camera IP web interface setting page by using
browser to login camera IP address (Default set to 192.168.0.13), go to
“Setup
System
Port&Devices” setting page, set the Baud Rate, camera
ID, Protocol to the same as the ones that have been set on the camera side.
(For detail, please refer to Part Two: Network Camera User Manual Page
25.)
10.
SDI and IP video setting have to be matching with each other, if you change
any one of the settings on any sides of the SDI or IP.
NOTE!
Regarding the camera ID and Baud Rate setting, for the first communication setting, you must match the
control system (or keyboard) camera ID and Baud Rate setting to the cameras.
After communicating successfully in between the camera and the control, you can modify the ID and baud rate
of the camera using the keyboard.


