BRT7989/7200
Page 7
Assembly STEP 1
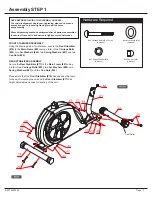
FRONT STABILIZER ASSEMBLY
Using the drawing below for reference, secure the
Front Stabilizer
(#16)
to the
Main Frame (#01)
using a total of two
Carriage Bolts
(#25
), two
Arc Washers (#49)
, two
Spring Washers (#47)
and two
Cap Nuts (#42)
.
REAR STABILIZER ASSEMBLY
Secure the
Rear Stabilizer (#17)
to the
Main Frame (#01)
using
a total of two
Carriage Bolts (#25)
, two
Arc Washers (#49)
, two
Spring Washers (#47)
and two
Cap Nuts (#42)
.
Please Note that the
Front Stabilizer (#16)
has end caps that spin
for ease of relocating the unit and the
Rear Stabilizer (#17)
has
height adjustable end caps for leveling of the unit.
Hardware Required
Front Roller
NOTE BEFORE STARTING THE ASSEMBLY PROCESS :
To avoid misalignment due to over-tightening, please do not use a
wrench and use only hand-tightening for now to ensure
easy assembly.
Wrench-tightening should be performed after all parts are assembled
to ensure all nuts, bolts, and parts are tightly secured before use.
#47 Spring Washer (M8)
[4 pieces]
#25 Carriage Bolt (M8 x 70mm)
[4 pieces]
#42 Cap Nut (M8)
[4 pieces]
#49 Arc Washer (M8)
[4 pieces]


