background image

INSTRUCTIONS FOR THE USE OF THE EARTH AUGERS 


4.5  Engine starting 


Proceed as follows to start the engine: 


Fig.15 


Fig.16 

1)


After carefully completing all the operations required for 

preparation and fuel supply, set the gas control lever and the red button 

in the START position. 

2)


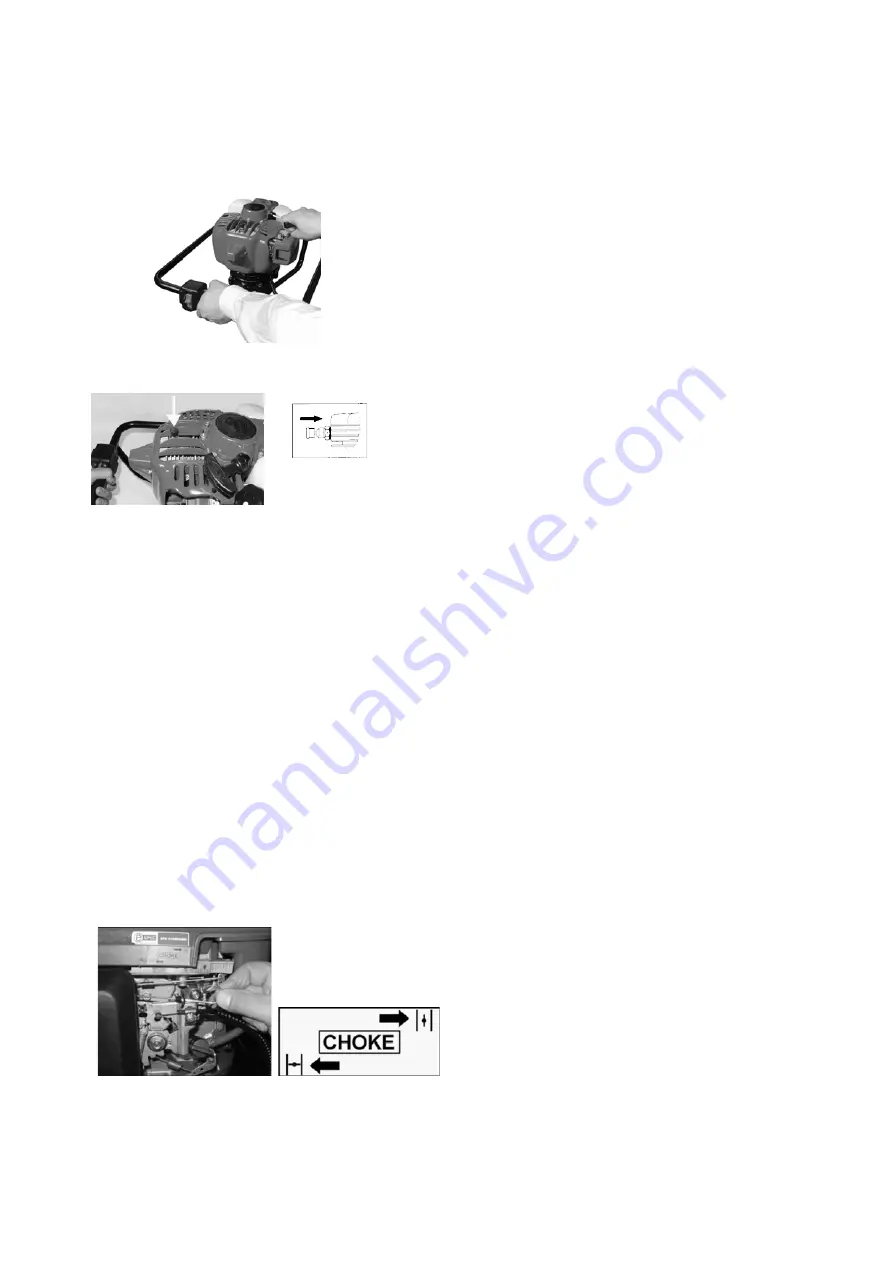
Grasp the handlebar of the earth auger firmly with your left hand 

and press the throttle lever. Use your right hand to slowly pull on the 

cord until it engages the sprockets on the flywheel (Fig. 15). 

3)


Follow the instructions regarding the carburetor provided below and 

then pull the starting cord with force until the machine starts up. Never 

pull the starting cord all the way out in order to avoid damaging its 

connection mechanism. 


The earth-augers NEA450 ST, NEA560 ST, NEA610 ST are equipped 

with a decompression valve that facilitates the starting of the engine by 

reducing the amount of force to be applied to the starting cord when 

the machine is being started.  In order to start these types of earth 

augers, press the decompression valve button (Fig. 16) positioned on 

the cylinder at the side of the starting and then proceed as indicated in 

point 1. 


Engine starting: 


with the engine cold, press the priming bulb 5-6 times until mixture flows out of the respective discharge hose (in 

order to completely fill all the carburettor chambers); 


set the air lever in the CLOSE position, and pull the starting cord for 1 - 2 times until the engine starts firing. Even 

if no firing sounds are heard, return the air lever to the OPEN position; 


pull the starting cord once again until the engine starts. If the engine fails to start after the fourth pull, repeat the 

operations above starting from first point. 

If, despite all these attempts, the engine fails to start, the combustion chamber must be flooded. In this case, unscrew, 

remove and dry the spark-plug and pull the starting cord several times without the spark-plug in position in order to 

clean/ventilate the combustion chamber. 

IMPORTANT: all these operations are not to be performed when the engine is already hot; but with the button in 

the central position it is sufficient to merely pull the starting cord until the engine starts. 

Please refer to the section engine instruction manual for further information about the engine. 


4.6  Starting the model T-170HO engine 


(follow the instructions provided in the HONDA engine 

operation and maintenance manual for all specifications 

regarding engine starting). 

In order to start the engine when cold, close the air lever 

(CHOKE) (see Fig. 17). 


After the engine has started, open the lever (see Fig. 17). 


Fig. 17 


GB - 11 

Summary of Contents for NEA 431

Page 1: ...ORIGINAL INSTRUCTIONS TRANSLATION INSTRUCTIONS POUR L EMPLOI DES TARIERES TRADUCTION DES NOTICE ORIGINALE LEGGERE ATTENTAMENTE IL PRESENTE MANUALE PRIMA DI UTILIZZARE LA MACCHINA READ CAREFULLY THIS...

Page 2: ......

Page 3: ......

Page 4: ...lio lubrificante per riduttore T 170HO 8 1 14 Olio motore HONDA per mod T 170HO 9 1 15 AVVIAMENTO 9 1 16 Premessa 9 1 17 Carburante per motori a 2 tempi 9 1 18 Carburante per motori a 4 tempi 9 1 19 U...

Page 5: ...rvare per sempre questo manuale e far riferimento ad esso per ogniproblema La macchina deve essere utilizzata solo da persone adulte e ben istruite sul suo funzionamento da un responsabile qualificato...

Page 6: ...a fate attenzione alla trivella l utensile che usate per forare il terreno nel suo movimento rotatorio pu trascinarvi e causarvi seri danni soprattutto se lavorate su terreni sassosi fate attenzione c...

Page 7: ...esplosiva o in luoghi dove esiste il pericolo di incendio per la lavorazione di materiali diversi da quelli previsti dal costruttore in condizioni di pericolosit o di malfunzionamenti della macchina p...

Page 8: ...RIVELLE 2 0 CARATTERISTICHE TECNICHE 2 1 Parti principali 7 1 2 3 4 6 5 Parti principali Fig 1 1 Serbatoio miscela 2 Manubrio 3 Carburatore 7 1 4 Riduttore 5 Trivella 6 Leva comando gas con sicurezza...

Page 9: ...valori medi ponderati tra funzionamento al minimo e al massimo senza carico in accordo con 2002 44 EC m s2 13 SX 13 DX 14 SX 14 DX 13 5 SX 13 5 DX 13 9 SX 9 9 DX 14 SX 10 DX 13 SX 13 DX 13 SX 13 DX 1...

Page 10: ...pposita sede del coperchio cilindro facendo passare il cavo in acciaio sotto la relativa sede Fig 3A Avvitate il registro sul coperchio cilindro del motore regolandolo con il dado in modo da eliminare...

Page 11: ...ndo il dispositivo di innesto della bussola scanalata che rilasciato funzioner da fermo Fig 10 6 Per il modello T 170HO montare il filtro aria nell apposito alloggiamento sul motore Il filtro aria smo...

Page 12: ...ita del motore E importante utilizzare benzina e olio di marca qualificata e impiegare la miscela dopo averla preparata entro le tre quattro settimane Miscelate la benzina con l olio prima di immetter...

Page 13: ...ilizzo della leva acceleratore N B A motore avviato alla prima accelerazione il pulsante ritorna automaticamente in posizione centrale Per le macchine dotate di motore KENDO o KAWASAKI non seguite la...

Page 14: ...scarico in modo da riempire completamente tutte le camere del carburatore ponete la leva della cuffia aria in posizione CLOSE tirate la funicella avviamento da 1 a 2 volte al massimo fino al raggiungi...

Page 15: ...ino del cambio a fine corsa verso l alto vedi fig 19 b Per disinnestare la trivella dal motore e mettere in folle portare l alberino a met della sua corsa vedi fig 20 c Per innestare la retromarcia po...

Page 16: ...state perforando Succede infatti che se la trivella incontra qualche grosso sasso o qualche radice si pu bloccare improvvisamente facendovi perdere il controllo della macchina l equilibrio e di conseg...

Page 17: ...elettrici che dovessero rendersi inutilizzabili per difetto di fabbricazione o di materiale accertato presso la nostra Societ c La garanzia limitata alla sostituzione pura e semplice dei pezzi difett...

Page 18: ...el T 170HO 8 3 3 Lubricating oil for reduction units in model T 170HO 8 3 4 HONDA engine oil for model T 170HO 9 4 0 STARTING 9 4 1 Overview 9 4 2 Fuel for 2 stroke engines 9 4 3 Fuel for 4 stroke eng...

Page 19: ...ble against things or third parties in the action range of the machine Make sure there are no people animals or objects in the action range of the earth auger While working make sure you are always in...

Page 20: ...holes in the ground especially when drilling in rocky soil always be prepared for the shock caused by the machine if it ever strikes big hidden roots or stones 1 4 Safety signs Warning danger caution...

Page 21: ...with risks of explosion or in places where there exists a risk of fires for operating the unit on materials different from those advised be the manufacturer in conditions of dangerousness or malfunct...

Page 22: ...OF THE EARTH AUGERS 2 0 TECHNICAL CHARACTERISTICS 2 1 Main parts 7 1 2 3 4 6 5 Main parts Fig 1 1 Mixture tank 2 Handle 3 Carburetor Air casing 7 1 4 Gear box 5 Auger 6 Throttle lever 7 Starting hand...

Page 23: ...105 Vibration h w weighted average values between minimum rpm and racing without load according to 2002 44 EC m s2 13 SX 13 DX 14 SX 14 DX 13 5 SX 13 5 DX 13 9 SX 9 9 DX 14 SX 10 DX 13 SX 13 DX 13 SX...

Page 24: ...der cover and pass the steel cable beneath the respective seat Fig 3A Screw the terminal into the engine cylinder cover and adjust the nut to eliminate excess play between cable and sheath in order to...

Page 25: ...ing device which will serve as a retainer when released after pressing Fig 10 6 For model T 170HO assemble the air filter in its housing on the engine This air filter is supplied disassembled in order...

Page 26: ...is important to use high quality petrol and oil and to use the mixture prepared within three four weeks of mixing Mix the petrol with the oil before adding it to the tank and perform this operation i...

Page 27: ...cannot be used Fig 13 Fig 14 3 STOP to switch off the engine Note After the engine has started the button automatically returns to its central position after the first acceleration For the machines eq...

Page 28: ...ming bulb 5 6 times until mixture flows out of the respective discharge hose in order to completely fill all the carburettor chambers set the air lever in the CLOSE position and pull the starting cord...

Page 29: ...th auger out of working gear into idle move the gearshift into halfway position see Fig 20 c In order to reverse drilling rotation direction move the gearshift all the way down to the bottom of its st...

Page 30: ...by the terrain being drilled The earth auger can stop suddenly if it hits a big root or stone and could make you lose control of the machine momentarily lose your balance and cause injury 5 3 What to...

Page 31: ...any mechanical or electrical parts that should result faulty due to manufacturing defects or defects in material as verified by our own assessment at ourCompany c This guarantee is limited only to the...

Page 32: ...e lubrifiante pour le r ducteur des mod les T 170HO 8 3 4 Huile pour moteur HONDA destin e au mod T 170HO 9 4 0 DEMARRAGE 9 4 1 Avant propos 9 4 2 Carburant pour les moteurs deux temps 9 4 3 Carburant...

Page 33: ...ou de m dicaments Travaillez seulement dans de bonnes conditions de visibilit et la lumi re du jour Utiliser toujours des v tements de travail indiqu s et un appropri outillage de protection bleus de...

Page 34: ...vous causer des l sions graves surtout si vous travaillez sur des terrains caillouteux faites attention ne pas vous faire surprendre par un arr t brusque de la tari re d une racine qui s est coinc e o...

Page 35: ...ns du manuel dans des lieux risque d explosion ou d incendie pour le travail de mat riaux diff rents de ceux pr vus par le fabriquant en conditions de danger ou mal fonctionnements de la machine utili...

Page 36: ...ES TECHNIQUES 2 1 Pi ces principales 7 1 2 3 4 6 5 Pi ces principales Fig 1 1 R servoir m lange 2 Guidon 3 Carburateur Protecteur air 7 1 4 R ducteur 5 Tari re 6 Levier de commande du gaz avec disposi...

Page 37: ...h w valeurs moyennes pond r es entre minimum et vitesse maximum sans charge en conformit avec 2002 44 EC m s2 13 SX 13 DX 14 SX 14 DX 13 5 SX 13 5 DX 13 9 SX 9 9 DX 14 SX 10 DX 13 SX 13 DX 13 SX 13 DX...

Page 38: ...t en faisant passer le c ble en acier sous le si ge pr vu cet effet Fig 3A Vissez la cosse sur le capot du cylindre du moteur en ajustant avec l crou de mani re liminer les ventuels jeux entre le c bl...

Page 39: ...t de la douille rainur e qui rel ch servira de but e Fig 10 6 Pour le mod le T 170HO montez le filtre air dans le logement pr vu cet effet sur le moteur Le filtre air est livr d mont pour le pr server...

Page 40: ...ra prolong e Il est important d utiliser de l essence et de l huile de bonnes marques et une fois que vous avez pr par le m lange il faut l utiliser dans les trois ou quatre semaines qui suivent M lan...

Page 41: ...d utiliser le levier de l acc l rateur N B Une fois que le moteur a d marr au cours de la premi re acc l ration le bouton poussoir revient automatiquement en position centrale Pour ce qui concerne les...

Page 42: ...mani re remplir compl tement toutes les chambres du carburateur Positionnez le levier pour arriv e d air en position ferm e CLOSE tirez le cordon de d marrage 1 2 fois au maximum jusqu ce que vous obt...

Page 43: ...fig 19 b Pour d samorcer la tari re du moteur et mettre au point mort amenez le petit arbre mi course voir fig 20 c Pour enclencher la marche arri re amenez le petit arbre en position basse en fin de...

Page 44: ...rez la tari re doit toujours rester strictement sous votre contr le Vous viterez ainsi les dangers d rivant du type de terrain que vous forez En effet si la tari re rencontre un grosse pierre ou une...

Page 45: ...t lectriques qui sont inutilisables par d faut de fabrication ou de mat riel d termin chez notre Soci t c La garantie est limit e au remplacement pur et simple des pi ces d fectueuses lorsque celles c...

Page 46: ...EA TJ 53 E 90 111 2 00 T 170 HO 71 105 3 60 c Il prodotto conforme alle direttive The product complies with the directives Das Produkt entspricht den Richtlinien Le produit est conforme aux directives...

Page 47: ......

Page 48: ...BLUE BIRD INDUSTRIES Fabbrica Motori s r l Via Due Camini 19 36010 ZAN Vicenza ITALY Telefono 0445 314138 ric aut Telefax 0445 314225 http www bluebirdind com E mail info bluebirdind com 690570 202203...

Reviews: