background image

Software Installation

17

If a Videohub control panel is selected in the Videohub Control Utility software, all of the panel's buttons will 
illuminate with the same colors and intensity as shown in the software interface. While the panel is selected 
in the software, the top left button will not indicate the status of the unit.

After configuring the network and control settings in the Blackmagic Videohub Control Utility, quit the 
software or unplug its USB connection. If the top left button begins to flash, refer to the diagnostic light 
information in the previous section named "Connecting Videohub Control Panels with Ethernet." Otherwise, 
you can immediately test the buttons as you program them and verify the SDI routes are valid.

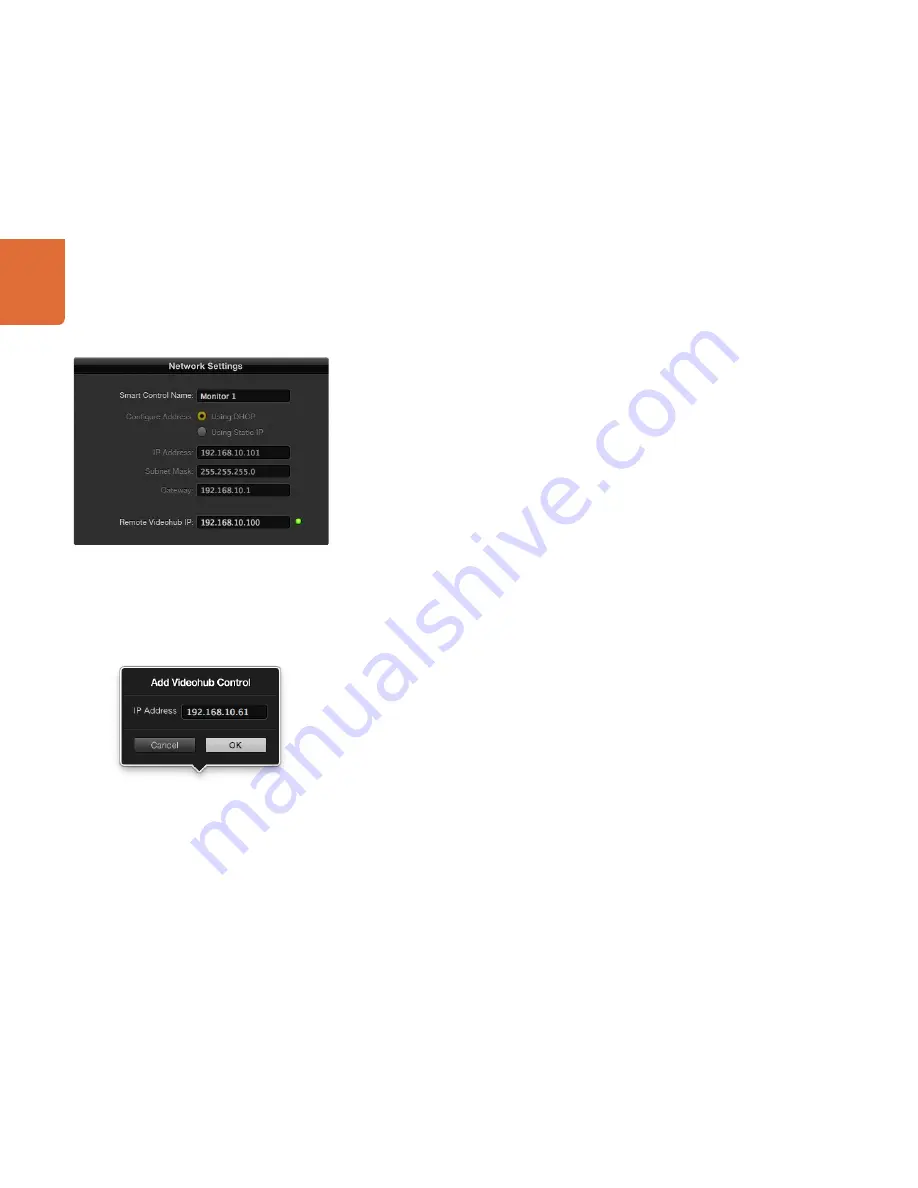
Network Settings

Each Videohub control panel requires an IP address to communicate with Videohub via your IP network.

When configuring a Videohub control panel via USB, you can choose DHCP or Static IP. DHCP automatically 
obtains all the network settings for your Videohub control panel and is the easier choice.

If you decide to use a static IP address, please ask your system administrator for a spare IP address to avoid 
creating an IP conflict on your network. You will then need to complete the IP address, subnet mask and 
gateway details for your Videohub control panel. A static IP address must be used if directly connecting a 
Videohub control panel to an Ethernet-equipped Videohub without using a network switch.

You will also need to complete the IP details for the Remote Videohub which you wish to control with your 
Videohub control panel. The remote Videohub is the Videohub Server and could refer to a Videohub Server 
computer or an integrated Videohub Server.

Add Videohub Control

If you already know the IP address of a Videohub control panel but it hasn't automatically appeared in the 
Videohub Control Panels pane, you can add the Videohub Control manually. To do so, click Add Videohub 
Control (+) at the bottom of the Videohub Control Panels pane. Type in the IP address of the Videohub 
control panel and click 

OK

. The software will verify the presence of the panel and add it to the Videohub 

Control Panels list. If the Blackmagic Videohub Control Utility does not find a Videohub control panel at the 
specified address, it will not add the unit to the list and will instead present an error message. You can use 
Blackmagic Videohub Control Utility to manually add a Videohub control panel when connected to a panel 
via Ethernet or USB.

Load/Save Settings

If you want to back up settings you've configured for your control panel, or set up several units the same way, 
you can save the settings from an already configured Videohub control panel and then load the settings 
file into the other units. After loading the pre-configured settings, you need only update network settings, 
including the control panel name, for each unit. If you want to dedicate Videohub Smart Control units to 
individual SDI destination devices, you will also need to specify the SDI destination device for each panel. 
You can load and save settings by choosing “Load Settings” or “Save Settings” from the File menu.

Blackmagic Videohub Control Utility network settings

You can manually add a Videohub control panel, by IP address, to 
the list of Videohub Control Panels

Summary of Contents for Videohub Master Control

Page 1: ...Installation and Operation Manual Videohub Control Windows November 2012 Mac OS X...

Page 2: ...with USB 12 Labelling Control Panels 13 Software Installation Installing the Videohub Control Utility Software 14 Updating the Software in Your Videohub Control Panel 15 Configuring the Videohub Contr...

Page 3: ...using dedicated broadcast quality hardware control panels that are also affordable We hope you get years of use from it and have lots of fun connecting everyone in your facility together This instruct...

Page 4: ...ol Thissectionprovidesyouwithalltheinformationyouneedtoknowbeforebuyingorinstalling a Videohub control panel You can plan how to set it up so there are no nasty surprises Hardware Installation Hardwar...

Page 5: ...Selection Button Level Button for independent RS 422 control from SDI Configurable buttons provide fast selection of common equipment types e g cameras Power over Ethernet network connection to Video...

Page 6: ...or initial configuration You will need to provide a USB 2 0 type A to B male cable This same USB cable can be used for applying internal software updates downloaded from the Blackmagic Design website...

Page 7: ...custom labelling Take button can be enabled 12 volt power supply connection Ethernet loop through to other network devices Power over Ethernet network connection to Videohub router Illuminated button...

Page 8: ...ing internal software updates downloaded from the Blackmagic Design website Internal software can provide new features compatibility with new hardware and support for new formats The Blackmagic Videoh...

Page 9: ...back to the network switch You will need to carry out the following steps to connect a Videohub control panel to the local area IP based network Step 1 Videohub control panels feature power over Ether...

Page 10: ...st you don t have any requirement to share Videohub on the network so it can be controlled by computers on the network you don t have much space such as in an OB van you have a limited power budget su...

Page 11: ...x format Unless you wish to use an AutoIP address disconnect and firmly reconnect the network cables to ensure they are properly connected check for faulty network cables and make sure the DHCP server...

Page 12: ...t can be found on the small left panel of the chassis just in front of the rack mounting holes The USB port will become inaccessible once Videohub Smart Control has been installed in a rack Therefore...

Page 13: ...ce plate to lie down next to the rest of the unit Step 5 The button caps can be easily lifted off with your fingers Remove the clear cap from a button that you wish to label while taking care to avoid...

Page 14: ...ility to your Applications folder The Videohub software installer for Windows also installs the Blackmagic Videohub Control Utility and there is nothing more you need to install If you have not alread...

Page 15: ...skip the rest of the steps in this section as your Videohub control panel is already up to date If a software update is required the following message will appear Software Update Required The softwar...

Page 16: ...n the network some units might not have received an IP address via DHCP and it will be necessary to manually configure each unit with appropriate network settings To do so connect a Videohub control p...

Page 17: ...trol with your Videohub control panel The remote Videohub is the Videohub Server and could refer to a Videohub Server computer or an integrated Videohub Server Add Videohub Control If you already know...

Page 18: ...port numbers to select crosspoint routes it is unnecessary to label these buttons as you can simply use the pre labelled numeric buttons If you prefer to use intuitive names of equipment to select cro...

Page 19: ...label the Videohub Master Control buttons Open the Videohub Control Utility and select your Videohub Master Control from the Videohub Control Panels pane Click one of the 15 unlabelled buttons in the...

Page 20: ...h up to 20 destinations Thesourcebuttonswillilluminatewhiteandthedestinationbuttonswillilluminategold colored Use this configuration if you don t intend to dedicate a Videohub Smart Control unit to ea...

Page 21: ...d close the window Take Button When the Use Take Button is enabled the lower right button becomes red colored Use this configuration if you wish to be able to select a change of route and then confirm...

Page 22: ...pment to devices which have matching labels for their remote and SDI ports This level is commonly used with SDI capture cards and VTR decks but cannot be used with cameras and monitors as they do not...

Page 23: ...422 remote control press the LEVEL button until you have set the appropriate routing level for your equipment Otherwise you can skip this step Type in the destination port number using the numeric pus...

Page 24: ...ation will be displayed on the LCD Press the SRC button so it lights white The source field will highlight blue on the LCD Scroll the wheel forwards or backwards until the desired source is found The...

Page 25: ...TR will be displayed on the LCD If you have made a mistake press the white CLEAR button and scroll until the correct destination is displayed Press the SRC button so it lights white The source field w...

Page 26: ...3 Mon 3A or Mon 3B could be displayed on the LCD If you have made a mistake press the white CLEAR button and scroll until the correct destination is displayed Press the SRC button so it lights white T...

Page 27: ...should not usually be set as destination devices and monitors won t match the RS 422 routing level Refer to the earlier section How to Label Buttons in Videohub Master Control to change this behavior...

Page 28: ...ind the destination to be locked Press and hold the gold DEST button until a lock icon appears in the destination field of the LCD Press DEST again to return the unit to its idle state and the destina...

Page 29: ...nfiguredasanXYcontroller destinationbuttonsappeargold colored and source buttons illuminate white When working with multiple destinations always select a destination button before selecting a source b...

Page 30: ...r You cannot unlock destination buttons locked by another computer iPad or Smart Control and the locked destination button will flash blue if you attempt to do so If you encounter a locked destination...

Page 31: ...ut the support options your dealer offers as they can arrange various support plans based on your workflow requirements Step 3 The next option is to email us with your questions using the web form at...

Page 32: ...care Blackmagic Design shall not be obligated to furnish service under this warranty a to repair damage resulting from attempts by personnel other than Blackmagic Design representatives to install rep...

Reviews: