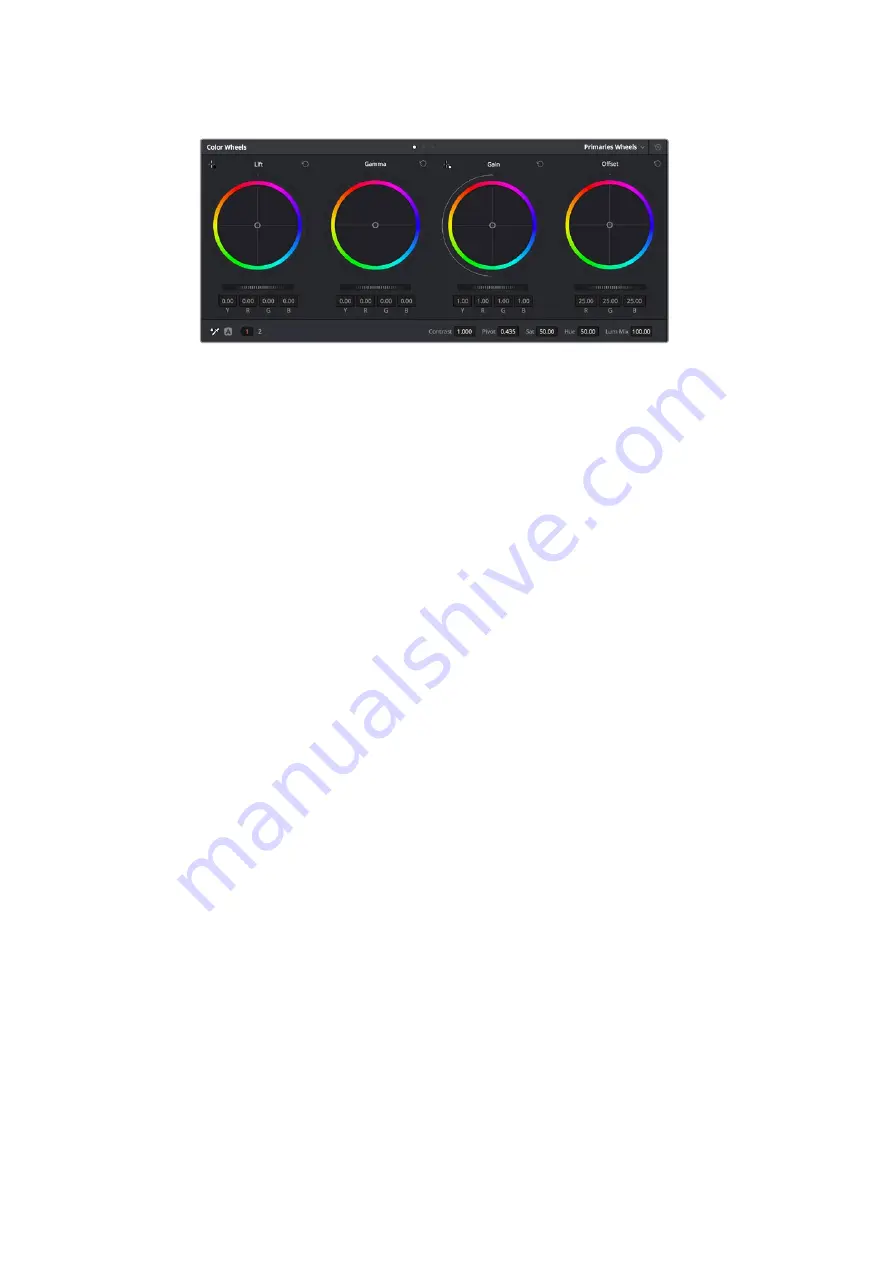
The ‘lift, ‘gamma’, ‘gain’ and ‘offset’ color wheels give you total control over the
color and tonal balance of your clips. To make a uniform adjustment to all colors for
each tonal region, drag the dial underneath the color wheels back and forth
For more accurate control of each color using a mouse, you can change the color wheels to
‘primaries bars’ which let you adjust each color and luminance channel for the lift, gamma and
gain controls separately. Simply select ‘primaries bars’ from the dropdown menu near the top
right of the color wheels.
Adjusting the ‘lift’:
With your clip selected on the color timeline, click on the ‘lift’
dial underneath the first color wheel. Slide it back and forth and watch how it affects
your image. You’ll see the brightness of the dark regions of your picture increase
and decrease.
Set it to where you want the dark areas to look their best. If you decrease the lift too
much, you’ll lose details in the blacks and you can use the parade scope to help avoid
this. The optimal position for blacks on the waveform is just above the bottom line of
the parade scope.
Adjusting the ‘gain’:
Click on the ‘gain’ dial and slide it back and forth. This adjusts
the highlights which are the brightest areas of your clip. The highlights are shown on
the top section of the waveform on the parade scope. For a brightly lit shot, these are
best positioned just below the top line of the waveform scope. If the highlights rise
above the top line of the waveform scope, they will clip and you will lose details in the
brightest regions of your image.
Adjusting the ‘gamma’:
Click on the ‘gamma’ dial underneath the color wheel and slide
it back and forth. As you increase the gamma you’ll see the brightness of the image
increase. Notice the middle section of the waveform will also move as you adjust the
gamma. This represents the mid tones of your clip. The optimal position for mid tones
generally falls between 50 to 70% on the waveform scope. However, this can be
subjective based on the look you are creating and the lighting conditions in the clip.
You can also use the curves palette to make primary color corrections. Simply click to create
control points on the diagonal line inside the curve graph, and drag them up or down to adjust
the master RGB contrast at different areas of image tonality. The optimum points to adjust are
the bottom third, mid, and top third of the curve line.
There are many more ways of doing primary color correction in DaVinci Resolve.
70
Working with Clips in DaVinci Resolve
Summary of Contents for cintel
Page 99: ...Cintel Scanner インストール オペレーションマニュアル 2020年5月 日本語 ...
Page 196: ...Manuel d utilisation et d installation Mai 2020 Français Cintel Scanner ...
Page 293: ...Installations und Bedienungsanleitung Mai 2020 Cintel Scanner Deutsch ...
Page 395: ...Manual de instalación y funcionamiento Escáner Cintel Mayo 2020 Español ...
Page 492: ...安装操作手册 2020年5月 中文 Cintel Scanner ...
Page 589: ...설치 및 사용 설명서 Cintel 스캐너 2020년 5월 한국어 ...
Page 686: ...Руководство по установке и эксплуатации Русский Май 2020 г Cintel Scanner ...
Page 783: ...Manuale di istruzioni Cintel Scanner Maggio 2020 Italiano ...
Page 880: ...Manual de Instalação e Operação Cintel Scanner Maio 2020 Português ...
Page 977: ...Kurulum ve Kullanım Kılavuzu Cintel Tarayıcı Mayıs 2020 Türkçe ...


