TIP
Whenever you change film type, gauge or enable HDR, the auto
black/white calibration is reset. The status indicator under the auto black/white
button reminds you to recalibrate the LED light source to help ensure the
highest quality scans or inform you if any problems occur.
RGB controls:
By default, a color balance control lets you adjust all three color
channels by varying amounts to alter the color temperature of the light source used to
illuminate the film, while the adjusted R, G, and B values are displayed in three fields
below. Optionally, you can choose to put this control into ‘color bars’ mode using the
mode pop-up to the right of the ‘light source’ title bar, which changes this control to
three vertical red, green, and blue color channel sliders.
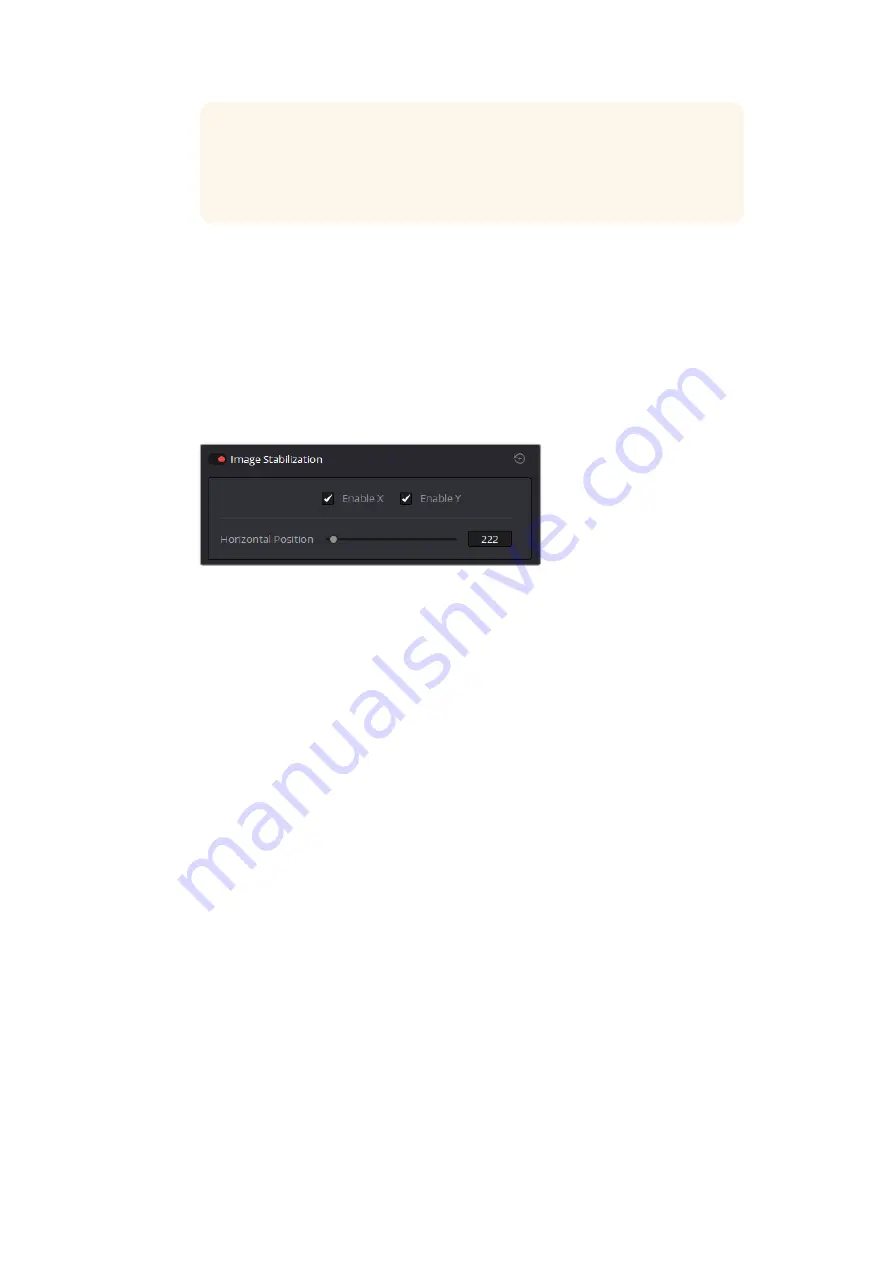
Image Stabilization
These controls let you enable and disable as well as control image stabilization to eliminate
vertical film hop.
Image Stabilization controls in the Media page
Image Stabilization enable/disable control:
The dot to the left of the ‘image
stabilization’ title bar lets you enable or disable your scanner’s hardware-based
image stabilization altogether. While hardware stabilization is typically desirable
when you have high quality perforations, you may want to turn this option off if the
condition of the perforations is poor and you decide to use DaVinci’s software based
stabilization instead.
When image stabilization is enabled, a horizontal X axis detection overlay is displayed
in the viewer, highlighting the edge of the film perforation that will be used as the
reference for stabilization. This overlay is automatically hidden when recording. Image
stabilization is enabled by default.
Enable X and Y checkboxes:
Enable X and enable Y lets you choose whether to
use hardware image stabilization to fix horizontal gate weave and vertical gate hop
respectively. If the results are unsatisfactory with both axes enabled, you can turn off
the axis that’s causing issues with stabilization.
Horizontal Position slider:
Your Cintel scanner attempts to automatically place the
stabilization detection overlay at the best location, with reference to the perforation
shown on the currently loaded frame, for the best stabilization result.
You will notice a thin transparent line in the blue alignment overlay. For optimum
stabilization, this line should touch the edge of the perforation. If the automatic
positioning is not ideal, you can manually move the overlay to a more ideal position,
either by dragging it in the viewer with your mouse, or by using the horizontal slider.
Ideal placement of the stabilization overlay should position the clear line in the
alignment overlay on the edge of the perforation, as shown in the example image.
With the overlay correctly positioned, this enables hardware stabilization of gate
weave along the X axis.
29
Capturing from Cintel using DaVinci Resolve
Summary of Contents for cintel
Page 99: ...Cintel Scanner インストール オペレーションマニュアル 2020年5月 日本語 ...
Page 196: ...Manuel d utilisation et d installation Mai 2020 Français Cintel Scanner ...
Page 293: ...Installations und Bedienungsanleitung Mai 2020 Cintel Scanner Deutsch ...
Page 395: ...Manual de instalación y funcionamiento Escáner Cintel Mayo 2020 Español ...
Page 492: ...安装操作手册 2020年5月 中文 Cintel Scanner ...
Page 589: ...설치 및 사용 설명서 Cintel 스캐너 2020년 5월 한국어 ...
Page 686: ...Руководство по установке и эксплуатации Русский Май 2020 г Cintel Scanner ...
Page 783: ...Manuale di istruzioni Cintel Scanner Maggio 2020 Italiano ...
Page 880: ...Manual de Instalação e Operação Cintel Scanner Maio 2020 Português ...
Page 977: ...Kurulum ve Kullanım Kılavuzu Cintel Tarayıcı Mayıs 2020 Türkçe ...