background image

30

1.877.877.2269

BLACKBOX.COM

NEED HELP?

LEAVE THE TECH TO US

LIVE 24/7

TECHNICAL

SUPPORT

1.877.877.2269

CHAPTER 3: CONFIGURATION USING RS-MODERATOR

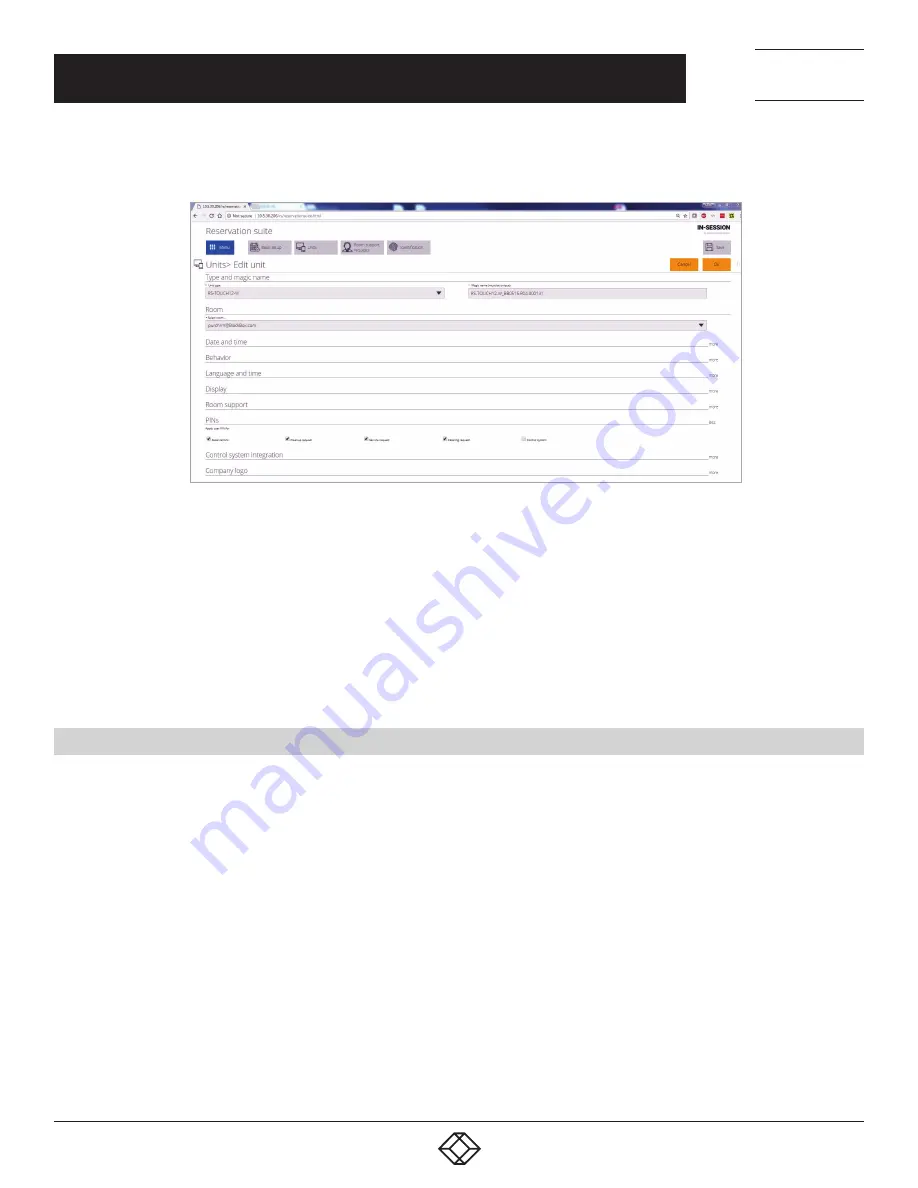
Click on the edit button of the selected unit. A detailed unit settings page will be displayed. Then tap on “more” in the “PINs” line.

FIGURE 3-44. UNIT SETTINGS PAGE

By using checkboxes in the “PINs” section , you can state which functions will require you to enter a PIN on the given panel:

Š

Š

“Reservations“ - user PIN will be required to reserve a room and prolong or end an event.

Š

Š

“Cleanup request“ - user PIN will be required to order cleanup.

Š

Š

“Service request“ - user PIN will be required to order technical support (common for both service departments).

Š

Š

“Catering request“ - user PIN will be required to order catering.

Š

Š

“Control system” - user PIN will be required to enter the operation screen of the control system.

Then click the “OK” button. Repeat this step for all units. Tap “Save” to save changes and apply it to the whole reservation suite.

3.13 DETAILED SETTINGS OF THE RESERVATION SYSTEM PANELS   

 
In “Units” menu, you can also change other detailed panel settings. Click on “Units/All units.” A list of all reservation system units 
will be displayed. Click on the edit button of the selected unit. A detailed unit settings page will be displayed. Each line represents 
one group of parameters to set. Then tap on “more” in the selected group.

Summary of Contents for RS-MODERATOR

Page 1: ...24 7 TECHNICAL SUPPORT AT 1 877 877 2269 OR VISIT BLACKBOX COM IN SESSION ROOM MODERATOR RS MODERATOR USER MANUAL Power LED SD OTG R eset ...

Page 2: ...oft Exchange Server 15 3 5 3 G Suite 16 3 6 Adding the Reservation System Panels 16 3 7 Adding Another Room Account User Accounts and Servers 19 3 8 Settings of the Reservation Suite Behavior 21 3 9 Inserting the Company Logo 22 3 10 Setting Up the Room Support Services 24 3 11 Setting Up the Confirmation of the Meetings 27 3 12 Setting Up PINs 29 3 13 Detailed Settings of the Reservation System P...

Page 3: ...ectors 1 RJ 45 1 HDMI 1 USB 2 0 1 USB 2 0 OTG 1 3 5mm Audio 1 Antenna Male 1 SD Card 1 Barrel Plug Display Type HDMI output Resolution 1920 x 1080p Indicators 1 Power LED Interface Reset Button Power 5 VDC power input jack Enclosure Metal chassis fanless Installation Desktop Dimensions 4 64 H x 3 97 W x 0 99 D 11 8 x 10 1 x 2 52 cm Protrudes 0 39 0 1 cm Weight 1 1 lb 0 5 kg ...

Page 4: ... plan with support of resource room mailboxes home and personal plans are not supported G Suite formerly Google Apps for Work subscription Google Apps Free edition also known as Standard edition is not supported It is also possible to use the default applications of these services to make a reservation of a room Outlook web interface mobile applications For easy administration of reservation syste...

Page 5: ...for IP address assignment if DHCP is used An open UDP port 1900 Opening this port is not mandatory it is used to make the reservation system units visible in the Windows File Explorer This port uses UPnP technology Universal Plug and Play which enables reservation system units in the file explorer to be made visible as other network devices This technology must also be enabled on a given computer ...

Page 6: ...Web pages are available in the English language only 3 2 ACCESSING ADMIN WEB To access the Admin Web of IN SESSION units you need a computer with an internet browser The computer must be connected to the same LAN network as the IN SESSION units The Admin Web pages can be opened in one of the following ways Option 1 Run File Explorer on your computer and select Network in the left part of the scree...

Page 7: ...eck whether the IP address has been acquired through DHCP On or not Off If the setting is not suitable for you it can be changed later for description how to do this see the IP Settings chapter Run the Internet browser on your PC and type in the RS MODERATOR unit s IP address 3 3 LOGIN If the RS MODERATOR unit is joined to the reservation suite you need to log in to gain access to Admin Web Enter ...

Page 8: ...SETTINGS In the left part choose Configuration If you select Identification in the upper left part you can change the Magic name Magic name is a unique name of a unit used in communication between reservation suite units It is factory set and there is usually no need to change it If you however need to change it you must ensure the new name is unique in the specific local network All changes made ...

Page 9: ...t enable the automatic assignment of DNS server addresses you need to set them in the bars Primary DNS server or Secondary DNS server You can also enter the IP address the subnet mask the default gateway as well as the primary and secondary server DNS of your network If the assignment of IP address through DHCP is enabled the entered setting of the IP address mask etc is taken as alternate configu...

Page 10: ...ser certificate file and upload it The following certificate types are supported PKCS 12 and x509 PEM DER You can also upload a private key file if the private key is not part of the user certificate If the user certificate or private key is encrypted enter the password to decrypt it in the Password optional box In the CA certificate entry upload the Radius server CA Certificate Click Apply to sav...

Page 11: ...t time click on Current date and time in the upper part of the screen The current date time and time zone are shown on the Current time line The applicable boxes can be selected to enter changes to the date day month year time hour minute second Be sure to click the Apply button for any changes to become effective FIGURE 3 7 CURRENT DATE AND TIME SCREEN To set the time zone choose Time zone in the...

Page 12: ...ess names of the primary and secondary NTP servers Use the Primary NTP server and Secondary NTP server boxes for this purpose Be sure to click the Apply button for any changes to become effective FIGURE 3 9 INTERNET CLOCK SCREEN You can go back to the home page with the Menu button or you can continue with other settings as described next 3 4 3 UPGRADING FIRMWARE To upload more recent firmware to ...

Page 13: ... the RS MODERATOR unit into the factory default mode and delete all user settings choose System in the left menu then Factory default in the upper part and then click the button Set factory default Confirm the deletion by the Yes button or cancel it by clicking the Cancel button FIGURE 3 12 FACTORY DEFAULT SCREEN If you choose License in the left menu you will see a page describing the EULA softwa...

Page 14: ...ill start the wizard for the reservation suite creation Enter the reservation suite name and password You need to confirm the password by entering it twice Enter Password and Reenter Password The entered passwords must be identical The reservation suite name and password mutually identify panels The password is also used for accessing the units settings The next procedure varies depending on the t...

Page 15: ...g mail blackbox local or the global name of the server if there is a DNS record for it e g exchange contoso com In the Communication timeout item enter the maximum time to wait for the server response If the server does not respond by this time it is evaluated as a communication error If a proxy server is required for the access to your exchange server check the box Use proxy server Enter the user...

Page 16: ...a JSON file with the certificate Now enter the user email see the IN SESSION Setup Guide G Suite Creating a user account In the Room settings section enter the room account email see the IN SESSION Setup Guide G Suite Creating a resource calendar In the field Room displayed name you can enter the room name that will be shown in the upper left hand corner of the IN SESSION panel You can now end thi...

Page 17: ...es with the Save button Once you create a new reservation suite and set the RS MODERATOR for the first panel you may join the panel to this suite Connect the panel to your network The opening screen will appear on the panel You can change the language and IP settings now Check also that the panel has set the same magic name as was set in the previous step for given panel in the RS MODERATOR Then t...

Page 18: ...d you have chosen during the creation of the suite Continue by tapping Join FIGURE 3 21 SELECT RESERVATION SUITE TO JOIN Now the panel will be connected to the on premises administrated reservation suite All settings on this panel you now can do using RS MODERATOR admin web NOTE This is the only way of joining an existing reservation suite Even if you create a new reservation suite with the same n...

Page 19: ...ame you can enter the room name that will be shown in the upper left hand corner of the IN SESSION panel In the server field select the server on which the room calendar is stored In the user account field select the user account used for the given room The procedure for adding user accounts and servers is described next Confirm the new room account by tapping OK You can change the room parameters...

Page 20: ...e server enter the user account name e g IN SESSION It is also possible that the user account will need to be entered in the domain user_account format e g blackbox IN SESSION depending on the Exchange server settings G Suite this option is not relevant Confirm the new user account by tapping OK You can change the user account password or delete the account using the edit and delete buttons in the...

Page 21: ... the meeting You can set the default subject of meetings in Default subject for new meetings for example Reserved from a panel If the default subject is not set it needs to be entered every time a new meeting is created Items Minimum duration of meeting and Maximum duration of meeting allow you to set the limits for reservations made through a panel The maximal duration is limited to midnight of t...

Page 22: ...on the panel in case of loss of communication with the server It means that if the loss of communication period is shorter than the set time no error message will be shown on the panel In the course of such loss the panel may not display up to date information The default setting is 15 minutes Tap Save to save changes and apply it in the whole reservation suite 3 9 INSERTING THE COMPANY LOGO IN SE...

Page 23: ...es will come up In your computer select a PNG file with the logo Then click the Add button Repeat this step to add all logos used in your reservation suite At the end tap Save to save changes Now you can select what logo will be displayed on each reservation suite unit Click on Units ll units A list of all reservation system units will be displayed FIGURE 3 30 LOGOS DISPLAYED ON RESERVATION UNITS ...

Page 24: ...address you have entered for this purpose If cleanup or support request is sent through the panel an icon in the upper right corner indicates that the room is waiting for cleanup or repair For more detailed description of how to use the services see the RS TOUCH7 manual Using the room support services section To set up a cleanup request email tap Room support services Cleanup FIGURE 3 32 SET UP CL...

Page 25: ...port services Custom service Settings on this page relate to the second of the two possible support service departments FIGURE 3 35 SET UP CUSTOM SERVICE REQUEST In the Custom service request list section you can edit the list of possible interventions available from the given service department You can enter up to 15 items The list is shared by the whole reservation suite In the Displayed name fi...

Page 26: ...o apply changes in the given room Repeat this step for all rooms Then tap Save to save changes Finally you need to set what support services will be available on each reservation system panel This setup is individual for each panel of the reservation suite i e catering requests may be enabled on some panels while on others this function may be disabled Click on Units All units A list of all reserv...

Page 27: ...anned meeting Confirmation is possible through a dialog box on the panel using information from occupancy sensors detection of the presence of people in the room or a combination of both When combining both confirmation modes the meeting is confirmed by whichever of the two events occurs first either the presence of persons in the room or confirmation by a dialog box on the panel If it is not conf...

Page 28: ... meeting unless confirmed will be cancelled Example the period of time for the cancellation of a common meeting is set to 15 min The meeting starts at 10 30 If the meeting is not confirmed on the panel by this time the organizer of the meeting gets an email at 10 40 with a warning about cancellation If the meeting is not confirmed by 10 45 it will automatically be cancelled at 10 45 In the Cancel ...

Page 29: ... system For example it can be used to enable all employees who know the user PIN to access all available functions while visitors not knowing the user PIN will be able to access only those functions that will not require the PIN A Service PIN should only be known to service department employees This PIN is the same for both service departments and is used to access the page where reported service ...

Page 30: ...p Service request user PIN will be required to order technical support common for both service departments Catering request user PIN will be required to order catering Control system user PIN will be required to enter the operation screen of the control system Then click the OK button Repeat this step for all units Tap Save to save changes and apply it to the whole reservation suite 3 13 DETAILED ...

Page 31: ...AND TIME SCREEN You can choose your time zone here and the panel will automatically change summer and winter time according to the rules in the specific zone Setting the time correctly is essential for the right operation of the reservation panel The panel enables synchronizing its clock with internet time NTP servers Time NTP servers are pre set to time nist gov and tak cesnet cz but if it does n...

Page 32: ...ayed according to the option Private meetings details The Room name font size item allows you to set the font size of the room name in the upper left corner of the panel The default setting is Small Under Displayed meeting info you can set how meeting information is displayed on the panel You can choose to view both the subject and the organizer only the subject or only the organizer The default o...

Page 33: ...ge the language on the panel Available options include changing panel language for 2 minutes until the end of the current meeting or until the end of the day The First day of week and First week of year items determine the way the monthly calendar will be displayed i e which day of the week is the first and how weeks are numbered The default setting is Monday and First week with min 4 days In Date...

Page 34: ...re not be active during those periods of time These periods of time are usually set for your ordinary working hours and working days when the panels are constantly switched on while otherwise a screensaver is used Here you can set the time Always on time from when From until when To the panel will be constantly switched on Use the day buttons in Always on in days to set the days when the panel wil...

Page 35: ...or reservation system panels to transfer information on room occupancy and currently running meetings to the control system In the Show control keypad item you can enable the displaying of the control keyboard on the reservation system panel The user can then activate the keypad by pressing the options button in the upper right corner of the screen and then selecting Control When you finish the de...

Page 36: ...on the home page FIGURE 4 1 ANALYTICS BUTTON It will open the page with Analytics functions FIGURE 4 2 ANALYTICS PAGE In the left most field you can select the time period for obtaining statistics data Here you can select some predefined time periods Current week Last month etc or if you will use User choice you can set the custom time period defined in items From and To You can also use the day f...

Page 37: ...LEAVE THE TECH TO US LIVE 24 7 TECHNICAL SUPPORT 1 877 877 2269 CHAPTER 4 USING ANALYTICS FIGURE 4 3 BASIC ANALYTICS PAGE If you click Show details you will see some other parameters and the trend over time graphs FIGURE 4 4 SHOW DETAILS PAGE ...

Page 38: ...me period Share of meetings reserved from panel 100 x total number of meetings created using reservation system panels total number of meetings in a given time period Share of meetings ended on plan 100 x total number of meetings finished as planned total number of meetings in a given time period Share of meetings finished from panel 100 x total number of meetings finished earlier than resevation ...

Page 39: ... We will be able to provide more efficient and accurate assistance if you have a complete description including the nature and duration of the problem when the problem occurs the components involved in the problem any particular application that when used appears to create the problem or make it worse 5 2 SHIPPING AND PACKAGING If you need to transport or ship your RS MODERATOR Package it carefull...

Page 40: ...ed and used in accordance with the instruction manual may cause harmful interference to radio communications Operation of this equipment in a residential area is likely to cause harmful interference in which case the user will be required to correct the interference at his own expense Changes or modifications not expressly approved by the party responsible for compliance could void the user s auth...

Page 41: ...etes que impidan el flujo de aire por los orificios de ventilación 10 El equipo eléctrico deber ser situado fuera del alcance de fuentes de calor como radiadores registros de calor estufas u otros aparatos incluyendo amplificadores que producen calor 11 El aparato eléctrico deberá ser connectado a una fuente de poder sólo del tipo descrito en el instructivo de operación o como se indique en el apa...

Page 42: ...ve consequential or cost of cover damages resulting from any errors in the product information or specifications set forth in this document and Black Box Corporation may revise this document at any time without notice B 2 TRADEMARKS USED IN THIS MANUAL Black Box and the Black Box logo type and mark are registered trademarks of Black Box Corporation Any other trademarks mentioned in this manual are...

Page 43: ..._____ __ ________________________________________________________________________________________________ __ ________________________________________________________________________________________________ __ ________________________________________________________________________________________________ __ ___________________________________________________________________________________________...

Page 44: ...NEED HELP LEAVE THE TECH TO US LIVE 24 7 TECHNICAL SUPPORT 1 877 877 2269 COPYRIGHT 2018 BLACK BOX CORPORATION ALL RIGHTS RESERVED RS MODERATOR_USER_REV1 PDF ...

Reviews: