11
ASSEMBLY
INSTALLING ON THE VEHICLE
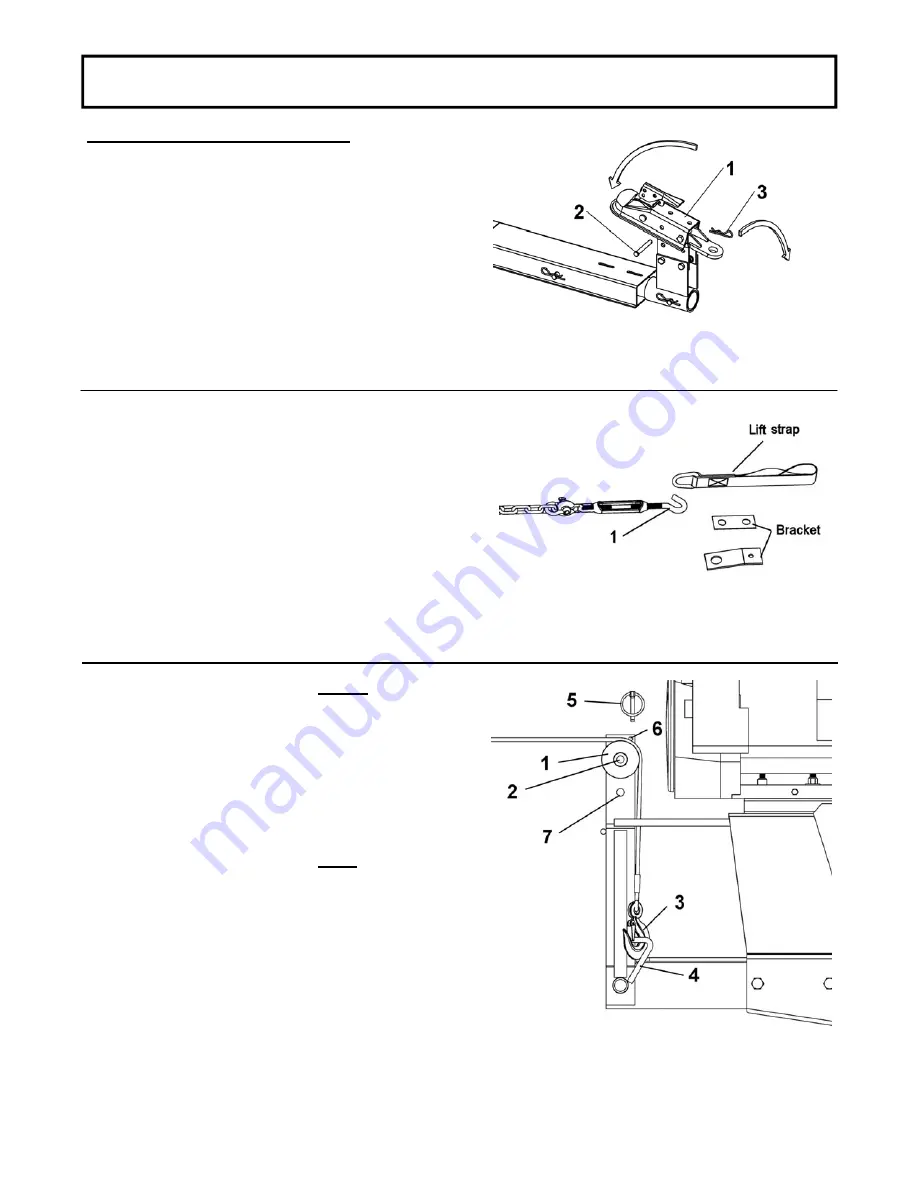
Place the hitch (item 1) on the tow hitch ball and
secure in place with a pin (item 2) and a hair pin (item
3).
IMPORTANT
:
Make sure the vehicle never comes
into contact with the subframe even when the
vehicle’s suspensions are compressed to the
maximum.
NOTE:
It is possible to turn the hitch support to
facilitate driving the vehicle over the subframe.
Installing the subframe on the tow hitch ball
Install the turnbuckles
Hook the turnbuckles (item 1) in the brackets or the lift
straps. Tighten the turnbuckles firmly.
IMPORTANT:
After adjusting the turnbuckles, tighten
firmly the nuts that secure the brackets on the
vehicle’s suspension arms. Make sure to lock the nuts
with the original locks. Furthermore, tighten firmly the
turnbuckle assembly nuts that secure them to the
subframe.
For vehicles with a winch that is higher than
20’’ (510mm) from the ground, follow these
instructions:
Install pulley (item 1) in the top hole of the lever with a
1/2’’ x 1 3/4’’ hex bolt (item 2) and secure in place
with the nylon insert lock nut. Tighten firmly.
Insert the winch hook (item 3) in the rod (item 4).
Secure the winch cable by inserting the lynch pin
(item 5) in the small hole (item 6).
For vehicles with a winch that is lower than
20’’ (510mm) from the ground, follow these
instructions:
Install pulley (item 1) in the bottom hole (item 7) of the
lever with a 1/2’’ x 1 3/4’’ hex bolt (item 2) and secure
in place with the nylon insert lock nut. Tighten firmly.
Insert the winch hook (item 3) in the rod (item 4).
Secure the winch cable by inserting the lynch pin
(item 5) in the small hole (item 6).
TIP:
Thread the winch hook in front of the hitch as
shown and then thread the cable over the pulley.
Install the winch hook


