background image

  11

  Installation

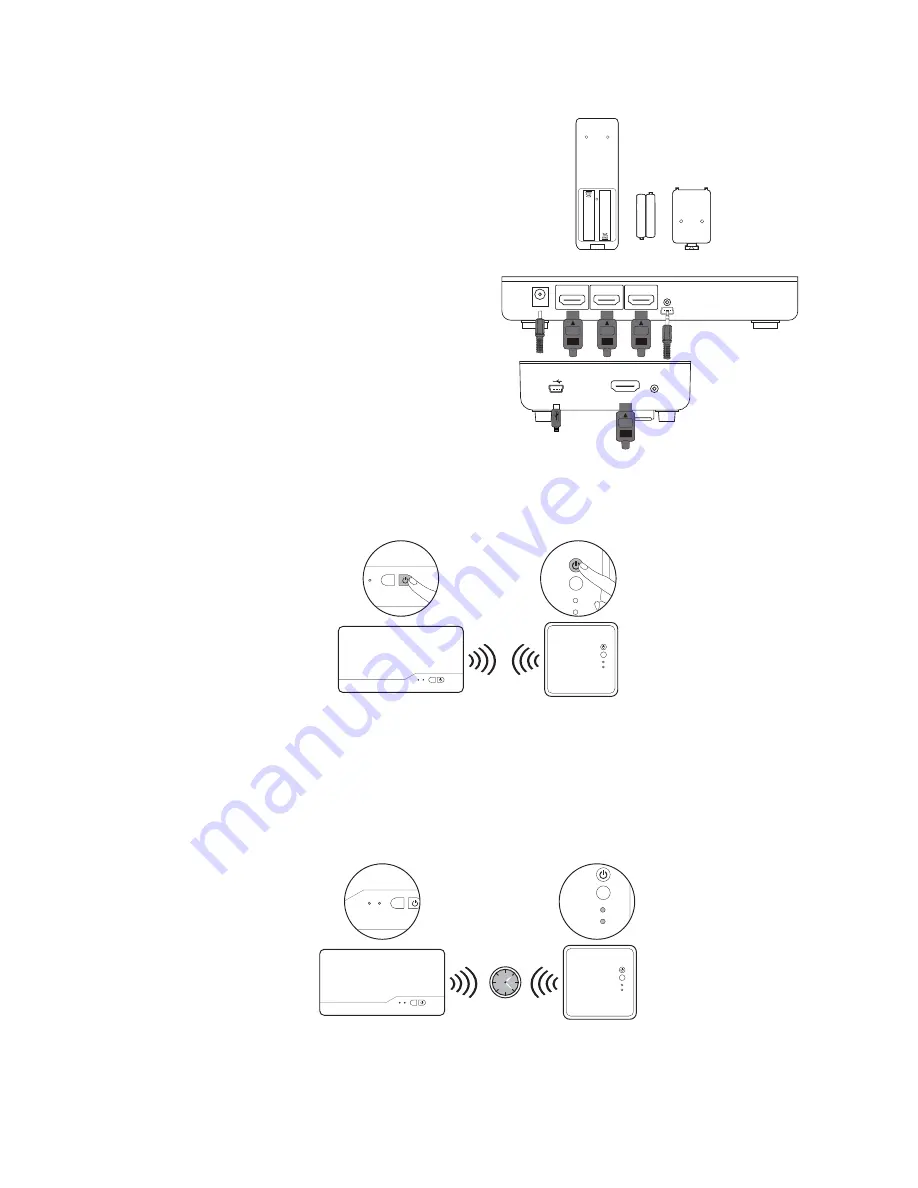
Booting up the transmitter and the receiver

1. Place two AAA batteries into the remote 

control.

2. Once the projector is turned on or the power 

adaptor is connected to wall socket, the 
receiver and transmitter will be turned on 
automatically.

3. If in standby mode (both power indicators of the transmitter and the receiver are lit in red), 

press the power button of either the transmitter or the receiver to turn on both the 
transmitter and the receiver. The same condition applies to remote control operation.

4. If the transmitter’s HDMI out display is on (transmitter’s power indicator is lit in purple) and 

the receiver stays in standby mode (receiver’s power indicator is lit in red), press the power 
button of either the receiver or the transmitter to wake up the other and make wireless 
connection automatically between each other. 

5. During the warm-up, the power indicator will blink in blue until the signal link between the 

transmitter and the receiver is established. It takes about 15 ~ 20 seconds to boot up 
successfully. 

HDMI

HDMI 1

HDMI 2

HDMI OUT

IR OUT

DC 5V

IR  IN

SOURCE

HDMI 1

HDMI 2

SOURCE

HDMI

2

1

SOURCE

HDMI 1

HDMI 2

SOURCE

DMI

1

SOURCE

HDMI 1

HDMI 2

SOURCE

HDMI

2

1

SOURCE

HDMI 1

HDMI 2

SOURCE

HDMI

2

1

Summary of Contents for FHD

Page 1: ...Wireless FHD Kit User Manual...

Page 2: ...or warranties either expressed or implied with respect to the contents hereof and specifically disclaims any warranties merchantability or fitness for any particular purpose Further BenQ Corporation...

Page 3: ...ter Tx 8 Setting up the IR blaster cable 8 Setting up the receiver Rx 9 Attaching receiver Rx to your BenQ projector with mounting holder A 9 Attaching Receiver Rx to your BenQ projector with mounting...

Page 4: ...e and Fluent Streaming Quality This solution operates at 4 9 GHz 5 9 GHz frequencies and features Dynamic Frequency Selection technology that adjusts the communication frequency automatically in case...

Page 5: ...t Cable 1 Source indicators These two LED indicators are lit in solid blue to show current input you switch 2 Source selection button Press to switch source inputs of the transmitter 3 Power button wi...

Page 6: ...k Plug the IR blaster extender cable into the IR OUT jack of the transmitter 1 Power button with LED indicator Press to turn the receiver on and off The indicator in the power button lights up in blue...

Page 7: ...x or Rx to wake up the other automatically 2 INFO button Press this button to display OSD of system related information on the display terminal connected the receiver 3 IR button Press to switch the I...

Page 8: ...Connect the supplied power adapter to the DC in jack of the transmitter and a wall socket The indicator on the power button lights up in blue when the transmitter is connected to the power socket Set...

Page 9: ...the mounting holder A L type Fix one side of the mounting holder to the tripod hole on the bottom of receiver and then fix the other side of the mounting holder to the bottom of projector by using the...

Page 10: ...older and the receiver to the ceiling mount as shown in the picture 2 Connect the supplied USB power adapter to the mini USB jack of the receiver and a wall socket The indicator on the power button of...

Page 11: ...ration 4 If the transmitter s HDMI out display is on transmitter s power indicator is lit in purple and the receiver stays in standby mode receiver s power indicator is lit in red press the power butt...

Page 12: ...us Description Power indicator on Rx Source indicator on Rx OSD Display on Rx Standby Power saving Static red off Initial boot up warm up It takes about 15 20 seconds for booting up Blinking blue Blin...

Page 13: ...nstruction In active mode press the power button on the top of the receiver or press remote control s power button pointing to the receiver the receiver enters standby mode and transmitter s HDMI out...

Page 14: ...device Check the IR sensor location of source device Make sure IR blaster sensor is close and straight to source device s IR sensor Please refer to step 3 in chapter 3 for setup Change IR blaster fre...

Page 15: ...e the transmitter closer to the receiver Power indicator is in solid blue and source indicator is slow flashing OSD displayed 1 Ensure your video resolution and frame rate is recognized and supported...

Page 16: ...20p 50Hz 720p YES 1280x720p 59 94 60Hz YES 1920x1080i 50Hz 1080i YES 1920x1080i 59 94 60Hz YES 1920x1080p 50Hz 1080p 60 YES 1920x1080p 59 94 60Hz YES Secondary CEA Video Timing 1920x1080p 23 98 24Hz 1...

Page 17: ...udio from HDMI inputs Up to 6Mbit s bit rate support Audio formats supported AC 3 and DTS 2 channel PCM 16 24 bits audio sample with 32 96KHz sampling rate as listed below 2channel PCM 32KHz 44 1KHz 4...

Page 18: ...Power supply 100 240V AC in 5V 2A DC out power adapter Operating temperature 0 40 C Interfaces Transmitter Tx Receiver Rx AV interfaces HDMI input 2 type A HDMI output 1 type A 1 type A Control signa...

Reviews: