6 720 611 443 GB (05.04)
20
Installation
3.8.3
Flue duct preparation and assembly
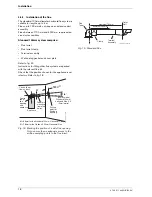
Measure the flue length L. Refer to fig. 23, 24.
Fig. 23 Flue length - rear
Fig. 24 Flue length - side
Measure ‘L’ from the end of the metal section of the flue
terminal to the centre of the flue outlet on the boiler as
shown in Fig. 23 & Fig. 24 and deduct 90mm from that
measurement.
Cut both inner and outer flue pipe square at the oppo-
site end to the terminal without creasing the tubes.
Remove any burrs before fitting the terminal to the tur-
ret.
Fig. 25 Flue terminal position
Assemble flue system completely. Push the ducts fully
together and clamp in the positions. The slope of the
terminal outlet must be directed as per Fig. 25.
The assembly will be made easier if a solvent free
grease is lightly applied i.e Silicone lubricant, to the
male end of the ducts.
NOTE: An inner wall sealing plate is provided
which should be fitted to the ducts before assem-
bly.
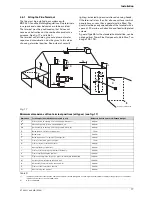
Push the assembly through the wall and fix the turret to
the appliance using the screws prefitted to the boiler
flue outlet. Refer to fig. 26.
Fig. 26 Flue turret
Ensure that the turret is fully secured to the socket on
the boiler.
If the terminal is within 2 m of the ground where there is
access then an approved terminal guard must be fitted.
The guard must give a clearance of at least 50 mm
around the terminal and fixed with corrosion resistant
screws.
L
120
6 720 611 400-22.1O
L
6 720 611 400-23.1O
6 720 611 400-24.1O
Outer Wall Face
Flue Terminal
Wall Sealing Gasket
Retaining
Screw
Flue Turret to
Boiler Sealing
Gasket
Flue Turret
6 720 611 400-16.1O
Appliance
Flue Socket

